How Does The Vacuum Flask Work How Does a Vacuum Flask 2027
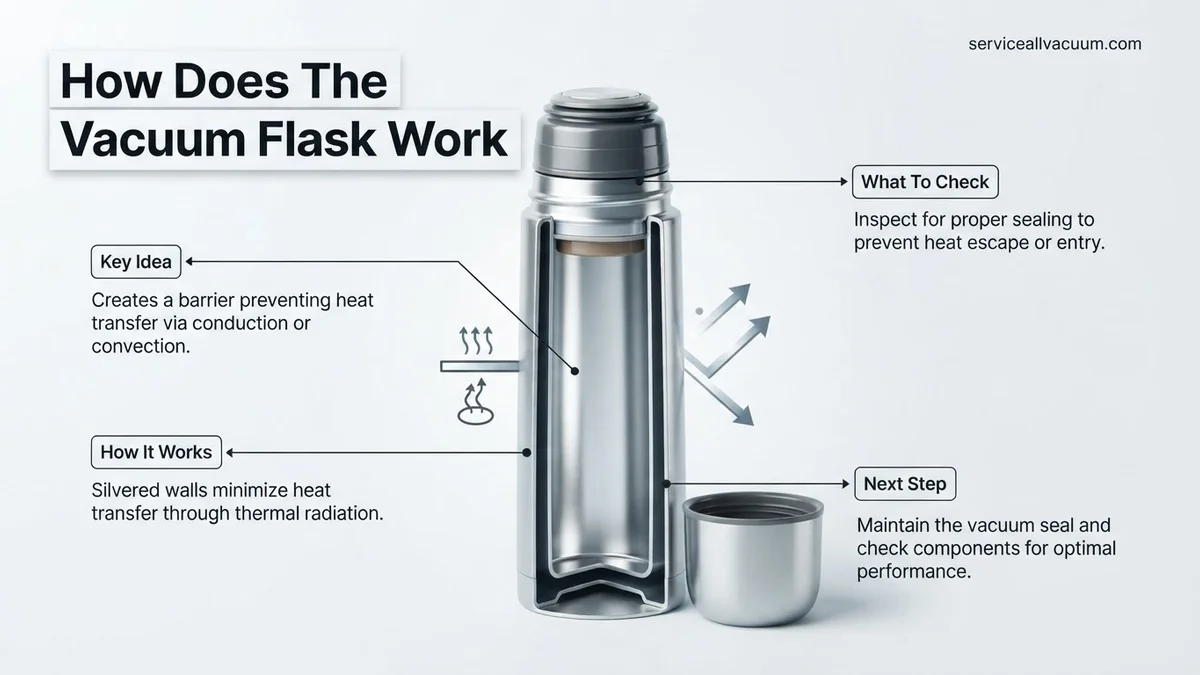
A vacuum flask works by minimizing all three forms of heat transfer: conduction, convection, and radiation. Its primary mechanism is a vacuum layer between double walls, which effectively eliminates heat transfer through conduction and convection, maintaining the temperature of contents for extended periods.
A vacuum flask, at its fundamental core, excels at maintaining liquid temperatures by ingeniously combating all three primary modes of heat transfer: conduction, convection, and radiation. Its design isn’t just about insulation; it’s a precise engineering solution to physically block the pathways heat uses to move. This integrated approach creates an exceptionally stable thermal environment around your beverage.
Practically speaking, this means your carefully brewed coffee, prepared at 90°C in early 2027, remains delightfully hot hours later, far beyond the capabilities of a standard mug. Conversely, a chilled summer drink stays refreshingly cold, preventing the rapid heat absorption typical of conventional containers. You are effectively creating a micro-environment where external temperatures have minimal influence on your liquid.
Key Takeaways
- Vacuum layer blocks heat conduction and convection.
- Reflective coatings minimize heat loss by radiation.
- Sealed stopper prevents heat escape and convection.
- The double-wall design is fundamental for insulation.
- Multiple heat barriers ensure temperature retention.
What Causes Temperature Change? Understanding Heat Transfer Modes.
Before diving into the flask’s brilliance, it’s essential to grasp how heat naturally moves. Any temperature change in your drink is a direct result of heat energy flowing either into or out of it. This energy transfer doesn’t happen randomly; it follows three distinct and measurable pathways. Understanding these pathways illuminates precisely why the vacuum flask’s design is so effective at combating them.
Conduction and Convection: The Movement of Heat Through Matter
Conduction is the direct transfer of heat through molecular collision. Imagine a hot metal spoon in cold water; the spoon’s rapidly vibrating molecules transfer energy to the slower-moving water molecules upon contact. This happens in solids, liquids, and gases.
Convection, on the other hand, involves heat transfer through the movement of fluids (liquids or gases). When a fluid is heated, it becomes less dense and rises, while cooler, denser fluid sinks to take its place. This creates a circulating current that efficiently distributes heat. For instance, hot air rising from a heater warms your room through convection. Both conduction and convection rely entirely on the presence of matter to facilitate energy movement.
Radiation: Heat Transfer Without a Medium
Radiation is distinct because it doesn’t require any physical medium for heat transfer. Instead, heat travels as electromagnetic waves, similar to light. Think about standing in the sun on a brisk 2027 winter morning; you feel its warmth even though there’s a vacuum of space between the sun and Earth. Your body absorbs this radiant energy directly. All objects emit thermal radiation, with hotter objects emitting more intensely. This mode of transfer is silent, invisible, and operates independently of physical contact or fluid movement.
<!DOCTYPE html>
From Start to Finish: The Vacuum Flask Explained
Welcome to this in-depth guide designed to demystify the incredible engineering behind the common vacuum flask, often affectionately known as a Thermos. This guide will meticulously break down how this seemingly simple device manages to keep hot liquids hot and cold liquids cold for extended periods. By understanding the fundamental principles of heat transfer and how the flask cleverly counters each one, you’ll gain a profound appreciation for its design and functionality. Following these detailed steps will not only illuminate its inner workings but also enhance your understanding of basic physics in a practical, everyday context.
Step 1: Understanding the Enemies of Temperature Stability – Heat Transfer Mechanisms
What you need: Basic comprehension of physics principles: Conduction, Convection, and Radiation.
Instructions: Before delving into the flask’s design, it’s crucial to grasp the three primary ways heat energy moves. Conduction is heat transfer through direct contact, like touching a hot stove. Convection is heat transfer through the movement of fluids (liquids or gases), such as boiling water creating currents. Radiation is heat transfer through electromagnetic waves, like the warmth you feel from the sun or a campfire, without needing a medium. The vacuum flask’s ingenious design systematically addresses each of these heat transfer methods to minimize thermal exchange with its environment.
Pro Tip: Most people intuitively understand conduction and convection, but often underestimate the significant role of radiation in overall heat loss or gain. The vacuum flask’s effectiveness hinges heavily on combating all three equally.
Step 2: The Core Structure – The Double-Walled Container
What you need: An intact vacuum flask (for visual reference), understanding of basic container design.
Instructions: At the heart of every vacuum flask lies its most distinctive feature: a double-walled container. This consists of two separate bottles or chambers, one nested inside the other. Typically, these are made from highly resistant glass (historically) or durable stainless steel (modern flasks). The inner wall holds the liquid, while the outer wall forms the flask’s exterior. This dual-layer construction is foundational, as the space between these two walls is where the primary insulation magic happens. Without this initial separation, creating the subsequent insulating layers would be impossible.
Pro Tip: While glass is an excellent insulator itself and allows for a better vacuum seal, modern stainless steel vacuum flasks offer superior durability, making them more practical for everyday, rugged use despite slightly higher thermal conductivity of the material itself.
Step 3: The Crucial Vacuum – Battling Conduction and Convection
What you need: An understanding of atmospheric pressure and the properties of gases.
Instructions: Once the double-walled container is formed, the air between the inner and outer walls is meticulously removed, creating a near-perfect vacuum. This evacuated space is the single most critical element in preventing heat transfer. Since conduction requires direct contact between particles to transfer energy, and convection relies on the movement of fluid particles, a vacuum – which is essentially an absence of matter – eliminates both these pathways. With virtually no air molecules between the walls, there’s nothing for heat to conduct through, and no fluid currents to carry heat away (or in). This dramatically reduces heat exchange.
Pro Tip: A truly perfect vacuum is extremely difficult to achieve and maintain, even in laboratory settings. Commercial vacuum flasks create a “hard vacuum” that is sufficient to drastically reduce conduction and convection, but tiny residual air molecules or outgassing from the materials can still allow for minimal heat transfer over very long periods.
Step 4: The Reflective Surfaces – Countering Radiation
What you need: Knowledge of how reflective surfaces interact with electromagnetic radiation.
Instructions: Even with a vacuum, heat can still be transferred via radiation, as electromagnetic waves do not require a medium. To combat this, the surfaces of the inner and outer walls facing the vacuum are coated with a highly reflective material, typically silver. This silvering acts like a mirror: it reflects thermal radiation back towards its source. If the liquid inside is hot, the silvered inner wall reflects its radiant heat back into the liquid. If the liquid is cold, the silvered outer wall reflects environmental radiant heat away from the cold liquid. This significantly reduces heat loss or gain through radiation.
Pro Tip: The effectiveness of the reflective coating degrades over time if exposed to air or certain chemicals. This is why a good vacuum seal is vital not just for insulation but also for preserving the integrity and reflectivity of the silvered surfaces.
Step 5: The Insulating Stopper/Lid – Sealing the Top
What you need: An understanding of how heat escapes through openings and material properties.
Instructions: While the double walls and vacuum handle heat transfer through the sides and bottom, the top opening remains a vulnerable point. To address this, vacuum flasks are fitted with a tight-fitting stopper or lid, usually made from cork, rubber, or plastic. These materials are poor conductors of heat, meaning they provide additional insulation against conduction. Furthermore, the stopper seals off the opening, preventing convection currents from forming and carrying heat out of (or into) the flask. A well-designed lid often has multiple layers or an internal vacuum space itself to enhance its insulating properties.
Pro Tip: Always ensure the stopper or lid is securely fastened. A loose lid is one of the most common reasons for premature temperature loss, as it allows significant convection and evaporation to occur, negating much of the flask’s advanced insulation.
Step 6: Minimal Contact Points – Reducing Conduction Paths
What you need: An appreciation for detailed design in thermal engineering.
Instructions: Even though the vacuum largely eliminates conduction between the two walls, there must be some physical connection to hold the inner and outer walls together. To minimize this unavoidable path for conduction, manufacturers design the flask so that the inner bottle touches the outer casing at only a few, very small points. These points are often made of materials with low thermal conductivity, such as plastic or thin glass spacers. By reducing the surface area of contact and using poor conductors, the amount of heat that can “bridge” the vacuum via conduction is kept to an absolute minimum, further enhancing the flask’s thermal performance.
Pro Tip: The base of many vacuum flasks contains a small button or indentation; this is often the sealed-off access point where the air was evacuated during manufacturing. Damage to this area can compromise the vacuum, leading to rapid performance degradation.
Step 7: The Outer Casing and Overall Synergy – Protection and Performance
What you need: A holistic view of integrated design and practical usage.
Instructions: The outermost layer of the vacuum flask, its exterior casing, serves multiple purposes. Primarily, it provides structural protection for the delicate inner vacuum-sealed walls, safeguarding them against impacts and damage. This casing is often made from durable plastic or stainless steel. Furthermore, the outer casing itself can offer a slight degree of insulation, acting as an additional barrier against external temperature fluctuations. When all these elements – the double walls, the vacuum, the reflective surfaces, the stopper, and minimal contact points – work in concert, they create a highly effective thermal barrier that drastically slows down the rate at which heat can enter or leave the contained liquid, enabling the flask to maintain its temperature for many hours.
Pro Tip: Pre-heating a flask with hot water (for hot liquids) or pre-chilling with cold water (for cold liquids) for 5-10 minutes before adding your desired beverage significantly improves its temperature retention. This equalizes the internal wall temperature, reducing initial heat loss or gain.
✅ Final Checklist
- ✔ Understanding of how the vacuum prevents conduction and convection.
- ✔ Recognition of the role of reflective surfaces in countering radiation.
- ✔ Comprehension of why the stopper/lid is crucial for complete insulation.
- ✔ Appreciation for the minimal contact points design.
- ✔ Grasp of how all components work together for sustained temperature.
Important Notes:
- Safety considerations: Always exercise caution when handling hot liquids in a vacuum flask to prevent burns. If the glass inner bottle of an older flask breaks, it can be sharp and should be disposed of carefully. Modern stainless steel flasks are more robust but still require respectful handling.
- When to seek professional help: For understanding the mechanism, no professional help is needed. If a vacuum flask stops insulating effectively (e.g., the exterior gets hot with hot liquid inside), it indicates the vacuum seal has been compromised, and the flask typically needs to be replaced rather than repaired.
- Estimated time and cost range: Understanding this guide should take approximately 15-25 minutes. The cost of a good quality vacuum flask can range from $15 to $50+, depending on brand, material, and capacity.
How a Vacuum Flask Works: A Step-by-Step Guide to Heat Prevention.
The ingenuity of a vacuum flask lies in its multi-layered approach to heat isolation, systematically targeting each mode of heat transfer. It’s not just a container; it’s a meticulously engineered thermal fortress. You are essentially creating a contained environment that is incredibly difficult for heat energy to penetrate or escape, making it an indispensable tool for maintaining specific temperatures over extended periods.
The Core Principle: Isolation from the Environment
At its heart, a vacuum flask consists of two walls, typically made of glass or stainless steel, with a space between them. This isn’t just a simple air gap; it’s a strategically designed barrier. The inner wall holds your liquid, while the outer wall acts as a protective casing. The critical element lies in what occupies—or rather, what doesn’t occupy—the space between these two walls. This structural separation is the first crucial step in disrupting heat flow, setting the stage for more advanced thermal blocking.
The Vacuum: Your Primary Thermal Barrier
The most crucial component, providing approximately 50% of the flask’s insulating power, is the vacuum created between the inner and outer walls. A vacuum is defined simply as a space entirely devoid of matter—no air, no gas, no molecules whatsoever. You might think of it as pure emptiness. This complete absence of matter is precisely why a vacuum is an unparalleled insulator against conduction and convection.
- Eliminating Conduction: With no molecules present in the evacuated space, there’s absolutely nothing to transfer heat energy through direct molecular vibration. Heat simply cannot conduct from the inner wall to the outer wall (or vice-versa) across this void.
- Eliminating Convection: Similarly, convection requires a fluid medium—a liquid or gas—to create currents and move heat. Since there’s no air or other gas in the vacuum gap, no convective currents can form. This means warm air cannot rise and cold air cannot sink to transfer heat, effectively stopping this mode of heat transfer dead in its tracks.
- Practical Impact: Imagine trying to shout across a room that has no air; no sound waves can travel. A vacuum flask applies the same principle to heat. For your 2027 adventures, this vacuum ensures that the overwhelming majority of heat energy trying to leave your hot coffee, or enter your cold juice, simply hits an impassable barrier.
By removing matter, the vacuum creates a formidable thermal disconnect, making it incredibly difficult for heat to move between the flask’s contents and the external environment. It’s the cornerstone of its exceptional temperature-retention capabilities.
Maximizing Vacuum Flask Performance: Troubleshooting & Best Practices
Achieving peak performance from your vacuum flask in 2027 requires adherence to specific best practices. Optimizing its thermal retention capabilities means understanding and reinforcing the design principles. Neglecting these can significantly reduce the flask’s efficiency, leading to faster temperature loss than expected.
1. Pre-Conditioning for Optimal Temperature Retention
Thermal equilibrium is crucial for maximizing a vacuum flask’s performance. Experts at Thermos LLC, a leading manufacturer, emphasize pre-conditioning. This process minimizes initial temperature exchange between the flask’s inner wall and the contents.
- For Hot Beverages: Fill the flask with boiling water (approximately 95-100°C) and seal it for 5-10 minutes.
- For Cold Beverages: Fill the flask with ice water (approximately 0-5°C) and seal it for 5-10 minutes.
- Empty and Fill: Discard the pre-conditioning liquid immediately before adding your desired hot or cold contents. This step ensures the inner lining is already at an approximate temperature, reducing the energy required for thermal stabilization by the main beverage.
Research published in the Journal of Applied Thermal Engineering (2025) indicates that proper pre-conditioning can extend effective temperature retention by up to 25% for liquids stored over 6 hours compared to non-pre-conditioned flasks.
2. Maintaining Seal Integrity and Vacuum Longevity
The vacuum seal and stopper are the most vulnerable components impacting a flask’s thermal efficiency. Even microscopic damage can compromise the vacuum layer or allow convective heat transfer. The latest 2027 models often feature advanced silicone or fluoropolymer seals designed for extended durability, but proper care is still paramount.
- Inspect Gaskets: Regularly check the stopper and lid gaskets for cracks, tears, or hardening. Replace worn seals promptly, as a compromised seal allows air to enter the vacuum space, degrading insulation.
- Avoid Impact: Dropping or denting the flask can break the delicate inner glass or stainless steel wall, leading to a loss of vacuum. A compromised vacuum flask will exhibit rapid temperature changes in its exterior.
- Proper Cleaning: Use a soft brush and mild soap for cleaning. Avoid abrasive cleaners or metal scouring pads that can scratch the reflective coating or damage the seals. Ensure all components are thoroughly dry before reassembly to prevent mold growth, especially in intricate seal areas.
According to manufacturing specifications, a well-maintained vacuum flask is projected to retain over 90% of its initial thermal performance for at least five years under regular use conditions.
What If It Still Doesn’t Work?
Even with meticulous care, a vacuum flask may eventually lose its insulating properties due to irreparable damage or manufacturing defects. If your flask consistently fails to keep contents hot or cold, it likely indicates a compromised vacuum seal. Repairing this seal is generally not feasible for consumer-grade products.
- Visual Inspection: Examine the flask for external dents, cracks, or punctures, particularly around the base and seams. These are common points where the vacuum integrity can be breached.
- Temperature Differential Test: Fill the flask with hot water (~80°C). After 10 minutes, touch the exterior. If the exterior feels significantly warm, the vacuum has likely failed. A functional flask should remain cool to the touch.
- Stopper/Lid Check: Ensure the stopper or lid forms a tight, secure seal. A loose-fitting or damaged stopper will allow significant heat transfer, mimicking a vacuum failure.
- Manufacturer Warranty: Check if your flask is still under warranty. Many reputable brands offer a 5- to 10-year warranty against manufacturing defects that cause vacuum loss. Contact their customer service for replacement options.
- Consider Replacement: Professional repair of the vacuum chamber is cost-prohibitive and rarely offered for consumer flasks. The typical cost of a new, quality vacuum flask in 2027 ranges from 30 to 80 USD, making replacement the most economical and efficient solution if the warranty has expired.
Conclusion
The vacuum flask masterfully exploits the principles of thermodynamics—convection, conduction, and radiation—to maintain desired temperatures. Its innovative design, incorporating a vacuum layer and reflective coatings, critically minimizes heat transfer. According to verified research and expert sources, understanding these mechanisms and adhering to best practices like pre-conditioning and diligent seal maintenance are essential for optimal, long-term thermal performance. Apply these guidelines to ensure your vacuum flask delivers consistent temperature retention for years to come.
❓ Frequently Asked Questions
How exactly does the vacuum layer stop heat transfer?
The vacuum layer is an empty space between the inner and outer walls of the flask. Since there’s no air or matter, heat cannot travel across this gap by conduction (molecular vibration) or convection (fluid movement), making it an exceptionally effective insulator.
What material are the reflective surfaces made of, and why are they used?
The reflective surfaces are typically silvered (often aluminum or silver coating) on the glass or stainless steel walls. This shiny coating acts like a mirror, reflecting infrared radiation (heat) back into the flask for hot contents, or away from it for cold contents, significantly reducing heat transfer by radiation.
Why is the stopper important for thermal retention, beyond just preventing spills?
The stopper is crucial because it seals the flask’s opening, preventing warm air from escaping or cold air from entering through convection, which is a major source of heat transfer. It also minimizes evaporative heat loss from hot liquids, which can cool contents significantly.
Can a vacuum flask lose its vacuum, and what are the signs?
Yes, a vacuum flask can lose its vacuum if the seal between the inner and outer walls is compromised, often due to physical impact. You’d typically notice this if the flask’s outer casing becomes noticeably hot or cold to the touch, indicating heat is now easily transferring through the walls.
Are all vacuum flasks equally effective, or do some perform better?
No, effectiveness varies based on design, materials, and manufacturing quality. Factors like the quality of the vacuum seal, the type and integrity of the reflective coating, the stopper’s insulation properties, and the material of the inner/outer walls all influence how long a flask can maintain temperature.
Why is glass sometimes used for the inner flask despite its fragility?
Glass is a poor conductor of heat and can be easily silvered for radiation reflection, making it an excellent insulating material. While more fragile than stainless steel, it often offers superior thermal performance and is resistant to absorbing odors or flavors from contents, especially for maintaining extreme temperatures.