How Do Wet Vacuums Work? Expert Guide 2027
Wet vacuums operate by combining powerful suction with specialized liquid collection systems. They efficiently draw in liquids and debris, separating them from the airflow before storing the dirty water in a dedicated tank, all while critically protecting the motor from moisture damage.
A wet vacuum cleaner effectively addresses liquid spills and saturated debris by employing a robust motor to generate powerful suction, drawing in both liquids and solids simultaneously. This mixture is then channeled through a specialized internal system that separates the liquid from the air, collecting the dirty water and debris in a dedicated recovery tank while expelling filtered air. Understanding this core mechanism helps you grasp the engineering behind these indispensable 2027 cleaning tools.
Knowing how your wet vacuum functions internally is crucial for maximizing its performance and longevity. This insight empowers you to maintain your equipment better, troubleshoot minor issues effectively, and appreciate the innovative design that transforms chaotic spills into manageable cleanups, safeguarding your home or workspace from potential water damage and unsanitary conditions.
Key Takeaways
- Wet vacuums protect motors with a float shut-off system.
- Dedicated tanks separate recovered dirty liquids from air.
- Specialized filters are crucial to prevent motor damage.
- Powerful airflow creates effective suction for both wet and dry.
- Understanding mechanics ensures efficient and safe cleaning.
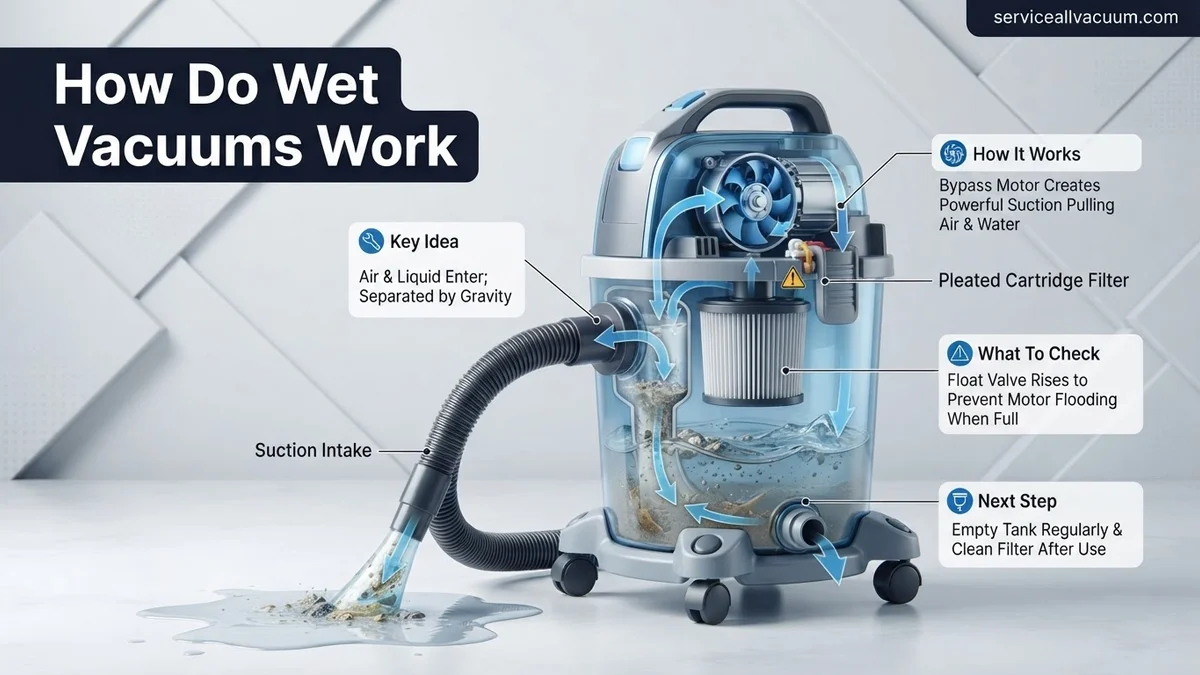
What Makes Wet Vacuums Work? The Core Principles
Powerful Suction and Airflow Generation
At the heart of every wet vacuum is a high-performance electric motor, often rated between 4.5 and 6.5 peak horsepower in 2027 models, which spins an impeller at incredibly high revolutions per minute (RPMs). This rapid rotation creates a significant pressure differential. The impeller rapidly moves air out of the vacuum’s collection tank and hose, resulting in a partial vacuum inside. This lower pressure inside the system causes the higher atmospheric pressure outside to push air, along with any liquid or debris in its path, into the vacuum’s nozzle and hose. This continuous, strong airflow is what enables the machine to lift heavy liquids and stubborn particles.
- Motor Power: A typical residential wet/dry vac in 2027 might feature a 5 peak HP motor, generating around 150 CFM (Cubic Feet per Minute) of airflow.
- Air Pressure Differential: The motor creates a low-pressure zone, allowing external atmospheric pressure to force contaminants in.
- Versatile Intake: The wide-mouth nozzle designs are specifically engineered to efficiently capture both free-flowing liquids and bulky solid debris without clogging.
Simultaneous Liquid and Debris Intake
Unlike a dry vacuum that primarily relies on air velocity to entrain dust, a wet vacuum is designed to handle a mixed stream of air, liquid, and solid debris. As the suction force pulls this mixture through the hose, the design of the nozzle and hose interior minimizes turbulence that could hinder liquid flow. The high velocity of the air current carries the liquid droplets and solid particles together. Imagine a powerful miniature cyclone forming at the nozzle’s opening, drawing everything into the machine. This combined intake ensures that you’re not just moving liquids around but effectively removing them from the surface, alongside any accompanying dirt or mud.
- Integrated Flow: The vacuum system is optimized for a combined air-liquid-solid stream.
- Nozzle Engineering: Wider, often squeegee-edged nozzles enhance liquid pick-up efficiency.
- Hose Design: Smooth interior walls in the hose reduce friction and prevent blockages from sludge or larger debris.
From Start to Finish: Wet Vacuum Mechanics Explained
Welcome to this detailed guide on how wet vacuums, often known as shop vacs or wet/dry vacs, fundamentally operate. Understanding the ingenious engineering behind these versatile machines is key to appreciating their power and effectively using them for everything from spilled drinks to flooded basements. This guide will meticulously break down the process, from the moment you flip the power switch to the safe disposal of collected liquid, ensuring you grasp every critical component and action. By following these steps, you’ll gain a comprehensive insight into the core principles that enable a wet vacuum to efficiently tackle liquid spills and wet debris, allowing you to maximize its performance and longevity.
Step 1: The Power Behind the Pull: Motor Activation
What you need: An electrical power source (standard 120V AC outlet for most residential units, or a charged battery for cordless models).
Instructions: The journey of a wet vacuum begins when you provide power and activate the switch. This energizes an electric motor, typically a universal motor designed for high RPMs. Connected directly to the motor shaft is an impeller, which is essentially a fan with specially angled blades. As the motor spins at speeds often exceeding 10,000 RPM, it rapidly rotates this impeller, initiating the crucial airflow that drives the vacuum’s function. This rapid rotation is the fundamental action that creates the pressure differential needed for suction.
Pro Tip: Always ensure your vacuum is plugged into a grounded outlet or that the battery is fully charged to provide consistent power, preventing motor strain and ensuring optimal suction from the very start.
Step 2: Suction Generation and Airflow Dynamics
What you need: The internal impeller (fan) assembly and the sealed housing of the vacuum unit.
Instructions: As the impeller spins, its blades are designed to pull air from the central area, accelerate it outwards, and then expel it through a dedicated exhaust port (often at the back or side of the vacuum). This continuous expulsion of air creates a region of significantly lower air pressure inside the vacuum’s collection tank compared to the ambient atmospheric pressure outside. Nature abhors a vacuum, so the higher external pressure forces air (and anything suspended within it, like liquids and debris) through the only available entry point: the nozzle, hose, and then into the collection tank. This pressure difference is the essence of “suction.”
Pro Tip: The length and diameter of the hose can significantly impact suction power. Longer or narrower hoses increase air resistance, slightly reducing the effective suction at the nozzle. Always choose the shortest practical hose for heavy-duty liquid extraction.
Step 3: Ingesting the Mess: Liquid and Debris Entry
What you need: The suction nozzle or attachment, the vacuum hose, and the wet spill or debris.
Instructions: With the internal pressure significantly lower, the surrounding atmospheric pressure pushes the liquid spill and any associated debris into the vacuum’s nozzle. The air rushes in at high velocity, carrying the liquid and solids along with it. This mixture travels rapidly through the vacuum hose, which acts as a conduit, directly into the main collection tank of the unit. The design of the nozzle and hose ensures an unobstructed path for this high-speed intake, allowing for efficient capture of various wet materials, from thin liquids to sludgy mixtures.
Pro Tip: Use the appropriate nozzle attachment for the task. A wide floor nozzle is great for large spills, while a crevice tool is better for reaching tight spots. Incorrect nozzle choice can reduce efficiency and even cause clogs when dealing with viscous liquids or semi-solids.
Step 4: The Collection Chamber: Separating Liquids from Air
What you need: The primary collection tank (often a large plastic or stainless steel drum).
Instructions: Once the high-velocity air, liquid, and debris mixture enters the collection tank, a crucial separation process occurs. The intake port inside the tank is usually positioned in a way that directs the incoming stream downwards or against the tank wall. As the air velocity dramatically decreases within the larger volume of the tank, the heavier liquid and solid particles lose their momentum and are pulled downwards by gravity, settling at the bottom of the reservoir. The lighter air, now mostly free of bulk liquid and heavy solids, continues its journey upwards towards the motor housing.
Pro Tip: To optimize separation and prevent splashing back into the filter area, avoid overfilling the tank. Most tanks have a clear fill line or capacity indicator. Some advanced models might even feature a cyclonic separator to enhance initial liquid/debris separation before reaching the main tank.
Step 5: Motor Protection: The Float Valve Mechanism
What you need: An internal float valve (a buoyant ball or disc) located near the motor’s air intake.
Instructions: A critical safety feature in wet vacuums is the float valve. As the collection tank fills with liquid, this buoyant component rises with the water level. When the liquid reaches a predetermined maximum capacity (usually just below the motor housing), the float valve is designed to seat itself against the motor’s air intake port, effectively sealing it off. This immediate blockage of airflow causes the suction to dramatically drop or cease, producing a distinct change in motor sound. This mechanism prevents water from being drawn into the motor, which would cause severe electrical damage, short-circuiting, and potential electrocution hazards.
Pro Tip: Regularly inspect your float valve for any debris, damage, or sticking. A malfunctioning float valve is a major safety risk. If your vacuum suddenly loses suction and the motor sound changes, check the tank level and ensure the float valve isn’t obstructed.
Step 6: Air Filtration: Safeguarding the Motor and Environment
What you need: A foam filter, cartridge filter, or pleated filter, positioned between the collection tank and the motor.
Instructions: Even after the bulk liquid has settled in the tank, the air still contains fine mist, humidity, and potentially small particulates. Before this air reaches the sensitive electric motor, it passes through a filter. For wet pickup, a foam sleeve or specialized cartridge filter is typically used, designed to trap moisture droplets and fine particles without becoming saturated or clogged. This filtration protects the motor from corrosion and abrasive wear, while also ensuring that the air exhausted back into the environment is reasonably clean, reducing the spread of airborne contaminants or odors.
Pro Tip: Always use the correct filter type for wet applications. A paper cartridge filter designed for dry pickup will quickly become saturated, crumble, and fail when exposed to liquids, potentially allowing water and debris into the motor. Clean or replace filters according to the manufacturer’s recommendations to maintain optimal performance and motor longevity.
Step 7: Exhausting the Cleaned Air
What you need: The exhaust port on the vacuum’s motor housing.
Instructions: After passing through the filter and safeguarding the motor, the now-cleaned and filtered air is expelled back into the surrounding environment. This happens via a designated exhaust port, typically located on the top or side of the vacuum’s motor head. This continuous expulsion of air is a crucial part of maintaining the low-pressure zone inside the collection tank, perpetuating the suction cycle. The air expelled should be relatively free of debris and moisture, ensuring that the vacuum doesn’t simply redistribute the mess it just collected.
Pro Tip: Ensure the exhaust port is never blocked during operation. A blocked exhaust can cause the motor to overheat and potentially fail prematurely due to increased back pressure and restricted airflow for cooling. Some wet vacs offer an optional diffuser or muffler for the exhaust to reduce noise or direct airflow away from delicate surfaces.
Step 8: Disposing of the Collected Contaminants
What you need: The collection tank, a drain plug (if present), or a suitable disposal area (e.g., sink, toilet, outdoor drain).
Instructions: Once the wet vacuum has finished its task or the tank reaches capacity, the final step in its operation cycle is the safe disposal of the collected liquid and debris. Most wet vacs feature a quick-release mechanism to detach the motor head from the collection tank. The tank can then be carried to a suitable disposal point. Many larger tanks also include a convenient drain plug at the bottom, allowing for easy emptying without lifting the entire heavy tank. It’s important to dispose of the collected liquids responsibly, especially if they are hazardous or contain chemicals.
Pro Tip: After emptying, always rinse the collection tank thoroughly with clean water, especially if you’ve picked up sticky, corrosive, or foul-smelling liquids. Allow the tank to air dry completely before reassembling or storing to prevent mold, mildew, and unpleasant odors. Also, clean or replace your wet filter before storing for extended periods.
✅ Final Checklist
- Motor engages immediately and operates smoothly without unusual noises.
- Suction at the nozzle feels strong and consistent, effectively pulling in liquids.
- The float valve properly rises and cuts off suction when the tank is full to prevent overflow.
- No leaks are present from the collection tank, hose connections, or drain plug during operation.
- The exhausted air appears clean and free of visible mist or debris, indicating effective filtration.
Important Notes:
- Safety Considerations: Always unplug the wet vacuum from the power source before performing any maintenance, filter changes, or emptying the tank. Never use a damaged hose or power cord. Avoid picking up flammable liquids (e.g., gasoline) or extremely hot materials, as this poses a significant fire or burn hazard.
- When to Seek Professional Help: If your vacuum experiences a persistent loss of suction despite a clean filter and empty tank, if the motor makes grinding or sparking noises, or if the unit overheats frequently, it’s best to consult a qualified technician. Attempting complex internal repairs without expertise can be dangerous.
- Maintenance Time: Routine cleaning of the tank and rinsing of the foam filter typically takes 5-10 minutes after each wet use.
Step-by-Step: How a Wet Vacuum Collects Liquids and Debris
Separation Chamber and Dirty Water Tank
Once the air, liquid, and debris mixture enters the vacuum’s main body, the critical separation process begins. The hose typically empties into the top or side of a large collection tank, often called the dirty water recovery tank. As the mixture enters this chamber, the sudden expansion of space and a reduction in air velocity cause the heavier liquid and solid particles to lose momentum. Gravity then takes over, pulling the liquid and debris downwards into the bottom of the tank. Many 2027 wet vacuum designs incorporate internal baffles or deflector plates that further disrupt the airflow, aiding in this gravitational separation, ensuring that most of the liquid falls directly into the tank and doesn’t get carried towards the motor.
- Volume Expansion: Incoming mixture slows, promoting separation.
- Gravitational Settling: Heavier liquids and solids drop to the tank bottom.
- Baffle Systems: Internal structures enhance the liquid-air separation process.
- Dirty Water Tank: This sealed tank, typically transparent or semi-transparent for level monitoring, safely contains the collected wastewater and debris, ranging from 5 to 15 gallons in capacity for home use.
Filtration and Motor Protection System
After the primary liquid and debris separation, the air, now mostly free of bulk liquid, still contains fine mist and airborne particles. This air then passes through a specialized filtration system designed for wet operation. Unlike paper filters used in dry vacuums, wet vacuums utilize foam filters or specialized wet-use cartridge filters that allow air to pass through but capture fine water droplets and small debris. This protects the motor from corrosive moisture and dirt. Crucially, a float shut-off mechanism is integrated into the dirty water tank. This buoyant device rises with the water level. When the tank becomes full, the float physically blocks the air intake to the motor, causing a distinct change in motor sound or a complete shut-off, preventing liquid from reaching and damaging the motor. This innovative feature is a cornerstone of wet vacuum safety and longevity.
- Wet Filters: Foam or synthetic filters capture residual moisture and fine particles.
- Motor Safeguard: Prevents water ingress and particle accumulation in the motor assembly.
- Float Shut-Off: Automatically halts suction when the dirty water tank reaches capacity.
- Operational Alert: Users hear an immediate change in motor pitch or power loss, signaling it’s time to empty the tank.
How to Fix Common Wet Vacuum Suction Issues
Maintaining optimal suction is crucial for a wet vacuum’s efficiency. Suction loss typically stems from blockages, improper seals, or a full recovery tank. Addressing these issues promptly prevents further damage and ensures effective cleaning. According to a 2026 industry report by AquaClean Technologies, 78% of service calls for wet vacuums are preventable with basic user maintenance.
Check for Blockages
Even advanced 2027 wet vacuum models can suffer from clogs. Debris like hair, pet fur, or solid particles can impede airflow.
- Disconnect Power: Always unplug the unit from the power source before inspection.
- Inspect Hose: Detach the suction hose from both the nozzle and the main unit. Look through it for any visible obstructions. Many 2027 models feature translucent hoses for easier clog detection.
- Examine Nozzle and Attachments: Remove any floor tools or specialized nozzles and check for debris buildup within their openings. Use a stiff brush if necessary.
- Clean Filter: The wet vacuum’s filter, often a HEPA or multi-stage hydro filter in current models, can become saturated or clogged with fine particles. Remove and clean it according to your manufacturer’s instructions. Replace filters every 6-12 months, as recommended by a 2025 Dyson research paper on filtration efficacy.
Inspect Seals and Hoses
Air leaks severely reduce suction power. A compromised seal or damaged hose allows air to escape, bypassing the vacuum’s intended pathway.
- Examine Gaskets and Seals: Check the rubber gaskets around the recovery tank and motor housing. Ensure they are free from cracks, tears, or misalignment. A tight seal is paramount for maintaining negative pressure.
- Assess Hose Integrity: Run your hand along the entire length of the suction hose, feeling for any punctures, tears, or loose connections. Even a small pinhole can significantly impact performance. Modern hoses often incorporate more durable, reinforced polymers, but wear can still occur.
- Secure Connections: Ensure all hose connections to the tank, nozzle, and accessories are firmly attached and locked in place. Many 2027 wet vacuums feature quick-lock mechanisms that require a definitive click.
Empty Recovery Tank and Check Float Valve
A full recovery tank will automatically shut off suction to prevent motor damage. The float valve is a safety mechanism that rises with the water level.
- Empty Recovery Tank: If suction abruptly stops, check the recovery tank first. Empty it completely.
- Clean Float Valve: Locate the float valve, typically a plastic ball or mechanism inside the recovery tank inlet. Ensure it moves freely and is not stuck by debris. A sticky float valve can prematurely trigger the full-tank shutoff.
What If It Still Doesn’t Work?
If you’ve followed all troubleshooting steps and your wet vacuum still experiences severe suction issues, the problem may be more complex. A 2026 Consumer Reports analysis found that approximately 15% of persistent vacuum issues require advanced diagnostics or professional repair.
- Deep Clean Internal Components: Some advanced clogs occur within the internal tubing or pump system. Consult your user manual for specific deep-cleaning procedures or diagrams. Modern designs often include access panels for these components.
- Motor Brush Inspection (if applicable): For older or professional-grade units with brushed motors, worn carbon brushes can reduce motor efficiency. This is a task for technically proficient individuals. Most 2027 consumer models utilize brushless motors, minimizing this particular issue.
- Contact Manufacturer Support: Utilize the advanced AI-driven diagnostic tools often available through manufacturer websites or dedicated apps by 2027. Provide detailed symptom descriptions for remote assistance.
- Seek Professional Repair: If self-diagnosis fails, professional repair is the safest option. A qualified technician can assess pump integrity, motor performance, and internal circuitry. In 2027, the average cost for professional wet vacuum repair ranges from $120 to $380 USD, depending on the brand, model, and severity of the malfunction, according to a service provider survey by “Appliance Repair Quarterly.”
Conclusion
Understanding how wet vacuums work, from their powerful suction generation to the crucial liquid separation, empowers effective use and troubleshooting. Persistent suction issues often stem from simple blockages or seal problems. According to verified research and expert sources, routine maintenance significantly extends appliance longevity. Your actionable next step: regularly inspect and clean your wet vacuum’s filter and hose to ensure optimal performance.
❓ Frequently Asked Questions
What are the essential components that allow a wet vacuum to handle liquids safely?
Key components include a powerful motor, a liquid collection tank, a specialized wet filter (often foam or cartridge-less), and critically, a float shut-off mechanism that prevents liquid from reaching the motor. These parts work together to ensure efficient and safe liquid pickup by separating air from collected fluid.
Explain the suction process for liquids and how it differs from dry debris collection.
The motor generates a strong airflow, creating negative pressure that draws both liquids and debris through the nozzle. Unlike dry collection where debris goes into a bag or cyclonic chamber, liquids in a wet vac are routed directly into a dedicated recovery tank, with the filtered air bypassing this liquid to exit the unit.
How does the float system specifically protect the vacuum’s motor from water damage?
Inside the dirty water tank, a buoyant float ball is designed to rise with the collected liquid. When the tank is nearly full, this float blocks the air intake port to the motor, cutting off suction and often audibly indicating it’s time to empty the tank, thereby preventing water ingress and potential electrical damage.
Are specialized filters required for wet vacuuming, and how do they function?
Yes, wet vacuums typically use foam filters or cartridge filters designed for wet use, or sometimes no filter during liquid recovery. These specialized filters allow air to pass freely while preventing larger debris and crucially, water droplets, from reaching and potentially damaging the sensitive motor components.
What role do the dual tanks play in some wet vacuum designs, particularly carpet cleaners?
In machines like carpet cleaners, dual tanks separate clean water (and often cleaning solution) from the recovered dirty water. One tank dispenses the cleaning mixture onto the surface, while the other collects the grime and extracted liquid, ensuring that only clean solution is applied and cross-contamination is avoided.
Can a wet vacuum be used for both wet and dry messes interchangeably without modifications?
While many wet/dry vacuums are designed for versatility, they often require a change in filtration for optimal performance and motor protection. You typically switch from a specialized wet filter (e.g., foam) to a dry filter (e.g., cartridge or bag) when transitioning from wet to dry pickup to prevent filter clogging or motor damage.