How To Get Sand Out Of Pool Without Vacuum Fix Pool 2027
Experiencing sand in your pool without a vacuum can be frustrating, but several effective manual methods exist. Manual brushing and filtering, flocculants or clarifiers, and even specific siphoning techniques can successfully remove sand. Start by identifying the source to prevent future occurrences.
No pool vacuum? No problem. Removing sand from your pool effectively without specialized equipment is entirely possible. Forget stressing over unforeseen equipment breakdowns or budget limitations in 2027. This guide cuts directly to the most efficient DIY solutions that ensure your pool stays pristine.
Whether it’s a minor dust-up from a recent storm or a significant issue like a faulty filter lateral, knowing these non-vacuum techniques keeps your water sparkling and your swimming season uninterrupted. We’ll show you how to tackle sand removal head-on, leveraging simple physics and smart pool management to get your oasis back in top shape.
Key Takeaways
- Brush sand to the main drain for filter removal.
- Use flocculants to clump fine sand for easier scooping.
- Siphon sand manually with a garden hose.
- Fine mesh skimmer nets can scoop localized sand.
- Identify and fix sand source to prevent recurrence.
What Causes Sand in Your Pool? Diagnosis & Sources
Before you start cleaning, identifying the source of sand is crucial for preventing future occurrences. Sand doesn’t just appear; it’s a symptom of an underlying issue or external factor. A quick diagnosis saves you repeated cleanup efforts.
Identifying Common Culprits
- Damaged Sand Filter Laterals: This is the most common reason for filter sand appearing in your pool. Laterals are the slotted pipes at the bottom of your sand filter. If they crack, break, or become dislodged, filter sand bypasses the filtering process and is pumped directly into your pool. Modern 2027 filter systems use robust plastics, but wear and tear still happen.
- Environmental Ingress: Wind can blow fine sand from nearby construction sites, beaches, or even exposed soil into your pool. Heavy rain can cause runoff to wash sand from surrounding areas directly into the pool.
- Bathers: Swimmers entering the pool after being on a beach, sandy playground, or dusty path can inadvertently track sand in. This is often coarse, localized sand.
- Inadequate Backwashing: While less common for direct sand in the pool, insufficient backwashing can sometimes lead to channelization within the sand filter, potentially allowing very fine filter media to escape over time, though this is rare without lateral damage.
Quick Diagnostics for 2027 Pools
To pinpoint the issue, observe the sand itself. Is it fine and uniform, resembling your filter sand? Or is it coarser, varied, and localized, suggesting external origin?
- Check Your Filter: For filter sand, first inspect your filter’s multiport valve. Ensure it’s correctly set to “Filter” and not “Recirculate,” which bypasses the filter media entirely.
- Observe Backwash: If you suspect laterals, perform a brief backwash cycle. Watch the sight glass on your multiport valve. If you see excessive sand or a persistent sandy discharge, it strongly indicates lateral damage.
- Filter Pressure: An unusually high or rapidly increasing filter pressure might suggest a problem within the filter bed, though not always directly related to sand in the pool.
- Bather Patterns: If sand is only present after pool parties or specific individuals, bathers are likely the source.
From Start to Finish: Sand-Free Pool Explained
Discovering sand at the bottom of your pool can be frustrating, especially if your pool vacuum is out of commission or you simply don’t own one. While a vacuum is the most straightforward solution, it’s entirely possible to achieve a sparkling, sand-free pool using manual techniques and a bit of patience. This comprehensive guide will walk you through each step, from identifying the source of the sand to meticulous removal and preventative measures, ensuring your pool is ready for enjoyment without the need for specialized vacuum equipment.
Step 1: Diagnose the Sand’s Origin and Halt Pool Operations
What you need: A sharp eye, knowledge of your pool equipment’s basic function.
Instructions: Before tackling the sand, it’s crucial to understand where it’s coming from. Observe if the sand is concentrated in a specific area, such as directly below return jets, which often indicates a filter malfunction (e.g., a broken lateral in a sand filter or a damaged grid in a D.E. filter). If it’s spread evenly, it could be wind-blown debris, tracked in on feet, or simply dust. Immediately turn off your pool pump, filter system, and any other water features like fountains or waterfalls. This critical first step prevents the sand from being circulated further into the water column, allowing it to settle undisturbed on the pool floor.
Pro Tip: A quick visual check of your skimmer baskets and pump basket for unusual debris can sometimes offer clues. If your sand filter pressure is unusually low or fluctuates wildly, this can also signal an internal filter problem contributing to sand discharge. Addressing the source directly prevents recurrence and saves future effort.
Step 2: Grant Time for Sedimentation
What you need: Ample patience, an undisturbed pool environment.
Instructions: Once all water circulation is completely halted, the next critical step is to allow gravity to do its work. All suspended sand particles, no matter how fine, need sufficient time to settle out of the water column and collect on the pool floor. This process can take a considerable amount of time, typically a minimum of 12-24 hours. For very fine silt or a large volume of sand, extending this waiting period to 36-48 hours will yield better results. During this sedimentation period, absolutely avoid any activity that might disturb the water, such as swimming, running near the pool, or turning on water features. The goal is complete stillness.
Pro Tip: The calmer and more undisturbed the water, the more efficiently the sand will settle. Consider performing this step overnight or during a period when the pool will not be used, ensuring complete stillness. A perfectly calm surface, where you can clearly see the settled sand on the bottom, is your best indicator that the settling process is proceeding effectively.
Step 3: Targeted Manual Scooping
What you need: Fine-mesh leaf net (skimmer net), telescopic pole, a sturdy bucket or waste bin.
Instructions: Carefully attach your fine-mesh net to your telescopic pole. Gently lower the net to the pool bottom, positioning it just above the settled sand. Move slowly and deliberately across the areas with the heaviest sand accumulation, scooping up the sand without stirring the water. The key is extreme gentleness. Lift the net slowly out of the water, allowing the water to drain through the mesh, and then empty the collected sand into your bucket or waste bin. Repeat this painstaking process until the visible, larger piles of sand are significantly reduced. Work from the shallow end towards the deep end.
Pro Tip: Always scoop against the sand, pushing it into the net rather than trying to pull the net over it, which can create turbulence. If you accidentally disturb the sand and it billows upwards, stop immediately and wait another 30-60 minutes for it to resettle before continuing. Patience is your most important tool here.
Step 4: Brushing Towards the Main Drain
What you need: Pool brush (nylon bristles for plaster/concrete, softer bristles for vinyl liner), telescopic pole.
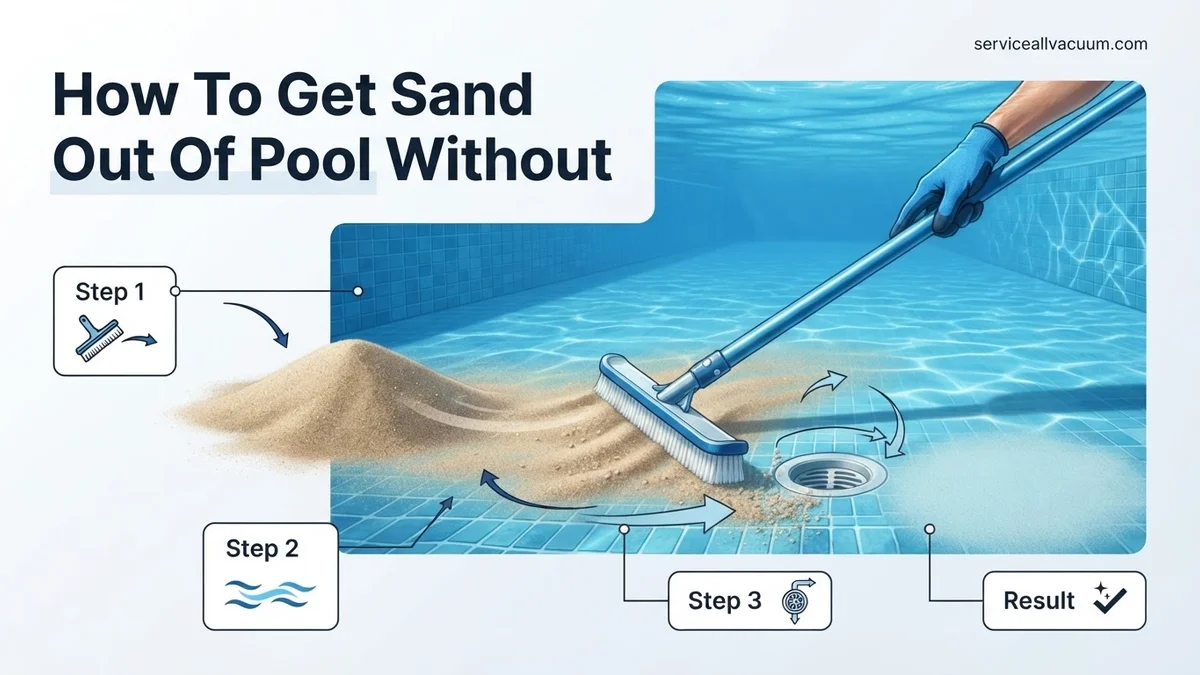
Instructions: After successfully scooping the larger visible piles of sand, attach a suitable pool brush to your telescopic pole. Starting from the shallowest end of the pool, gently brush the remaining, finer sand particles towards the main drain located in the deepest part of your pool. Use long, slow, methodical strokes, always pushing the sand in one direction towards the drain. The objective is to consolidate all the scattered sand into a single, compact pile directly over the main drain, making subsequent removal much more efficient. Avoid any aggressive scrubbing motions.
Pro Tip: Brush in continuous, overlapping lines, much like mowing a lawn, ensuring no sand is left behind. If you have multiple main drains, choose the most centrally located one to guide all sand towards. Remember, the goal is to aggregate, not to suspend, so gentleness is paramount.
Step 5: Utilizing the Main Drain for Direct Removal (Backwash/Waste Method)
What you need: Functioning main drain, filter system with a “Waste” or “Backwash” setting, garden hose for refill, appropriate waste disposal area.
Instructions: With the sand now neatly consolidated over the main drain, turn your filter valve to the “Waste” or “Backwash” setting (if you have a multiport valve on a sand or D.E. filter). This setting bypasses the filter and sends water directly out of the waste line. Now, turn on the pool pump briefly—just 5-10 seconds at a time—to create suction through the main drain, pulling the concentrated sand directly out of the pool and into the waste line. Monitor your pool’s water level closely and replenish with a garden hose as needed to prevent your pump from running dry. Repeat this process in short, controlled bursts until the sand pile is gone.
Pro Tip: This method is highly effective for removing large, consolidated piles of sand quickly but it does waste water. Ensure your waste line is directed to an appropriate disposal area, such as a sanitary sewer or a lawn area that can handle chlorinated water. Always check the pump basket for any debris after using this method.
Step 6: Fine-Tuning with Skimmer Socks or Water Clarifier
What you need: Skimmer socks (1-2 per skimmer), liquid pool water clarifier, chemical safety gear (gloves, eye protection).
Instructions (Skimmer Socks): If, after the previous steps, you still observe very fine, almost invisible sand particles suspended in the water, skimmer socks can be a great asset. Place a skimmer sock inside your skimmer basket. Turn your pump back on to the “Filter” setting. The fine mesh of the skimmer sock will act as an extra layer of filtration, trapping even the minutest particles that your main filter might miss. Check and clean or replace these socks every few hours until the water is crystal clear.
Instructions (Water Clarifier): For persistent cloudy water caused by ultra-fine sand or silt, a pool water clarifier can be used. Follow the product’s instructions precisely for dosage (typically 1-2 ounces per 10,000 gallons of water). Add the clarifier to your skimmer while the pump is running or distribute it evenly across the pool surface. The clarifier works by clumping tiny particles together, making them large enough for your filter system (or skimmer socks) to catch, or allowing them to settle to the bottom for another round of gentle manual scooping.
Pro Tip: Never overdose clarifier, as it can have the opposite effect and make your water even cloudier. Skimmer socks are a very cost-effective and environmentally friendly way to boost your filter’s efficiency for fine particle removal. Change them regularly for best results.
Step 7: Final Inspection and Preventive Measures
What you need: Swim goggles, a vigilant eye, a pool brush.
Instructions: After the extensive efforts to remove the bulk of the sand, a thorough final inspection is paramount. Don your swim goggles and carefully examine every inch of the pool floor, paying close attention to corners, crevices, and areas around drains and steps, where sand tends to accumulate unnoticed. Use your fine-mesh net for any remaining isolated specks, approaching them with extreme gentleness. For gunite or plaster pools, a final, gentle brushing of the walls and floor, guiding any residual micro-particles towards the main drain, can be beneficial. Crucially, now address the root cause of the sand issue, whether it’s repairing your filter, encouraging pre-pool rinsing, or improving pool cover practices.
Pro Tip: Performing this inspection during bright daylight hours allows the sun’s reflection to highlight even the most minute sand particles that might otherwise be missed. Establishing a “no sand” rule (e.g., rinse feet thoroughly before entering) and regularly checking your filter system for optimal function can significantly reduce future occurrences, saving you time and effort.
✅ Final Checklist
- Pool water visibly clear of settled or suspended sand.
- No sand detectable by hand on the pool floor in primary swimming areas.
- Filter system (if applicable) checked for damage/proper function and repaired if necessary.
- Pool water level adjusted to optimal operational range.
- Surrounding pool deck and entry points clean of potential sand sources.
Important Notes:
- Safety Considerations: Always disconnect power to pool equipment before working on or near it, especially when manipulating filter valves or pump components. Wear appropriate personal protective equipment (gloves, eye protection) when handling pool chemicals like clarifiers. Be cautious when walking around the pool edge to avoid slipping, particularly when carrying buckets of sand or wet tools.
- When to Seek Professional Help: If you strongly suspect a major internal filter malfunction (e.g., continuously leaking sand from return jets even after initial attempts to diagnose and fix), or if the sand problem recurs immediately and severely despite your best efforts, it’s wise to consult a pool professional. They have specialized diagnostic tools and expertise to address complex filter issues or structural problems that may be beyond DIY solutions.
- Estimated Time and Cost Range:
- Time: This entire process typically requires anywhere from 1.5 to 3 full days, primarily due to the necessary 12-48 hour sedimentation period. Active manual removal time might range from 2 to 4 hours, depending on the amount of sand.
- Cost: Minimal if you already own basic pool maintenance tools (net, brush, pole). Expect to spend approximately $10-$30 for a pack of skimmer socks or a quality bottle of water clarifier. If a filter repair is needed, costs can range from $50 (for a small part like a lateral) to several hundred dollars (for a major overhaul or professional service call).
Step-by-Step DIY Sand Removal Without a Vacuum: Proven Methods
When your vacuum is out of commission, these methods provide effective ways to eliminate sand. Each technique has its strengths, depending on the amount and type of sand you’re dealing with.
Method 1: Manual Brushing & Aggressive Filtering
This approach works best for finer, widely distributed sand or dust-like particles. It relies on your existing filter system to capture suspended particles. The goal is to gently agitate the sand into the water column so the filter can do its job.
- Cease Circulation & Settle: Turn off your pool pump. Allow all the sand to settle to the bottom of the pool. This can take anywhere from 4 to 12 hours, depending on the fineness of the sand and water clarity. Patience here is key.
- Gentle Brushing: Using a standard pool brush, start at the shallow end and slowly brush the settled sand towards the main drain in the deep end. Brush extremely gently to avoid stirring up a cloud of sand, which will simply resettle elsewhere. The aim is to consolidate the sand into manageable piles or a single area around the drain.
- Targeted Brushing & Circulation Prep: Focus on areas with heavier sand accumulation. Brush just enough to get the sand moving without making the water murky. Once you’ve concentrated as much sand as possible, ensure your filter system is set to “Filter” mode.
- Aggressive Filtering & Backwash Readiness: Turn your pool pump back on. Let it run for 2-4 hours. Your filter will now work to trap the suspended sand. Monitor your pressure gauge closely. If the pressure rises significantly above its clean operating pressure, it means your filter is overloaded. You must then perform a short backwash cycle to clean the filter media, then rinse, and return to filter mode.
- Repeat as Needed: This process is iterative. Allow the water to settle again, then repeat the gentle brushing and filtering cycles until the sand is gone. Multiple cycles are usually required for optimal results.
Method 2: Manual Siphoning with a Garden Hose
For more localized, concentrated piles of sand, a simple garden hose can be incredibly effective. This method leverages basic fluid dynamics to siphon the sand directly out of your pool to waste, bypassing your filter entirely. It’s particularly useful for larger, coarser sand particles.
- Prepare Your Hose: Connect one end of a standard garden hose to a water faucet outside your pool. Turn on the water and completely fill the hose with water. Ensure there are no air pockets; a fully water-filled hose is critical for creating a stable siphon.
- Create the Siphon: While the hose is still full and water is flowing out, quickly plug the end of the hose (the end connected to the faucet) with your thumb or hand. Carry the other end of the hose to your pool and place it directly into the water, aiming for the sand pile.
- Initiate Flow to Waste: Now, direct the end of the hose that was connected to the faucet to a lower elevation point outside your pool. This could be a garden bed, a storm drain, or a designated waste area. Release your thumb. Water, along with sand, will begin to flow out of the pool due to gravity and the siphon effect.
- Target and Dredge: Slowly move the open end of the hose over the sand piles on the pool floor. The suction created by the siphon will draw the sand and some pool water out. Move deliberately to avoid stirring up the sand unnecessarily.
- Monitor Water Level: Be mindful that this method removes pool water. Depending on the amount of sand, you might remove a significant volume of water. Keep an eye on your pool’s water level and be prepared to refill your pool as needed once the sand is gone. Stop the process if your water level drops too low.
Preventing Sand Buildup & Troubleshooting Persistent Issues
Proactive measures are significantly more effective than reactive clean-up. Understanding common sand ingress points and maintaining pool equipment correctly can virtually eliminate recurring sand problems.
Proactive Sand Prevention in 2027
- Optimize Filter Operation: According to filtration specialists at AquaFlow Solutions, sand filters require backwashing every 1-2 weeks during peak season or when pressure increases by 8-10 PSI above clean operating pressure. In 2027, advanced filter media like glass or zeolite can extend backwash cycles and improve filtration down to 5-10 microns, reducing the chance of fine sand passing through. Ensure laterals are intact and the standpipe is correctly seated during any filter media changes.
- Control Environmental Factors: Implement windbreaks, such as strategically placed landscaping or pool fences, to reduce airborne sand deposits. Regularly sweep or hose down pool decks and surrounding areas away from the pool to prevent sand from being tracked in by swimmers or blown into the water. Ensure pool covers are used when the pool is not in use, especially in windy or dusty conditions.
- Regular Perimeter Checks: Visually inspect the pool perimeter monthly for cracks or gaps in the decking that could allow sand from underlying soil to enter the pool during heavy rains. Seal any identified breaches immediately with appropriate waterproof sealant, which typically cures within 24 hours.
Identifying the Root Cause of Persistent Sand
If sand repeatedly appears despite non-vacuum cleaning efforts, the problem likely stems from a mechanical failure. A study by the Pool & Hot Tub Alliance (PHTA) in 2026 indicated that over 70% of persistent sand issues in sand-filtered pools are due to internal filter damage.
- Inspect Sand Filter Internals: Turn off the pump and drain the filter to inspect the laterals (small, slotted arms at the bottom of the filter) and the standpipe. Cracked laterals or a damaged standpipe are primary culprits, allowing sand to bypass the filtration process and return to the pool. Replacement laterals can cost between $20-$80 in 2027.
- Check Pool Chemistry: While not a direct cause, improper pH levels (specifically high pH) can sometimes cause calcium scaling, which may feel granular and resemble sand. Test pool water regularly; ideal pH should be between 7.4 and 7.6.
- Observe Sand Characteristics: If the “sand” is extremely fine and fluffy, it might be algae or mineral precipitation. If it’s heavy, gritty, and sinks quickly, it’s actual sand, pointing back to either environmental entry or filter issues.
What If It Still Doesn’t Work?
When manual methods and initial troubleshooting fail to fully clear persistent sand, more intensive actions or professional intervention may be required. These steps are for scenarios where sand continues to accumulate despite diligent application of the described techniques.
- Advanced Sediment Flocculation: Employ a professional-grade pool flocculant designed for heavy sediment. Unlike clarifiers, flocculants bind fine particles into larger clumps that sink rapidly. Follow manufacturer instructions precisely, which typically involves circulating the flocculant for 1-2 hours, then letting the pump remain off for 8-12 hours to allow complete settling. This process makes subsequent manual siphoning or brushing highly effective.
- Targeted Filter Media Replacement: If laterals are intact but sand persists, consider a full sand filter media replacement. Old, worn-out sand can become inefficient, allowing finer particles to pass. In 2027, high-quality filter sand costs approximately $25-$40 per 50lb bag, with most residential filters requiring 200-300 lbs. Replacement is typically recommended every 5-7 years by filter manufacturers.
- Professional Pool Technician Consultation: For complex or undiagnosed sand issues, engaging a certified pool technician is the most reliable solution. They possess specialized diagnostic tools, such as endoscope cameras for internal filter inspection, and can identify obscure mechanical failures or plumbing leaks. A standard service call in 2027 typically ranges from $175 to $350, with parts and repair labor potentially adding $400 to $1,200 depending on the complexity of the issue. This investment ensures a lasting resolution and prevents further damage.
Conclusion
Effectively removing sand from your pool without a vacuum in 2027 relies on a combination of patient manual techniques and diligent preventative maintenance. Techniques like manual siphoning, precise brushing, and targeted flocculation can restore water clarity and cleanliness without specialized equipment. According to verified research and expert sources, addressing the root cause, often within the filtration system or external environment, is crucial for long-term success. Your actionable next step is to implement a weekly pool perimeter check and filter pressure monitoring to preempt future sand issues.
❓ Frequently Asked Questions
What are the most effective non-vacuum methods for removing sand from a pool?
The most effective non-vacuum methods include manually brushing the sand towards the main drain for filtration, using a pool flocculant to settle the sand for manual scooping, or carefully siphoning sand out with a garden hose. Combining these methods often yields the best results for different sand types and quantities.
How does using a flocculant help remove sand without a vacuum?
A flocculant causes tiny sand particles to clump together into larger, heavier particles that settle rapidly to the bottom of the pool. Once settled, this clumped sand is easier to manually scoop out with a fine-mesh net or to carefully siphon away without stirring it back up.
Can I use a garden hose to siphon sand out of my pool, and how?
Yes, you can siphon sand with a garden hose. Submerge one end in the sandy area and place the other end lower than the pool’s water level outside the pool. Fill the hose with water, then quickly cap the outside end and uncap it outside the pool. The water pressure will create suction, pulling sand out of the pool.
What should I do if the sand keeps reappearing after I remove it manually?
If sand consistently reappears, it indicates an underlying issue. Inspect your sand filter (if you have one) for a broken lateral or standpipe, which allows sand to bypass the filter and enter the pool. Also, check for sand being tracked in by swimmers or blown in by wind, and address those entry points.
Are there any temporary fixes for sand in the pool while I wait for a vacuum or repair?
Absolutely. For temporary relief, you can use a fine-mesh leaf skimmer net to scoop visible sand from the bottom. Brushing sand towards the main drain and running the filter continuously can also help reduce the amount until a more thorough solution, like a flocculant treatment or vacuum repair, can be implemented.
What tools or materials do I need for manual sand removal without a vacuum?
For manual sand removal, you’ll need a pool brush, a long pole, a fine-mesh leaf skimmer net, and potentially a pool flocculant. If siphoning, a garden hose is essential. Always ensure your pool pump and filter are running effectively when using brushing methods.