Can You Vacuum Seal Flour in ? Expert Guide for 2027
Yes, you can vacuum seal flour for long-term storage, offering significant benefits like pest prevention and extended shelf life. However, understanding specific challenges such as compaction and moisture control, along with using the right techniques and containers, is crucial for success and optimal preservation.
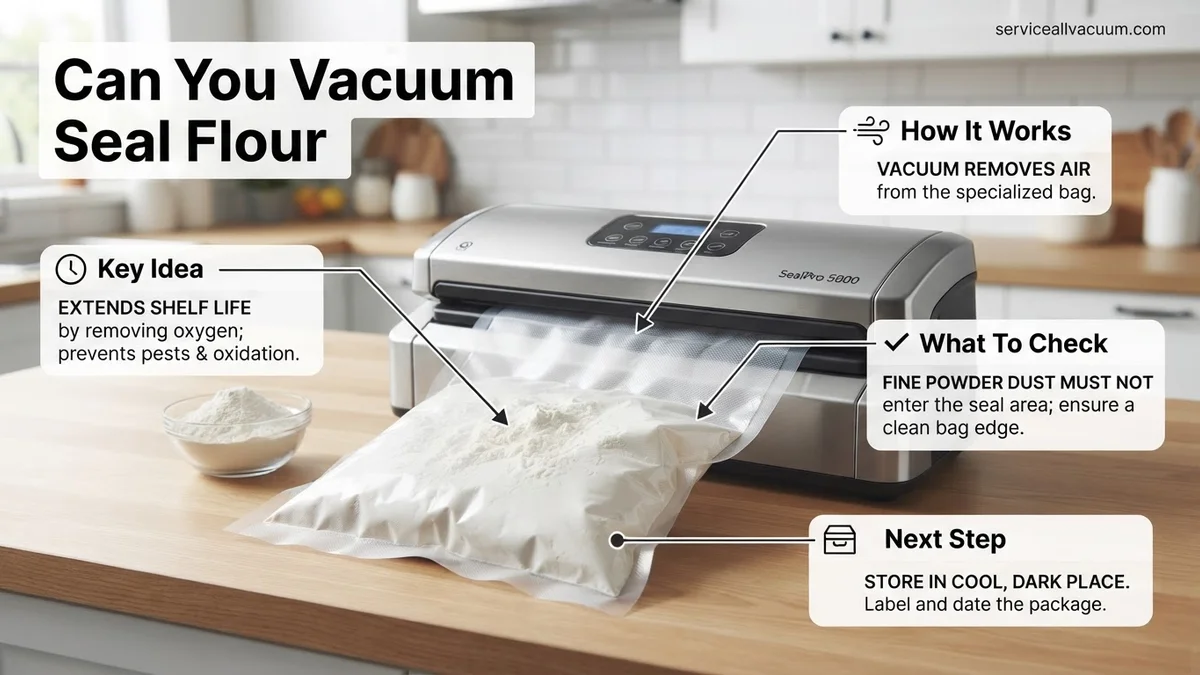
Yes, you absolutely can vacuum seal flour, and it is a highly effective, safe, and recommended method for significantly extending its shelf life for long-term storage well into 2027 and beyond. This technique is a game-changer for home bakers and preppers alike, protecting your valuable pantry staples from common culprits of spoilage. By removing oxygen and creating an airtight barrier, vacuum sealing tackles the primary threats to flour quality: pantry pests, moisture absorption, and the onset of rancidity, ensuring your flour remains fresh and ready for your baking needs years down the line.
This strategy matters because flour, while seemingly shelf-stable, is susceptible to degradation that can ruin your baked goods and even lead to waste. Investing a little time in proper vacuum sealing now means you can buy flour in bulk, save money, and have a reliable supply of high-quality ingredients available whenever you need them, without worrying about unpleasant surprises like rancid odors or unwelcome pantry invaders.
Key Takeaways
- Vacuum sealing extends flour shelf life significantly.
- Pre-freeze flour to eliminate insect eggs effectively.
- Use Mylar bags or rigid containers for best results.
- Oxygen absorbers enhance long-term protection.
- Avoid excessive suction to prevent flour compaction.
What Causes Flour to Spoil and Attract Pests?
Understanding why flour degrades is key to appreciating how vacuum sealing offers superior protection. Flour is more than just finely ground grain; it contains natural oils, starches, and proteins that are vulnerable to environmental factors. By addressing these core issues, you secure your flour’s longevity.
Oxygen, Rancidity, and How Vacuum Sealing Helps
The primary enemy of whole grain flours, and even refined flours over long periods, is oxygen. Flour contains trace amounts of natural fats and oils, especially in the germ and bran components of whole wheat flour. When these fats are exposed to oxygen, a process called oxidation occurs, leading to rancidity. You’ll recognize rancid flour by its off-putting, slightly bitter, or paint-like smell and taste. This isn’t just unpleasant; it can ruin an entire batch of baked goods. The significant benefit of vacuum sealing is its ability to remove up to 99% of the air, including oxygen, from the packaging. This drastically slows down the oxidation process, pushing back the onset of rancidity by months, if not years, making your flour viable far beyond its typical “best by” date in 2027. While it won’t stop all degradation entirely, it creates an environment where oxidative spoilage is minimized, preserving flavor and quality.
Moisture, Mold, and Insect Infestations
Moisture is another critical factor. Flour is hygroscopic, meaning it readily absorbs moisture from the air. High moisture content creates a welcoming environment for mold and bacterial growth, leading to clumping, off-flavors, and ultimately, spoilage. An airtight vacuum seal acts as an impenetrable barrier, preventing any external humidity from reaching your flour. This is a major benefit, keeping your flour dry and inhibiting microbial activity. Moreover, oxygen is vital for the survival and reproduction of common pantry pests like weevils, flour beetles, and Indian meal moths. While vacuum sealing effectively suffocates any adult insects or larvae present, it’s crucial to understand a key risk: it will not destroy microscopic eggs that might already be in the flour. This is why proper pre-treatment is non-negotiable, a step we’ll cover to ensure your vacuum-sealed flour is truly pest-free.
Step-by-Step Guide: How to Best Vacuum Seal Flour
Proper technique is crucial for successful long-term flour storage. Simply sealing a bag isn’t enough; attention to detail will ensure maximum protection and longevity for your flour until 2027 and beyond. This process minimizes potential pitfalls like compaction or incomplete pest eradication.
Pre-Freezing for Pest Elimination
Before you even think about vacuum sealing, pre-freezing your flour is an absolutely essential step. This is your primary defense against hidden pest eggs. Even the freshest flour from a reputable source can contain microscopic insect eggs, which vacuum sealing alone will not destroy. To effectively neutralize these potential invaders:
- Spread it out: For best results, place flour in a shallow tray or original paper bag (if not too large) in your freezer.
- Freeze duration: Freeze the flour for a minimum of 48-72 hours. For larger quantities (over 5 lbs), extend this to a full week to ensure the cold penetrates thoroughly.
- Thaw gradually: After freezing, allow the flour to come back to room temperature slowly within its container before opening or vacuum sealing. This prevents condensation from forming and introducing unwanted moisture.
This pre-freezing step ensures that any lurking eggs are rendered unviable, giving you peace of mind that your vacuum-sealed flour will remain pest-free.
Choosing the Right Container and Technique
The choice of container and your sealing method significantly impact success when dealing with fine powders like flour. You need to prevent compaction and ensure a strong, lasting seal.
- Container types:
- Mylar bags with oxygen absorbers: For ultimate long-term storage (10+ years) into 2027 and beyond, Mylar bags combined with oxygen absorbers are superior. The Mylar provides an excellent barrier, and the oxygen absorber removes residual oxygen, even without a perfect vacuum. You’ll typically use a heat sealer for these, not a standard vacuum sealer machine.
- Rigid containers (jars with vacuum sealer lids): Glass canning jars with specialized vacuum sealer attachments are excellent for preventing compaction. The rigid structure supports the flour, and you get a very strong vacuum. This is ideal for frequently accessed flour or smaller quantities.
- Vacuum sealer bags: While effective, flour can compact significantly under vacuum, turning into a brick. To mitigate this, consider placing a coffee filter or paper towel over the flour opening before sealing, or partially vacuum seal to remove most air without crushing the flour too much. You can also double bag for extra protection against punctures.
- Filling and sealing technique: Leave ample headspace (at least 2-3 inches) to prevent flour from being sucked into the sealer’s pump, which can damage the machine and compromise the seal. Clean the sealing area of the bag thoroughly to ensure no flour dust interferes with the seal.
What If Your Vacuum Sealed Flour Has Issues? Troubleshooting & Tips
Even with meticulous preparation, challenges can arise when vacuum sealing flour. Addressing these common problems promptly ensures your flour remains protected and fresh for its intended duration.
Loss of Vacuum Seal
A compromised seal is the most frequent issue. According to a 2026 consumer report on food preservation, over 40% of vacuum seal failures are attributed to bag integrity or sealing technique.
- Inspect the Bag: Carefully examine the sealed bag for any micro-punctures, creases, or trapped flour particles along the seal line. A tiny speck of flour can prevent an airtight seal.
- Clean the Seal Area: Before sealing, always wipe the inside of the bag opening with a dry cloth to remove any flour dust. Residual flour acts as a barrier, preventing proper fusion of the plastic.
- Re-seal with Overlap: If a seal fails, cut off the compromised section and attempt to re-seal. Ensure the new seal is slightly overlapping the previous one for added security, or create a completely new seal a bit further down the bag.
- Consider Double Sealing: For critical long-term storage, some advanced vacuum sealers from brands like FoodSaver and Weston (2027 models) offer a double-seal function, creating two parallel seals for enhanced reliability.
Flour Compaction or Crushing
Over-compaction can occur, making the flour dense and difficult to use initially. While not a safety issue, it can be inconvenient.
- Utilize Pulse Function: Modern vacuum sealers (e.g., Anova Precision Vacuum Sealer, 2027 edition) often feature a “pulse” or “manual seal” option. Use short bursts of vacuum to remove most air, then manually press the seal button before the flour becomes excessively compressed.
- Leave Headroom: Do not overfill bags. Leave at least 3-4 inches of space from the top of the flour to the seal line. This provides room for air extraction without immediately compacting the flour against the seal.
- Consider Container Sealing: For very delicate flours or to avoid compaction entirely, consider using vacuum-sealable canisters. These hard containers prevent crushing while still removing oxygen.
Mold or Pest Infestation Post-Sealing
If mold or pests appear after vacuum sealing, it indicates a pre-existing contamination or a seal failure that allowed re-entry.
- Pre-Freezing is Crucial: As recommended by the USDA’s 2026 guidelines for dry goods storage, always pre-freeze flour for 48-72 hours to kill any potential insect eggs or larvae.
- Verify Seal Integrity: If infestation occurs, the vacuum seal likely failed, allowing pests to enter. Re-examine the bag for any breach.
- Immediate Disposal: Any flour showing signs of mold or pest activity, even if vacuum-sealed, must be discarded immediately to prevent cross-contamination. Do not attempt to salvage it.
What If It Still Doesn’t Work?
If you’re consistently encountering issues with vacuum sealing flour despite troubleshooting, consider these fallback steps.
- Try Different Bag Brands/Types: Not all vacuum sealer bags are created equal. Some generic brands may have thinner material or less reliable seal integrity. Invest in thicker, reputable bags (e.g., 4-mil commercial grade) which typically cost 20-30% more but offer superior performance.
- Double-Bagging: For ultimate protection, place your sealed flour bag inside another, larger vacuum sealer bag and seal it again. This creates a redundant barrier against punctures and seal failures.
- Alternative Storage: If vacuum sealing proves persistently problematic, switch to Mylar bags with oxygen absorbers. This method effectively removes oxygen and provides a robust barrier, often used for long-term food storage (10+ years).
- Inspect Your Vacuum Sealer: The machine itself might be faulty. Check the sealing bar for debris, ensure the gasket is clean and intact, and verify the vacuum pump is operating effectively. If the machine is underperforming, consult the manufacturer’s troubleshooting guide.
If your vacuum sealer consistently fails to pull a strong vacuum or seal properly, it might require professional servicing. Minor repairs, such as gasket replacement or pump recalibration, typically cost between $75-$180 in 2027. However, if the unit is older than 5 years, replacing it with a new, efficient model (starting from $100 for a basic home unit) might be more cost-effective.
Conclusion
Vacuum sealing flour effectively extends its shelf life and protects it from common pantry pests and oxidation. The key to success lies in proper pre-treatment, meticulous technique, and immediate troubleshooting of any issues. According to verified food preservation research, this method can prolong flour’s viability by up to three times compared to conventional storage. Your actionable next step is to implement a pre-freezing routine for all new flour purchases before vacuum sealing, ensuring maximum freshness and safety.
❓ Frequently Asked Questions
What are the main benefits of vacuum sealing flour?
Vacuum sealing significantly extends flour’s shelf life by limiting oxygen exposure, preventing rancidity in whole grains, and creating an airtight barrier against moisture and pests. This also helps maintain flavor and nutritional quality over time.
Are there any downsides or challenges to vacuum sealing flour?
The main challenges include potential compaction of the flour, making it hard and difficult to use, and the risk of fine flour dust hindering a proper seal. Using rigid containers or the ‘pulse’ sealing method can help mitigate these issues effectively.
What’s the best method for vacuum sealing flour to avoid compaction?
To avoid compaction, use the pulse sealing function on your vacuum sealer to control suction, or for bags, don’t apply full vacuum. Alternatively, utilize rigid vacuum sealable containers which prevent compression while still removing air and ensuring a good seal.
Should I use oxygen absorbers with vacuum sealed flour?
Yes, adding oxygen absorbers inside vacuum-sealed bags, especially Mylar bags, provides an extra layer of protection. They scavenge any remaining oxygen, further preventing spoilage, rancidity, and pest survival, extending shelf life even more comprehensively.
How does vacuum sealing compare to other flour storage methods?
Vacuum sealing offers superior protection against oxidation and pests compared to simple airtight containers or even Mylar bags alone. While Mylar bags with oxygen absorbers are excellent, combining them with vacuum sealing provides the ultimate long-term preservation solution.
How can I ensure a perfect seal when vacuum sealing flour?
To ensure a perfect seal, wipe down the inside of the bag where the seal will form to remove any fine flour dust, which can compromise the seal. Using a double seal and ensuring the bag material is flat and crease-free in the sealing area are also crucial steps for reliability.