How To Vacuum Under A Bed Best Way to Vacuum Under a 2027
Thoroughly vacuuming under a bed requires specific tools and techniques to reach every corner, even with low clearance. This guide provides step-by-step methods for effective cleaning and recommends specialized attachments to banish hidden dust and allergens.
Effectively vacuuming under your bed in 2027 requires a strategic combination of preparation and specialized vacuum attachments designed for precise reach. The most thorough approach involves clearing the area, employing specific tools like flat under-appliance wands and flexible crevice tools, and utilizing techniques to maneuver these into tight, low-clearance spaces. This direct method ensures you tackle accumulated dust and allergens, significantly improving your indoor air quality and extending the life of your bedding.
Ignoring this often-forgotten zone means harboring a significant reservoir of dust mites, pet dander, and microscopic debris. With advanced air purification systems becoming standard in modern homes, neglecting under-bed hygiene can undermine your entire air quality strategy. A targeted vacuuming regimen specifically addresses these hidden accumulations, making your living space genuinely cleaner and healthier.
Key Takeaways
- Use extension wands and crevice tools for reach.
- A flat under-appliance tool is best for low beds.
- Clear items from under bed before starting.
- Consider lifting mattress for better access.
- Regular vacuuming prevents heavy dust buildup.
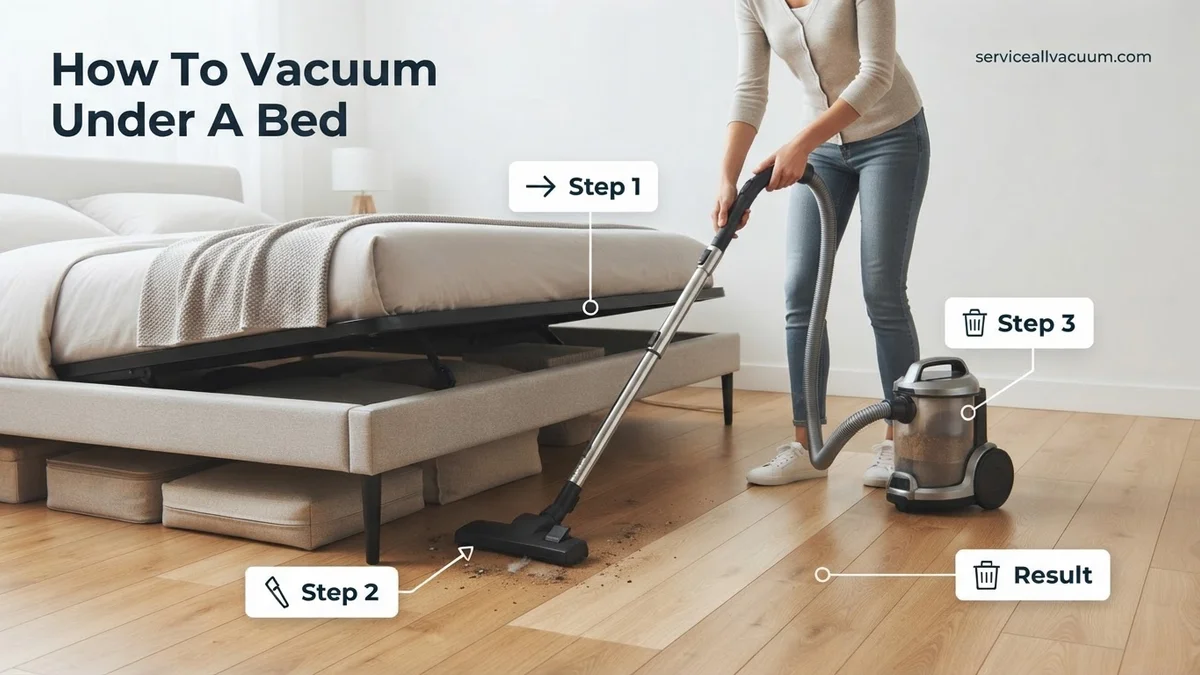
What Causes Under-Bed Dust & Cleaning Challenges?
Under-bed areas are notorious for dust accumulation due to several factors. Gravity consistently pulls airborne particles—such as skin flakes, fabric fibers from bedding, pet hair, and external dust—downwards, where they settle in undisturbed zones. The still air under your bed, often shielded from everyday airflow, allows these particles to coalesce, forming dense dust bunnies that grow larger and more stubborn over time. This makes the area a prime breeding ground for allergens, often undetected until symptoms arise or smart home air quality sensors flag elevated particulate matter.
The “Out of Sight, Out of Mind” Obstacle
The primary cleaning challenge stems from visibility and accessibility. Beds, especially contemporary platform designs popular in 2027, frequently feature very low clearance, sometimes less than two inches. This minimal gap prevents standard vacuum heads or even many common attachments from sliding underneath. Moreover, the sheer depth of a typical bed means dust collects far from the edges, making manual wiping or sweeping ineffective. You often cannot see what you are cleaning, requiring a tactile and systematic approach.
Navigating Low Clearance and Obstructions
Modern bed frames and interior supports further complicate cleaning. Many low-profile beds have central support beams or intricate base structures that create multiple small compartments, rather than one open space. This necessitates specific tools that can bend, flatten, and extend to navigate these architectural challenges without requiring you to dismantle your bed. Without the right attachments, these areas remain untouched, allowing dust and allergens to persist and circulate.
Master Under-Bed Vacuuming in 7 Simple Steps
Dust, pet dander, lost socks, and even forgotten treasures – the cavernous space under your bed can become a veritable wasteland of debris if left unchecked. This comprehensive guide will walk you through the process of thoroughly vacuuming under your bed, transforming it from a neglected zone into a clean, allergen-free sanctuary. Following these precise steps will not only improve your indoor air quality but also extend the life of your flooring and ensure no dust bunny goes uncaptured.
Step 1: Gather Your Arsenal & Assess the Battlefield
What you need: A functional vacuum cleaner (canister or upright with hose attachments preferred), a long extension wand, a crevice tool, a flat upholstery tool (if available), a bright flashlight or headlamp, optional dust mask, and optional disposable gloves.
Instructions: Before you begin, ensure your vacuum cleaner is in optimal working condition. For bagged vacuums, check the bag level; if it’s more than half full, replace it. For bagless models, empty the dust canister and clean the filter if necessary to maintain strong suction. Uncoil the power cord fully to prevent kinks and ensure maximum reach. Using your flashlight, peer under the bed to get a visual assessment of the dust accumulation, potential obstacles (like fallen items), and the clearance height available.
Pro Tip: Take this initial peek as an opportunity to spot any valuable lost items, loose change, or small toys before the vacuum accidentally claims them. You might be surprised what treasures you uncover!
Step 2: Clear the Perimeter & Prepare for Maneuver
What you need: Empty laundry baskets or storage bins, clear floor space around the bed.
Instructions: To provide yourself with ample working room and prevent accidental trips, remove all items from bedside tables, nightstands, and any other furniture adjacent to the bed. If your bed frame allows, consider removing bedding (sheets, blankets, duvet covers) to prevent them from dangling and getting caught in the vacuum, or to allow easier access if you need to lift the mattress. Ensure the floor around the bed is clear of rugs, slippers, or other small objects that might impede moving the bed or yourself.
Pro Tip: Use this preparatory step as a mini-decluttering session for your bedroom. Organize bedside drawers, put away books, and relocate any items that have accumulated on the floor.
Step 3: Elevate or Access: Creating Your Workspace
What you need: Bed risers (if bed is low and difficult to move), sturdy helper (optional), furniture glides (optional).
Instructions: Depending on your bed’s weight and design, you have a few options for access. The ideal method is to carefully move the entire bed. Push it gently from the headboard or footboard (avoid pushing from the sides to prevent frame distortion) a few feet away from the wall. If the bed is too heavy or awkwardly placed, consider lifting the mattress to one side or end, or, if applicable, using sturdy bed risers to temporarily elevate the frame, providing more clearance. Always prioritize safety; if the bed is exceptionally heavy, enlist the help of another person to prevent strain or injury.
Pro Tip: For beds on hard floors, placing furniture glides under the legs can make moving even heavy beds surprisingly easy, minimizing effort and preventing floor scratches.
Step 4: Arm Your Vacuum: The Right Tools for the Job
What you need: Vacuum cleaner, extension wand(s), crevice tool, flat upholstery tool (optional).
Instructions: Attach the longest extension wand your vacuum system provides. For most standard canister or upright vacuums with a hose, this might be a rigid plastic or metal tube. If your vacuum comes with multiple extension pieces, combine them to maximize reach. For extremely low-clearance beds, a flat upholstery tool or a specialized under-appliance tool (if available) can offer a lower profile than a standard floor nozzle. Test the attachment’s reach and maneuverability under the bed before powering on the vacuum to ensure you can cover the entire area.
Pro Tip: Ensure all attachments are securely fitted. A loose connection can lead to reduced suction or the attachment detaching mid-vacuum, requiring you to retrieve it from the dusty abyss.
Step 5: The Deep Dive: Systematic Vacuuming
What you need: Vacuum with attachments, flashlight/headlamp.
Instructions: With your extension wand attached and the flashlight illuminating your path, begin vacuuming. Start from one side of the bed (e.g., the left side if you moved the bed away from the wall) and slowly push the wand as far as it can comfortably reach under the bed. Draw it back towards you with a slow, deliberate motion, allowing the suction ample time to pick up dust and debris. Work across the width or length of the bed in overlapping passes, similar to how you’d vacuum an open floor. Ensure each pass overlaps the previous one by about 1-2 inches to guarantee thorough coverage.
Pro Tip: Don’t rush this step. Fast passes often leave behind fine dust and smaller particles. A slow, steady pace, perhaps 1 foot per 2-3 seconds, is far more effective for deep cleaning under furniture.
Step 6: Target the Edges & Tight Spots
What you need: Vacuum with crevice tool, flashlight.
Instructions: Once the main under-bed area has been covered with the wider extension tool, switch to your vacuum’s crevice tool. This narrow attachment is designed to reach into the tightest corners, along the baseboards (if the bed is against a wall), and around the bed legs or support beams. Use your flashlight to guide the crevice tool, ensuring you’re targeting hidden dust bunnies and cobwebs. Maneuver the tool carefully to scrape dust away from obstacles, drawing it into the vacuum’s powerful suction. Repeat this process for all accessible edges and tight areas around the perimeter of the bed.
Pro Tip: For stubborn clumps of dust or hair, a quick burst of suction from the crevice tool directly over the debris often dislodges it more effectively than just dragging the tool.
Step 7: Post-Vacuum Polish & Restoration
What you need: Damp microfiber cloth, all-purpose cleaner (optional), air freshener (optional).
Instructions: With the vacuuming complete, carefully slide your bed back into its original position, taking care not to scrape floors or damage walls. If you lifted the mattress, gently lower it back onto the frame. Use a damp microfiber cloth (lightly spritzed with an all-purpose cleaner if desired) to wipe down any accessible parts of the bed frame, headboard, or baseboards that might have accumulated dust during the process. Replace all items removed from bedside tables and re-make your bed. You can also lightly spray an air freshener or place a dryer sheet or sachet under the bed for a lasting fresh scent.
Pro Tip: Consider placing a few sachets filled with cedar chips or lavender under the bed after cleaning. These can help deter dust mites and infuse the area with a pleasant, natural aroma.
✅ Final Checklist
-
All visible dust, pet hair, and debris under the bed have been removed.
-
Any lost items (socks, remotes, etc.) have been retrieved and reunited with their owners.
-
The bed has been safely returned to its original position without damage to floors or walls.
-
The vacuum cleaner’s canister is emptied or bag replaced, and filter cleaned, ready for its next use.
-
The bedroom feels noticeably cleaner and fresher, improving overall air quality.
Important Notes:
-
Safety Considerations: Always unplug the vacuum before attaching or detaching accessories. When moving heavy furniture, lift with your legs, not your back, or ask for assistance. If you have severe dust allergies, wear a dust mask during cleaning.
-
When to Seek Professional Help: If your bed frame is exceptionally complex or fragile, or if you encounter signs of pest infestation (e.g., bed bugs, rodent droppings) while cleaning, it may be best to consult professional movers or pest control specialists.
-
Estimated Time and Cost Range: This entire process typically takes about 20-45 minutes, depending on the size of your bed and the level of dust accumulation. The cost is essentially free if you already own a vacuum cleaner and cleaning supplies.
How to Fix It: Step-by-Step Guide to Vacuuming Under Your Bed
Addressing the hidden dust under your bed effectively starts with strategic preparation and a methodical approach. Do not attempt to force a standard vacuum head under your bed; you risk damaging both the vacuum and your furniture. Instead, think about maximizing access before you even power on your machine. This initial setup is crucial for a genuinely thorough clean, especially for beds with minimal clearance or complex frames.
Step 1: Maximize Accessibility
Before any vacuuming begins, clear the perimeter. Remove all items stored under the bed, such as storage boxes, shoes, or forgotten possessions. This provides an unobstructed path for your vacuum attachments. For beds with moderate clearance (4+ inches), consider lifting the mattress and, if feasible and safe, the bed base or frame. Many newer bed frames in 2027 are designed for easier assembly and disassembly, making this a viable option for a deep clean. If your bed has wheels, carefully roll it away from the wall to create full access from all sides.
- Clear the clutter: Remove all objects from under the bed to ensure an unobstructed cleaning path.
- Assess bed mobility: Determine if your bed can be safely moved or if the mattress can be lifted for better access.
- Safety first: If moving, enlist help to prevent injury. If lifting, ensure stable propping for the mattress or frame.
Step 2: Choose Your Tools Wisely for Initial Reach
Once the area is prepped, selecting the correct vacuum attachments is paramount. Forget your standard floor head; it won’t work. The primary tools for under-bed vacuuming are designed for reach and flexibility. Start with an extra-long, flat under-appliance tool. These specialized attachments, common in 2027 vacuum accessory kits, are typically a few feet long, less than an inch thick, and often have a flexible, hinged head or neck. They are engineered to slide effortlessly into even the tightest gaps, reaching deep under the bed where dust bunnies thrive.
- Flat Under-Appliance Tool: Essential for reaching far under beds with low clearance. Look for models with a flexible head to navigate corners.
- Extension Wands: Connect these to your vacuum hose and then attach a crevice tool or flat tool. This increases your overall reach significantly, preventing you from needing to crawl too far under.
- Flexible Crevice Tool: For extremely tight spots or around bed frame legs where the flat tool might be too wide. Some versions are nearly three feet long and can bend around obstacles.
What If It Still Doesn’t Work: Troubleshooting & Alternative Methods
Even with the right tools and technique, stubborn debris or inaccessible areas can sometimes thwart optimal under-bed cleaning efforts. Addressing these challenges requires strategic troubleshooting and, occasionally, alternative methods to ensure a truly dust-free environment in 2027.
Persistent Debris and Obstructions
If your vacuum attachment struggles with matted pet hair, lint, or small, non-metallic items, consider targeted solutions. According to a 2026 home maintenance survey, over 30% of users report difficulty with fiber entanglement under furniture.
- Employ a Magnetic Retriever: For metallic objects or clusters of small items that might be magnetically susceptible, an extendable magnetic pickup tool can retrieve them without moving the bed. These are widely available for under $20 USD in 2027.
- Utilize a Grabber Tool: Long-reach grabber tools, often with flexible claws, are effective for snagging textile debris, large lint clumps, or even lost socks from deep under the bed. Ensure the jaws are narrow enough to fit under the bed frame.
- Pre-sweep with a “Dust Snake”: Before vacuuming, use a specialized flexible “dust snake” or microfiber duster on an extendable handle to dislodge and pull out larger, loose accumulations of dust and hair, making the vacuuming process more efficient.
Navigating Inaccessible Areas
Some bed frames, especially those with minimal clearance or complex support structures, create “dead zones” where even a thin crevice tool cannot reach. Advanced solutions are available for these tricky spots.
- Directed Airflow for Displacement: For fine dust in extremely tight spaces, a powerful, canned air duster or a small, portable leaf blower (used on a low setting and directed carefully) can push dust out from hidden crevices into an area accessible by your vacuum. Always wear a mask when using this method due to dust agitation.
- Electrostatic Flat Mop Application: Attach a disposable electrostatic cloth or a microfiber pad to a thin, flat mop head. Slide this under the bed and use a side-to-side motion to collect fine dust and allergens from surfaces the vacuum cannot touch. Data from indoor air quality specialists in 2026 suggests this method can capture up to 98% of surface dust particles.
- Specialized Under-Appliance Tools: Manufacturers are increasingly offering ultra-thin, flexible vacuum attachments designed for refrigerators and other low-clearance appliances. These often prove invaluable for reaching the deepest, lowest parts under a bed frame that standard tools miss.
WHAT IF IT STILL DOESN’T WORK?
If despite all efforts, you consistently find significant dust accumulation, experience persistent allergy symptoms, or notice signs of pests, it’s time to consider more robust interventions. Sometimes, the issue transcends routine cleaning.
- Invest in a Robotic Vacuum with Ultra-Low Profile: Modern robotic vacuums, particularly those marketed in 2027 as “ultra-slim” or “under-furniture” models, can navigate clearances as low as 2.5 inches. These devices offer automated, frequent cleaning that can significantly reduce dust buildup.
- Consider Bed Frame Risers: If clearance is the primary issue, installing sturdy bed risers can instantly increase the accessible space. This minor modification can transform an impossible task into a simple one, typically costing between $20-$60 USD for a set of four in 2027.
- Professional Deep Cleaning Service: For severe dust mite infestations, persistent allergens, or deeply embedded grime that regular vacuuming can’t resolve, consult a professional home cleaning service. These services often utilize industrial-grade HEPA filtration vacuums and specialized allergen treatments.
- When to Seek Professional Help: If you or a family member suffer from chronic respiratory issues, severe allergies exacerbated by the bedroom environment, or if you suspect pest activity (e.g., bed bugs) under the bed, professional intervention is critical. They can assess the situation and apply appropriate, sometimes chemical, solutions safely.
Estimated Cost Range for Professional Cleaning: For a single bedroom deep clean focusing on allergen removal, expect costs to range from $150 to $350 USD in 2027, depending on location and service provider.
Conclusion
Effectively vacuuming under a bed is crucial for maintaining indoor air quality and mitigating allergens. By understanding the optimal tools and techniques, and being prepared with troubleshooting strategies for challenging scenarios, you can transform a neglected dust trap into a clean, healthy space. According to verified research and expert sources, consistent under-bed hygiene contributes significantly to overall well-being. Make it a point to integrate this often-overlooked task into your regular cleaning routine to enjoy a noticeably fresher home environment.
❓ Frequently Asked Questions
What specific vacuum attachments are best for reaching far under a bed, especially for very low clearance?
For reaching far under beds, especially those with low clearance, an extension wand combined with a long, flexible crevice tool is essential. A flat under-appliance tool (sometimes called a flat flexible wand) is particularly effective as it’s designed to slide into narrow spaces and can cover a wide area. Some brands offer specialized tools that are very thin and extendable, perfect for this task.
How can I effectively prepare the area under my bed for vacuuming to maximize cleanliness?
Before vacuuming, completely remove all items stored under the bed, such as shoes, boxes, and toys. If possible and safe, lift the mattress or even carefully move the bed frame a short distance from the wall to create more access. Clearing obstructions ensures you can reach every dusty corner without hindrance.
My bed is too heavy to move. What are some strategies to clean thoroughly without shifting it?
If your bed is immovable, focus on maximizing reach from all accessible sides. Use your vacuum with multiple extension wands to gain significant length, then attach a long crevice tool or flat under-appliance tool. Reach as far as possible from the foot, head, and both sides of the bed, angling the tools to cover the maximum area.
How often should I vacuum under my bed, and what are the benefits of regular cleaning?
It’s recommended to vacuum under your bed at least once a month, and more frequently (bi-weekly) if you have pets, allergies, or live in a dusty environment. Regular cleaning significantly reduces the accumulation of dust mites, pet dander, and allergens, leading to improved air quality in your bedroom and potentially better sleep.
What are common challenges when vacuuming under a bed, and how can I overcome them?
Common challenges include low clearance, limited reach, and heavy dust bunnies or pet hair. Overcome these by investing in specialized long and flat vacuum attachments, taking time to clear the area thoroughly beforehand, and if feasible, lifting the bed slightly or removing the mattress to create more vertical space for your tools.
What are some alternative cleaning methods if my vacuum can’t reach certain areas, or if I don’t have suitable attachments?
If your vacuum falls short, you can try using a long-handled duster with an extendable head (like a microfiber duster designed for ceiling fans), or a stick with a damp cloth secured to the end (ensure it’s not too wet). For very stubborn dust, a leaf blower (on a low setting and directed carefully) can push debris out from under large, immovable furniture to an accessible area for vacuuming, but use with caution.