How to Unclog Vacuum in 2026 Step-by-Step Fix Guide
A sudden loss of suction usually means a blocked airway or tangled brush roll. Unplug the vacuum and inspect the hose, canister, and filter components systematically to locate and safely remove the trapped debris without damaging your appliance.
Restoring suction to your vacuum comes down to a systematic physical inspection of three primary zones: the hose, the brush roll, and the filters. When your vacuum suddenly loses power, makes a high-pitched whining noise, or smells like burning dust, a blockage is almost always to blame.
By systematically checking these components in 2026, you can avoid costly repair bills and get your floors clean in under fifteen minutes. Let us dive straight into diagnosing and clearing the restriction.
Key Takeaways
- Always unplug the vacuum cleaner before attempting any inspection or clearing process.
- Systematically check the hose, canister, filters, and brush roll to locate the blockage.
- Use a blunt tool like a broom handle to carefully push out stubborn clogs.
- Wash and completely dry filters before reinstalling them to ensure proper airflow.
- Regularly clean hair and threads from the roller brush to prevent future clogs.
What Causes Vacuum Clogs and How to Diagnose the Blockage
Common Culprits That Trigger Suction Failure
Vacuum clogs rarely happen all at once. They build up over weeks of daily cleaning. Knowing what typically causes a blockage helps you target the right area immediately. Here are the most common items that get stuck in modern vacuums:
- Large clumps of pet hair and long human hair wrapping around internal joints
- Coins, small plastic toys, and paper clips sucked up by accident
- Dense clumps of fine dust mixed with carpet fibers
- Caked-on dirt inside damp or improperly dried filters
Quick Diagnostic Tests to Find the Clump
Before you start tearing your machine apart, you need to isolate where the clog actually lives. Run these simple diagnostic checks to save time:
- The Suction Test: Remove the main floor attachment and place your hand directly over the end of the wand or hose. If suction feels strong at the base but weak at the tip, the blockage is trapped inside the wand or hose.
- The Smell Test: A faint burning smell usually indicates that the motor is working overtime against a total blockage, or that hair has locked up the brush roll bearings.
- The Visual Check: Look through clear-bin canisters or translucent hoses to spot trapped debris balls instantly.
Vacuum Clogs: What Causes It and How to Fix It
A sputtering or losing-suction vacuum is one of the most frustrating household nuisances, but thankfully, most blockages can be resolved in just a few minutes with the right approach. This comprehensive guide will walk you through the systematic diagnostic and clearing process to restore your vacuum to peak performance, saving you money on unnecessary repairs or replacements.
Step 1: Power Down and Disconnect
What you need: Your clogged vacuum, a well-lit workspace, and dry hands.
Instructions: Before touching any part of your vacuum, turn off the power switch and physically unplug the machine from the electrical wall outlet. If you are using a cordless, battery-operated vacuum, remove the battery pack entirely to prevent accidental startup. Never attempt to inspect or clear a clog while the appliance is connected to power, as automatic sensors or accidental trigger presses can cause sudden motor engagement, leading to severe injury or damage to the internal impellers.
Pro Tip: Always wrap the cord neatly and lay the vacuum flat on a protected surface like a towel or carpet to avoid scratching hardwood floors during the process.
Step 2: Inspect the Exterior Hose and Attachments
What you need: A long, flexible wooden broom handle, a bright flashlight, and a pair of blunt-nosed pliers.
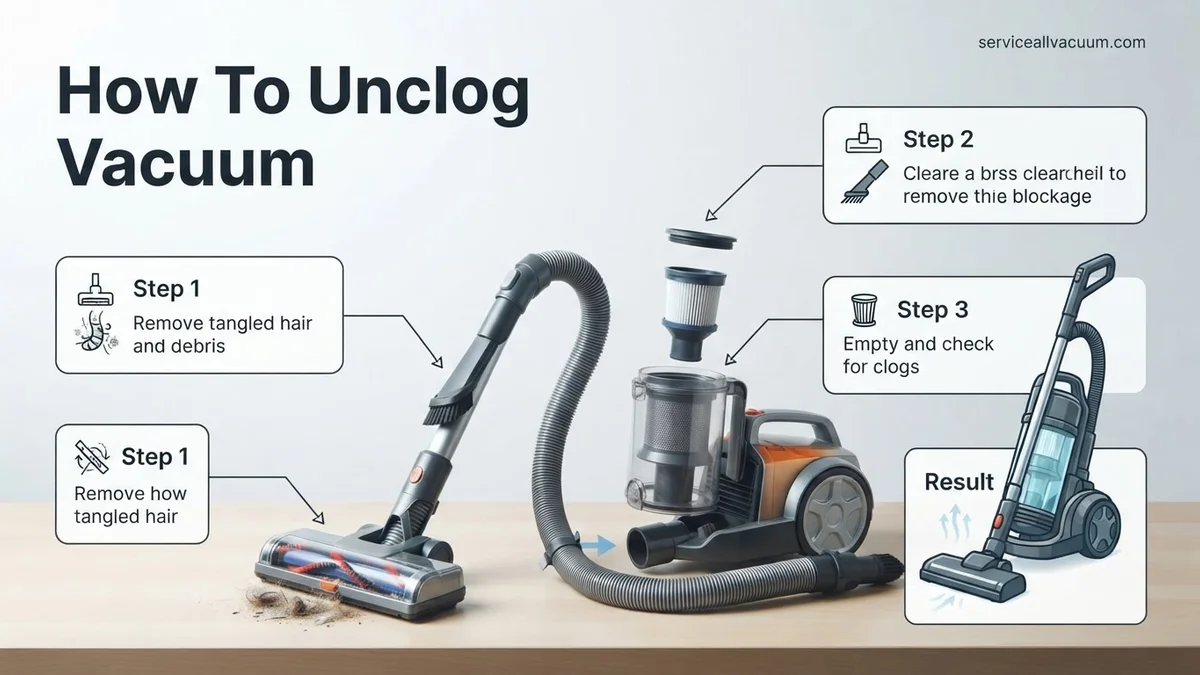
Instructions: Detach the flexible hose from the main body of the vacuum and disconnect any plastic extension wands or floor nozzles. Shine your flashlight down one end of the hose while peering into the other to locate any lodged debris, such as coins, pet hair clumps, or stray plastic wrappers. If you spot a blockage, gently feed the wooden broom handle through the hose to push the obstruction out. Avoid using sharp metal objects like screwdrivers, which can easily puncture the flexible plastic walls of the hose.
Pro Tip: If hair and dust are tightly wrapped inside the hose, use blunt-nosed pliers to carefully pull the mass outward rather than pushing it deeper.
Step 3: Check the Brush Roll and Floor Nozzle
What you need: A pair of sharp scissors, a seam ripper, and paper towels.
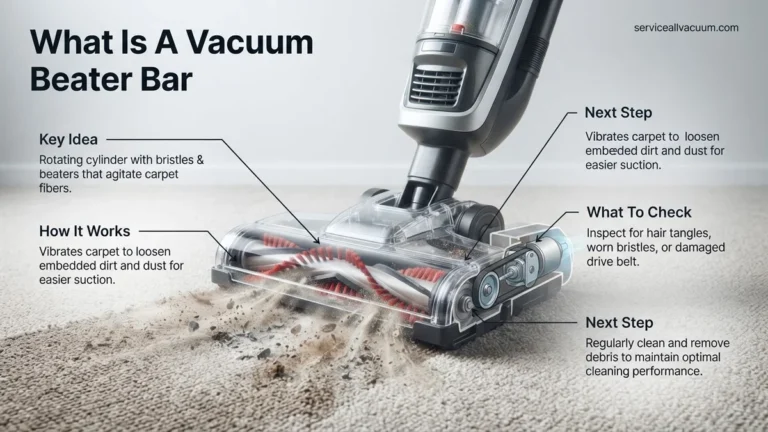
Instructions: Flip your vacuum over to examine the motorized floor nozzle or brush roll. Long human hair, sewing thread, and carpet fibers frequently wrap tightly around the rotating cylinder, choking the airflow and stopping the brush from spinning. Use a pair of scissors or a crafting seam ripper to carefully slice through the tangled layers of hair parallel to the brush roll groove. Take care not to cut the soft bristles. Once sliced, pull the accumulated hair away in strips, and wipe down the surrounding plastic housing to remove built-up dust and pet dander.
Pro Tip: Spin the brush roll manually with your fingers after clearing to ensure it rotates freely without catching or resistance.
Step 4: Empty and Wash the Dirt Bin or Dust Cup
What you need: A large plastic trash bag, warm dish soap, and a clean sponge.
Instructions: Over top of your trash bag, release the latch on your bagless vacuum’s dirt cup and empty all contents. Many modern vacuums feature secondary cyclones or screens inside the bin that catch fine dust; inspect this area closely for compressed cakes of dirt that restrict airflow. If the bin is heavily soiled, detach it completely from the unit and wash it thoroughly using warm water and mild dish soap. Ensure the dust cup is 100% bone dry before reattaching it to the vacuum body, as introducing wet dust into the motor housing can permanently fry the electrical components.
Pro Tip: Allow washed plastic dirt bins to air-dry for at least 24 hours in a well-ventilated area before putting them back.
Step 5: Clean or Replace the Filters
What you need: Access to a sink, a soft-bristled brush, and replacement filters if necessary.
Instructions: Locate your vacuum’s pre-motor and post-motor filters, which are typically found beneath the dirt cup or near the exhaust port. Foam and felt pre-motor filters can usually be tapped gently against the inside of a trash can to dislodge loose dust, then rinsed under cold running water until the water runs clear. HEPA exhaust filters, however, are frequently paper-based and must not be washed unless explicitly stated by the manufacturer. Tap these gently, and replace them every 6 to 12 months depending on household usage and pet ownership.
Pro Tip: Putting a damp filter back into a vacuum creates a breeding ground for mold and immediately sucks fine dust into a cement-like sludge.
Step 6: Test and Reassemble the Machine
What you need: Your cleaned vacuum components and a small patch of debris on the floor.
Instructions: Once every component—hose, brush roll, bin, and filters—is completely clean and dry, reassemble the vacuum in the reverse order of disassembly. Ensure all latches click firmly into place and the hose locks securely to avoid suction leaks. Plug the vacuum back into the electrical outlet or reinsert the battery. Turn the machine on and place your hand near the floor nozzle to test the suction power. Finally, run the vacuum over a small test patch of cereal or dust on the floor to verify that debris is successfully traveling up into the bin.
Pro Tip: Listen closely to the motor pitch; a high-pitched whistling often indicates an unsealed connection or a remaining partial blockage.
✅ Final Checklist
- The vacuum is safely unplugged during the entire cleaning process.
- The flexible hose and extension wands are completely clear of obstructions.
- The brush roll is free of wrapped hair, threads, and carpet fibers.
- All filters are either thoroughly cleaned and dried or newly replaced.
- Suction has been tested and verified on a small patch of floor debris.
Important Notes:
- Never operate a vacuum without its filters properly installed, as fine dust particles will ruin the motor.
- If you smell burning rubber or notice a smoking motor after clearing a clog, turn off the machine immediately; the belt may have slipped or snapped.
- Estimated time: 15 to 30 minutes. Estimated cost: $0 (unless replacement filters are needed, typically $10-$25). Seek professional repair if the motor itself is making a grinding noise or failing to turn on.
Step-by-Step Guide to Clearing the Vacuum Hose and Canister
Safety First and Preparation Steps
Before you touch any part of your vacuum cleaner, you must prepare the workspace safely. Taking two minutes to prep prevents personal injury and protects your machine’s electrical components.
- Unplug the vacuum cord entirely from the wall outlet. If you use a cordless model in 2026, remove the lithium-ion battery pack completely.
- Lay the vacuum flat on a well-lit, hard surface like a kitchen floor or workbench.
- Wear thick rubber gloves to protect your hands from hidden sharp objects like broken glass, sewing needles, or metal staples.
- Disconnect all detachable hoses, extension wands, and floor heads so you can work on individual pieces.
Clearing the Hose and Canister Inlet
The flexible hose is the number one spot for stubborn clogs because of its ribbed interior design. Debris easily catches on these ridges and builds into a solid wall.
- Detach both ends of the main flexible hose from the vacuum body and the floor tool.
- Straighten the hose out as much as possible on the floor to loosen compressed debris.
- Take a long, blunt-ended tool like a broom handle or a PVC pipe and gently push it through the hose from the wider end to the narrower end. Never use a sharp metal rod that could puncture the plastic.
- Shake the hose vigorously to dislodge any remaining compressed dust clumps.
- Check the canister inlet port where the hose connects to the vacuum body. Use your gloved fingers or needle-nose pliers to pull out any tightly packed lint balls trapped right at the opening.
How to Clean Tangled Debris from the Vacuum Brush Roll
Hair, carpet fibers, and pet fur wrap tightly around the brush roll, restricting rotation and airflow. According to maintenance data from leading vacuum manufacturers, brush roll jams account for nearly 40 percent of household vacuum service calls.
Step-by-Step Brush Roll Extraction
- Disconnect power: Unplug corded models or remove the battery pack from cordless vacuums entirely before touching the rotating assembly.
- Access the roll: Flip the floor nozzle upside down and locate the release tabs, screws, or sliding latch securing the bottom plate.
- Remove the guard: Detach the plastic plate or belt cover to expose the full length of the cylindrical brush roll.
- Cut away tangles: Slide a seam ripper or blunt-nosed utility scissors along the specialized groove channel to slice through bound hair without severing bristles.
- Pull free and clean bearings: Lift the brush roll out of its housing, clear dust from the end caps, and spin the housing by hand to ensure smooth bearing movement.
What If It Still Doesn’t Work: Advanced Troubleshooting and Filter Care
If clearing the hose and brush roll fails to restore suction, the issue typically stems from saturated filtration media or a sealed system blockage. Advanced diagnostic steps help isolate deep mechanical failures.
- Inspect pre-motor and HEPA filters: Modern 2026 models feature intelligent sensor lights indicating filter restriction. Wash foam filters under cold water for two minutes or replace HEPA cartridges that exceed their 12-month manufacturer lifespan.
- Check automatic shutoff thermal switches: Overheated motors trip internal circuit breakers. Leave the vacuum unplugged in a ventilated room for 45 minutes to let the thermal fuse reset.
- Test the motor bypass valve: Manually actuate the internal suction valve to ensure it is not stuck open due to trapped debris or a snapped return spring.
- Evaluate repair viability: If the motor housing emits a burning smell or grinding noise, the armature may be failing. Professional motor replacements range from $80 to $150, making replacement more cost-effective for units older than five years.
Conclusion
A sudden loss of suction or persistent clogs can render your cleaning routine inefficient, but systematic inspection quickly restores peak airflow. By methodically clearing the hose, detangling the brush roll, and maintaining clean filters, you prevent long-term motor strain. According to verified research and expert appliance sources, regular preventative maintenance extends the functional lifespan of modern vacuums by up to 30 percent. Take your next actionable step today by inspecting your vacuum’s filter system and running a quick airflow test.
❓ Frequently Asked Questions
How can I safely find where a clog is located in my vacuum?
Start by disconnecting the hose from the vacuum body and looking straight through it toward a light source. If the hose is clear, check the connection ports, dust cup inlet, and brush roll base for trapped clumps of dust or hair.
What is the safest tool to push out a stubborn clog stuck inside a vacuum hose?
A flexible, blunt tool like a broom handle or a length of PVC pipe works best. Never force sharp or metal objects into the hose, as they can easily tear the plastic or puncture the wire reinforcement coil.
Why does my vacuum smell like burning when I turn it on?
A burning smell often indicates that the motor is working extra hard against a severe blockage, or that hair and debris have jammed the roller brush, causing the drive belt to slip and overheat.
How do I clean long hair and threads wrapped tightly around the vacuum brush roll?
Unplug the vacuum, turn the base over, and use a pair of sharp scissors or a seam ripper to carefully slice along the groove of the roller. Pull the freed hair away in sections without pulling hard on the bristles.
Can clogged filters cause a vacuum to stop working entirely?
Yes, severely clogged filters restrict airflow to the motor, which can cause the vacuum to automatically shut off as a safety precaution against overheating. Cleaning or replacing the filters usually restores normal operation.
What should I do if the vacuum still lacks suction after clearing all visible clogs?
Check for cracks or loose seals in the hose and attachments where air might be escaping. If all pathways are clear and intact, inspect the motor exhaust filter or consult a professional repair technician.