How to Thaw Vacuum Sealed Fish Best Step-by-Step Guide 2026
Thawing vacuum-sealed fish safely requires a critical first step: always cut open or remove the vacuum packaging before letting the fish thaw. Failing to do so creates an oxygen-free environment where dangerous Clostridium botulinum bacteria can multiply. Once the seal is broken, you can safely use the refrigerator or cold water bath method.
To safely thaw vacuum-sealed fish, you must first cut open and remove the airtight plastic packaging before putting the fish in the refrigerator or a cold water bath. Keeping fish sealed while it thaws creates a low-oxygen environment that allows dangerous bacteria to multiply rapidly, posing a severe food safety risk.
Navigating home seafood preparation in 2026 requires strict adherence to modern food safety guidelines. Whether you are prepping a quick weeknight salmon fillet or a delicate whitefish, skipping the package removal step can lead to serious illness. Here is how to handle your frozen catch correctly from freezer to plate.
Key Takeaways
- Always remove or puncture the vacuum seal before thawing to prevent botulism.
- Refrigerator thawing is the safest method, taking between 12 to 24 hours.
- Use a leak-proof bag in cold water for a faster 30-minute thaw.
- Never use room temperature air or warm water to thaw frozen seafood.
- Cook thawed fish immediately and do not refreeze it raw.
Why You Must Open Vacuum Sealed Fish Before Thawing
The airtight nature of vacuum packaging is great for preventing freezer burn, but it creates a hidden danger during the defrosting process. You need to understand the science behind this risk to protect your household.
The Hidden Danger of Clostridium botulinum
Vacuum sealing removes almost all the oxygen from the package. While this preserves quality in the freezer, it creates a major hazard when the temperature rises during thawing. Clostridium botulinum is a bacterium that thrives in oxygen-free environments. If the fish stays sealed while moving from freezing temperatures to refrigerator or room temperatures, these spores can activate and produce deadly botulinum toxin before the center of the fish even thaws. Opening the package allows oxygen back in, which stops this specific toxin production.
Essential Safety Rules for Package Removal
Follow these quick steps the moment you take your fish out of the freezer:
- Use clean kitchen shears to completely snip off the top of the vacuum seal bag.
- Slide the fish out of the plastic entirely rather than letting it thaw inside a torn pouch.
- Place the unwrapped fish on a clean plate or in a breathable container.
- Cover the fish loosely with plastic wrap to prevent it from drying out in the fridge.
Master Thawing Vacuum Sealed Fish in 6 Simple Steps
Thawing vacuum-sealed fish requires extra care because sealing locks out oxygen, creating a unique environment where dangerous bacteria can thrive if handled improperly. This comprehensive walkthrough guides you through safely transitioning your frozen seafood from the freezer to the plate, preserving its delicate texture, ocean-fresh flavor, and nutritional value without risking foodborne illness.
Step 1: Inspect the Packaging Integrity
What you need: Your frozen vacuum-sealed fish, good lighting, and clean hands.
Instructions: Before doing anything with your frozen fish, carefully examine the vacuum packaging for any signs of tears, punctures, or loose seals. Gently press the plastic to ensure it is still tightly clinging to the contours of the fish. If you notice any tears or if the package has lost its vacuum seal, you must take a crucial preparatory action: completely remove the fish from its plastic wrapping before thawing. Leaving fish in a compromised, leaky vacuum bag during thawing drastically increases the risk of bacterial contamination, specifically from anaerobic pathogens.
Pro Tip: Never submerge a torn or leaking vacuum-sealed package in water, as this will waterlog the fish and introduce ambient bacteria directly to the flesh.
Step 2: Choose Your Thawing Method Strategy
What you need: Kitchen timer, calendar, and access to a refrigerator or cold tap water.
Instructions: Decide whether you are using the slow refrigerator method or the rapid cold-water method based on your meal planning. The refrigerator method is the gold standard for preserving quality and safety, requiring 12 to 24 hours of advance planning. The cold-water method is your go-to backup plan if you need the fish thawed within an hour. Select your path now and commit to it, keeping in mind that you should never use room-temperature air or the microwave for vacuum-sealed fish, as these methods ruin the texture and create unsafe temperature danger zones.
Pro Tip: Plan ahead whenever possible. Thawing in the refrigerator overnight yields the firmest texture and prevents protein degradation.
Step 3: Implement the Refrigerator Method (Slow and Safe)
What you need: A deep ceramic plate, a rimmed baking sheet, or a glass dish.
Instructions: If you chose the refrigerator method, place your intact vacuum-sealed fish package onto a rimmed plate or dish to catch any condensation or accidental leaks. Position the dish on the lowest shelf of your refrigerator, ideally where the temperature sits consistently between 35°F and 38°F. Allow the fish to rest undisturbed for 12 to 24 hours, depending on the thickness of the cut. Thinner fillets like sole or tilapia may take only 12 hours, while thick salmon loins or cod steaks will need the full 24 hours to thaw completely.
Pro Tip: Keep the fish away from ready-to-eat foods in your fridge to prevent cross-contamination in the unlikely event of a packaging micro-tear.
Step 4: Execute the Cold Water Method (Rapid Thawing)
What you need: A large mixing bowl, a colander, and a steady supply of cold tap water.
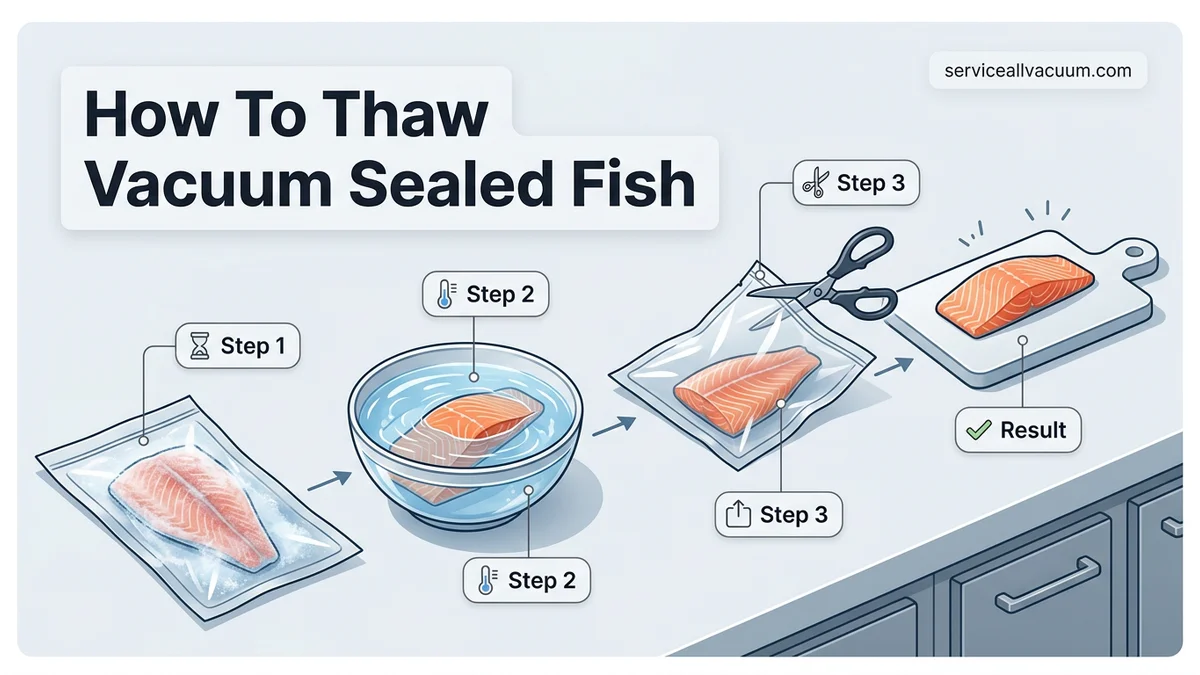
Instructions: If you are short on time, ensure your fish is still fully sealed in an airtight, undamaged vacuum package. Fill a large bowl with cold tap water—never warm or hot water. Submerge the sealed fish package entirely in the cold water. To ensure the fish stays completely submerged, you can place a small plate or saucer on top of it. Change the water completely every 30 minutes to maintain a safe, cold temperature that inhibits bacterial growth. Depending on thickness, most standard fillets will be fully thawed using this technique within 30 to 60 minutes.
Pro Tip: You can speed up this process slightly by placing the bowl in the sink under a very thin, continuous trickle of cold tap water.
Step 5: Cut the Vacuum Seal and Release the Fish
What you need: Clean kitchen shears or sharp scissors, and a clean cutting board.
Instructions: Once your fish is fully thawed—meaning it feels flexible throughout with no icy core remaining—take it to your prep station. Crucially, before cooking or seasoning, use clean kitchen shears to cut open the top of the vacuum seal bag. Vacuum-sealed packaging creates an anaerobic environment; exposing the fish to oxygen immediately before cooking allows any harmless surface microbes to dissipate and lets the natural fresh sea aroma return. Slide the fish gently out of the plastic and discard the packaging immediately.
Pro Tip: Do not let thawed fish sit in the open open-air bag for too long; cut it open right before you are ready to rinse and prep.
Step 6: Rinse, Pat Dry, and Final Inspection
What you need: Cold running water, paper towels, and a clean plate.
Instructions: Place the thawed fish in a fine-mesh colander and rinse it gently under a cold tap for 5 to 10 seconds to wash away any surface proteins or residual sea salt brine. Immediately after rinsing, transfer the fish to a clean plate lined with multiple layers of paper towels. Pat the top and bottom of the fish firmly until it is completely dry. Removing excess surface moisture is the secret to achieving a golden, crispy sear in the pan rather than steaming the fish. Inspect the flesh one last time to ensure it bounces back slightly to the touch and smells fresh.
✅ Final Checklist
- Verified the vacuum packaging was entirely free of tears and punctures before submerging or refrigerating.
- Thawed the fish strictly using either the refrigerator (12-24 hours) or the cold water bath method.
- Ensured no ice crystals or rigid frozen cores remained in the thickest part of the fish.
- Cut open the vacuum seal bag immediately before preparation to allow oxygen exposure.
- Rinsed and thoroughly patted the fish dry with paper towels to eliminate excess moisture.
Important Notes:
- Never thaw vacuum-sealed fish at room temperature on the kitchen counter, as the airtight plastic wrapper combined with warm air creates a breeding ground for harmful toxins like botulism.
- If you accidentally punctured the vacuum seal during freezing or thawing, cook the fish immediately after thawing to ensure safety.
- Estimated time range: 30 minutes (cold water method) to 24 hours (refrigerator method). Cost: Free.
How to Safely Thaw Fish Using the Refrigerator Method
The refrigerator method is the gold standard for thawing seafood. It keeps the fish at a consistently safe, cold temperature, minimizing any risk of bacterial growth while preserving the delicate texture of your catch.
Step-by-Step Refrigerator Thawing
Proper timing and placement matter when using your fridge to defrost seafood. Here is how to execute this method:
- Take your frozen fish out of the freezer and completely remove the vacuum-sealed plastic packaging as detailed above.
- Place the unwrapped fish on a rimmed plate or shallow dish to catch any natural juices that release during the thawing process.
- Cover the dish loosely with a layer of plastic wrap or foil.
- Place the dish on the lowest shelf of your refrigerator, where the temperature remains the coldest and most stable.
Timing and Quality Control
Most standard fish fillets take between 12 to 24 hours to thaw completely in a standard refrigerator set to 38 degrees Fahrenheit or lower. Thicker cuts, like whole fish or large salmon sides, may need up to 24 to 36 hours. Once thawed, you should cook the fish within 24 hours for optimal freshness and safety. Never refreeze raw fish that has been thawed unless you have cooked it thoroughly into a new dish first.
Step-by-Step Guide to the Cold Water Thawing Method
When you need your seafood ready faster than the overnight refrigerator method allows, submersing the package in cold water serves as the gold standard. According to culinary safety guidelines from the USDA and the FDA, keeping the temperature safely out of the dangerous bacterial zone requires strict adherence to specific procedural steps.
Submerging and Temperature Control
Food safety authorities mandate that water must remain cold throughout the entire process to prevent microbial proliferation. Warm or hot water invites rapid bacterial growth on the outer edges of the fish while the interior remains frozen solid. Follow these precise steps for optimal results:
- Inspect the vacuum-sealed package to ensure there are no punctures, tears, or loose seals that could allow water to contaminate the fish.
- Place the sealed fish inside a leak-proof ziplock bag and seal it tightly as an extra layer of protection against water logging.
- Fill a large bowl or your kitchen sink with cold tap water, ensuring the temperature reads below 40 degrees Fahrenheit.
- Submerge the bagged fish completely in the cold water, using a heavy plate or small weight to keep it fully underwater if necessary.
- Change the cold water every 30 minutes to maintain a low temperature and encourage steady, continuous thermal transfer.
Most standard fillets thaw thoroughly within 30 to 60 minutes using this method, depending on thickness and density.
What to Do If Your Fish Was Thawed Incorrectly
Discovering that your vacuum-sealed fish sat on the counter for too long or thawed in warm water requires immediate assessment. Improperly thawed seafood often harbors dangerous pathogens like Clostridium botulinum or Vibrio species. According to seafood safety experts, ignoring these temperature abuse windows poses severe health risks.
Assessing and Managing Thawing Errors
If you suspect your fish thawed outside safe temperature parameters, execute these recovery steps:
- Check the internal temperature of the fish using a reliable digital food thermometer; if it has exceeded 40 degrees Fahrenheit for more than two hours, discard it immediately.
- Smell the fish closely for any distinct sour, ammonia-like, or overly fishy odors, which indicate advanced bacterial spoilage.
- Examine the texture for excessive sliminess or mushiness, as compromised flesh structure means the protein integrity has completely failed.
- If the fish spent less than two hours in the danger zone, cook it thoroughly and immediately to internal temperatures exceeding 145 degrees Fahrenheit to neutralize potential pathogens.
- Consult a local food safety extension office or waste management professional if you cannot verify the exact timeline of temperature abuse, with disposal fees typically costing nothing compared to the price of medical treatment for foodborne illness.
Conclusion
Mastering how to thaw vacuum sealed fish ensures you preserve both the delicate texture and nutritional value of your seafood while keeping harmful bacteria at bay. By prioritizing safe refrigerator methods or controlled cold water submersions, you protect your household from foodborne illness. According to verified research and expert culinary sources, maintaining strict temperature controls during prep is the single most important factor in seafood safety for 2026. Take your next step by inspecting your freezer stock today and planning your thawing schedule in advance.
❓ Frequently Asked Questions
Why is vacuum-sealed frozen fish a botulism risk during thawing?
Vacuum packaging removes oxygen, which creates an ideal, airtight environment for Clostridium botulinum spores to produce dangerous toxins if kept at temperatures above 38°F. Cutting the package open restores oxygen flow and neutralizes this specific anaerobic risk.
How do I safely use the cold water method for fish?
After cutting open the vacuum package, place the fish into a leak-proof Ziploc bag and submerge it completely in a bowl of cold tap water. Change the water every 15 minutes to ensure it stays chilled, and the fish will typically thaw in under an hour.
What should I do if I forgot to open the package while it thawed?
If the fish thawed entirely while still sealed in an airtight vacuum package at unsafe temperatures, discard the fish immediately. It is not worth risking foodborne illness from potential bacterial toxins.
How can I tell if my thawed fish is safe to eat?
Safe thawed fish should feel cold, have firm flesh that springs back slightly when pressed, and possess a mild, fresh ocean scent rather than a strong, sour, or ammonia-like odor.
Do I need to wash the fish after taking it out of the vacuum package?
Food safety authorities generally recommend against washing raw fish, as splashing water can spread bacteria around your kitchen sink. Instead, simply pat the thawed fish dry with clean paper towels.
Can I cook vacuum-sealed fish straight from frozen without thawing?
Yes, many types of frozen fish can be baked, broiled, or steamed directly from frozen if you adjust the cooking time by about 50 percent. However, you should still remove the vacuum packaging before cooking.