How to Make Vacuum Smell Better in Step-by-Step 2026
Bad odors coming from a vacuum cleaner are usually caused by trapped mold, pet hair, and dirt accumulating in the filter or bag. Eliminating these smells requires a deep clean of washable components combined with simple DIY deodorizing methods like baking soda and essential oils.
To make your Cleaner Guide”>vacuum smell better right now, sprinkle half a cup of baking soda mixed with 10 drops of your favorite essential oil directly onto your carpet before vacuuming it up. Alternatively, you can place an essential oil-soaked cotton ball straight into your vacuum bag or canister to instantly neutralize musty exhaust odors as you clean through your home in 2026.
Dealing with a foul-smelling vacuum turns a routine chore into an unpleasant sensory experience. When pet hair, trapped dust, and hidden moisture mix inside a warm motor, they breed bacteria that pump stale air back into your living spaces every time you turn the machine on. Fixing this issue requires targeting both the root causes of the odor and applying smart DIY deodorizing tricks.
Key Takeaways
- Empty the canister or replace the vacuum bag regularly to stop mold growth.
- Wash reusable foam filters thoroughly and let them dry completely before reinserting.
- Sprinkle baking soda on carpets before vacuuming to neutralize trapped odors.
- Add a few drops of essential oil to a cotton ball inside the vacuum bag.
- Remove tangled hair and debris from the brush roll to prevent burning smells.
What Causes Bad Odors in Your Vacuum Cleaner
Before you can permanently freshen your machine, you need to understand what creates those terrible smells in the first place. Vacuums act like air filtration systems, trapping everything from organic skin flakes to microscopic mold spores. By 2026, modern vacuums handle heavy workloads, but they still struggle when biological matter decomposes inside sealed plastic housings.
The Trap of Organic Debris and Moisture
Organic matter sits inside your vacuum for days or weeks between cleaning sessions. When you vacuum up damp pet accidents, spilled kitchen food, or hidden carpet mold, that moisture creates a breeding ground for mildew. The following items frequently trigger terrible vacuum odors:
- Damp pet hair and dander trapped deep within the brush roll housing
- Decomposing food crumbs stuck in the inner hose or lower intake valve
- Mold spores multiplying inside unwashed foam and HEPA filters
- Old dust that has absorbed household humidity over several months
Heat Activation of Trapped Bacteria
Your vacuum relies on a high-speed motor that generates significant internal heat during operation. When that warmth hits stagnant dust and bacteria trapped inside a dirty canister or bag, it acts like a dehydrator in reverse. It heats up the decaying organic matter and forces pungent, foul-smelling exhaust fumes straight out into your room.
Master Vacuum Odors in 7 Simple Steps
A foul-smelling vacuum cleaner can quickly turn a routine house-cleaning session into an unpleasant chore, blowing stale dust and musty odors into every room. Over time, hair, pet dander, trapped moisture, and decomposing debris create the perfect breeding ground for bacteria and mold inside your machine. This comprehensive guide will walk you through a thorough deep-cleaning and deodorizing process to neutralize bad smells at their source, ensuring your home smells fresh and clean every time you vacuum.
Step 1: Unplug and Disassemble the Vacuum
What you need: Your vacuum cleaner, a well-lit workspace, and safety gloves if preferred.
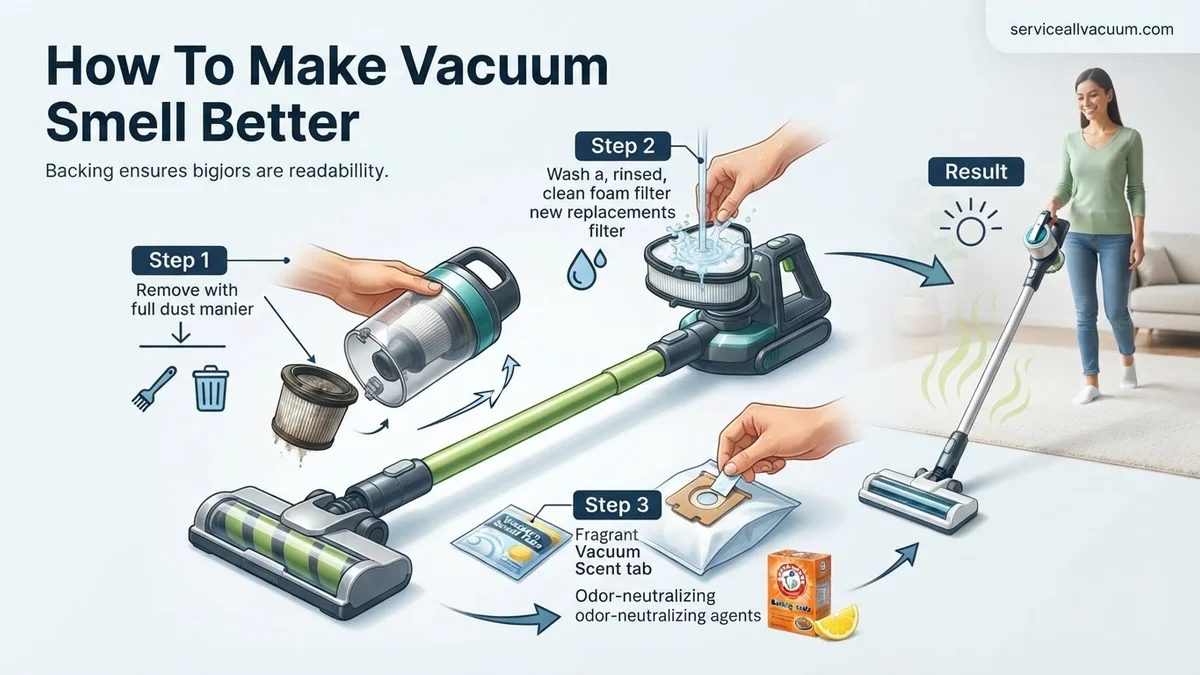
Instructions: Safety always comes first when dealing with household appliances. Begin by unplugging your vacuum cleaner from the wall outlet to prevent any accidental activation. Next, systematically detach all removable components. This includes taking off the dust cup or opening the bag compartment, removing the hose, disconnecting the wand, and taking out any floor attachments. Lay each piece out on a flat surface so you can inspect them individually for trapped debris or blockages that are often the hidden culprits behind lingering household odors.
Pro Tip: Never submerge the main motor housing or electrical cords in water, as this will permanently damage the appliance and create a severe electrical hazard.
Step 2: Empty and Wash the Dust Bin or Replace the Bag
What you need: A large trash bag, mild dish soap, warm water, and a microfiber cloth.
Instructions: If you use a bagless vacuum, empty the contents directly into your trash bag outdoors to avoid releasing dust clouds back into your living space. Once emptied, wash the plastic dust canister thoroughly using warm water and a few drops of mild dish soap. Use a sponge or cloth to scrub away caked-on grime and fine dust particles. If your vacuum uses a disposable bag, throw away the old one immediately—even if it is not entirely full, as stagnant organic matter inside the bag is usually the primary source of the foul smell.
Pro Tip: Ensure the dust bin is 100 percent dry before reattaching it to the vacuum. Trapped moisture mixed with leftover dust will rapidly grow mold and create a worse odor.
Step 3: Clean and Sanitize the Filters
What you need: Access to a running sink, mild dish soap (if manufacturer-approved), and a clean drying rack.
Instructions: Locate all filters in your vacuum cleaner, which typically include a pre-motor foam or felt filter and a post-motor HEPA filter. Check your user manual to determine if your specific filters are washable. For washable foam or plastic-framed filters, rinse them gently under lukewarm running water, massaging them lightly to release trapped fine dust and oils. Continue rinsing until the water runs completely clear. Squeeze out excess water gently without wringing or twisting, and place them on a rack to air dry completely for at least 24 to 48 hours.
Pro Tip: Never reinstall damp filters into your vacuum cleaner. Running the motor with wet filters can cause motor burnout and encourage mold spores to proliferate rapidly.
Step 4: Inspect and Clear the Hose and Brush Roll
What you need: A long broom handle or flexible snake brush, scissors or a seam ripper, and disinfecting wipes.
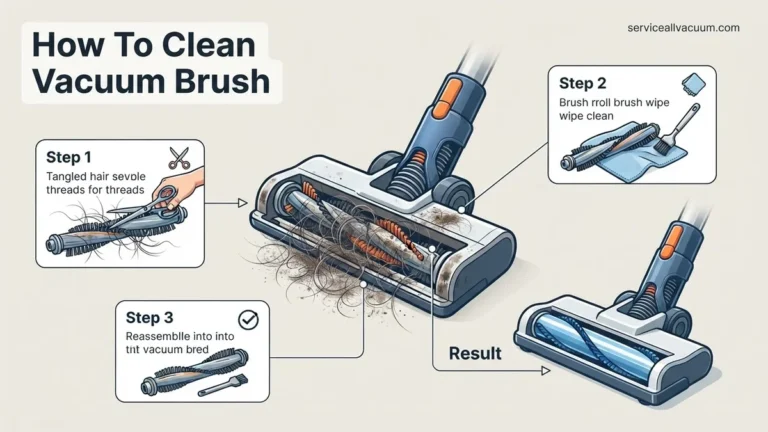
Instructions: The flexible hose and the motorized brush roll are notorious traps for hair, pet fur, and damp lint that rot over time. Detach the hose and look through it; if you spot a clog, carefully push it out using a long, blunt tool like a broom handle. For the brush roll, use scissors or a seam ripper to slice through tightly wound hair and threads, pulling them away from the roller cylinder. Wipe down the entire brush chamber and the exterior of the hose with a disinfecting wipe to eliminate lingering bacterial odors.
Pro Tip: Be careful not to puncture the flexible vacuum hose with sharp tools when clearing stubborn clogs.
Step 5: Apply Baking Soda Deodorizer
What you need: 1/2 cup of plain baking soda and a sifter or spoon.
Instructions: Baking soda is a natural, highly effective neutralizing agent that tackles stubborn acidic odors at a molecular level. Before you begin vacuuming your carpets, sprinkle about half a cup of baking soda directly onto the floor surface. Let the powder sit undisturbed for 15 to 30 minutes to allow it to absorb deep-seated pet odors, food smells, and mustiness embedded in the carpet fibers. As you vacuum up the baking soda, it will also pass through your machine’s internal pathways, helping to deodorize the inner chamber, hose, and bag as it travels.
Pro Tip: Do not use excessive amounts of baking soda, as very fine powder can bypass worn-out filters and clog the motor or exhaust ports.
Step 6: Infuse with Essential Oils
What you need: A few drops of your favorite essential oil (such as lavender, lemon, or eucalyptus) and a cotton ball or tissue.
Instructions: To give your vacuum a long-lasting, pleasant scent during operation, create a custom scent booster. Place two to five drops of pure essential oil onto a clean cotton ball or a small piece of tissue. Drop this scented cotton ball directly into the clean vacuum bag or drop it into the bottom of an empty bagless dust canister. As air rushes through the vacuum during your cleaning routine, it will gently draw the pleasant aroma through the exhaust, leaving your entire home smelling fresh and clean instead of kicking up stale dust.
Pro Tip: Avoid applying essential oils directly onto plastic parts or foam filters, as concentrated oils can degrade certain plastics or attract sticky dust over time.
Step 7: Perform Regular Maintenance and Preventative Care
What you need: A calendar reminder and basic cleaning supplies.
Instructions: To keep your vacuum smelling fresh permanently, establish a routine maintenance schedule. Empty the dust bin or replace the disposable bag after every two to three uses, long before it reaches maximum capacity. Wash your foam filters every month and replace HEPA filters once every six to twelve months according to the manufacturer’s guidelines. Never vacuum up damp messes, fireplace ashes, or wet food waste, as these materials create immediate, severe odors and can permanently damage the internal mechanical components of your appliance.
Pro Tip: Keep a dedicated sheet of paper near your cleaning supplies to track when filters were last washed or replaced.
✅ Final Checklist
- Vacuum is completely unplugged before disassembly and cleaning.
- Dust bin is thoroughly washed and 100 percent dry, or a fresh bag is installed.
- All foam and HEPA filters have been washed and air-dried for at least 24 hours.
- Hose and brush roll are completely free of hair clogs and debris.
- Baking soda and essential oil scent booster are properly applied and functional.
Important Notes:
- Always follow manufacturer guidelines regarding washable versus non-washable filter replacements.
- If you smell a persistent burning electrical odor rather than a musty smell, discontinue use immediately and seek professional appliance repair.
- Estimated time: 45 to 60 minutes of active work (plus drying time); Estimated cost: $0 to $10 if replacing filters or purchasing baking soda.
How to Clean Filters, Canisters, and Brush Rolls Step-by-Step
Deodorizing won’t work if you leave the original source of the smell rotting inside your machine. You must deep clean the physical components to reset your vacuum’s baseline freshness for 2026. This foundational maintenance takes about fifteen minutes and immediately stops bad odors at their source.
Washing Filters and Emptying Canisters
Most modern vacuums feature washable filters and dust bins that trap the vast majority of odor-causing fine dust. Neglecting these components guarantees that scents will linger no matter what sprays or beads you use later. Follow these steps to clean them properly:
- Take your vacuum outside to a trash can and completely empty the dust bin or toss the old disposable bag.
- Remove all pre-motor and post-motor filters, shaking off loose debris gently over the trash.
- Rinse foam or pleated filters under lukewarm tap water until the water runs completely clear of gray residue.
- Let all filter components air dry in a well-ventilated area for a full 24 to 48 hours before reinstalling them.
Clearing the Brush Roll and Intake Hose
Hair, carpet fibers, and random debris wrap tightly around the rotating brush roll, creating a dense mat that holds onto old odors. Use a pair of sharp scissors to carefully snip away wrapped hair without damaging the rubber belt or bristles. Next, detach the main hose and inspect it with a flashlight to push out any stuck debris using a long broom handle or a damp microfiber cloth.
Proven DIY Methods to Make Your Vacuum Smell Better While Cleaning
Deodorizing your machine does not require expensive commercial fresheners. In fact, many household items provide superior results without clogging your filter. According to cleaning equipment engineers, treating the source of the odor during routine maintenance yields the longest-lasting freshness for your home in 2026.
Method 1: The Baking Soda and Essential Oil Treatment
Baking soda neutralizes acidic odor molecules rather than just masking them. Follow these steps to apply it safely to your carpets before vacuuming:
- Mix one cup of baking soda with ten drops of your preferred antimicrobial essential oil, such as tea tree or eucalyptus.
- Let the mixture sit in a glass jar for 24 hours to distribute the oil evenly.
- Sprinkle a thin layer of the mixture across low-traffic carpet areas.
- Wait fifteen minutes to allow the sodium bicarbonate to absorb trapped pet and food odors.
- Vacuum the powder up slowly to distribute the fresh scent through the machine exhaust.
Method 2: The Cotton Ball Filter Infusion
You can scent your exhaust air without introducing moisture into the motor housing. Take a clean cotton ball, apply five drops of lemon or lavender extract, and place it directly inside the main collection canister or vacuum bag chamber. As air pulls through the system, it releases a subtle, clean aroma into the room.
What If It Still Doesn’t Work and the Odor Persists?
If deep cleaning the components and using deodorizing powders fail to eliminate the stench, a deeper mechanical issue is likely at play. Persistent foul smells usually indicate hidden blockages or electrical component degradation that basic surface cleaning cannot fix.
- Inspect the belt and motor housing: A burning rubber smell indicates friction from a slipping belt or a jammed roller brush. Replacement belts typically cost between $5 and $15.
- Check for hidden organic blockages: Debris trapped in the lower intake hose can rot over time. Detach the hose and flush it with warm water and mild dish soap, ensuring it dries completely for 24 hours before reattaching.
- Replace the HEPA filter: Filters older than 12 months often trap microscopic mold spores that emit damp odors when warmed by the motor. New manufacturer-certified filters range from $20 to $50.
- Consult a professional repair technician: If the motor windings are overheating or emitting an electrical ozone smell, professional servicing is required. Repair diagnostics generally cost between $40 and $80.
Conclusion
A foul-smelling vacuum transforms a routine chore into an unpleasant experience by recirculating musty odors throughout your living space. By systematically washing washable components, replacing degraded filters, and utilizing natural neutralizing agents like baking soda, you can permanently restore fresh airflow to your machine. According to verified research and appliance manufacturing experts, executing these maintenance steps every three to six months prevents odor buildup and extends overall machine longevity. Take the next step today by inspecting your vacuum’s filter and initiating a deep-cleaning cycle.
❓ Frequently Asked Questions
How can I make my vacuum smell good while cleaning?
You can make your vacuum smell fresh by placing an essential oil-soaked cotton ball inside the dust bag or canister, or by using commercial vacuum scent tablets designed for airflow systems.
How do I get rid of pet odors coming from my vacuum?
Pet odors accumulate rapidly in the brush roll and bag. Disassemble the nozzle, cut away trapped pet hair, wash removable plastic parts with warm soapy water, and replace the charcoal filter if your model has one.
Is it safe to vacuum up laundry detergent powder?
While laundry detergent or carpet powder can mask bad smells temporarily, they often contain fine particles that can clog filters, cake up inside the motor, or void your vacuum warranty. Stick to baking soda or specialized vacuum products.
How do I know if my vacuum filter needs to be replaced?
If washing the filter and letting it dry for 24 hours does not eliminate the musty odor, or if the material remains discolored and clogged, it is time to buy a replacement filter.
Can I spray air freshener inside my vacuum canister?
Avoid spraying liquid household air fresheners into the vacuum canister or motor intake, as moisture mixes with dust to create a paste that breeds mold and damages electrical components.
Why does my vacuum smell like dead animals?
This pungent smell often occurs when the vacuum sucks up organic matter like rodent droppings, old food crumbs, or dead insects that decompose inside a warm, dark dust bag or canister.