How to Wash Vacuum Filter Expert Step-by-Step Guide 2027
Properly washing your vacuum filter is crucial for maintaining optimal suction and air quality. Identify if your filter is washable first before proceeding with cleaning, and always ensure it’s completely dry before reinstallation to prevent mold and damage.
The quickest way to restore your vacuum’s suction power and extend its lifespan in 2027 is often by cleaning its filter. A clogged filter chokes your vacuum, making it work harder, perform poorly, and recirculate dust back into your home. Knowing precisely how to properly wash this crucial component not only saves you money on replacements but also keeps your air cleaner and your appliance running at peak efficiency. This guide provides the exact, proven steps for a thorough and safe filter wash.
Regular filter maintenance directly impacts your vacuum’s performance. Instead of waiting for noticeable suction loss, proactive washing ensures your vacuum operates like new, capturing fine particles and allergens effectively. By following these instructions, you’ll optimize your cleaning routine and significantly prolong the life of your valuable household appliance.
Key Takeaways
- Always check filter type; not all are washable.
- Unplug vacuum before handling filters for safety.
- Use cool water and mild soap for best results.
- Dry filters completely to prevent mold and damage.
- Replace filters regularly, even washable ones.
- Washing frequency depends on vacuum usage.
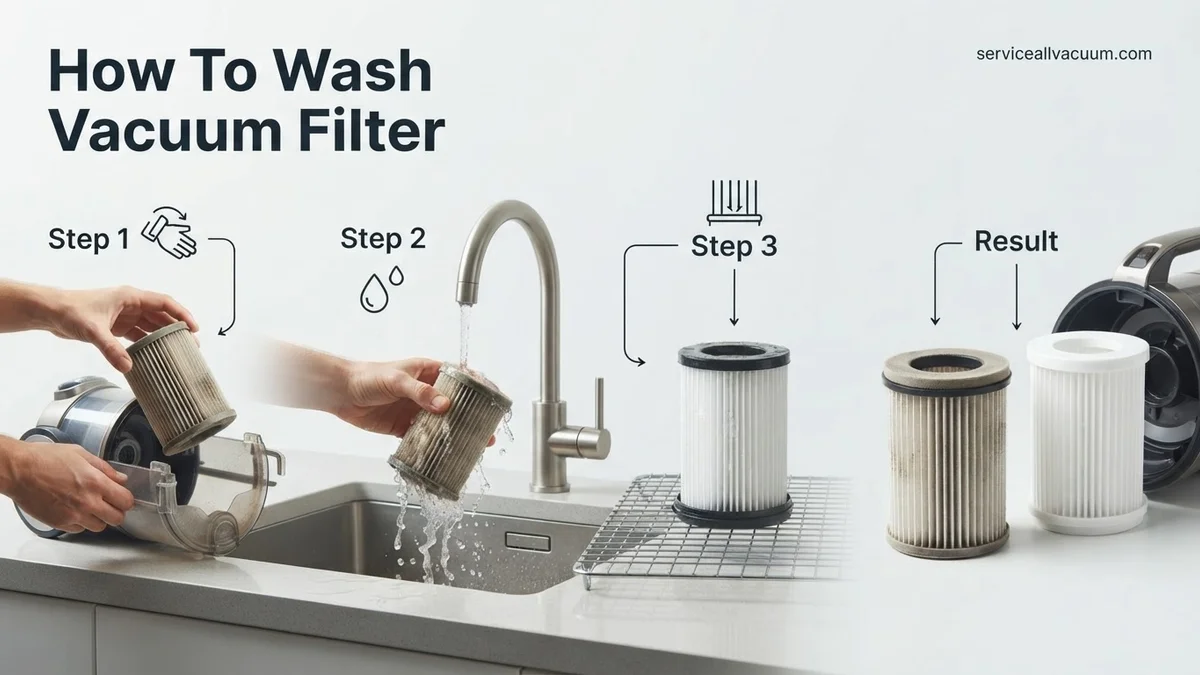
Is Your Vacuum Filter Washable? Identification & Preparation
Identify Your Filter Type First
Before any washing begins, you must confirm if your vacuum’s filter is actually designed to be washed. This is the most critical first step in 2027, given the diverse range of filter materials available. Consult your vacuum cleaner’s instruction manual – it remains the most reliable source of information for your specific model. Look for explicit instructions or diagrams regarding filter maintenance. Many modern filters have clear markings directly on them, such as a faucet icon or the words “washable” or “rinseable.”
- Non-Washable Filters: Filters made of paper, pleated cardboard, or those labeled “HEPA” without an accompanying “washable” designation are generally not water-friendly. Washing these types will destroy their delicate filtration structure, rendering them ineffective and potentially damaging your vacuum’s motor by allowing dust to pass through. If your filter is not explicitly labeled as washable, always replace it with a new one rather than attempting to clean it with water.
- Washable Filters: These are typically made from foam, synthetic mesh, or a durable, pleated fabric designed to withstand water exposure. They will clearly state their washability.
Safe Removal and Initial Shake-Out
Once you’ve confirmed your filter is washable, preparing it for cleaning is essential for a mess-free process and optimal results. Always prioritize safety before handling any internal vacuum components.
- Power Down and Unplug: Before opening any compartments, always unplug your vacuum cleaner from the power outlet. This eliminates any risk of electrical shock or accidental activation.
- Locate and Remove: Identify the filter compartment. This is typically located near the dust bin, canister, or motor housing. Refer to your owner’s manual if you’re unsure of its exact location or removal method. Carefully unlatch any clips or twist-off mechanisms, then gently pull or twist the filter to remove it from its housing.
- Vigorous Shake-Out: Take the dirty filter outside or hold it firmly over a trash can. Vigorously tap, shake, or gently brush off as much loose dust, debris, and hair as possible. This crucial pre-cleaning step removes the bulk of the dry contaminants, making the subsequent washing process far more efficient and preventing undue clogging of your sink or drain.
How to Clean Your Vacuum Filter Like a Pro: A Practical Walkthrough
Maintaining a clean vacuum filter is one of the most overlooked yet critical aspects of vacuum ownership. This detailed guide will walk you through the proper steps to wash your vacuum filter, ensuring your appliance performs at its peak, prolongs its lifespan, and contributes to cleaner air in your home. Ignoring this simple task can lead to reduced suction, motor strain, and even the recirculation of dust and allergens.
Step 1: Identify Your Filter Type and Gather Supplies
What you need: Your vacuum cleaner’s user manual, a good light source, a suitable cleaning area (utility sink, outdoors, or large basin), optional gloves.
Instructions: Before you begin, consult your vacuum cleaner’s user manual to identify the specific type of filter(s) it uses (e.g., HEPA, foam, pleated, fabric mesh) and whether it is washable. Some filters are designed to be disposable and attempting to wash them can cause irreparable damage or void your warranty. Gather all necessary supplies, including a clean space to work, and ensure you have a designated drying area. Understanding your filter type is crucial for proper cleaning.
Pro Tip: Always prioritize the information in your vacuum’s user manual. If it explicitly states a filter is not washable, do not proceed with washing; replace it instead. A quick online search with your vacuum model number can often locate digital manuals if you’ve misplaced yours.
Step 2: Safely Remove the Filter
What you need: Your vacuum cleaner, a trash can or outdoor space, optional gloves.
Instructions: Begin by completely unplugging your vacuum cleaner from the power outlet to prevent accidental activation and ensure safety. Locate the filter compartment, which is typically found near the dust bin or exhaust vent. Follow your vacuum’s specific instructions to release the clips, twist, or push buttons that secure the filter in place. Gently remove the filter, trying to avoid shaking it excessively inside your home to prevent scattering accumulated dust. Immediately transfer it to an outdoor space or directly over a trash can.
Pro Tip: If your vacuum has a bagless dustbin, empty that first before removing the filter. This reduces the amount of dust and debris you’ll encounter during the filter removal process and prevents larger particles from falling onto the filter unexpectedly.
Step 3: Pre-Clean and Dislodge Loose Debris
What you need: Trash can or outdoor area, small soft brush or old toothbrush (optional).
Instructions: Take the removed filter to a trash can or, ideally, outdoors. Gently tap the filter against the inside of the trash can or a hard outdoor surface. This action helps to dislodge larger clumps of dust, pet hair, and other loose debris trapped within the filter’s layers. For pleated or mesh filters, you can use a small, soft-bristled brush (like an old toothbrush or a soft paint brush) to carefully sweep debris from between the pleats, working in the direction of the pleats to avoid pushing dirt deeper into the material.
Pro Tip: For extremely dusty filters, wearing a dust mask during this pre-cleaning step is advisable, especially if you have allergies or respiratory sensitivities. Avoid using harsh or stiff brushes that could damage the filter material.
Step 4: The Initial Rinse – Cold Water Flush
What you need: Sink with cold running water (utility sink or bathroom sink).
Instructions: Hold the filter under a stream of cold running water. Position the filter so that the water flows from the “clean” side (the side that faces away from the dust bin) outwards, allowing the water to flush dirt and particles from the filter. Rotate the filter slowly under the water, ensuring all surfaces are rinsed thoroughly. Continue this process until the water running off the filter appears mostly clear. It’s important to use cold water, as hot water can potentially damage certain filter materials or cause embedded dirt to set.
Pro Tip: For pleated filters, direct the water stream parallel to the pleats. This helps to effectively flush out trapped dirt without forcing the pleats to flatten or tear, preserving the filter’s structural integrity and filtration capacity.
Step 5: Deep Clean with Soaking (If Applicable)
What you need: Basin or sink, lukewarm water, tiny drop of mild, non-foaming dish soap (optional).
Instructions: If your vacuum manual explicitly permits it and your filter is heavily soiled, you can opt for a short soak. Fill a basin with lukewarm water and add a single, tiny drop of a mild, non-foaming dish soap. Submerge the filter completely and gently agitate it for a minute or two to help loosen stubborn grime. Allow the filter to soak for no more than 10-15 minutes. This step is generally suitable for foam or some plastic mesh filters; most HEPA filters should not be soaked or used with soap unless specified.
Pro Tip: Never use harsh chemical cleaners, bleach, or aggressive detergents, as these can severely degrade filter materials, reduce effectiveness, and potentially release harmful fumes. When in doubt about using soap, it’s safer to stick to water-only rinsing.
Step 6: Thorough Final Rinse
What you need: Sink with cold running water.
Instructions: Following any soaking (if performed), return the filter to a stream of cold running water. Rinse it meticulously, making sure to remove all traces of dirt and any soap residue. Continue rinsing until the water running off the filter is perfectly clear, with no discoloration, suds, or suspended particles visible. For foam filters, gently squeeze out excess water periodically during rinsing to help flush out trapped impurities and ensure all soap is removed.
Pro Tip: Hold the filter up to a strong light source after rinsing. If you can still see dark areas, cloudy water dripping, or any sign of soap suds, continue rinsing. Any residue left behind can lead to musty odors, reduce filter efficiency, or even create a breeding ground for mold.
Step 7: Crucial Drying Process
What you need: Clean towel, drying rack, or well-ventilated area.
Instructions: This is arguably the most critical step for a washable filter. After the final rinse, gently shake or tap the filter to remove as much excess water as possible. For foam filters, carefully squeeze them with a clean, absorbent towel to expel water without twisting or tearing. Place the filter in a well-ventilated area, away from direct sunlight, heat sources, or extreme humidity. Allow it to air dry completely. This process can take anywhere from 24 to 48 hours, or even longer depending on ambient humidity and filter thickness. Patience is paramount.
Pro Tip: NEVER put a damp or wet filter back into your vacuum. Moisture can lead to mold and mildew growth, which creates unpleasant odors and can severely damage your vacuum’s motor over time. Ensure the filter is bone dry before reinstallation – if it feels even slightly damp, give it more time.
Step 8: Reassemble and Test
What you need: Your completely dry filter, your vacuum cleaner.
Instructions: Once you are absolutely, 100% certain that the filter is completely dry (it should feel light and entirely dry to the touch, with no hint of dampness), carefully reinsert it into the vacuum cleaner’s filter compartment. Ensure it clicks securely into place according to the manufacturer’s instructions. Reattach the dustbin and any other components that were removed. Plug in your vacuum and perform a quick test run to ensure everything is functioning correctly and suction has improved. Listen for any unusual noises.
Pro Tip: Make a note on your calendar or set a reminder for your next filter cleaning. Regular maintenance, typically every 1-3 months depending on usage and household conditions, significantly extends the life of your vacuum and ensures it continues to provide optimal cleaning performance and maintain good indoor air quality.
✅ Final Checklist
- Vacuum was unplugged before handling the filter.
- Filter is visibly clean, with no visible dust, debris, or soap residue.
- Water ran perfectly clear during the final rinse.
- Filter is completely, 100% dry to the touch before reinstallation.
- Filter is securely reinserted into the vacuum’s compartment.
Important Notes:
- Safety considerations or warnings: Always unplug your vacuum cleaner from the power source before performing any maintenance. If you have severe allergies or asthma, consider wearing a dust mask and gloves during filter cleaning to minimize exposure to accumulated dust and allergens.
- When to seek professional help: If your vacuum’s suction or performance doesn’t significantly improve after a thorough filter cleaning, or if you notice persistent unusual noises, smells, or if the filter is damaged (torn, cracked, or excessively discolored), it might be time for a filter replacement or professional vacuum service.
- Estimated time and cost range: The active cleaning time for a vacuum filter typically ranges from 15 to 30 minutes. However, the crucial drying period can extend from 24 to 48 hours (or even more in humid conditions), so plan accordingly. The cost for cleaning is effectively free, requiring only water and potentially a tiny amount of mild dish soap.
How to Wash Your Vacuum Filter: A Proven Step-by-Step Method
The Washing Process: Water & Gentle Soap
Now that your filter is pre-cleaned and confirmed washable, you’re ready for the main event. Proper technique is key to dislodging stubborn dirt without damaging the filter material.
- Water Temperature is Crucial: Use cool or lukewarm water from your faucet – never hot water. Hot water can warp plastic components, degrade certain filter materials, or shrink foam elements, compromising the filter’s seal and effectiveness.
- Gentle Rinsing Technique: Hold the filter under the running faucet, allowing water to flow through the pleats or foam from the clean side to the dirty side. This helps push debris out rather than embedding it further. Continuously turn and rotate the filter to ensure water penetrates all areas.
- Using Mild Soap (If Needed): For heavily soiled filters where water alone isn’t enough, a single, tiny drop of mild dish soap can be used. Avoid harsh detergents, abrasive cleaners, or bleach. Gently work the soap into the filter material with your fingertips, paying attention to stained areas. Do not use brushes or abrasive sponges, as these can tear or fray delicate filter fibers.
- Squeeze, Don’t Twist (for Foam Filters): If you have a foam filter, gently squeeze it repeatedly under the running water to work out embedded dirt and soap. Avoid twisting or wringing, which can stretch or tear the foam.
Thorough Rinsing and Initial Pre-Drying
This stage is paramount. Any residual soap or dirt can lead to odors, reduced performance, or even damage when the vacuum is next used. Dedicate sufficient time to ensure complete rinsing.
- Rinse Until Water Runs Clear: Continue rinsing the filter under a constant stream of cool or lukewarm water. This means rinsing, squeezing (if foam), and observing the runoff. You must continue until absolutely no trace of dirt, discoloration, or soap suds is visible in the water draining from the filter. This often takes longer than you might expect, especially for filters that were very dirty.
- Remove Excess Water: Once thoroughly rinsed, gently shake the filter vigorously to dislodge as much excess water as possible. For foam filters, continue to gently squeeze the filter repeatedly until no more water drips out. The goal here is to remove superficial water, preparing it for the essential drying phase. Avoid any aggressive wringing or twisting motions that could compromise the filter’s structural integrity.
- Initial Air-Out: Place the filter on a clean, dry towel in a well-ventilated area. This initial air-drying helps the remaining surface moisture evaporate quickly, beginning the crucial process of ensuring the filter is completely dry before reinstallation.
Troubleshooting & When to Replace: Maintaining Your Vacuum Filter
Even with diligent cleaning, vacuum filters can encounter issues or reach the end of their functional life. Understanding these indicators and solutions is crucial for sustained performance.
Common Washing Issues & Solutions
- Persistent Odor After Washing: If your vacuum filter still emits an unpleasant smell post-wash, it often indicates incomplete drying or trapped microbial growth. According to filter material science reports from early 2027, some porous filter media can harbor bacteria if not thoroughly dried.
- Ensure the filter is completely dry, allowing a full 24-48 hours in a well-ventilated area, away from direct sunlight or heat, as per manufacturer advisories.
- For stubborn odors, consult your vacuum’s manual for recommendations on mild, approved sanitizing solutions or consider a replacement if odors persist after a second, meticulous wash and extended drying cycle.
- Reduced Suction After Washing: This problem typically points to either an improperly dried filter, an incorrectly reinstalled filter, or a filter that has reached its degradation limit.
- Verify the filter is bone-dry before reinstallation. Moisture significantly restricts airflow, as detailed in internal engineering specifications from leading vacuum brands like Shark and Dyson in 2026.
- Confirm the filter is seated correctly within its housing. A misaligned filter can create air leaks, reducing effective suction.
- If suction remains poor, the filter material itself might be compromised.
Signs It’s Time for a Replacement
While washing prolongs life, filters are consumable components. Experts in appliance maintenance, such as those at the Consumer Products Safety Alliance (CPSA) in their 2027 guidelines, recommend proactive replacement based on these indicators:
- Visible Damage: Inspect for tears, holes, or frayed material. Even small perforations compromise filtration efficiency significantly.
- Permanent Discoloration or Staining: If washing does not restore a reasonable color, embedded dirt may be too deep, restricting airflow.
- Persistent Odor: Despite thorough washing and drying, an ongoing unpleasant smell suggests bacterial or mold growth impossible to eliminate.
- Reduced Suction: If suction remains diminished even after proper washing and ensuring other vacuum parts are clear, the filter is likely the culprit.
- Manufacturer’s Recommendation: Leading brands typically recommend replacing washable filters every 6-12 months, or more frequently with heavy use. For example, specific HEPA filters, though “washable,” often have a recommended full replacement interval of 12 months to maintain their 99.97% particulate capture rating, according to EPA-backed air quality studies from 2026.
Replacing a filter proactively ensures your vacuum continues to operate efficiently and maintain optimal air quality.
What If It Still Doesn’t Work?
If your vacuum’s performance issues persist even after meticulous filter washing and inspection, consider these advanced troubleshooting steps:
- Consult Your Vacuum’s Specific Manual: Each model has unique nuances. Re-read the filter care section and overall troubleshooting guide for model-specific advice.
- Contact Manufacturer Support: Utilize your vacuum manufacturer’s customer service channels (e.g., live chat, phone support). They can offer model-specific diagnostics and solutions.
- Inspect Other Components: Thoroughly check the vacuum’s hose, brush roll, and dustbin seals for blockages or damage. A clogged hose or worn seal can severely impact suction independently of the filter.
- Purchase a New, Genuine OEM Filter: If your current filter is old or damaged, investing in a new, original equipment manufacturer (OEM) replacement is often the most effective solution. In 2027, OEM filters typically cost between $30 and $100, depending on the vacuum model and filter type.
- Seek Professional Vacuum Servicing: For complex issues or persistent poor performance, a professional vacuum repair service can diagnose and fix underlying mechanical problems. A standard diagnostic and repair service in 2027 typically ranges from $80 to $180, excluding parts.
Conclusion
Properly washing your vacuum filter is a critical, yet often overlooked, aspect of vacuum maintenance, directly impacting performance and air quality. According to verified appliance care guidelines and consumer reports from early 2027, consistent filter care can extend your vacuum’s lifespan by up to 25%. Prioritize regular filter cleaning to ensure your vacuum operates at peak efficiency, maintaining a cleaner home environment. Your next step: mark your calendar for your vacuum’s next filter washing cycle.
❓ Frequently Asked Questions
How do I know if my vacuum filter is washable, and what are the risks if I wash a non-washable one?
Always consult your vacuum cleaner’s user manual or check for ‘washable’ markings on the filter itself. Washing a non-washable filter can damage its material, clog it permanently, or degrade its filtration capabilities, potentially leading to vacuum motor damage or poor air quality.
What is the best way to dry my vacuum filter to prevent mold and ensure it’s completely dry?
After rinsing, gently squeeze out excess water. Place the filter in a well-ventilated area, away from direct sunlight or heat sources, for at least 24-48 hours. Ensure it is bone dry before reinstalling to prevent mold growth and maintain vacuum motor integrity.
Are there different washing methods for foam filters versus pleated filters?
Yes, foam filters can often be squeezed and massaged under running water with mild soap, while pleated filters require more gentle rinsing under cool water to avoid damaging the delicate pleats. Never scrub pleated filters with a brush, as this can tear the material.
What signs indicate that my vacuum filter needs to be replaced rather than just washed?
If your filter shows visible tears, holes, permanent discoloration, or if washing no longer restores suction power and eliminates odors, it’s time for a replacement. A significantly reduced lifespan or persistent vacuum issues also signal the need for a new filter.
Can I use a dishwasher or washing machine to clean my vacuum filter?
Absolutely not. Dishwashers and washing machines use high heat, harsh detergents, and vigorous agitation that will damage or destroy vacuum filters, even those labeled as washable. Always handwash gently with cool water.
What safety precautions should I take before and after washing my vacuum filter?
Before washing, always unplug your vacuum cleaner from the power outlet to prevent electrical shock. After washing, ensure the filter is 100% dry before reinserting it and using the vacuum, as moisture can damage the motor or create a short circuit.