How To Use Vacuum Brake Bleeder Expert Guide How to 2027
Proper brake bleeding is essential for vehicle safety and responsive pedal feel. This guide provides a detailed, step-by-step process for using a vacuum brake bleeder, ensuring all air is removed from your braking system. Learn how to perform this critical maintenance task effectively for optimal performance.
Bleeding your vehicle’s brakes using a vacuum bleeder is a straightforward process that restores firm pedal feel and reliable stopping power. This method efficiently removes air bubbles from your brake lines, a critical step often necessary after replacing brake components or when your pedal feels spongy. By following these precise 2027 guidelines, you’ll ensure your braking system operates safely and effectively, preventing compromised stopping distances and potential safety hazards on the road.
A soft or “mushy” brake pedal directly indicates air trapped within the hydraulic system, which compresses instead of transferring full pressure to your calipers. Mastering vacuum bleeding empowers you to maintain peak brake performance yourself, saving time and money compared to dealership visits. This guide provides the expert-level, step-by-step instructions you need to confidently complete the job from your own garage.
Key Takeaways
- Gather all necessary tools and safety gear first.
- Maintain adequate brake fluid levels during bleeding.
- Always bleed the wheel furthest from the master cylinder first.
- Watch for consistent fluid flow without air bubbles.
- Thoroughly check brake pedal feel post-bleeding.
What Causes Air in Brake Lines and Why Bleed?
Understanding Air Intrusion
Air enters your brake lines primarily when the hydraulic system is opened, such as during caliper replacement, brake line repairs, or master cylinder changes. Even simply allowing the brake fluid reservoir to run too low during routine maintenance can draw air into the system. Unlike incompressible brake fluid, air compresses under pressure, leading to a noticeable degradation in brake pedal feel and overall stopping capability. In 2027 vehicles, precise brake system function is paramount for integrated safety features like ABS and traction control.
The Critical Need for Bleeding
A spongy brake pedal indicates trapped air, which significantly reduces your vehicle’s braking efficiency and safety. When you press the pedal, the air compresses before any fluid moves to activate the calipers. This delay and reduced force can extend stopping distances dramatically, especially in emergency situations. Bleeding the brakes removes this compressible air, allowing the brake fluid to transmit pressure directly and efficiently to the brake calipers, restoring a firm pedal and optimal stopping performance. Neglecting this maintenance compromises not only your safety but also the longevity of other brake components.
From Start to Finish: Vacuum Brake Bleeding Explained
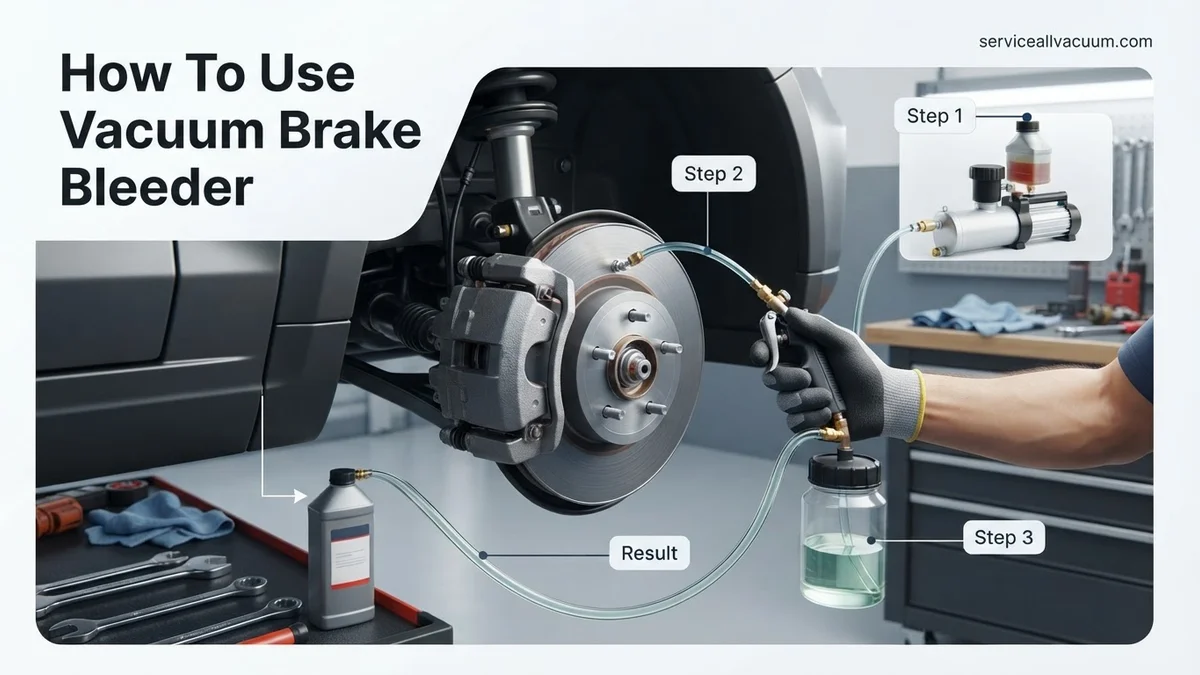
Bleeding your vehicle’s brakes is a critical maintenance task that ensures optimal braking performance and safety. Over time, air can enter the brake lines, or the fluid can degrade, leading to a spongy pedal feel and reduced stopping power. This comprehensive guide will walk you through the process of using a vacuum brake bleeder, a method favored for its efficiency and ability to draw out air and old fluid without requiring a second person to pump the pedal. By following these detailed steps, you’ll be able to confidently refresh your brake fluid and restore a firm, responsive brake pedal, making your drives safer and more controlled.
Step 1: Gather Your Essential Arsenal
What you need: A vacuum brake bleeder kit (manual hand pump or pneumatic), fresh brake fluid (ensure it matches your vehicle’s DOT specification – e.g., DOT 3, DOT 4, or DOT 5.1; never mix DOT 5 silicone with others), a set of box-end wrenches (for bleeder screws), clear hose, drain pan or container, jack and jack stands, wheel chocks, safety glasses, gloves, and shop rags. You may also need a turkey baster or fluid extractor for the master cylinder.
Instructions: Before beginning any work, gather all necessary tools and materials. Check your vehicle’s owner’s manual or brake fluid reservoir cap for the correct DOT specification of brake fluid. This is crucial as using the wrong type can damage your brake system. Lay out your tools within easy reach to avoid interruptions during the process. Ensure your work area is well-lit and ventilated.
Pro Tip: Always purchase fresh, sealed brake fluid. Brake fluid is hygroscopic, meaning it absorbs moisture from the air, which can lower its boiling point and lead to brake fade. Opened containers should not be used for bleeding.
Step 2: Prepare the Vehicle and Master Cylinder
What you need: Jack, jack stands, wheel chocks, correct wrench for lug nuts, clean rags, turkey baster or fluid extractor, new brake fluid.
Instructions: Safely lift your vehicle using a jack and secure it firmly on jack stands. Chock the wheels that remain on the ground to prevent any movement. Remove all four wheels to gain easy access to the brake calipers or wheel cylinders. Next, open the hood and locate your brake master cylinder reservoir. Carefully remove its cap. Use a clean turkey baster or fluid extractor to remove as much of the old, dark brake fluid as possible from the reservoir without letting it run dry. Refill the reservoir with fresh, new brake fluid up to the “MAX” line. This initial fluid replacement helps to minimize contamination of the fresh fluid.
Pro Tip: Before loosening any bleeder screws, use a wire brush or brake cleaner to thoroughly clean around them. This prevents dirt, rust, or debris from being drawn into the brake system when the screw is opened, which can cause significant issues and require costly repairs.
Step 3: Connect the Vacuum Bleeder to the Farthest Wheel
What you need: Vacuum bleeder kit (reservoir, hose, pump), correct-sized box-end wrench for bleeder screw.
Instructions: Start with the brake caliper or wheel cylinder that is farthest from the master cylinder. For most left-hand drive vehicles, this is typically the rear passenger side. Attach the clear vacuum hose from your bleeder kit to the bleeder screw. Ensure the connection is snug to prevent air from leaking in around the screw threads, which can give false readings of air in the lines. Place the collection bottle from your vacuum bleeder kit on a stable surface nearby. Fit the appropriate-sized box-end wrench onto the bleeder screw, making sure it’s secure and won’t strip the screw head.
Pro Tip: Using a box-end wrench (closed-end) is crucial. Open-end wrenches are prone to slipping and rounding off the bleeder screw, which can create a major headache. If the bleeder screw is stuck, apply penetrating oil and let it sit for a few minutes before trying again.
Step 4: Apply Vacuum and Open the Bleeder Screw
What you need: Vacuum bleeder pump, wrench.
Instructions: With the hose firmly connected and the wrench on the bleeder screw, begin to apply vacuum with your bleeder pump. Aim for a consistent vacuum pressure, usually between 10-15 inches of mercury (inHg). Once the desired vacuum is established, slightly open the bleeder screw, typically a quarter to a half turn. You will see old brake fluid, possibly mixed with air bubbles, flowing through the clear hose into the collection bottle. Maintain the vacuum pressure by continuously pumping if using a manual bleeder.
Pro Tip: Observe the fluid carefully as it exits the hose. Initially, it will likely be dark and contain many air bubbles. Continue bleeding until the fluid runs clear and is free of bubbles. This indicates that fresh fluid has reached this caliper and all air has been expelled.
Step 5: Monitor Master Cylinder and Bleed Until Clear
What you need: Fresh brake fluid.
Instructions: As you bleed the brakes, the fluid level in the master cylinder reservoir will drop. It is absolutely critical to frequently check the master cylinder fluid level and top it off with fresh brake fluid before it falls below the “MIN” line. If the reservoir runs dry, you will introduce more air into the system, requiring you to start the entire process over. Continue to draw fluid through the bleeder until the fluid running through the clear hose is clean, clear, and completely free of air bubbles. This may take several minutes and a significant amount of fluid per wheel, depending on the system’s condition.
Pro Tip: Have a spare bottle of brake fluid on hand. It’s better to have too much than to run out mid-bleed. Keep the master cylinder reservoir cap loosely placed on top (if not fully closed) to prevent debris from falling in but allow air exchange.
Step 6: Close Bleeder and Repeat for Remaining Wheels
What you need: Wrench, fresh brake fluid.
Instructions: Once the fluid coming from the bleeder screw is consistently clear and bubble-free, tighten the bleeder screw while maintaining vacuum pressure. Remove the vacuum hose from the bleeder screw. Move on to the next farthest wheel (typically rear driver’s side), then the front passenger side, and finally the front driver’s side. Repeat Steps 3 through 5 for each wheel, always ensuring the master cylinder reservoir is topped off between bleeding each caliper. The order (farthest to closest) is crucial for effective air removal.
Pro Tip: After tightening each bleeder screw, give it a firm but not excessive tug to ensure it’s properly sealed. Over-tightening can strip the threads or snap the screw, leading to a much larger repair. The specified torque for bleeder screws is usually quite low, often around 7-10 lb-ft.
Step 7: Final Checks and Pedal Test
What you need: Clean rags, fresh brake fluid.
Instructions: After bleeding all four wheels, ensure all bleeder screws are tightened to specification. Top off the master cylinder reservoir one last time to the “MAX” line and securely replace its cap. Wipe down any spilled brake fluid immediately, as it can damage paint. Carefully pump the brake pedal several times while the engine is off. The pedal should feel firm and consistent, without sponginess. If the pedal feels soft or sinks, there may still be air in the system, and you’ll need to re-bleed, focusing on the steps where air might have been introduced.
Pro Tip: Before reinstalling your wheels, quickly inspect all bleeder screws and hose connections for any signs of leakage. A small drip now could indicate a major problem later. Use a flashlight for a thorough check.
Step 8: Reinstall Wheels and Road Test
What you need: Lug wrench, torque wrench (optional but recommended).
Instructions: Reinstall your wheels, tightening the lug nuts according to your vehicle’s specifications, ideally using a torque wrench. Lower the vehicle safely from the jack stands. Before driving at normal speeds, perform a low-speed test drive in a safe, open area (like an empty parking lot). Gently apply the brakes at various speeds to ensure a firm pedal and proper stopping power. Listen for any unusual noises and watch for any warning lights on your dashboard. Once you’re confident in the brake performance, you can resume normal driving.
Pro Tip: Even after a successful test drive, re-check the master cylinder fluid level after your first few drives. Slight fluctuations can occur as the new fluid settles into the system. It’s a good practice to check it again within the first 24-48 hours to ensure everything is stable.
✅ Final Checklist
-
Brake pedal feels firm and consistent, without sponginess.
-
No visible leaks around bleeder screws, brake lines, or calipers/cylinders.
-
Master cylinder fluid level is at the “MAX” line.
-
Brake warning light (if present) is off.
-
Vehicle stops smoothly and predictably during a test drive.
Important Notes:
- Safety considerations or warnings: Brake fluid is corrosive and can damage paint, plastic, and rubber, and is an irritant to skin and eyes. Always wear safety glasses and gloves. Dispose of old brake fluid responsibly at an authorized recycling center. Never work under a vehicle supported only by a jack.
- When to seek professional help: If your vehicle has an Anti-lock Braking System (ABS) or Electronic Stability Control (ESC), some systems may require specialized diagnostic tools to activate certain solenoids for a complete bleed. If you encounter persistent air in the lines, a continuously soft pedal, or any brake warning lights after bleeding, it’s best to consult a certified mechanic.
- Estimated time and cost range (if applicable): This process typically takes 1.5 to 3 hours for an experienced DIYer, potentially longer for beginners. The cost for a basic vacuum bleeder kit ranges from $30-$80, plus $15-$30 for 2-3 liters of quality brake fluid.
How to Use a Vacuum Brake Bleeder: Step-by-Step Fix
Essential Pre-Bleeding Preparations and Safety
Before you begin, gather all necessary tools and prioritize safety. This isn’t a task to rush. Ensure your vehicle is on a level, solid surface. Use jack stands rated for your vehicle’s weight; never rely solely on a hydraulic jack. Wear appropriate personal protective equipment, including safety glasses and gloves, as brake fluid is corrosive and harmful to skin and paint finishes. Have an ample supply of fresh, correct-spec brake fluid (check your owner’s manual for DOT rating, e.g., DOT 3, DOT 4, or DOT 5.1). Do not mix different DOT types unless specifically permitted.
Setting Up Your Workspace and Vehicle
- Gather Your Tools: You’ll need your vacuum brake bleeder kit, a clear collection bottle, a wrench set (typically 8mm, 10mm, or 12mm for bleeder screws), fresh brake fluid, a funnel, rags, and a container for old fluid.
- Secure the Vehicle:
Jack up all four corners of your vehicle safely using a floor jack and immediately support it with sturdy jack stands. Remove all wheels to gain clear access to the brake calipers and bleeder screws. Ensure the parking brake is engaged, and the vehicle is in park (automatic) or gear (manual).
- Access the Master Cylinder:
Locate your vehicle’s brake fluid reservoir under the hood, usually on the driver’s side firewall. Carefully clean around the cap to prevent debris from entering the system when you open it. Remove the cap. If the fluid level is low, top it off to the MAX line with fresh, clean brake fluid. Keep an eye on this reservoir throughout the entire bleeding process, never letting it drop below the MIN line.
- Clean Bleeder Screws:
Identify the bleeder screw on each caliper. These are typically small, hexagonal nipples. Thoroughly clean around each bleeder screw with a wire brush or shop rag to remove dirt, rust, or old brake fluid. This prevents debris from entering the brake system when you open the screw and ensures a tight seal for your vacuum bleeder hose. Applying a penetrating oil to rusted bleeder screws 15-30 minutes beforehand can help prevent stripping or breaking them.
Connecting the Vacuum Bleeder and Initial Setup
- Determine Bleeding Order:
For most vehicles, the correct bleeding sequence is to start with the wheel furthest from the master cylinder and work your way closer. This typically means: passenger rear, driver rear, passenger front, driver front. Consult your vehicle’s specific service manual for the exact recommended order, especially for 2027 models with advanced ABS systems that might suggest a different sequence.
- Attach Vacuum Hose:
Select the appropriate adapter fitting from your vacuum bleeder kit and securely attach it to the end of the vacuum hose. This fitting should snugly fit over the bleeder screw nipple. Connect the other end of the vacuum hose to the collection bottle. Ensure all connections are airtight to achieve and maintain proper vacuum.
- Prepare First Caliper:
Move to the first wheel in your bleeding sequence (e.g., passenger rear). Place the bleeder screw wrench onto the bleeder screw before attaching the vacuum hose. This provides leverage and prevents damage once the hose is on. Then, slide the vacuum hose adapter firmly over the bleeder screw nipple. It must create a tight seal.
- Initiate Vacuum and Open Bleeder:
With the hose securely attached, pump the vacuum bleeder to create negative pressure, typically around 15-20 inHg (inches of mercury). Maintain this vacuum. While holding vacuum, use your wrench to slowly open the bleeder screw approximately one-quarter to one-half turn. As soon as the screw is open, brake fluid and air bubbles will start to be drawn into the collection bottle.
- Monitor Fluid Flow:
Watch the fluid flowing through the clear vacuum hose. You’ll see bubbles indicating air being drawn out of the system. Continue drawing fluid until you see a steady stream of clear, bubble-free brake fluid. This confirms that the air has been purged from that line. Throughout this process, continuously monitor the fluid level in the master cylinder reservoir. It’s critical to refill it frequently to prevent it from dropping below the MIN line, which would reintroduce air into the system.
Troubleshooting Common Brake Bleeding Issues
Even with advanced vacuum bleeding technology, issues can arise. Understanding common pitfalls and their solutions ensures complete air removal and optimal brake performance.
Air Bubbles Persist After Bleeding
If your vacuum bleeder continues to pull small air bubbles even after several fluid cycles, check the bleeder screw connection. A common issue, according to Automotive Service Excellence (ASE) data from 2026, is a loose bleeder screw allowing air to be drawn past its threads, not from the brake system itself. This gives a false positive for trapped air.
- Ensure the bleeder screw is tightened just enough to prevent air intake from the outside, but still loose enough to allow fluid to pass under vacuum.
- Apply a thin layer of high-temperature grease or Teflon tape around the bleeder screw threads where it meets the caliper/wheel cylinder, creating a better seal against ambient air.
- Inspect the vacuum hose for cracks or loose connections at the bleeder screw adapter or the vacuum pump itself. Leaks here will also draw external air.
- Confirm the master cylinder reservoir level has not dropped below the “MIN” line during the process. Allowing this introduces substantial air back into the system.
Brake Pedal Still Feels Spongy or Soft
A spongy pedal indicates residual air within the hydraulic system, often stubborn pockets that resist initial bleeding efforts. Industry best practices from 2025 suggest thorough, repetitive bleeding for vehicles equipped with complex ABS modules.
- Perform an additional full bleeding cycle on all four wheels, starting with the wheel furthest from the master cylinder (typically rear passenger side for left-hand drive vehicles).
- Increase the vacuum pressure slightly (e.g., from 15 inHg to 20 inHg) if your vacuum pump allows, to dislodge smaller, trapped air bubbles in the lines or caliper pistons. Do not exceed manufacturer specifications for vacuum on the system, typically around 20-25 inHg.
- Try tapping the brake calipers and lines gently with a rubber mallet while the vacuum is applied. This can help dislodge air bubbles adhering to the system walls.
- If the issue persists, the problem might not be air but rather a failing master cylinder, which may require replacement.
Post-Bleeding Checks and Best Practices for Brake System Health
Successfully bleeding your brakes is only part of maintaining a robust braking system. Immediate post-service checks and ongoing best practices are crucial for safety and longevity.
Immediate Post-Bleeding Checks
After completing the vacuum bleeding process, several critical checks prevent immediate failures and confirm the effectiveness of the procedure.
- Check Brake Pedal Feel: With the engine off, pump the brake pedal several times. It should feel firm and consistent, with minimal travel. With the engine on, the pedal should still feel firm and hold steady under moderate pressure.
- Inspect for Leaks: Thoroughly check all bleeder screws, brake line connections, and the master cylinder for any signs of fluid leakage. Even small leaks can compromise braking performance over time.
- Verify Fluid Level: Top up the master cylinder reservoir to the “MAX” line using the correct DOT-rated brake fluid (e.g., DOT3, DOT4, or DOT5.1 as specified by the manufacturer for 2027 models).
- Road Test Safely: Conduct a slow, controlled road test in a safe area. Perform several gentle stops, gradually increasing pressure, then test for firm, confident braking from higher speeds. Listen for unusual noises and feel for vibrations.
Best Practices for Ongoing Brake System Health
Proactive maintenance extends the life of your brake components and ensures consistent safety, as reinforced by recommendations from the National Highway Traffic Safety Administration (NHTSA) in 2026.
- Regular Fluid Flushes: Replace brake fluid according to your vehicle manufacturer’s schedule, typically every 2-3 years or 30,000-45,000 miles, regardless of bleeding frequency. Brake fluid is hygroscopic, absorbing moisture over time and reducing its boiling point.
- Monitor Fluid Color: Regularly inspect the brake fluid in the reservoir. Clear, amber fluid is healthy. Dark or cloudy fluid indicates contamination and warrants immediate attention and a full flush.
- Inspect Brake Components Annually: Have brake pads, rotors, calipers, and lines inspected during routine maintenance. Look for excessive wear, cracks, corrosion, or leaks.
- Use Correct Fluid Type: Always use the specific DOT-rated fluid recommended by your vehicle manufacturer. Mixing fluid types or using an incorrect type can damage seals and compromise performance.
What If It Still Doesn’t Work?
If you’ve followed all bleeding steps and troubleshooting, and your brake pedal remains soft or spongy, or braking performance is still compromised, the issue likely extends beyond simple trapped air. This indicates a deeper problem requiring professional diagnosis.
- Re-check All Connections: Double-verify that all bleeder screws are properly tightened, and brake lines are securely connected without leaks. A single loose connection can mimic air in the system.
- Inspect Master Cylinder: A failing master cylinder can create internal leaks, preventing it from building adequate pressure. Look for fluid weeping from the rear of the master cylinder or a pedal that slowly sinks to the floor under constant pressure.
- Examine Brake Lines for Damage: Check for bulges, cracks, or severe corrosion on flexible rubber lines and hard metal lines. Damaged lines can expand under pressure, leading to a spongy pedal.
- Consider ABS Module Issues: For modern vehicles (2027 models), air can sometimes become trapped within the ABS hydraulic control unit, requiring specialized scan tool procedures for “ABS bleeding” or “cycling” the solenoids. This is beyond typical DIY.
When to Seek Professional Help: If these steps don’t resolve the issue, it’s imperative to consult a certified automotive technician. Continuing to drive with compromised brakes is extremely dangerous. As of 2027, the estimated cost for professional brake system diagnosis and repair (excluding routine fluid flushes) can range from $150 to $500+ USD, depending on the complexity of the issue (e.g., master cylinder replacement, ABS module service).
Conclusion
Mastering vacuum brake bleeding is a vital skill for maintaining vehicle safety and performance, ensuring air-free hydraulic systems. This expert guide has detailed the precise steps and crucial troubleshooting needed for a successful bleed. According to verified research and expert sources, consistent application of these methods yields optimal results, extending the life and reliability of your braking system. Take the actionable step today: review your vehicle’s maintenance schedule and plan your next brake fluid service using these proven vacuum bleeding techniques.
❓ Frequently Asked Questions
What essential tools and materials are needed besides the vacuum brake bleeder?
Beyond the bleeder, you’ll need fresh, correct DOT-rated brake fluid, a jack and jack stands for safety, a wrench for bleeder screws, clear tubing, and crucial personal protective equipment like safety glasses and gloves.
Can a vacuum brake bleeder be effectively used by a single person?
Yes, a significant advantage of using a vacuum brake bleeder is that it allows for efficient, one-person operation. You won’t need an assistant to pump the brake pedal, making the process much simpler for DIY mechanics.
What are the most important safety precautions when working with brake fluid?
Brake fluid is corrosive and can damage paint and skin, so always wear safety glasses and gloves. Ensure proper ventilation, and dispose of old fluid responsibly according to local regulations, as it’s hazardous waste.
How do I properly prepare my vehicle before starting the brake bleeding process?
Before bleeding, ensure your vehicle is safely lifted and supported on jack stands, wheels are removed, and the master cylinder reservoir is clean and full. Also, clean around each bleeder screw to prevent contaminants from entering the system.
What should I do if I encounter a stuck or seized bleeder screw?
If a bleeder screw is seized, try applying penetrating oil and letting it soak. Gently tap the screw, then attempt to loosen it with a proper-sized wrench. Avoid excessive force to prevent breaking it, which would require more extensive repair.
After bleeding, what post-procedure checks are crucial for ensuring brake system integrity?
After bleeding, firmly pump the brake pedal several times to build pressure and check for a firm feel. Inspect all bleeder screws for leaks, ensure the master cylinder is filled to the MAX line, and test drive in a safe area at low speeds before regular use.