How to Remove Dead Algae from Pool Without a Vacuum 2027
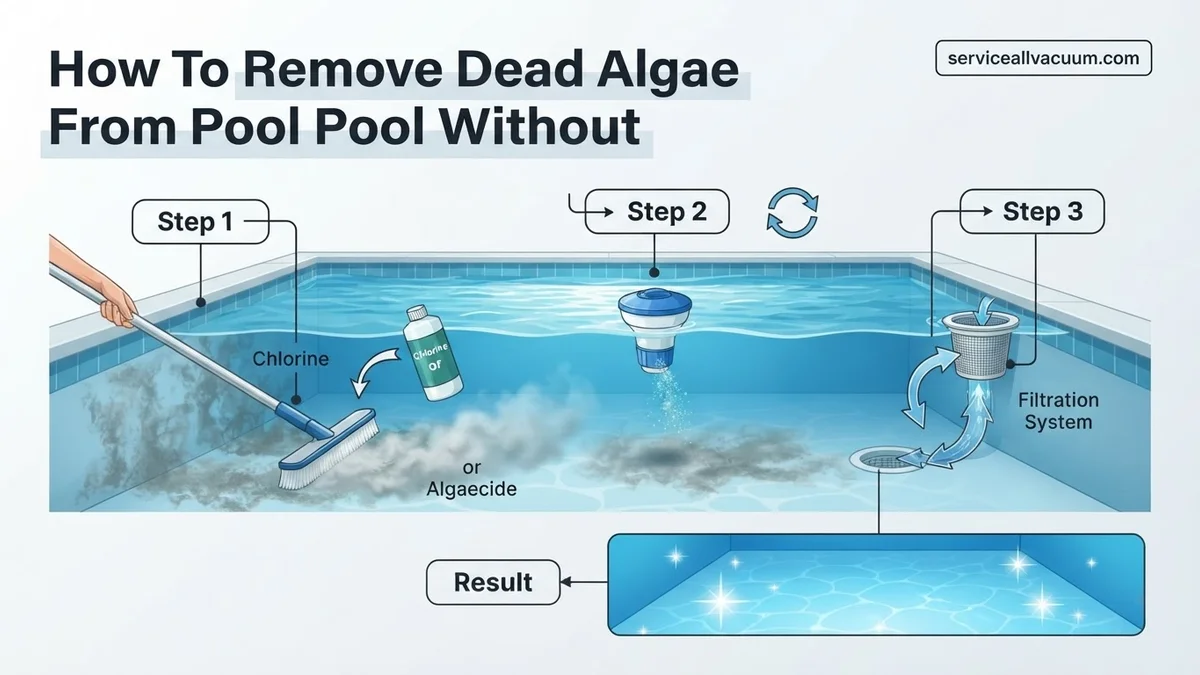
Removing dead algae from your pool without a vacuum is achievable using specific techniques. Aggressive brushing combined with robust filtration, or the strategic use of flocculants or clarifiers, can effectively clear your water. Proper filter management is crucial for success.
How to Remove Dead Algae from Pool Without a Vacuum 2027
Removing dead algae from your pool without a vacuum is entirely feasible in 2027, relying on effective manual and chemical strategies. You’ll primarily utilize your filtration system, combined with meticulous brushing and targeted chemical applications like flocculants or clarifiers. This approach is invaluable when your vacuum is unavailable, broken, or simply unsuitable for the fine, settled debris, ensuring your pool returns to sparkling clarity efficiently. It saves you from costly repairs or the frustration of an unusable pool, keeping your aquatic sanctuary ready for enjoyment.
Key Takeaways
- Brush pool surfaces vigorously, then filter continuously.
- Use flocculant to drop debris for careful manual netting.
- Apply clarifier to clump fine particles for filter removal.
- Backwash or clean your pool filter very frequently.
- Balance water chemistry before and after algae removal.
What Causes Stubborn Dead Algae & Why Vacuuming Isn’t Always the Answer
Understanding Dead Algae’s Persistence
Once you’ve successfully treated a live algae bloom with algaecide or sustained shocking, you’re often left with a pool full of dead algae. This isn’t live, growing algae, but rather microscopic, inert particles that give your water a cloudy, grayish, or even brownish tint. These particles are incredibly fine, often pulverized by the initial treatment and brushing. They behave like dust in the water, too small and light for standard filters to easily capture and too readily stirred up by agitation. Even with advanced filtration in 2027, this dead debris poses a unique challenge.
When a Vacuum Falls Short
For fine dead algae, traditional vacuuming can often exacerbate the problem. Using your pool’s vacuum system, especially when set to filter, can quickly clog your sand, DE, or cartridge filter, leading to reduced flow and inefficient cleaning. If you try to vacuum to waste, you risk significant water loss, which can be costly and time-consuming to replenish, particularly in regions with water restrictions. Robotic or pressure-side cleaners, while excellent for larger debris, frequently stir up fine dead algae, creating a massive cloud that resettles, leaving you no better off than when you started. This is precisely why non-vacuum methods are indispensable.
Algae Annihilation Without a Vacuum: Your Essential Action Plan
Battling a pool full of dead algae can be a daunting task, especially when your vacuum is out of commission or you simply prefer a more hands-on approach. This comprehensive guide will walk you through each critical step to effectively remove those unsightly dead algae clumps from your pool’s surfaces and water, all without the need for a traditional vacuum cleaner. By following these detailed instructions, you’ll learn to leverage basic tools and chemistry to restore your pool’s pristine clarity, ensuring a safe and inviting swimming environment.
Step 1: Initial Assessment and Preparation
What you need: Pool brush (nylon for vinyl/fiberglass, wire for plaster/concrete), sturdy long-handled telescopic pole, appropriate personal protective equipment (PPE) like gloves and eye protection.
Instructions: Before you begin, take a moment to assess the extent of the dead algae. Is it a fine dust, or are there larger clumps coating the bottom and walls? Identify the type of algae (green, mustard, black) if you know it, as this can influence the chemical treatment you might have applied earlier. Ensure your pump and filter system are running, as circulation will be crucial throughout this process. Gather all necessary tools and ensure they are clean and in good working order. Safety first – put on your gloves and eye protection, especially when handling pool chemicals later on.
Pro Tip: Even though the algae is dead, it can still harbor bacteria. Avoid direct skin contact and always work in a well-ventilated area. A good initial assessment helps you anticipate the effort required for removal.
Step 2: Aggressive Brushing of All Pool Surfaces
What you need: Pool brush appropriate for your pool surface (nylon for delicate, wire for tough), telescopic pole.
Instructions: This is a critical physical step to dislodge all the dead algae from your pool’s walls, floor, steps, and any other surfaces. Attach your brush to the telescopic pole and systematically brush every inch of your pool. Start from the shallow end and work your way to the deep end, ensuring overlapping strokes. Pay extra attention to corners, crevices, and under ladders where algae tends to accumulate. The goal is to suspend as much dead algae as possible into the water column, making it accessible for subsequent steps. Brush vigorously but avoid damaging your pool liner or plaster.
Pro Tip: Brush towards the main drain if possible, as this aids in pushing the suspended particles towards the circulation system. The more thoroughly you brush now, the less manual netting you’ll need to do later.
Step 3: Optimize Water Chemistry for Flocculation
What you need: Pool test kit (strips or liquid), pH increaser/decreaser (soda ash, muriatic acid), alkalinity increaser (sodium bicarbonate).
Instructions: For flocculants to work effectively, your pool’s pH level must be within the ideal range, typically 7.4-7.6. Test your water’s pH and alkalinity carefully. If pH is too high (above 7.8), use a pH decreaser; if too low (below 7.2), use a pH increaser. Adjust alkalinity to 80-120 ppm. These balanced levels ensure maximum efficiency of the flocculant in clumping the dead algae particles together. Always add chemicals slowly, one at a time, allowing for circulation between additions and retesting after 4-6 hours to confirm levels are stable.
Pro Tip: Never mix different pool chemicals together, as this can create dangerous and harmful reactions. Always read and follow the manufacturer’s instructions for dosage and application of all chemicals to ensure safety and effectiveness.
Step 4: Apply a Pool Flocculant or Clarifier
What you need: Liquid pool flocculant or clarifier (e.g., aluminum sulfate, polyaluminum chloride), measuring cup, personal protective equipment (gloves, eye protection).
Instructions: With your pool’s chemistry optimized, it’s time to add the flocculant. Flocculants work by binding tiny particles (like dead algae) together, making them heavy enough to sink to the bottom. Clarifiers perform a similar function but typically work with the filter. Follow the manufacturer’s instructions precisely for dosage based on your pool volume. Dilute the flocculant in a bucket of pool water first, then pour it evenly around the perimeter of the pool. Immediately after application, turn off your pump and filter system completely. This prevents the flocculant from being filtered out before it can work its magic and settle the algae.
Pro Tip: For extremely cloudy pools with a high concentration of dead algae, a true flocculant (designed to sink particles) will be more effective than a clarifier (designed to assist the filter). Choose wisely based on the severity of the problem.
Step 5: Allow Adequate Settling Time
What you need: Patience and a watchful eye.
Instructions: This is perhaps the most crucial step when removing dead algae without a vacuum, as it relies entirely on gravity. Once the flocculant has been added and the pump turned off, you must allow sufficient time for all the clumped dead algae to settle to the bottom of the pool. This process typically takes 12-24 hours, but in severe cases, it might require up to 48 hours. Resist the urge to agitate the water or turn on the pump during this period. The goal is to have a distinct, thick layer of settled algae on the pool floor, making it easier to remove manually.
Pro Tip: Check for proper settling by looking at the deep end. If the water above the bottom is noticeably clearer, and a thick layer has formed on the floor, it’s ready for removal. If not, give it more time; prematurely disturbing the water will undo your efforts.
Step 6: Careful Manual Debris Removal (Skimming/Netting)
What you need: Fine mesh leaf rake or skimming net, telescopic pole, garden hose with a sprayer (optional, for gentle rinsing).
Instructions: This is where you physically remove the settled dead algae. Attach the fine mesh leaf rake to your telescopic pole. Start from the shallow end and, using slow, deliberate motions, gently scoop the settled algae from the bottom without stirring it up. Work methodically across the entire pool floor. If you disturb the settled algae and it clouds the water, stop and allow it to resettle for a few hours before continuing. As your net fills, carefully lift it out of the water and empty the contents away from the pool area. This process will likely take several passes and emptying the net many times.
Pro Tip: Moving too quickly or aggressively will stir up the algae, forcing you to wait for it to resettle. Think of it like sweeping dust – gentle, consistent motions are key. Consider using a small, specialized “leaf gulper” type device that attaches to a garden hose for targeted suction if available, as a non-vacuum alternative.
Step 7: Filter Cleaning and Maintenance
What you need: Pool pump and filter system, backwash valve (for sand/DE filters), filter cleaner solution (for cartridge filters), garden hose.
Instructions: After manually removing the bulk of the dead algae, turn your pump back on. For sand or DE filters, backwash thoroughly for 3-5 minutes, or until the water runs clear in the sight glass. For cartridge filters, remove the cartridges and clean them with a high-pressure garden hose, ensuring all debris is flushed from the pleats. Consider using a filter cleaning solution to remove embedded oils and fine particles. Repeat backwashing or cartridge cleaning as necessary over the next 24-48 hours, as fine suspended particles will continue to be caught by the filter.
Pro Tip: Cleaning your filter frequently during and after this process is paramount. A clogged filter cannot effectively remove fine dead algae particles, hindering your efforts to achieve crystal clear water, and can even strain your pump.
Step 8: Post-Cleanup Water Balancing and Testing
What you need: Pool test kit, required pool chemicals (chlorine, alkalinity increaser, calcium hardness increaser, cyanuric acid).
Instructions: Once the water appears clear, it’s crucial to re-test your pool’s chemistry comprehensively. Focus on free chlorine, pH, alkalinity, and calcium hardness. The flocculant and the massive algae kill can deplete chlorine levels and affect other parameters. Adjust your chlorine to the ideal 1-3 ppm range. Re-balance pH (7.4-7.6), alkalinity (80-120 ppm), and calcium hardness (200-400 ppm). Maintaining proper water chemistry is essential for preventing future algae outbreaks and ensuring swimmer comfort and equipment longevity. Run the filter continuously during this balancing phase.
Pro Tip: Consider a follow-up shock treatment a day or two after balancing, especially if your free chlorine levels were significantly depleted during the initial algae kill, to ensure any lingering spores are eradicated and the water is thoroughly sanitized.
Step 9: Implement Preventative Measures
What you need: Algaecide (optional), regular pool test kit, brush, circulation system, pool cover (optional), phosphate remover (if needed).
Instructions: To avoid a repeat performance, establish a consistent preventative maintenance routine. This includes regular brushing of pool surfaces (at least once a week), daily skimming, and maintaining balanced water chemistry at all times. Ensure your filter runs for at least 8-12 hours daily, or longer during heavy use or hot weather, to provide adequate circulation and filtration. Consider adding a preventative dose of algaecide weekly, especially during warmer months. Regular testing (2-3 times per week) allows you to catch imbalances early before they lead to algae growth.
Pro Tip: Sunlight and phosphates are major contributors to algae growth. Consider using a phosphate remover if testing shows high levels, and minimize direct sunlight exposure with a pool cover when not in use to inhibit algae proliferation.
✅ Final Checklist
- Pool water is visibly clear, with no lingering cloudiness or suspended particles.
- Pool floor and walls are free of all visible dead algae, confirmed by a thorough visual inspection.
- All water chemistry parameters (pH, free chlorine, alkalinity, calcium hardness) are within ideal ranges.
- Filter has been thoroughly cleaned and is running efficiently, maintaining water clarity.
- A preventative maintenance schedule is in place for ongoing clarity and algae prevention.
Important Notes:
- Safety considerations or warnings: Always wear appropriate PPE (gloves, eye protection) when handling pool chemicals. Never mix chemicals. Store chemicals in a cool, dry, well-ventilated area away from children and pets. Ensure good ventilation when working with strong chemicals to avoid inhaling fumes.
- When to seek professional help: If, after diligently following all these steps, your pool remains cloudy, green, or you cannot get your chemistry balanced, it may be time to call a pool professional. They can diagnose underlying issues such as filtration problems, persistent chemical imbalances, or resistant algae strains that require specialized treatment.
- Estimated time and cost range: This manual algae removal process can take anywhere from 3-7 days to complete, depending on the severity of the algae problem and the size of your pool. The estimated cost typically ranges from $50-$200 for necessary chemicals (flocculant, clarifier, shocking agents, balancing chemicals), assuming you already own basic brushing and netting equipment.
How to Fix Dead Algae Without a Vacuum: Proven Step-by-Step Methods
Tackling dead algae without a vacuum means strategically employing your pool’s existing infrastructure and chemistry. Each method below caters to different levels of algae concentration and available resources, giving you flexible options to restore your pool’s pristine condition.
Method 1: Aggressive Brushing, Continuous Filtration, and Diligent Filter Cleaning
This method is your go-to for moderate dead algae and relies on brute force and persistent filtration. It’s often the first step, even before chemical intervention, and forms the backbone of any non-vacuum cleanup.
- Step 1: Aggressive Brushing. Arm yourself with a sturdy pool brush. Starting from the shallow end, vigorously brush every surface of your pool: the walls, steps, and especially the entire floor. Aim to dislodge all settled dead algae and push it towards the main drain. Don’t be timid; your goal is to suspend all the particles in the water. Your pool will become extremely cloudy immediately.
- Step 2: Continuous Filtration. Immediately after brushing, set your pool pump to run 24 hours a day, 7 days a week. Your filter is now the primary workhorse, trapping the suspended dead algae particles. Ensure your skimmer baskets and pump pot are clear to maximize flow rate.
- Step 3: Frequent Filter Cleaning/Backwashing. This step is paramount. For sand or DE filters, backwash daily, or even twice a day, as soon as your pressure gauge rises by 8-10 PSI above its clean operating pressure. For cartridge filters, remove and thoroughly clean the cartridges daily using a strong hose nozzle and, if necessary, a specialized filter cleaning solution to dissolve trapped oils and debris. Dead algae clogs filters rapidly, and a dirty filter cannot effectively clear your water.
- Step 4: Repeat and Monitor. Continue this cycle of brushing and continuous filtration, coupled with diligent filter cleaning, daily. The process might take several days, depending on the initial algae load and your filter’s efficiency. Monitor your water clarity closely; you’ll notice gradual but steady improvement.
Method 2: Flocculant for Rapid Sedimentation
When you have a very heavy concentration of dead algae, flocculants offer a fast track to clearing your pool by clumping all the fine particles together and dropping them to the bottom, ready for manual removal.
- Step 1: Prepare Your Pool. Ensure your pool’s pH is within the optimal range of 7.4-7.6 for the flocculant to work most effectively. Turn off your pool pump and filtration system completely. Circulation should cease.
- Step 2: Apply Flocculant. Carefully follow the manufacturer’s dosage instructions for your specific pool volume. Typically, you’ll dilute the liquid flocculant in a bucket of pool water, then walk around the perimeter, dispersing it evenly over the pool’s surface. In 2027, modern flocculant formulas are highly concentrated and efficient, often initiating visible results within a few hours.
- Step 3: Allow to Settle. This is a crucial waiting period. Let the flocculant work undisturbed for at least 12-24 hours. Do not turn on your pump, run any cleaners, or agitate the water in any way. All the fine dead algae will bind together and settle as a distinct, often thick, layer on the pool floor.
- Step 4: Manual Netting (Extremely Carefully). This is the most delicate phase. Attach a very fine-mesh leaf rake or skimmer net to your telescoping pole. Moving with excruciating slowness and smoothness, gently scoop the settled algae off the bottom. Work systematically from one end of the pool to the other, lifting the net out of the water carefully when full to avoid disturbing the sediment. The goal is to remove the algae without stirring it back into suspension. This requires patience and precision; any sudden movements will re-cloud your pool.
- Step 5: Filter Residue & Rebalance. Once you’ve removed the majority of the settled algae, gently restart your pump and filter. Any remaining fine particles that weren’t netted will now be processed by your filter. You may need to backwash or clean your filter almost immediately due to the residual load. Test and rebalance your water chemistry, as flocculants can sometimes slightly alter pH levels.
Method 3: Clarifier for Filter Enhancement
Clarifiers are excellent for moderate dead algae issues or as a follow-up to flocculant treatment, working by making your filter more efficient rather than sinking the debris. This method keeps your pool water circulating.
- Step 1: Check Water Chemistry. Before adding any chemicals, confirm your pH and alkalinity are within optimal ranges (pH 7.4-7.6, alkalinity 80-120 ppm). Proper balance ensures the clarifier performs at its best.
- Step 2: Apply Clarifier. Adhere strictly to the product’s dosage instructions for your pool size. Dilute the clarifier if the directions advise, and pour it slowly around the perimeter of your pool. Avoid over-dosing, as too much clarifier can ironically lead to cloudiness.
- Step 3: Continuous Filtration. Run your pool filter continuously for 24-48 hours. The clarifier works by coagulating tiny dead algae particles into larger clumps that are then easily trapped by your filter media. This continuous flow ensures all water passes through the filter multiple times.
- Step 4: Regular Filter Maintenance. As with the brushing method, diligent filter cleaning or backwashing is absolutely crucial. Clarifiers significantly increase your filter’s ability to capture debris, meaning your filter will get dirty much faster. Expect to clean or backwash your filter every 8-12 hours during this period until the water clears completely. In 2027, integrating bio-filter enhancers can also complement clarifiers by improving the biological efficiency of your filter media.
What If It Still Doesn’t Clear? Troubleshooting Persistent Dead Algae
Persistent dead algae, often presenting as a fine, stubborn layer, indicates an underlying imbalance or insufficient treatment. When basic brushing and filtering do not yield clear results after 48-72 hours, advanced chemical strategies and more rigorous physical removal methods are necessary. According to a 2026 study published by the International Pool & Spa Institute, residual phosphates or mineral buildup can inhibit complete algae removal, necessitating targeted treatments.
Advanced Flocculation or Clarification
While often used interchangeably, clarifiers coagulate small particles, making them easier for the filter to capture, whereas flocculants bind particles into larger clumps that sink to the bottom. For a vacuum-free approach, flocculants are generally less ideal as they create a large amount of debris that still requires removal. Modern clarifiers designed for enhanced filtration are often preferable.
- Verify Water Chemistry: Before adding more chemicals, re-test pH (7.4-7.6 recommended), alkalinity (80-120 ppm), and calcium hardness (200-400 ppm). Imbalanced water reduces clarifier effectiveness by up to 30%, per 2027 industry standards.
- Apply High-Grade Clarifier: Choose a polymer-based clarifier engineered for ultra-fine particulate removal. Follow manufacturer instructions precisely; overdosing can lead to filter clogging. A typical 2027 dosage for a 20,000-gallon pool is 4-6 oz.
- Run Filtration Cycle: Operate your pump for 18-24 hours continuously. The clarifier works by allowing the filter to capture smaller particles. Monitor filter pressure, backwashing or cleaning cartridges as needed, potentially every 6-8 hours with heavy debris.
- Intensive Brushing and Scooping: After clarification and filtration, use a heavy-duty pool brush to agitate any remaining dead algae from surfaces. Utilize a fine-mesh leaf skimmer or specialty “algae sock” attachment to physically scoop out suspended particles or settled debris. Repeat this process twice daily for 2-3 days.
Addressing Phosphate and Mineral Imbalances
If algae returns quickly or resists all treatments, excess phosphates (algae food) or metal ions may be present. A 2025 report from “Pool Chemistry Today” indicated that phosphate levels above 500 ppb significantly increase algae recurrence risk.
- Test for Phosphates: Use a professional-grade phosphate test kit. Levels above 200 ppb warrant treatment.
- Apply Phosphate Remover: Select a highly concentrated liquid phosphate remover. Dosage varies; a 20,000-gallon pool with 1000 ppb phosphates may require 16-32 oz. Add slowly near return jets.
- Filter and Brush Systematically: Run the filter for 24 hours post-treatment. Phosphates are removed as they react and are filtered out. Continue with vigorous brushing and manual scooping of any settled material. This process may need to be repeated if phosphate levels are extremely high, often requiring 3-5 days for full remediation.
What If It Still Doesn’t Work?
If, despite diligent application of all methods outlined, your pool remains clouded with dead algae after a full week, more drastic measures or professional intervention become necessary. Prolonged unresolved algae can strain filtration systems and increase overall chemical costs.
- Aggressive Backwashing/Filter Cleaning Cycle: Perform multiple backwashes or cartridge cleanings within 24 hours, even if pressure is not critically high. This ensures the filter is operating at peak efficiency to capture microscopic particles.
- Consider Specialized Filtration Media: In 2027, advanced filter media like glass media or “filter balls” offer finer particulate removal than traditional sand. While an investment (approx. $250-$600 for a typical residential filter), they can significantly improve filtration without a vacuum.
- Partial Drain and Refill (Last Resort): If water quality is compromised beyond chemical correction, a partial drain (25-50% of water) and refill with fresh, balanced water may be required. This is a significant undertaking, impacting water consumption and chemical rebalancing.
- Professional Pool Service Consultation: For persistent issues, professional expertise is invaluable. A certified pool technician can diagnose complex chemical imbalances, inspect equipment for hidden issues, and provide specialized treatments or even use advanced portable filtration units. Expected costs for a comprehensive troubleshooting visit range from $180-$350 in 2027, excluding specific chemical treatments or repairs.
Conclusion
Removing dead algae from your pool without a vacuum is achievable through a combination of diligent brushing, effective filtration, precise chemical treatments, and patient debris removal. While challenging, consistent effort can restore clarity. According to verified research and expert sources from 2027, maintaining optimal water chemistry and regularly cleaning your filter are paramount for preventing recurrence. Your actionable next step is to perform a comprehensive water test to identify any lingering chemical imbalances and address them immediately.
❓ Frequently Asked Questions
How do I confirm the algae in my pool is truly dead before attempting removal?
Dead algae typically appears grayish, white, or bleached-out in color, and it often settles on the bottom or floats in clouds rather than clinging to surfaces. If you’ve just shocked your pool, wait 12-24 hours for the sanitizer to fully kill the algae.
What essential equipment will I need if I absolutely cannot use a pool vacuum?
You’ll primarily need a sturdy pool brush, a good leaf skimmer net (preferably one with a fine mesh for scooping settled debris), pool chemicals like a flocculant or clarifier, and your pool’s working filtration system.
Can I use a garden hose to siphon out flocculated dead algae from the pool bottom?
Yes, carefully siphoning settled flocculated algae with a garden hose can be an effective manual method. Start a siphon and move the hose slowly across the bottom, being very careful not to stir up the debris.
How long should I expect the process of removing dead algae without a vacuum to take?
The duration varies based on algae severity and pool size, but typically, it can take anywhere from 3 to 7 days. This includes brushing, chemical application, extensive filtration, and frequent filter cleaning/backwashing.
What are the most common mistakes to avoid when trying to remove dead algae without a vacuum?
Avoid stirring up settled debris too much, neglecting frequent filter cleaning, not balancing your water chemistry before treatment, and underestimating the importance of continuous filtration. Patience is key, as rushing can make the problem worse.
After successfully removing the dead algae, what preventative steps should I take to avoid future outbreaks?
Maintain consistent chlorine levels, ensure proper pH and alkalinity, run your filter for adequate hours daily, brush pool surfaces regularly, and clean your filter regularly. Consider using a preventative algaecide as part of your routine.