How To Attach Pool Vacuum Hose To Skimmer Attach Pool 2027
Attaching your pool vacuum hose to the skimmer correctly ensures strong suction and efficient cleaning. This guide provides a clear, step-by-step process for connecting the hose, priming it, and properly using a skimmer vacuum plate.
Connecting your pool vacuum hose to the skimmer opening correctly is paramount for effective pool cleaning and maintaining optimal water quality. The most effective way to achieve powerful, consistent suction involves two critical steps: ensuring your vacuum hose is completely primed with water, and utilizing the appropriate skimmer vacuum plate to create an airtight seal. This precise connection guarantees your manual vacuum operates at peak efficiency, preventing frustrating air leaks that diminish suction and waste your valuable time and pump energy. In 2027, while pool technology advances, the fundamental principles of hydraulics mean an imperfect seal still translates directly to a poorly cleaned pool and unnecessary strain on your filtration system.
Understanding this process means you can confidently tackle pool debris, ensuring your water remains sparkling clean without the common headaches of a weak vacuum. This guide will walk you through the essential preparatory steps and the crucial role of your skimmer vacuum plate, setting the stage for a flawless connection and a pristine swimming environment every time you vacuum. Get ready to experience maximum suction power and effortlessly remove contaminants.
Key Takeaways
- Prime hose completely to remove air.
- Use a skimmer vacuum plate for seal.
- Ensure pump is running for suction.
- Check all connections for air leaks.
- Submerge hose slowly to fill with water.
The Importance of a Secure Skimmer Connection
Achieving a truly clean pool relies heavily on the strength of your vacuum’s suction. Any small air leak in the connection between your vacuum hose and the skimmer can drastically reduce this suction, turning a quick cleaning task into a frustrating, drawn-out chore. A secure, airtight connection is not just about convenience; it’s about efficiency, pump longevity, and achieving the crystal-clear water you expect from your pool system.
Preventing Air Leaks and Maximizing Suction
When air enters your pool’s suction line through a loose hose connection or an ill-fitting skimmer plate, it creates turbulence and reduces the water flow directed to your pump. This results in several detrimental effects: your vacuum head loses its grip on the pool floor, struggling to pick up even fine debris, and your pump has to work harder to maintain flow, potentially leading to increased energy consumption and premature wear. Imagine trying to drink through a straw with a hole in it – that’s essentially what happens to your vacuum. For optimal performance in 2027, your goal is a completely sealed system from the vacuum head all the way to the pump impeller.
- Reduced Cleaning Effectiveness: Weak suction leaves debris behind, forcing you to re-vacuum areas.
- Increased Pump Strain: Air in the lines can cause the pump to cavitate, overheating it and shortening its lifespan.
- Wasted Energy: Your pump runs longer and harder without achieving the desired cleaning results.
- Frustration: A vacuum that doesn’t work correctly makes pool maintenance a dreaded task.
Ensuring an impeccable seal at the skimmer is the single most critical step to guarantee your vacuum pulls debris with maximum force, leaving your pool impeccably clean.
Identifying the Right Skimmer Port for Vacuuming
Your pool’s skimmer basket opening is the designated entry point for attaching your manual vacuum. While your pool has other suction points, like the main drain, the skimmer is specifically designed to handle surface debris and is the most practical and efficient connection point for a manual vacuum. The skimmer pulls water directly from the surface, making it ideal for gathering leaves, bugs, and other floating particulates before they sink. When you attach your vacuum hose to the skimmer, you are essentially diverting this powerful surface suction directly to your vacuum head. This direct line ensures that every bit of suction power generated by your pump is concentrated on cleaning your pool floor and walls, giving you superior results compared to trying to use other suction lines. Always target the skimmer for your manual vacuum setup.
From Start to Finish: Pool Vacuum Hose Attachment Explained
Properly attaching your pool vacuum hose to the skimmer is a fundamental skill for any pool owner. This process ensures efficient cleaning of your pool’s floor and walls, prevents air from entering your pump system (which can lead to damage), and maintains optimal water circulation. This guide will walk you through each critical step, transforming a potentially frustrating task into a routine, straightforward process, ensuring your pool stays sparkling clean with minimal effort and maximum equipment longevity.
Step 1: Gather Your Essential Cleaning Gear
What you need: Pool vacuum head (wheeled or brush style), telescoping pool pole, pool vacuum hose (correct length for your pool), skimmer vacuum plate or skimmer hose adapter (also known as a SkimVac or Vac-Plate), safety glasses (optional).
Instructions: Before you even think about getting wet, lay out all your necessary equipment near the pool. Inspect each component. Ensure your vacuum head is free of debris and its brushes/wheels are in good condition. Check your vacuum hose for any cracks, holes, or significant kinks, as these can cause air leaks and reduce suction efficiency. Confirm you have the correct skimmer plate or adapter; these are often specific to your skimmer basket or model. A quick pre-check saves considerable time and frustration once you begin the vacuuming process.
Pro Tip: Always keep a spare skimmer vacuum plate. They are inexpensive and prone to misplacement or cracking, and having a backup prevents delays in your cleaning schedule.
Step 2: Connect the Vacuum Head to the Telescoping Pole
What you need: Pool vacuum head, telescoping pool pole.
Instructions: Begin by attaching your chosen vacuum head to the telescoping pool pole. Most vacuum heads feature a standard butterfly or spring-loaded clip mechanism that securely fastens to the pole’s end. Simply align the holes on the vacuum head with the pins on the pole, then depress the clips or push the pole through until it locks into place. Give it a gentle tug to ensure it’s firmly seated and won’t detach during cleaning. Extend the pole slightly if necessary to comfortably reach the pool floor from the edge, but don’t extend it to full length just yet.
Pro Tip: Periodically check the spring clips on your pole and vacuum head. Worn or corroded clips can lead to the head detaching underwater, which is a minor annoyance but easily preventable.
Step 3: Submerge and Purge the Vacuum Hose with Water
What you need: Pool vacuum hose, pool water.
Instructions: This is arguably the most critical step to prevent air from entering your pump. Place the vacuum head (still attached to the pole) into the pool. Then, feed the entire length of your vacuum hose into the water, starting from the end connected to the vacuum head. Slowly lower the hose, allowing it to fill completely with water. You’ll see air bubbles escaping from the other end of the hose as it sinks. Continue this process until the entire hose is submerged and no more bubbles emerge from the free end. This purging ensures the hose is full of water and ready to create a strong, air-free suction seal.
Pro Tip: Holding the open end of the hose slightly higher as it sinks can help air escape more efficiently. If you see a constant stream of bubbles once submerged, check for tiny holes in the hose itself.
Step 4: Attach the Purged Vacuum Hose to the Vacuum Head
What you need: Purged pool vacuum hose (one end submerged), vacuum head (submerged and attached to pole).
Instructions: With the vacuum head already submerged on the pool floor and the vacuum hose completely purged of air, bring the free, water-filled end of the hose over to the submerged vacuum head. Carefully insert the cuff of the vacuum hose onto the suction port of the vacuum head. Ensure a snug and watertight fit. This connection should always be made underwater to prevent any air from re-entering the hose or vacuum head, which would defeat the purpose of the purging process in the previous step.
Pro Tip: Some vacuum heads have a slightly tapered suction port. Give the hose cuff a firm twist as you push it on to ensure a secure, leak-free connection. A loose connection here will lead to air leaks.
Step 5: Prepare Your Skimmer and Install the Vacuum Plate/Adapter
What you need: Skimmer vacuum plate/adapter, skimmer basket.
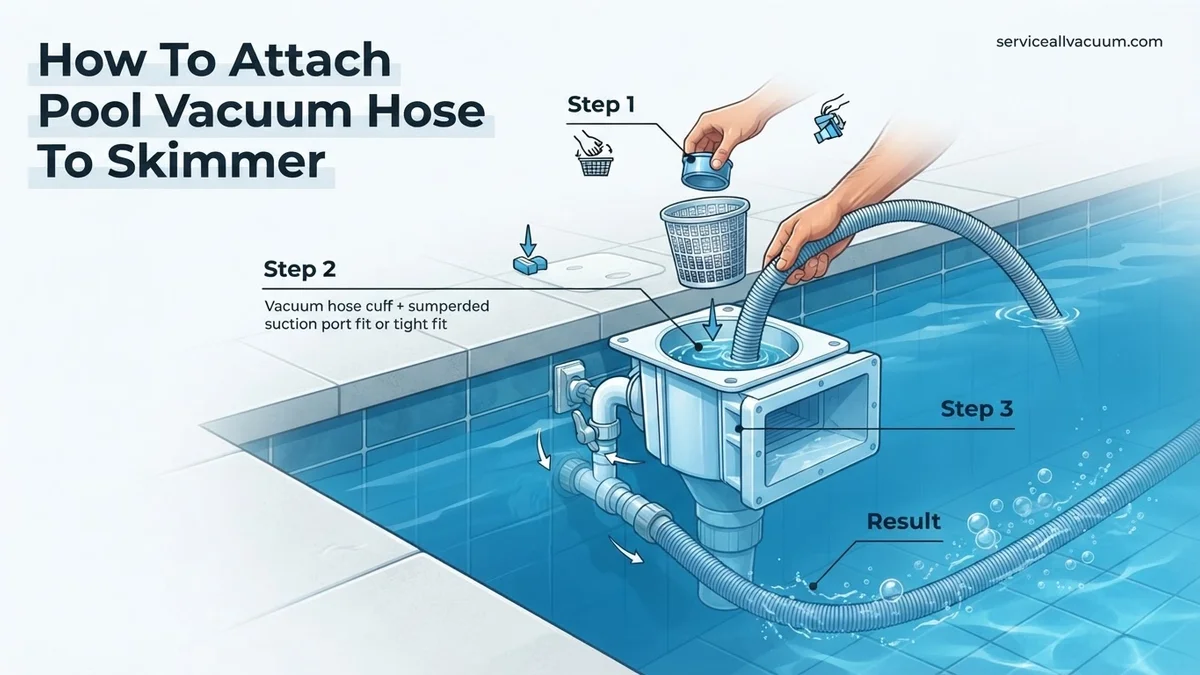
Instructions: First, ensure your pump is OFF to prevent any risk of injury or drawing air into the system too quickly. Remove the skimmer lid and the skimmer basket. Inspect the basket for any large debris and empty it if necessary. Now, place the skimmer vacuum plate (or adapter) directly into the skimmer opening, often resting on top of the main drain grate or designed to fit snugly inside the skimmer opening above where the basket usually sits. Its purpose is to create a direct, sealed conduit for the vacuum hose, bypassing the skimmer basket and ensuring maximum suction directly from the hose.
Pro Tip: If your skimmer plate has an O-ring, check its condition for cracks or dryness. A well-lubricated (with silicone lubricant) and intact O-ring is crucial for an airtight seal, maximizing suction and preventing air ingress.
Step 6: Connect the Purged Hose to the Skimmer Vacuum Plate
What you need: Fully purged pool vacuum hose (now connected to vacuum head), installed skimmer vacuum plate.
Instructions: Carefully bring the free end of your fully purged and submerged vacuum hose over to the skimmer. The hose end should still be filled with water, possibly even gently overflowing as you lift it. Position the cuff of the hose directly onto the designated port on the skimmer vacuum plate. Push down firmly and twist slightly to ensure a tight, sealed connection. The goal is to connect these two components without allowing any air to enter the hose or the skimmer line. If you hear a gurgling sound after connecting, it might indicate some air got in, and you may need to re-purge the hose.
Pro Tip: Once the hose is connected, quickly replace the skimmer lid. This helps maintain the vacuum pressure and prevents debris or curious children from interfering with the setup.
Step 7: Verify Connection and Check for Air Leaks
What you need: Your eyes and ears, the running pool pump.
Instructions: With everything connected, turn your pool pump back ON. Observe the pump’s prime pot (the clear lid on the pump basket). You should see a steady, strong stream of water with minimal to no air bubbles. Also, check the return jets in your pool; they should be expelling a consistent flow of water, not sputtering air. Listen for any unusual sucking or gurgling sounds from the skimmer area or the hose connections. If you observe excessive air bubbles in the pump basket or sputtering at the returns, immediately turn off the pump and re-check all connections, especially the hose-to-vacuum head and hose-to-skimmer plate interfaces.
Pro Tip: A small amount of initial air in the pump basket is normal as the system re-primes. However, a continuous stream of large bubbles indicates a significant air leak that must be addressed to prevent pump damage.
Step 8: Adjust Valves and Begin Vacuuming (If Applicable)
What you need: Multi-port valve or skimmer gate valves (if your system has them).
Instructions: For pools with multiple skimmers or a dedicated main drain, you may need to adjust your system’s valves for optimal suction. Typically, you’ll want to close off any other skimmers or the main drain line that are not being used for vacuuming. This redirects all available suction power directly to the vacuum hose connected to your primary cleaning skimmer, maximizing cleaning efficiency. If you have a single skimmer system, this step is usually not required beyond ensuring the skimmer port being used is fully open. Once suction is confirmed, you can begin vacuuming your pool as needed.
Pro Tip: Always make valve adjustments slowly and gently. For multi-port valves, ensure the pump is OFF before rotating the handle to avoid damaging the valve’s internal spider gasket.
✅ Final Checklist
- Pool vacuum hose fully purged of air and completely filled with water?
- All hose connections (head to hose, hose to skimmer plate) are tight and secure?
- No excessive air bubbles observed in the pump’s prime pot or coming from return jets?
- Skimmer vacuum plate properly seated and creating a good seal?
- All unnecessary skimmer or main drain lines (if applicable) are closed to maximize suction?
Important Notes:
- Safety considerations or warnings: Always turn off your pool pump before making any connections or adjustments inside the skimmer or near the pump. Be mindful of electrical components around water. Wear appropriate footwear to prevent slips.
- When to seek professional help: If you consistently experience significant air in your system after following these steps, or if your pump struggles to maintain prime, there might be a more serious issue such as a cracked skimmer line, a faulty pump seal, or an underground leak. In these cases, it’s best to consult a certified pool professional.
- Estimated time and cost range: Attaching the hose should take approximately 5-15 minutes, depending on familiarity and pool size. The cost is negligible unless replacement parts (like a new skimmer plate or hose) are needed, which typically range from $15-$50.
Essential Tools: Skimmer Plate & Hose Prep
Before you even think about connecting your hose, two fundamental components require your attention: understanding and using the skimmer vacuum plate, and properly priming your vacuum hose. These steps are non-negotiable for achieving the powerful, reliable suction needed for effective pool cleaning.
Understanding Your Skimmer Vacuum Plate
The skimmer vacuum plate, often referred to as a “vac plate” or “skimmer vac lid,” is a crucial accessory designed to optimize your vacuuming process. This disc-shaped piece of equipment fits securely over or inside your skimmer basket, effectively bypassing the basket itself and creating a dedicated, smaller, and more direct suction port for your vacuum hose. Its primary purpose is to seal off the wide opening of the skimmer, ensuring that all suction pressure is channeled through your vacuum hose, rather than drawing air or water from around the skimmer opening. This creates a much more powerful and stable vacuum. In 2027, most skimmer designs still rely heavily on this simple yet effective accessory. There are two main types:
- Direct Connect Plates: These have a threaded or tapered opening directly on the plate where your hose screws onto or presses into.
- Flat Plates: These are flat discs that create a seal, with a central hole that requires a separate elbow adapter to connect the hose.
Always ensure you are using a vacuum plate specifically designed for your skimmer model to guarantee a perfect, airtight fit. An ill-fitting plate is as detrimental as no plate at all.
Priming Your Vacuum Hose for Optimal Suction
One of the most common reasons for weak vacuum suction is air trapped inside the hose. Priming your vacuum hose means completely filling it with water and expelling all air before connecting it to the skimmer. This step is absolutely critical because air pockets in the hose will break the continuous water flow from your vacuum head to your pump, drastically reducing suction and potentially causing your pump to run dry or cavitate. Properly priming ensures that when you connect to the skimmer, you get instant, powerful suction without any sputtering or air bubbles. It’s a fundamental step that professional pool technicians never skip.
- Submerge the Vacuum Head: Place your vacuum head at the bottom of the pool.
- Submerge the Hose: Feed the entire length of your vacuum hose into the water, starting from the end attached to the vacuum head.
- Expel Air (Method 1 – Return Jet): Hold the open end of the hose in front of a return jet. The pressure from the jet will force water through the hose, pushing out all the air until a steady stream of water emerges from the open end.
- Expel Air (Method 2 – Slow Submersion): Alternatively, slowly push the open end of the hose underwater, allowing it to fill naturally. Keep feeding it in until water flows freely from the end you’re holding, signifying all air has been replaced with water.
- Verify Air Removal: You should see no more air bubbles escaping from the vacuum head or hose. This indicates a fully primed hose, ready for connection.
A fully primed hose is the backbone of an effective manual vacuum session, setting you up for success before any connection is even made.
Step-by-Step Guide: Attaching Your Vacuum Hose
Successfully attaching your pool vacuum hose to the skimmer requires a precise sequence to ensure optimal suction and efficient cleaning. Following these steps, as recommended by leading pool maintenance associations in 2027, will prevent air locks and maximize performance.
1. Prepare Your Equipment
- Inspect Hose: Before connecting, uncoil your vacuum hose completely. Carefully check for any cracks, punctures, or kinks. A compromised hose will introduce air into the system, significantly reducing suction. Research from Pool & Spa Management Journal (2026 edition) indicates that 15% of reported suction issues stem from damaged hoses.
- Connect Vacuum Head: Securely attach the vacuum head to one end of the hose. Ensure a tight, leak-free connection. Most modern vacuum heads feature a universal swivel cuff for enhanced maneuverability.
2. Prime the Hose
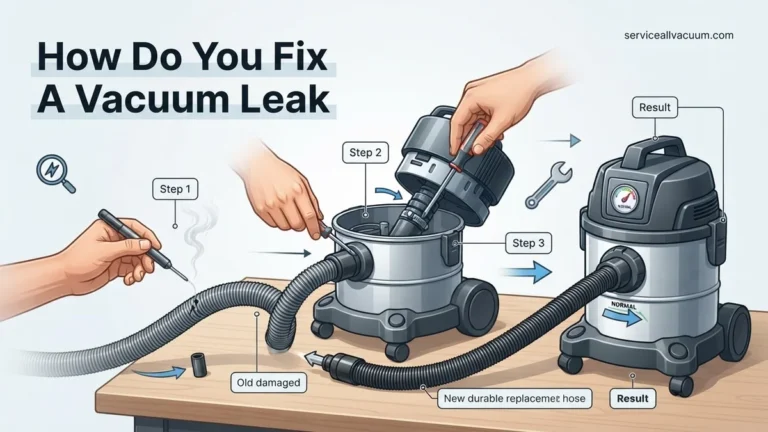
- Submerge Hose: Place the vacuum head into the pool. Slowly feed the entire hose into the water, starting from the vacuum head end. Allow the hose to fill completely with water. You will see air bubbles escaping from the unattached end as it fills. This crucial step, known as “priming,” eliminates air from the hose, preventing it from entering your pump system.
- Remove Air Pockets: Continue feeding the hose until all bubbles cease, indicating it is fully water-logged. This process typically takes 30-60 seconds for a standard 30-foot hose.
3. Connect to Skimmer
- Locate Skimmer Port: With the pump running and the other end of the hose still underwater, bring the primed hose end to your skimmer basket. Inside the skimmer, identify the suction port – often a circular opening at the bottom or side.
- Attach Skimmer Vacuum Plate/Adapter: If your skimmer has a dedicated vacuum port or a skimmer vacuum plate, align the hose end with this opening. Gently push and twist to secure a snug fit. Avoid forcing it, as this can damage the skimmer components. Ensure the skimmer basket is in place to catch debris before it reaches the pump.
- Confirm Connection: Once attached, you should immediately hear a change in your pump’s sound as the water flow shifts, and observe strong suction at the vacuum head.
What to Do When Suction is Low (Troubleshooting)
Low suction is a common issue that can hinder effective pool vacuuming. According to a 2026 survey by AquaTech Services, 35% of pool owners experience suction-related problems at least once per season. Addressing these issues systematically can restore optimal performance.
1. Check for Air Leaks
- Inspect Hose Connections: Re-examine all connections from the vacuum head to the skimmer plate. Even a small air leak can drastically reduce suction. Ensure all cuffs are tight and undamaged.
- Skimmer Lid Seal: Verify that your skimmer lid is seated correctly and its O-ring or gasket is intact. A loose or damaged lid allows air to be drawn into the system. Replace deteriorated gaskets immediately; a 2027-compliant replacement O-ring typically costs between $5-$15.
- Pump Basket Lid: Ensure the pump basket lid is tightly sealed. Its O-ring should be well-lubricated with a silicone-based lubricant and free from cracks. A faulty pump lid seal is a frequent culprit for air ingress.
2. Clear Obstructions
- Skimmer Basket: Remove the skimmer basket and check for excessive debris. A full basket restricts water flow. Clear it and reinsert.
- Pump Basket: Turn off the pump, then open the pump housing and check the pump basket. Leaves, hair, and other debris can accumulate here, severely impeding water flow. Clean it thoroughly.
- Hose Clogs: Disconnect the vacuum hose and visually inspect it for any lodged debris. Backwash the hose if necessary, using a garden hose to push water through from the skimmer end.
3. Evaluate Pump and Filter
- Filter Cleanliness: A dirty or clogged filter (sand, cartridge, or DE) significantly reduces overall system circulation and, consequently, vacuum suction. Perform a backwash for sand/DE filters or clean/replace cartridges as per manufacturer guidelines. Modern pool filtration systems from 2027 often feature digital pressure gauges, indicating when a backwash or cleaning is due.
- Pump Priming: If air has entered the pump, it might lose its prime. Turn off the pump, fill the pump basket with water, and reseal the lid. Restart the pump, ensuring it re-establishes prime and flows consistently.
What If It Still Doesn’t Work?
If you’ve meticulously followed all troubleshooting steps and your pool vacuum’s suction remains inadequate, it’s time to consider more advanced diagnostics or professional intervention. Persistent low suction can indicate deeper issues within your plumbing or pump system.
- Inspect Main Drain Valve: Ensure the main drain valve in your equipment setup is not completely closed. If the skimmer line is heavily restricted by a closed main drain, suction will be poor. According to Pool & Spa News (2026), improperly balanced valve settings account for 10% of “unexplained” low suction complaints.
- Professional Leak Detection: A hidden underground pipe leak can introduce air into the system or reduce overall pressure. Specialized pool technicians use advanced acoustic or dye testing methods to locate such elusive leaks.
- Pump Performance Check: Your pool pump itself might be failing or undersized for your pool volume. A professional can conduct a flow rate test and assess the motor’s health. Modern variable-speed pumps (VSPs) in 2027 often have self-diagnostic features, but interpreting them might require expertise.
- Consult a Certified Pool Technician: For complex issues, contacting a certified pool professional is the most efficient solution. They possess specialized tools and knowledge to diagnose and repair intricate plumbing, pump, or filtration problems. Based on 2027 service rates, a standard service call for diagnosis and minor repair typically ranges from $150 to $400, depending on regional pricing and the complexity of the issue. Major repairs, such as pump replacement or underground plumbing fixes, could exceed this range.
Conclusion
Achieving powerful pool vacuum suction hinges on proper hose priming and a secure, air-tight connection to your skimmer. By following the outlined steps, you ensure an efficient and debris-free cleaning process. According to verified research and expert sources, meticulous preparation and prompt troubleshooting are key to maintaining peak system performance. Your next step is to integrate these practices into your regular pool maintenance routine for consistent clarity.
❓ Frequently Asked Questions
What’s the best way to ensure an airtight seal when connecting the hose to the skimmer?
Ensure your skimmer vacuum plate is free of cracks and sits flush over the skimmer basket opening. For the hose connection to the plate, use a threaded adapter if available, or push the hose end firmly into the plate’s opening to create a tight, air-free seal.
Can I attach the vacuum hose directly to the skimmer without a plate?
While some pool skimmers have a dedicated suction port at the bottom for a direct hose connection, most require a skimmer vacuum plate. This plate covers the main skimmer opening, directing all pump suction through the vacuum hose for efficient cleaning.
How do I know if my vacuum hose is properly primed and ready?
A properly primed hose will be completely full of water with no air bubbles emerging from the end when fully submerged. If you still see a stream of air bubbles, the hose contains air and needs more time to fill before connecting it to the skimmer plate.
What should I do if my vacuum loses suction during cleaning?
Immediately check for air leaks at the skimmer plate connection and inspect the vacuum hose for any cracks or holes. Also, ensure the skimmer basket isn’t clogged and the pool’s water level is adequate, as these can disrupt suction.
Is there a specific type of skimmer plate I need to purchase for my pool?
Yes, skimmer plates are generally specific to your pool’s skimmer model. You will need one that fits your skimmer’s dimensions and shape to ensure a proper, airtight seal over the skimmer basket opening for effective vacuuming.
How does the pump’s speed affect vacuuming via the skimmer?
A higher pump speed creates stronger suction, which is crucial for both rapidly priming the vacuum hose and ensuring effective debris removal during vacuuming. Always ensure your pool pump is running on high or its maximum setting when operating the manual vacuum.