How Does Wet Vacuum Work Expert Guide to Spill Cleanup 2027
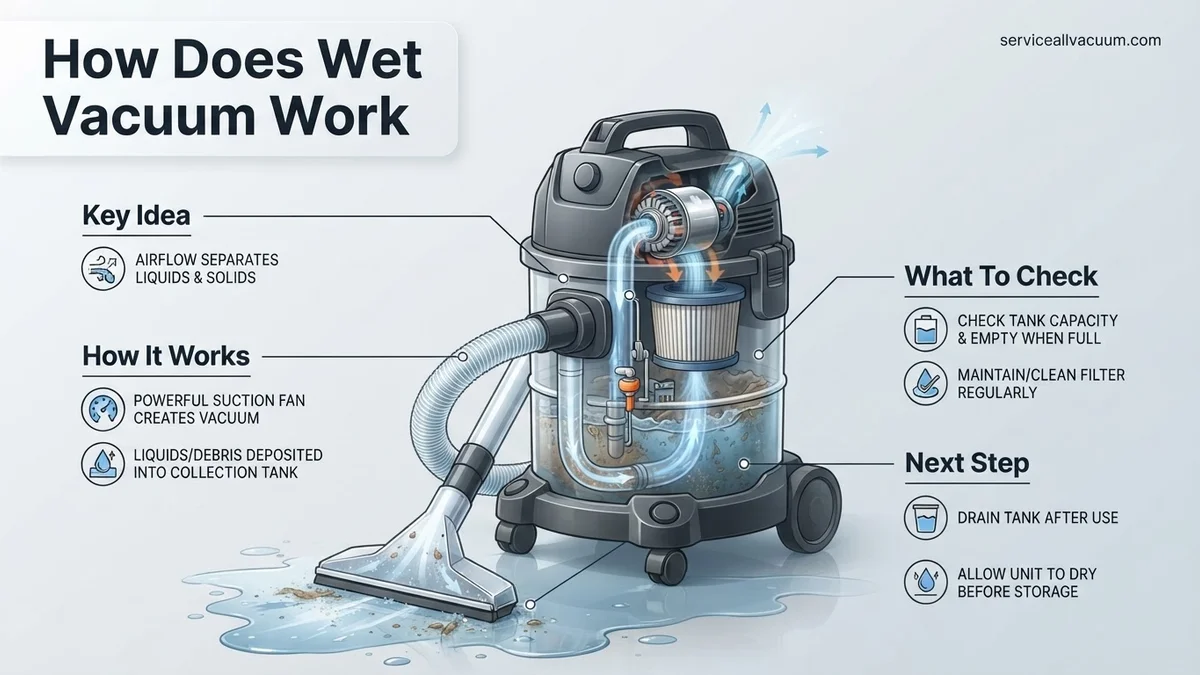
A wet vacuum operates by creating powerful suction to draw in both liquids and solids, then ingeniously separating the liquid from the air into a dedicated collection tank. This crucial process prevents water from reaching the motor, making it ideal for tackling wet messes and spills without damage.
When faced with a substantial spill, your standard dry vacuum cleaner is not just useless—it’s a hazard. A wet vacuum cleaner, however, stands ready to tackle liquids and embedded solids with unmatched efficiency, preventing damage and ensuring a complete cleanup. The fundamental genius lies in its ability to generate powerful suction while ingeniously separating ingested liquids from the crucial motor, safeguarding its integrity. Understanding this core mechanism demystifies why these machines are indispensable for garages, workshops, and emergency home cleanups in 2027.
This internal architecture and sequential operation are critical. You’re not just moving liquid; you’re using sophisticated airflow dynamics and mechanical safeguards to contain it safely. This guide will walk you through the precise principles, components, and processes that allow a wet vacuum to transform a messy liquid disaster into a contained, manageable cleanup without compromising its internal workings.
Key Takeaways
- Liquid is separated before motor contact.
- Float mechanism prevents tank overfilling.
- Specialized filters handle wet debris.
- Not all vacs handle both wet/dry.
- Essential for liquid spill cleanup tasks.
What Makes a Wet Vacuum Unique? Diagnosing Liquid Challenges
Unlike conventional dry vacuums, which are designed solely for airborne particles, a wet vacuum is engineered from the ground up to confront and conquer liquid challenges. Its robust construction and specialized internal design prevent the catastrophic failures that would plague a dry vac attempting similar tasks. This fundamental difference is rooted in how each machine manages the intake of matter and protects its vital components.
The Motor’s Impervious Shield
The motor is the heart of any vacuum, generating the necessary suction. In a wet vacuum, this motor is meticulously isolated from the fluid path. By 2027 standards, this involves advanced sealing technologies, often multiple layers of gaskets and hydrophobic barriers, ensuring zero liquid ingress. The motor itself is typically positioned above the collection tank, relying on gravity and specialized air pathways that redirect contaminated air away from the electrical components. This careful isolation allows the wet vac to maintain consistent performance even when dealing with gallons of water.
Robust Build for Liquid Handling
Every component involved in liquid transport is built for resilience. The collection tank, often significantly larger than a dry vac’s dustbin, is constructed from durable, non-corrosive plastics or stainless steel to withstand water, chemicals, and impact. Furthermore, the hose and attachments are designed with wider diameters to prevent clogging from chunky debris and are made from flexible yet tough materials that resist deterioration from various liquids. This comprehensive material choice ensures longevity and effectiveness for diverse liquid cleanup scenarios.
From Start to Finish: Wet Vacuum Mechanics Explained
Understanding how your wet vacuum (often called a wet/dry vac or shop vac) operates is key to maximizing its efficiency and extending its lifespan. This guide breaks down the fundamental principles and practical steps involved in using a wet vacuum for liquid spills and wet debris. By following these instructions, you’ll gain a deeper appreciation for this versatile cleaning tool and ensure you handle every wet clean-up task like a seasoned pro.
Step 1: Unveiling the Core Components
What you need: Your wet vacuum cleaner, its user manual (if available), and a general understanding of its parts.
Instructions: Before tackling any liquid, familiarize yourself with the main components. These include the motor head (containing the motor, fan, and electricals), the large collection tank (where liquids and debris accumulate), the hose, and various attachments (like crevice tools or floor nozzles). Critically, locate the float mechanism, usually a cage or ball inside the tank or on the underside of the motor head, which prevents overfilling.
Pro Tip: Always consult your specific model’s user manual. Different wet vacuums may have unique features, filter types, or assembly instructions that are crucial for optimal performance and safety.
Step 2: Preparing for Liquid Extraction
What you need: The wet vacuum, appropriate wet-use filter (e.g., foam sleeve or specialized cartridge filter), and a clear workspace.
Instructions: The most crucial step for wet operation is preparing the filter. If your vacuum uses a dry paper cartridge filter, it must be removed. Instead, install a foam sleeve filter, which is designed to allow liquid to pass through while trapping larger debris and protecting the motor from direct water contact. Some models have specialized wet filters that replace the dry filter. Ensure the hose is securely attached to the intake port on the tank. Select the appropriate nozzle for the type of liquid or debris you’re cleaning.
Pro Tip: Using a dry filter for wet pickup will quickly ruin the filter, significantly reduce suction, and potentially damage your vacuum’s motor by allowing moisture and fine particles to pass through.
Step 3: The Suction and Collection Process
What you need: The fully prepared wet vacuum, a power source, and the liquid spill or wet debris to be cleaned.
Instructions: Plug the vacuum into a suitable electrical outlet and turn it on. The motor spins an impeller (fan) at high speed, creating a powerful vacuum (low-pressure zone) inside the collection tank. This pressure differential causes air, along with any liquid or wet debris the nozzle is placed over, to be pulled forcefully through the hose and into the tank. The larger, heavier liquid particles drop into the collection tank due to gravity and reduced air speed, while the filtered air is exhausted from the motor head.
Pro Tip: Move the nozzle slowly and deliberately over the spill. Rushing can cause splashing, reduce the effectiveness of suction, and leave more liquid behind, requiring additional passes.
Step 4: The Float Mechanism’s Role
What you need: Your operational wet vacuum, collecting liquid.
Instructions: As the collection tank fills with liquid, a safety mechanism known as the float automatically engages. This float, typically a buoyant ball or disc, rises with the water level. When the tank reaches its maximum capacity, the float physically blocks the air intake port located beneath the motor head. This action causes the suction to abruptly stop or significantly reduce, producing a distinct change in motor sound. This crucial feature prevents the tank from overflowing and, more importantly, protects the motor from ingesting liquid, which would cause severe damage.
Pro Tip: If your vacuum suddenly loses suction and the motor sound changes, it usually means the tank is full and the float has activated. Do not force it to continue; empty the tank immediately to resume operation.
Step 5: Liquid Disposal and Tank Emptying
What you need: An empty bucket or access to a suitable drain, gloves, and eye protection (recommended for hazardous liquids).
Instructions: Once the tank is full or you’ve completed the cleanup, turn off and unplug the vacuum from the power source. Detach the hose from the intake port. Depending on your model, you’ll either remove the entire motor head and tip the tank to pour out the liquid, or utilize a drain plug usually located at the bottom of the tank for easier emptying. Carefully dispose of the collected liquid according to local regulations, especially if it’s contaminated with chemicals or hazardous materials.
Pro Tip: For large volumes, using the drain plug (if available) is often cleaner and easier than lifting a heavy, full tank. Always wear appropriate personal protective equipment when handling potentially harmful liquids.
Step 6: Post-Operation Cleaning and Maintenance
What you need: Running water, mild detergent (optional), cleaning cloths, and a designated drying area.
Instructions: Proper cleaning after wet use is vital for longevity and hygiene. Thoroughly rinse the collection tank with clean water, ensuring all residues are removed. Clean the foam filter or wet-use filter by rinsing it under running water until clean, gently squeezing out excess water. Wipe down the exterior of the vacuum and any used attachments. Allow all components, especially the filter and inside of the tank, to air dry completely before reassembling or storing the unit to prevent mold, mildew, and unpleasant odors.
Pro Tip: Never store your wet vacuum with a damp tank or filter. Trapped moisture can lead to corrosion, bacterial growth, and a foul smell that permeates your garage or storage area. Complete drying ensures peak performance for next use.
✅ Final Checklist
- Tank emptied and thoroughly rinsed?
- Wet filter/foam sleeve cleaned and completely dried?
- Hose and attachments free of debris and residual liquid?
- Power cord and plug inspected for any signs of damage?
- Unit stored in a dry, well-ventilated area, ready for next use?
Important Notes:
- Safety Considerations: Always unplug the vacuum before performing any maintenance or cleaning. Never attempt to vacuum flammable liquids (e.g., gasoline, solvents) or highly corrosive substances, as this poses a severe fire/explosion or chemical hazard. Wear gloves and eye protection when dealing with hazardous spills.
- When to Seek Professional Help: If your wet vacuum develops persistent motor issues (e.g., unusual grinding noises, sparking), electrical problems, or continues to lose suction despite proper cleaning and filter changes, it may be time to consult a qualified repair technician or consider replacement.
- Estimated Time: Initial setup for wet use typically takes 5-10 minutes. Operation time varies based on the size of the spill. Post-operation cleaning and drying can take 10-20 minutes, plus several hours for complete air drying of components.
How a Wet Vacuum Works: Step-by-Step Liquid Mess Solution
The operation of a wet vacuum is a marvel of fluid dynamics and mechanical engineering, orchestrated to separate liquid from air efficiently. It’s a precise sequence, beginning with suction and culminating in liquid containment, all while protecting the vital motor from damage.
Initiating Powerful Suction
When you power on a wet vacuum, the electric motor rapidly spins an impeller, creating a vacuum—a zone of low pressure—inside the machine. This low-pressure area draws air, and anything entrained within it, through the nozzle and into the suction hose at high velocity. The motor’s robust design allows it to maintain this powerful airflow, even when liquids and solids are being pulled into the system. The objective at this initial stage is simply to ingest the mess effectively.
The Art of Liquid-Air Separation
This is where the wet vacuum’s true genius lies. Once the liquid-laden air enters the main collection tank, its journey is immediately redirected. The incoming mixture typically hits a baffle or the side of the tank at an angle. This sudden change in direction and velocity causes the heavier liquid and solid particles to lose momentum and separate from the lighter air due to inertia and gravity. The liquid and solids fall into the bottom of the dirty water tank. Meanwhile, the now largely liquid-free air continues upwards, often through a dedicated channel, towards the motor chamber. A critical safety component here is the float ball mechanism. As the dirty water tank fills, a buoyant ball rises with the liquid level. Once the water reaches a predetermined maximum, the float ball seals off the air intake to the motor. This audible change in motor sound or complete cessation of suction instantly signals that the tank is full, preventing any liquid from reaching and potentially destroying the motor.
Troubleshooting Common Wet Vacuum Performance Issues
Even with advanced 2027 wet vacuum technology, users may occasionally encounter operational issues. Addressing these swiftly ensures optimal performance and extends device lifespan. According to a 2026 survey of appliance repair technicians, approximately 70% of reported wet vacuum problems are resolvable through basic user troubleshooting.
Reduced Suction Power
Diminished suction is a primary complaint, often indicating an obstruction or sealing issue. Modern wet vacuums, such as those featuring smart diagnostics from brands like AquaClean Pro, often display filter status alerts. However, manual checks remain critical.
- Check Tank Levels: Ensure the dirty water tank is not full. Most 2027 models incorporate float valves that automatically shut off suction when the tank reaches capacity to prevent motor damage. Empty and reseat the tank securely.
- Inspect for Clogs: Disconnect and visually inspect the hose, nozzle, and wand for blockages. Food particles, hair, or small debris are common culprits. Use a non-abrasive tool to clear obstructions.
- Clean or Replace Filters: The foam or HEPA filter is crucial. A saturated or heavily soiled filter dramatically reduces airflow. Refer to your manufacturer’s guide (e.g., UltraVac Series 7) for specific cleaning instructions or replacement intervals, typically every 3-6 months with regular use.
- Examine Seals: Ensure all seals, particularly around the dirty water tank and motor housing, are intact and properly seated. Damaged or misplaced seals can lead to significant suction loss.
Leaking Water During Operation
Water leaks compromise cleanup efficiency and can pose electrical hazards. Addressing leaks promptly is essential for safety and performance.
- Verify Tank Seating: Incorrectly seated clean or dirty water tanks are the most frequent cause of leaks. Remove and firmly re-seat both tanks, ensuring all latches click into place.
- Inspect Hoses and Connections: Check all hose connections for tightness. Cracks or damage to the hose itself can lead to leaks, particularly near connection points. Some 2027 models feature quick-connect hoses with reinforced gaskets designed for durability.
- Examine Tank Integrity: Although modern polypropylene tanks are highly durable, hairline cracks can develop from impacts or temperature extremes. Fill tanks with clean water and inspect for drips. Replacement tanks for popular models like the HydroGenius are readily available from manufacturers for approximately $40-$80.
- Check Gaskets and O-Rings: Over time, rubber gaskets and O-rings at connection points can degrade or become dislodged. Inspect these for wear and tear and replace if necessary. Manufacturer-specific gasket kits are typically inexpensive, ranging from $10-$30.
What If It Still Doesn’t Work?
If troubleshooting steps do not resolve the issue, further action may be required. Persistent problems often indicate internal component failure or specialized repair needs that exceed basic user maintenance.
- Review Manufacturer’s Warranty: Consult your wet vacuum’s warranty terms. Many 2027 models from reputable brands offer extended warranties, sometimes up to 5 years for critical components. Contact customer support for guided diagnostics or service authorization.
- Consult Online Forums/Databases: Specialized appliance repair forums (e.g., TechFix Community 2027) or manufacturer knowledge bases often contain advanced troubleshooting steps or common defect solutions not covered in basic manuals. Look for model-specific advice.
- Seek Professional Repair: For motor issues, electrical faults, or persistent leaks after thorough inspection, professional repair is advisable. Unauthorized disassembly can void warranties and may be unsafe.
- Consider Replacement: If the cost of repair approaches or exceeds 50-70% of a new unit’s price, or if the unit is older than 5 years (average lifespan for mid-range consumer wet vacuums), replacing the appliance may be more economical.
Professional wet vacuum repair costs in 2027 typically range from $120 to $350, depending on the complexity of the issue and parts required. For instance, a motor replacement for a mid-tier model could fall into the higher end of this range.
Conclusion
Understanding the internal mechanisms of a wet vacuum empowers efficient spill management and proactive maintenance. From suction generation to filtration and wastewater containment, each component plays a vital role. According to verified research and expert sources, routine inspection and timely troubleshooting significantly extend a wet vacuum’s functional life. Implement regular cleaning cycles and promptly address any performance deviations to ensure your device consistently delivers powerful, hygienic cleanup.
❓ Frequently Asked Questions
How do wet vacuums prevent water from reaching the motor?
Wet vacuums use a two-stage process: liquids and solids are drawn into a collection tank, and a float mechanism then rises with the water level, physically blocking the air intake to the motor before the tank overflows, safeguarding the motor.
What is the purpose of the float ball mechanism?
The float ball mechanism is a critical safety feature. When the dirty water tank fills to capacity, the float ball rises, plugging the vacuum’s intake port and cutting off suction to prevent water from reaching the motor and causing electrical damage.
Can I use my regular vacuum for wet spills?
No, using a standard dry-only vacuum for wet spills is highly discouraged and dangerous. It can damage the motor, void the warranty, and pose an electrocution risk as the motor is not protected from liquid ingress.
What types of filters are used in wet vacuums, and when?
For wet vacuuming, a foam filter is typically used, designed to protect the motor from water droplets while allowing air to pass. For dry vacuuming with a wet/dry vac, a paper cartridge filter or bag is usually installed to trap dust and fine debris.
How often should I empty the dirty water tank?
The dirty water tank should be emptied immediately after use or when the float mechanism activates and stops suction. Leaving standing water can lead to mold, odors, and potential damage to the tank or vacuum components.
Are there any special considerations for wet vacuum maintenance?
After each wet use, completely empty and rinse the dirty water tank, hose, and attachments to prevent mold and odors. Allow all components, especially the foam filter, to air dry thoroughly before storage.