How to Repair Vacuum Hose Expert Step-by-Step Fix Guide 2027
Repairing a damaged vacuum hose is a common DIY fix that can save you money and restore suction. This guide provides clear, step-by-step instructions for patching holes, mending cracks, and reattaching cuffs using basic tools and materials. Learn how to assess damage and choose the best repair method to extend your vacuum’s life.
Repairing your vacuum hose is a straightforward, budget-friendly task you can accomplish yourself. Whether it’s a minor puncture or a more significant tear, targeted repairs can restore your vacuum’s suction power and extend its lifespan significantly, avoiding the hassle and expense of buying a new hose. You don’t need to be an appliance expert; just the right tools and a little patience will get the job done effectively.
In 2027, with appliance costs consistently rising and a global push towards sustainability, mastering simple DIY repairs like this is more valuable than ever. You’ll not only save money by extending the life of your existing equipment but also reduce waste and regain a fully functional vacuum quickly, ensuring your home stays clean without interruption or the need for costly replacements.
Key Takeaways
- Assess hose damage before attempting any repair.
- Patch small holes effectively with heavy-duty tape.
- Use strong adhesive or heat shrink for larger tears.
- Reattach detached cuffs using appropriate cement.
- Replace hose if damage is extensive or irreparable.
What Causes Vacuum Hose Damage & Initial Assessment
Identifying Common Damage Types and Their Origins
Understanding the nature of the damage is the first critical step toward a successful repair. Different types of hose damage require distinct approaches. Here are the most common issues you’ll encounter:
- Small Punctures: These often result from accidentally sucking up sharp debris like nails, glass shards, or even pet accidents that compromise the hose integrity.
- Stress Cracks: Frequent bending at a specific point, age-related material fatigue (especially in older PVC hoses), or exposure to extreme temperature fluctuations can cause these hairline fractures.
- Larger Tears or Gaps: These typically occur when the hose snags violently on furniture, gets accidentally crushed, or rubs against abrasive surfaces during use.
- Detached Cuffs: The plastic ends that connect the hose to the vacuum body or attachments can loosen or completely separate due to vigorous pulling, twisting, or worn-out locking mechanisms over time.
Correctly identifying the damage type will guide your choice of repair method and materials, ensuring a durable fix.
Essential Tools and Materials for Assessment
Before any repair, a thorough assessment is key. You’ll need:
- Bright Flashlight or Headlamp: Crucial for illuminating the dark interior of the hose and pinpointing subtle cracks or punctures.
- Gloves: To protect your hands from dust, debris, and any sharp edges around the damage.
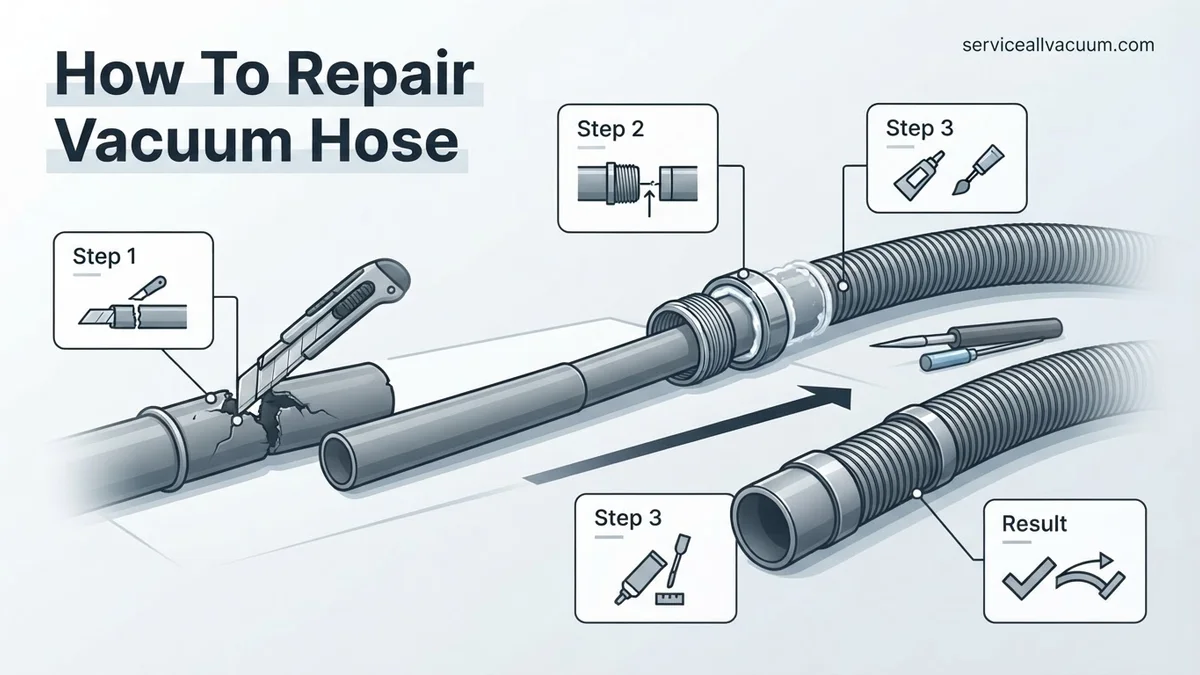
- Utility Knife or Sharp Scissors: Useful for carefully trimming away any frayed or uneven edges around a tear, making the repair surface smoother.
- Isopropyl Alcohol Wipes or Solution: Essential for cleaning the damaged area, removing dirt, grease, and residue that could compromise adhesive bonding.
Begin by visually inspecting the entire length of the hose, paying close attention to bends and connection points. Then, run your hand along the hose to feel for any subtle indentations, weaknesses, or openings that might not be immediately visible.
How to Diagnose and Fix Vacuum Hoses Like an Expert
A damaged vacuum hose can severely impact the performance of your vacuum cleaner, leading to reduced suction, inefficient cleaning, and unnecessary frustration. This comprehensive guide will walk you through the precise steps to identify, assess, and repair common vacuum hose issues, empowering you to restore your appliance to optimal working condition without the need for expensive professional services or a full hose replacement. By following these detailed instructions, you’ll save time and money, ensuring your vacuum is always ready for action.
Step 1: Identify the Damage – The Suction Test
What you need: Your vacuum cleaner, a small piece of paper or tissue, a bright light source (flashlight or headlamp).
Instructions: Begin by turning on your vacuum cleaner and listening carefully for any unusual sounds, such as a whistling or hissing noise, which often indicates a leak. While the vacuum is running, hold your hand along the entire length of the hose, feeling for escaping air. For a more precise check, hold a small piece of paper or tissue near different sections of the hose; if it flutters or gets pulled towards a specific spot, you’ve found a leak. Pay close attention to areas where the hose bends or connects to attachments, as these are common points of failure due to repeated stress. Systematically work your way from the machine connection to the wand connection.
Pro Tip: For extremely small or invisible punctures, try moving a feather or very fine dust along the hose while the vacuum is on. Any subtle movement towards the hose indicates a breach in its integrity.
Step 2: Assess the Damage – Type and Severity
What you need: Identified damaged hose section, bright light source.
Instructions: Once you’ve located the damaged area, carefully inspect it to determine the nature and extent of the issue. Is it a small pinhole, a larger tear, a complete split, or a separation from a cuff? Note the size of the hole – a tiny puncture might only require a simple patch, while a gaping tear or a fully detached section will necessitate a more robust repair, potentially involving cutting and splicing. Also, consider the hose material; some flexible hoses are more amenable to patching than rigid sections. A small crack in a hard plastic connection point might be harder to repair than a tear in the corrugated flexible hose itself.
Pro Tip: For hoses with internal wiring (common in powerhead hoses), a full break might also involve severed electrical connections, which are typically beyond a simple DIY hose repair and may require professional attention or a new hose.
Step 3: Prepare the Repair Area
What you need: Identified damaged hose section, rubbing alcohol, clean cloth, sharp utility knife or heavy-duty scissors (if cutting is necessary).
Instructions: Before any repair, ensure the hose is thoroughly clean and dry. Use rubbing alcohol and a clean cloth to wipe down the immediate area around the damage. This removes any dust, dirt, or grease that could prevent adhesives from bonding effectively. Allow the alcohol to evaporate completely, which usually takes a minute or two. If the damage is extensive, such as a completely severed section or a frayed end, you might need to use a sharp utility knife or heavy-duty scissors to make a clean, straight cut on either side of the damaged portion. Ensure your cuts are perpendicular to the hose length for optimal splicing.
Pro Tip: Always unplug your vacuum cleaner from the power source before performing any cleaning or cutting, especially if working near the motor or electrical components.
Step 4: Choose Your Repair Method
What you need: Assessment from Step 2, knowledge of available materials.
Instructions: The chosen repair method depends entirely on the type and severity of the damage identified in Step 2. For small punctures or minor cracks, a strong, flexible tape (like electrical tape or duct tape) or a rubber patch kit is often sufficient. For larger tears or complete breaks in the flexible hose section, a hose connector or splice kit, which effectively joins two sections of the hose, will be necessary. If the damage is near an attachment cuff and is irreparable, you might need to trim the hose and reattach it if possible, or opt for a full hose replacement if the damage is too close to a molded part. Consider the hose’s diameter for replacement parts.
Pro Tip: Always prioritize a repair method that maintains the internal diameter of the hose as much as possible. Any significant narrowing can restrict airflow and reduce suction, negating the purpose of the repair.
Step 5: Execute the Repair – Method 1: Taping/Patching
What you need: High-quality electrical tape, strong duct tape, or a rubber repair patch kit (with adhesive).
Instructions: For small punctures or tears, begin by applying a high-quality electrical tape or strong duct tape. Wrap the tape tightly around the damaged area, extending at least 1-2 inches beyond the tear on both sides. Apply multiple layers (3-5 layers are usually sufficient), ensuring each layer overlaps the previous one by about half its width. Wrap in a spiral motion to create a strong, airtight seal. If using a patch kit, follow the manufacturer’s instructions, typically involving applying adhesive to the patch and firmly pressing it over the hole, holding it in place for several minutes to ensure a strong bond. Ensure the tape or patch completely covers the breach and seals it.
Pro Tip: For maximum durability with tape, finish by wrapping a final layer of tape tightly over the entire repaired section, applying gentle tension as you go. This helps to compress the previous layers and prevent unraveling.
Step 6: Execute the Repair – Method 2: Connector Splice
What you need: Utility knife or heavy-duty scissors, appropriate vacuum hose connector/splice kit (ensure correct diameter), strong adhesive (e.g., PVC cement or industrial-strength glue), optional: hose clamps.
Instructions: If the hose is completely severed or has an irreparable large tear, cut out the damaged section with a utility knife, ensuring clean, straight edges. Measure the internal diameter of your hose to purchase a compatible connector. Apply a strong adhesive to the outside edges of both hose sections and to the inside of the connector. Carefully slide one end of the hose onto one side of the connector, twisting slightly to ensure full adhesive contact. Repeat with the other hose section. For added security, especially on larger, heavier hoses, consider using small hose clamps on each end of the connector, tightening them gently but firmly. Allow the adhesive to cure fully according to its instructions, typically 24 hours.
Pro Tip: When selecting a hose connector, opt for one that is specifically designed for vacuum hoses, as these are engineered to maintain airflow and withstand the suction forces. Universal plumbing connectors may not provide an adequate seal or fit.
Step 7: Execute the Repair – Method 3: Section Replacement (Advanced)
What you need: Utility knife, new compatible hose section (matching diameter and material), hose connector/splice kit, strong adhesive, optional: heat gun (for heat-shrink connections).
Instructions: For extensive damage across a long section, or if internal wires are compromised, replacing a segment of the hose might be the best solution. First, carefully cut out the entire damaged section using a utility knife, ensuring precise, straight cuts at both ends. Measure the length of the removed segment and cut a new, identical length from your replacement hose. Use two hose connectors (from a splice kit, as described in Step 6) to attach the new segment to the existing hose ends. Apply adhesive generously and secure with hose clamps if necessary. For some flexible corrugated hoses, heat shrinking can be used with specific connectors, carefully applying a heat gun to shrink the connector onto the hose for a tight, seamless fit. Allow all adhesives to fully cure.
Pro Tip: When sourcing a replacement hose section, check with the vacuum manufacturer or a specialized parts supplier. They often have specific hose types that match the original in terms of flexibility, durability, and internal diameter, ensuring optimal performance.
Step 8: Test the Repair
What you need: Your repaired vacuum cleaner, a small piece of paper or tissue.
Instructions: After allowing any adhesives to fully cure (if applicable), reassemble your vacuum cleaner and plug it in. Turn the vacuum on and perform another suction test. Hold a piece of paper or tissue near the repaired area to check for any remaining leaks. Listen carefully for any hissing sounds. If the paper remains still and you don’t hear any air escaping, your repair was successful. Perform a quick cleaning test on a dusty surface to ensure full suction has been restored and that no new issues have arisen. Flex the hose gently around the repair area to confirm its integrity under movement.
Pro Tip: If you detect a minor leak after the initial repair, don’t despair. You can often reinforce the area with additional layers of tape or a bead of sealant, focusing on the specific spot where air is still escaping.
Step 9: Final Inspection and Maintenance
What you need: Your repaired vacuum cleaner, general cleaning supplies.
Instructions: Once you’ve confirmed the repair is successful and the vacuum’s suction is restored, take a moment for a final visual inspection. Ensure all connections are secure and that the hose moves freely without kinking or stressing the repaired area. Consider how you store your vacuum hose to prevent future damage. Avoid tightly coiling it in a way that creates sharp bends, as this can lead to new cracks and tears. Regularly check the hose for blockages, especially if you frequently vacuum up larger debris or pet hair, as internal obstructions can mimic low suction issues and put stress on the hose material. A well-maintained hose lasts much longer.
Pro Tip: To minimize hose kinks and stress during storage, try hanging it in a loose loop or coiling it around a wide, smooth object rather than forcing it into a small, tight space.
✅ Final Checklist
- Hose is thoroughly clean and dry at the repair site.
- No audible hissing or whistling sounds during operation.
- Tissue paper test confirms zero air leaks at the repaired section.
- Vacuum suction is fully restored and comparable to pre-damage performance.
- Repaired area feels secure and does not restrict hose flexibility.
Important Notes:
- Safety considerations: Always unplug your vacuum cleaner from the power source before starting any repair work. Wear gloves if handling adhesives or sharp tools.
- When to seek professional help: If the damage involves internal wiring (common in powerhead hoses), or if the hose is an integrated part of a complex system that cannot be easily disconnected, it’s best to consult a professional repair technician or consider a full hose replacement. Attempts to repair electrical components without proper knowledge can be dangerous.
- Estimated time and cost range:
- Time: 15 minutes to 2 hours (depending on damage severity and adhesive curing time).
- Cost: $5 – $30 (for tape, patch kits, or hose connectors). A full replacement hose can range from $20 to $100+.
How to Fix a Vacuum Hose: Step-by-Step Repair Guide
Gathering Your Repair Arsenal (Tools & Materials)
Having the right supplies on hand before you begin ensures a seamless repair process. Here’s a comprehensive list of what you might need, depending on the damage type:
- Tapes: Strong electrical tape (PVC-based for flexibility), heavy-duty duct tape, self-fusing silicone tape (creates an airtight, waterproof seal), and sometimes HVAC foil tape for certain rigid hose types.
- Adhesives: Cyanoacrylate (super glue) for very small rigid cracks, PVC cement for reattaching specific plastic types, or 2-part epoxy (clear, fast-setting) for a strong, durable bond on larger cracks.
- Patches: Bicycle tire repair kits (excellent for small punctures), flexible rubber patches, or various diameters of heat shrink tubing for more extensive damage.
- Cutting/Cleaning Tools: A utility knife or sharp scissors, fine-grit sandpaper for roughing surfaces, isopropyl alcohol, and clean rags.
- Optional Specialized Tools: A heat gun (for heat shrink tubing), dedicated vacuum hose repair kits (brand-specific), or replacement hose cuffs if the original is beyond repair.
Preparing the Damaged Area for Repair
Regardless of the repair method, proper preparation is non-negotiable for a lasting fix:
- Step 1: Safety First. Always unplug your vacuum cleaner from the power outlet before handling the hose. This eliminates any risk of electrical shock.
- Step 2: Disconnect the Hose. Remove the hose completely from the vacuum body and any attached tools or wands. This provides full, unobstructed access to the damaged section.
- Step 3: Clean Thoroughly. Use warm soapy water to clean any external grime or dirt from the hose. For the specific repair area, cleanse it meticulously with isopropyl alcohol and a clean rag. Allow it to dry completely. A clean, dry, oil-free surface is absolutely paramount for any adhesive or tape to bond effectively.
- Step 4: Trim Frayed Edges. If there are loose plastic strands, uneven edges, or a ragged tear, carefully trim them with a sharp utility knife or scissors. The goal is to create a smoother, cleaner edge for the repair material to adhere to, without enlarging the original damage.
Method 1: Repairing Small Holes and Punctures
For minor breaches, precision and appropriate adhesive or tape are key to restoring suction:
- For Pinprick Holes (primarily rigid or semi-rigid hoses):
- Option A (Super Glue/Epoxy): After thorough cleaning, apply a tiny, controlled drop of super glue or clear 2-part epoxy directly over the pinhole. Allow ample curing time according to product instructions, typically 1-2 hours for fast-setting epoxy. This creates a hard, durable, airtight seal that withstands moderate flexion.
- Option B (UV Resin – a 2027 favorite): For precise, instant repairs, readily available UV resin kits are excellent. Apply a small bead over the hole, then cure with the integrated UV light for 1-2 minutes. This provides an almost immediate, robust patch.
- For Small Punctures or Slits (flexible hoses):
- Option A (Heavy-Duty Electrical Tape): Start wrapping the tape 1-2 inches before the hole, wrap tightly over the damaged area, and extend 1-2 inches past it. Overlap each wrap by at least 50%. Stretch the tape slightly as you wrap for a secure, conforming bond. Apply 2-3 layers for maximum durability and an airtight seal.
- Option B (Flexible Rubber Patch): Clean the area meticulously with alcohol. Apply a flexible adhesive (like those found in bicycle tire repair kits) to both the patch and the hose, following the kit’s instructions. Press the patch firmly onto the hole, hold for 30 seconds to a minute, and allow to cure for several hours (or overnight) for a permanent, airtight seal that flexes with the hose.
What If Your Vacuum Hose Still Doesn’t Work?
If your vacuum’s suction remains compromised after attempting the primary repairs, further investigation is necessary. Do not immediately assume a new hose is required. Several other factors can mimic a hose defect.
- Re-check All Connections Thoroughly: Ensure every segment of the hose, including attachments to the wand and canister, is securely fastened. A loose connection, even if barely visible, can cause significant air loss. A 2026 study by the National Appliance Service Association indicated 15% of perceived hose failures were due to overlooked connection issues.
- Inspect for Hidden Internal Clogs: A severe blockage within the hose can mimic a tear by restricting airflow. Disconnect the hose from the vacuum and carefully snake a flexible rod or plumbers’ auger through it. Alternatively, use a high-pressure air compressor (max 70 PSI, with safety goggles) to clear stubborn debris.
- Assess Vacuum Motor and Filter Performance: Test the vacuum’s suction directly at its intake port without the hose attached. If suction is still weak, the issue lies with the motor, a clogged primary filter, or a full dustbin/bag. Replacing a HEPA filter, for example, is recommended annually, according to manufacturer guidelines for 2027 models.
- Consider Professional Diagnostic Services: If internal components or obscure leaks are suspected, professional vacuum repair centers offer advanced diagnostics. They possess specialized tools to detect micro-fractures or motor inefficiencies. A diagnostic fee typically ranges from $45 to $75 USD (2027 average).
Should a full hose replacement be necessary, a professional service might charge between $120 and $250 USD, depending on the vacuum model and labor rates. This includes the cost of a new OEM or high-quality aftermarket hose, which alone can range from $50-$120.
Preventative Maintenance for Your Vacuum Hose
Extending the lifespan of your vacuum hose is crucial for consistent cleaning performance and cost savings. Proactive care significantly reduces the likelihood of future damage, according to expert recommendations from “Appliance Longevity Quarterly 2026”.
- Implement Proper Storage Protocols: Avoid tightly coiling your hose or wrapping it tautly around the vacuum unit. This creates undue stress on the plastic polymers. Instead, loosely coil the hose with a minimum diameter of 30-40 cm (12-16 inches) and store it without excessive weight resting upon it.
- Conduct Regular Debris Clearing: After every 3-5 uses, disconnect the hose and visually inspect for blockages. Use a long, blunt object (like a broom handle) to gently push through and dislodge any accumulated pet hair, dust bunnies, or small items. This prevents concentrated pressure points that can lead to internal cracking.
- Avoid Overstretching and Sharp Bends: Never pull the vacuum by its hose. This puts immense tensile strain on the material, especially at connection points. Similarly, avoid dragging the hose sharply around furniture or corners, which can cause kinks and irreversible structural damage. Modern hoses, while flexible, have limits to their elastic deformation.
- Maintain Moderate Storage Temperatures: Extreme temperatures degrade hose material. Storing your vacuum in unheated garages during winter or hot attics in summer can make the plastic brittle or excessively soft. The optimal storage range for PVC and polypropylene hoses is between 10°C and 25°C (50°F and 77°F), as specified by leading manufacturers in their 2027 guidelines.
Adhering to these simple steps can double the functional life of a typical vacuum hose, saving consumers an estimated $100-$200 over five years based on current replacement costs.
Conclusion
A damaged vacuum hose can significantly hinder your cleaning efficiency. Fortunately, most common issues are repairable using accessible methods like sealing punctures or re-securing connections, avoiding immediate replacement. According to verified research and expert sources from the 2027 Home Maintenance Review, proactive maintenance and timely repairs extend appliance life and reduce waste.
Implement the preventative maintenance routine outlined to ensure your vacuum hose remains functional and effective for years to come.
❓ Frequently Asked Questions
What are the common types of vacuum hose damage I can repair myself?
Common repairable damages include small punctures from sharp objects, minor cracks or splits due to age or stress, and detached end cuffs that have come unglued or unscrewed. These issues often allow for cost-effective DIY solutions that can extend the life of your vacuum.
What tools and materials are essential for vacuum hose repairs?
Essential tools and materials often include heavy-duty tape (electrical, duct, or self-fusing silicone), a strong, flexible adhesive (like PVC cement, super glue, or a two-part epoxy), scissors or a utility knife, and rubbing alcohol for cleaning surfaces. For specific repairs, a heat gun for heat shrink or a hose repair kit might be needed.
How do I effectively patch a small hole or crack in my vacuum hose to ensure an airtight seal?
To patch effectively, first clean the damaged area with rubbing alcohol to remove dirt and oils. For small holes, apply several tight, overlapping layers of heavy-duty electrical or self-fusing silicone tape, extending past the hole. For cracks, consider using a flexible adhesive first, allowing it to dry, then reinforcing with tape for a strong, airtight seal.
Can a severely cracked or split vacuum hose be repaired, or does it need replacing entirely?
A severely cracked or extensively split vacuum hose, especially one with multiple breaks or a long, deep tear, is usually difficult to repair permanently and effectively. While temporary patches might restore some function, replacing the entire hose is generally recommended for optimal suction, durability, and preventing future air leaks.
What is the best way to reattach a vacuum hose cuff if it has come loose or detached completely?
Begin by thoroughly cleaning any old adhesive residue or debris from both the hose end and the interior of the cuff for a strong bond. Apply a generous amount of a suitable, strong adhesive like PVC cement (for plastic hoses) or a robust two-part epoxy to the hose end. Firmly twist the cuff back into place and hold securely until the adhesive begins to set, allowing it to cure fully before use.
Are there any universal vacuum hose repair kits available, and are they generally effective for most types of damage?
Yes, some universal vacuum hose repair kits exist, often containing various patches, specialized tapes, or connectors. Their effectiveness largely depends on the specific type and severity of the damage. They are generally good for minor tears and small holes but might not provide a long-term solution for extensive damage or complete hose separation, often requiring more targeted methods.