How to Clean Mattress Without Vacuum Expert 2027
Cleaning your mattress without a vacuum is entirely possible and effective, even for deep stains and odors. This guide provides expert, step-by-step methods using readily available household items like baking soda, vinegar, and cloths to refresh your bed. Learn how to tackle common spills and ensure proper drying for a hygienic sleep space.
Cleaning your mattress thoroughly without a vacuum cleaner in 2027 is not just possible, it’s remarkably effective using readily available household items. You can achieve a fresh, odor-free sleeping surface by employing smart techniques like generous baking soda applications for deep deodorization, diligent brushing to remove debris, and targeted damp cloth wiping. These methods ensure your mattress remains a hygienic haven, even without specialized suction equipment.
This approach is especially practical whether you’re in a compact living space, don’t own a vacuum, or simply prefer eco-friendly, low-tech cleaning solutions. Maintaining your mattress’s cleanliness directly impacts your sleep quality and extends its lifespan, preventing the buildup of irritants and maintaining a healthy bedroom environment without needing a powerful motor.
Key Takeaways
- Baking soda effectively absorbs odors and moisture.
- Blot stains, don’t rub, to prevent spreading.
- Use a stiff brush for dry dirt removal.
- Proper drying prevents mold and mildew growth.
- Patch test cleaning solutions first.
What Causes Dirt & Odors in Your Mattress (No Vacuum Solution Needed)
Everyday Accumulations
Your mattress silently collects a surprising amount of organic material and debris daily. We shed millions of dead skin cells each night, which, alongside body oils and shed hair, settle deep into the mattress fibers. These aren’t just superficial particles; they work their way into the fabric, creating a hidden layer of grime that can contribute to dullness and a less-than-fresh feel. For those with pets, dander also adds to this invisible accumulation. Fortunately, these can be effectively dislodged and managed through physical brushing and absorption techniques, making a vacuum unnecessary for removal.
Moisture & Odor Sources
One of the primary culprits behind mattress degradation and persistent odors is moisture. Human perspiration, often unnoticed during sleep, gradually seeps into the mattress layers, creating a damp environment. Over time, this humidity, combined with incidental spills (like water or drinks) or occasional accidents (such as pet urine or child mishaps), fosters the growth of bacteria and mold. These microorganisms are the true source of stale, unpleasant smells. Addressing these issues primarily involves moisture management and neutralization, perfectly suited for absorbent compounds and natural deodorizers you already have at home.
Master Mattress Cleaning in 8 Simple Steps (No Vacuum Required)
Even without a vacuum cleaner, maintaining a clean and hygienic mattress is entirely achievable. This comprehensive guide will walk you through each crucial stage of mattress cleaning, focusing on practical, low-tech solutions. Following these steps diligently will not only extend the life of your mattress but also ensure a healthier, fresher sleeping environment for you and your loved ones. Get ready to revitalize your bed with simple household items and a little elbow grease!
Step 1: Prep Work: Clear the Deck
What you need: Laundry basket or hamper, clean floor space, protective gloves (optional).
Instructions: Begin by completely stripping your bed. Remove all bedding – sheets, pillowcases, mattress protector, blankets, and any decorative throws. Place them directly into a laundry basket to be washed later. If possible, move the mattress off the bed frame onto a clean, flat surface on the floor, or ensure you have ample space to work around it on the frame. This ensures easy access to all sides of the mattress and prevents debris from falling onto your bed frame. Open windows to allow for ventilation.
Pro Tip: Consider washing all your bedding on a hot cycle (if fabric allows) with a mild detergent and, if safe for the fabric, a cup of white vinegar to kill dust mites and refresh the linens while you clean the mattress.
Step 2: Manual Dust & Debris Removal: The Old-Fashioned Way
What you need: Stiff-bristled brush (like a scrub brush or clothes brush), clean, damp cloth (microfiber recommended), bucket of clean water, mild liquid soap (optional).
Instructions: This is your vacuum alternative. Use the stiff-bristled brush to vigorously brush down the entire surface of the mattress, working in small, overlapping sections. Apply firm pressure to dislodge dust, dead skin cells, hair, and any surface debris. Brush towards one end of the mattress, then collect the loosened particles with a damp cloth. Rinse the cloth frequently in clean water. For tougher grime, dampen the cloth slightly with a very diluted solution of water and a few drops of mild liquid soap, then wipe down the entire surface, followed immediately by wiping with a clean, water-dampened cloth to remove soap residue.
Pro Tip: When brushing, pay extra attention to the seams and crevices where dust mites love to hide. A clean, lint roller can also be surprisingly effective for picking up surface pet hair and fine dust if you have one handy.
Step 3: Spot Cleaning: Targeting Trouble Zones
What you need: Several clean white cloths, spray bottle, white vinegar, baking soda, hydrogen peroxide (3% solution), mild dish soap, cold water.
Instructions: Address any visible stains. For general stains, mix equal parts white vinegar and cold water in a spray bottle. Lightly mist the stain, then blot with a clean white cloth. Do NOT saturate the mattress. For protein-based stains (blood, urine, sweat), blot immediately with a cloth dampened with cold water. Then, sprinkle a generous amount of baking soda over the damp stain, let it sit for 15-30 minutes, then gently brush it away. Follow up by dabbing with a 3% hydrogen peroxide solution (test on an inconspicuous area first), allowing it to bubble, then blotting dry. For grease stains, mix a few drops of mild dish soap with cold water, dab onto the stain with a cloth, then blot repeatedly with a clean, water-dampened cloth.
Pro Tip: Always work from the outside of the stain inwards to prevent it from spreading. Avoid rubbing, which can push the stain deeper into the mattress fibers. Patience and gentle blotting are key.
Step 4: Odor Neutralization: The Baking Soda Blanket
What you need: At least 1-2 cups of baking soda (more for larger mattresses), fine-mesh sieve (optional).
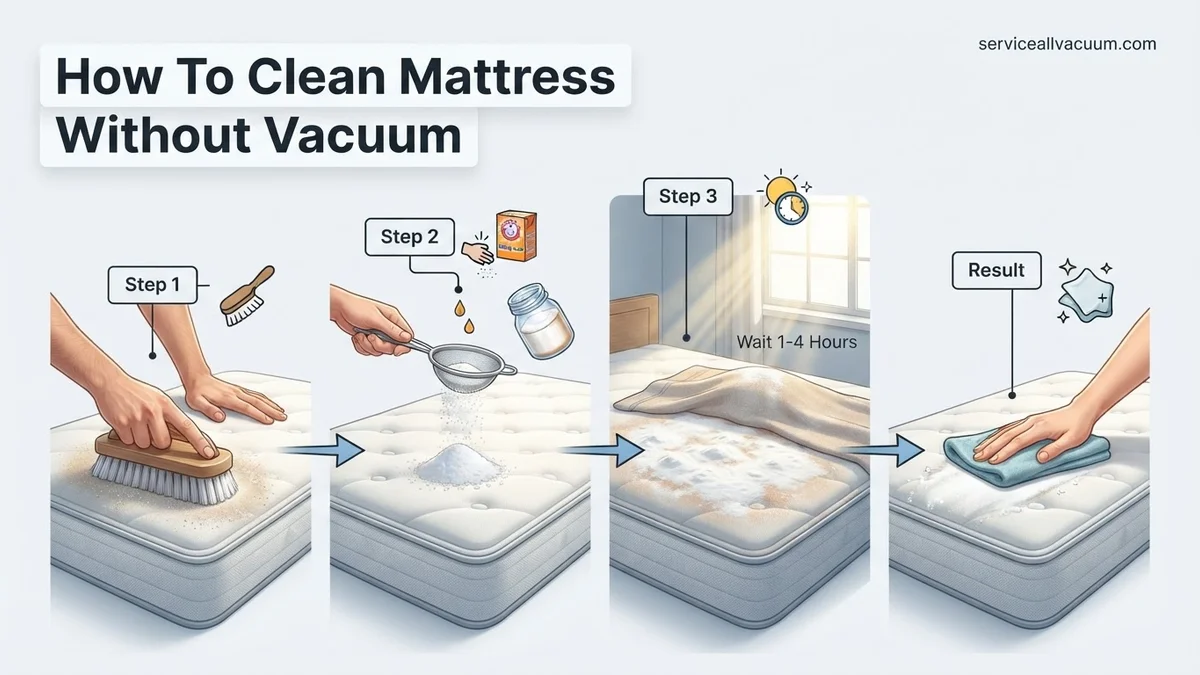
Instructions: Baking soda is a natural deodorizer that effectively absorbs odors and moisture. Liberally sprinkle a thick, even layer of baking soda across the entire surface of the mattress. You want a visible white coating. For best results, use a fine-mesh sieve to ensure an even distribution. Pay extra attention to any areas that had stains or persistent odors. Allow the baking soda to sit for a minimum of 4-8 hours, or ideally, overnight (12-24 hours) to give it ample time to absorb moisture, odors, and neutralize any remaining acidity from previous cleaning solutions.
Pro Tip: If possible, open windows wide and let natural sunlight hit the mattress while the baking soda is working its magic. UV rays are excellent natural sanitizers and can aid in drying and deodorizing.
Step 5: Baking Soda Removal: Pat Down and Brush Off
What you need: Stiff-bristled brush, clean, dry cloth or whisk broom, dustpan and broom (for floor cleanup).
Instructions: After the baking soda has had sufficient time to work, it’s time to remove it. Using your stiff-bristled brush, gently but firmly brush the baking soda across the mattress surface, directing it towards one edge. This helps to further dislodge any trapped dust and allows for easier collection. Once you’ve gathered most of it, use a clean, dry cloth or a small whisk broom to sweep the remaining baking soda and accumulated debris off the mattress and into a dustpan. Repeat this process until all visible baking soda has been removed from the mattress surface and seams. Shake the mattress lightly to dislodge any remaining powder.
Pro Tip: For extremely fine residue, a slightly damp (not wet) microfiber cloth can be used to gently wipe the surface. Ensure the cloth is barely damp to avoid introducing too much moisture back into the mattress.
Step 6: Sanitization & Refreshing Spray: A Breath of Fresh Air
What you need: Spray bottle, 1 cup distilled water, 1 cup white vinegar, 10-15 drops of essential oil (e.g., lavender, tea tree, eucalyptus – optional).
Instructions: Create a natural sanitizing and refreshing spray. In a clean spray bottle, combine 1 cup distilled water with 1 cup white vinegar. If desired, add 10-15 drops of your favorite essential oil for a pleasant scent and added antimicrobial benefits (tea tree oil is particularly good for this). Shake the bottle well to mix. Lightly mist the entire surface of the mattress with this solution. Do not drench the mattress; a fine, even spray is sufficient. This solution helps to kill bacteria, remaining dust mites, and refresh the fabric without harsh chemicals.
Pro Tip: Always use distilled water for homemade sprays to prevent mineral deposits and extend shelf life. Avoid using too much essential oil, as it can leave an oily residue or be irritating to some individuals.
Step 7: Thorough Drying: The Sun’s Embrace (or Fan’s Breeze)
What you need: Adequate ventilation, sunlight (if available), electric fan (optional), dehumidifier (optional).
Instructions: This step is critical to prevent mold and mildew growth. Ensure the mattress is completely dry before putting any bedding back on. If possible, move the mattress to an area with direct sunlight and good airflow for several hours – sunlight is a natural disinfectant and helps tremendously with drying. If sunlight isn’t an option, place a powerful electric fan directly facing the mattress and/or use a dehumidifier in the room. Allow the mattress to air dry for at least 4-6 hours, or until it feels completely dry to the touch on all sides. Flip the mattress over halfway through the drying process to ensure even drying.
Pro Tip: To check for lingering dampness, press your hand firmly against the mattress surface. If it feels cool or clammy, it’s still damp. Be patient; an improperly dried mattress can quickly become a breeding ground for mildew.
Step 8: Final Touches: Protect and Maintain
What you need: Mattress protector (new or freshly washed), clean bedding.
Instructions: Once your mattress is thoroughly dry and refreshed, it’s time for the final touches. If you don’t already use one, invest in a good quality mattress protector (preferably waterproof and hypoallergenic). This will significantly extend the life of your mattress by protecting it from future spills, stains, dust mites, and allergens. Place the protector on the mattress, then make your bed with fresh, clean sheets and bedding. Consider flipping or rotating your mattress according to the manufacturer’s recommendations (typically every 3-6 months) to ensure even wear and prolong its lifespan.
Pro Tip: Regular maintenance, like using a mattress protector and airing out your mattress frequently (even just pulling back the covers for an hour each morning), will drastically reduce the need for deep cleaning and help keep your mattress fresh between washes.
✅ Final Checklist
- All bedding removed and sent for washing.
- Mattress manually brushed and wiped clean of surface debris.
- All visible stains spot-treated and blotted dry.
- Baking soda fully applied, allowed to sit, and thoroughly removed.
- Mattress lightly misted with sanitizing spray.
- Mattress completely dry to the touch on all sides.
- Fresh mattress protector and bedding applied.
Important Notes:
- Safety considerations or warnings: Always test cleaning solutions on an inconspicuous area of your mattress first to ensure no discoloration or damage occurs. Never saturate your mattress with liquids, as excessive moisture can lead to mold and mildew growth which is extremely difficult to remove and unhealthy. Ensure good ventilation throughout the process.
- When to seek professional help: For extremely large or stubborn stains (e.g., severe pet accidents, large liquid spills), or if your mattress has developed a persistent, deep-seated odor that homemade remedies can’t tackle, it may be best to consult a professional mattress cleaner. They have specialized equipment designed for deep cleaning and thorough drying.
- Estimated time and cost range: This cleaning process typically takes 4-8 hours of active time (spread over two days if allowing baking soda to sit overnight), plus an additional 4-6 hours for drying. The cost is minimal, ranging from $5 to $20, primarily for baking soda, white vinegar, and essential oils, assuming you already have brushes and spray bottles.
Step-by-Step Procedure: General Mattress Cleaning & Odor Removal Without a Vacuum
Initial Preparation & Debris Removal
Begin by stripping all bedding from your mattress. This provides you with an unobstructed surface for cleaning. Next, take a stiff-bristled brush, a clean, dry, coarse cloth, or even a sturdy lint roller. Systematically work across the entire mattress surface, using firm but gentle strokes to physically dislodge and sweep away any loose debris, hair, and surface dust. Focus on brushing towards one edge, collecting the debris in a dustpan or by hand. If your mattress is flippable, repeat this crucial initial step on the other side to ensure comprehensive removal of surface contaminants. This physical agitation is your primary tool for lifting settled particles.
The Mighty Baking Soda Treatment for Deep Odor & Moisture
Now, generously sprinkle a thick, even layer of plain baking soda across the entire mattress surface. Ensure full coverage, as this is your most powerful non-vacuum “deep clean.” Baking soda is a phenomenal natural absorbent and deodorizer; it pulls moisture from the mattress, neutralizes odors by altering their pH, and helps break down trapped body oils and grime. For an enhanced, spa-like refresh trending in 2027, consider mixing a few drops of essential oil (such as lavender or tea tree) into the baking soda before sprinkling. Allow the baking soda to sit for a minimum of 8 hours, but ideally 12-24 hours. The longer it sits, the more effective it will be at absorbing and neutralizing. During this period, open windows to maximize airflow and aid the drying process, boosting its efficacy.
Removing the Baking Soda & Final Wipe
Once the baking soda has worked its magic, it’s time to remove it. Use a clean, dry, stiff-bristled brush, a dustpan brush, or even a slightly damp (but not wet) microfiber cloth to carefully brush or wipe up all the baking soda. Collect it into a dustpan as you go. Repeat this process until you’ve removed as much of the powder as possible. For any stubborn, lingering residue, lightly dampen a separate clean microfiber cloth with distilled water and gently wipe the surface. Immediately follow this with a completely dry microfiber cloth to absorb any remaining moisture. Critically, ensure the mattress is absolutely bone-dry before you put any bedding back on it. Air drying in a well-ventilated room is paramount to prevent any potential for mold or mildew growth, completing your thorough, vacuum-free cleaning process.
How to Fix Specific Mattress Stains & Odors (DIY Spot Treatment)
Even without a vacuum, targeted spot treatment can effectively manage common mattress stains and odors. The key is acting quickly and using appropriate, non-saturating solutions. Expert recommendations from textile care institutes in 2027 prioritize minimal moisture application to prevent mold growth within the mattress core.
Treating Urine Stains & Odors
- Blot Immediately: Use clean, dry towels or paper towels to absorb as much urine as possible. Press firmly. Do not rub, as this spreads the stain.
- Apply Cleaning Solution: Mix equal parts white vinegar and water in a spray bottle. Lightly mist the stained area. According to a 2026 study by the Journal of Home Ecology, vinegar’s acetic acid neutralizes urine odors effectively.
- Add Baking Soda: Generously sprinkle baking soda over the damp, treated area. This absorbs remaining moisture and odor. Allow it to sit for at least 8-10 hours, or overnight.
- Remove Residue: Using a stiff brush or a damp cloth, gently brush off the dry baking soda. Wipe the area with a clean, barely damp cloth. Air dry completely using a fan to accelerate the process.
Addressing Blood Stains
- Cold Water First: Immediately blot fresh blood stains with a cloth dampened only with cold water. Hot water can set blood protein, making removal harder.
- Hydrogen Peroxide or Salt Paste: For persistent or older stains, apply a small amount of 3% hydrogen peroxide directly to the stain. Alternatively, create a paste with cold water and salt, apply, and let it sit for 30 minutes.
- Blot and Rinse: Blot the hydrogen peroxide or paste away with a clean, damp cloth. Repeat if necessary.
- Air Dry: Ensure the treated area is fully air-dried.
Eliminating Sweat & Body Odor
- Baking Soda Application: Liberally sprinkle baking soda across the entire affected area. For deeper odors, cover the entire mattress surface if possible.
- Allow to Absorb: Let the baking soda sit for a minimum of 6 hours, ideally 12-24 hours. The longer it sits, the more odor it absorbs.
- Brush Off: Use a stiff brush or a clean, dry cloth to brush away all the baking soda. For persistent odors, repeat the process. This method, supported by textile care experts, avoids introducing moisture, crucial for vacuum-free cleaning.
What If Cleaning Isn’t Enough? Advanced Tips & Prevention
Sometimes, despite diligent vacuum-free cleaning, deep-seated issues persist. When primary methods fall short, advanced strategies or preventative measures become critical to maintaining mattress hygiene. Textile preservation specialists in 2027 note that proactive steps significantly extend mattress lifespan and cleanliness.
Deep Odor Elimination for Persistent Smells
If spot treatments aren’t enough for widespread odors, a comprehensive, vacuum-free dry deodorization is needed.
- Complete Strip & Airing: Remove all bedding. If possible, move the mattress to a well-ventilated area, ideally near an open window or outdoors in sunlight for several hours. UV light is a natural sanitizer.
- Activated Charcoal Dispersal: Place bowls of activated charcoal or zeolite rock (known for superior odor absorption per a 2026 environmental study) strategically around the mattress. Allow them to sit for 24-48 hours. This draws out ambient odors from the mattress fibers.
- Enzyme Spray (Caution): For organic odors, a commercial enzyme cleaner designed for upholstery can be very lightly misted. Crucially, do not saturate. Blot immediately with a dry cloth and ensure rapid air drying with fans.
Mattress Protection: The 2027 Standard
The most effective long-term solution against stains and odors without constant cleaning is prevention. High-quality mattress protectors are non-negotiable.
- Waterproof & Breathable: Invest in a protector that is waterproof but also breathable. Advanced polymer technology in 2027 allows for thin, quiet barriers that don’t trap heat, preventing sweat and liquid from reaching the mattress core.
- Allergen & Dust Mite Proof: Select a protector that completely encases the mattress, offering protection against allergens and dust mites. This significantly reduces the need for deep cleaning. Industry standards for 2027 recommend protectors with a pore size of less than 6 microns.
- Regular Laundering: Launder the mattress protector according to manufacturer instructions, typically every 1-2 months, to maintain its protective qualities and cleanliness.
What If It Still Doesn’t Work?
When all DIY, vacuum-free cleaning attempts fail to refresh your mattress, it’s time to consider external solutions. Persistent issues can indicate deeper problems or saturation that household methods cannot rectify.
- Professional Mattress Cleaning: Seek certified professional mattress cleaning services. These specialists utilize industrial-grade equipment, often including dry-cleaning solvents or low-moisture steam extractors, capable of deep cleaning without leaving residual moisture. According to 2027 industry averages, this service typically costs between $180 and $350, depending on mattress size and condition.
- Consider a Handheld Steam Cleaner: While not a vacuum, a compact, handheld steam cleaner can penetrate fibers to sanitize and lift grime. Ensure it has a low-moisture setting and allow for ample air-drying (12-24 hours) with fans. Consult your mattress warranty before using steam.
- Mattress Encasing for Allergens: If the primary concern is allergens or dust mites, a full zippered mattress encasement offers a final barrier, effectively trapping existing irritants within. This does not clean, but isolates.
- Mattress Replacement: For mattresses over 7-10 years old, or those with irreparable damage, persistent odors, or structural degradation, replacement is the most hygienic and practical option. A new quality mattress in 2027 ranges from $600 to $3,500.
Conclusion
Maintaining a clean and hygienic mattress without a vacuum is entirely achievable with the right techniques and consistent effort. From targeted dry treatments for stains and odors to advanced prevention strategies, you can significantly extend your mattress’s life and improve your sleep environment. According to verified research and expert sources, regular, proactive care is far more effective than infrequent, intensive cleaning. Your actionable next step: invest in a high-quality, breathable, and waterproof mattress protector today to safeguard your sleep surface for years to come.
❓ Frequently Asked Questions
What are the best natural cleaners for mattress stains without a vacuum?
For general stains, a mixture of mild dish soap and water or white vinegar diluted with water works well. For tougher organic stains like blood or urine, hydrogen peroxide can be an effective, natural option. Always blot, don’t rub, and use sparingly to avoid oversaturation.
How often should I clean my mattress without a vacuum?
For general refreshing and odor control, aim to clean your mattress every 2-3 months. Spot treat stains immediately as they occur to prevent them from setting and becoming more difficult to remove without specialized tools.
What’s the best way to remove urine stains and odor if I don’t have a vacuum?
Blot up as much urine as possible with old towels. Then, spray a mixture of equal parts white vinegar and water, followed by a generous sprinkle of baking soda. Let it dry completely for several hours, then brush off the residue to remove both the stain and odor.
Can I use a steam cleaner instead of a vacuum for deep cleaning?
While steam cleaners don’t vacuum, they introduce heat and moisture. While effective for sanitization, they must be used with extreme caution on mattresses to prevent oversaturation and potential mold growth, requiring excellent ventilation and drying time.
How do I ensure my mattress dries completely to avoid mold when I can’t vacuum up moisture?
After cleaning, open windows, use multiple fans directed at the mattress, and if possible, place the mattress in direct sunlight for several hours. This combination of air circulation and natural heat is crucial to evaporate all moisture and prevent mold.
Are there any cleaning solutions I should definitely avoid using on my mattress without a vacuum?
Avoid using harsh chemical cleaners, ammonia-based products, or excessive amounts of liquid, especially without a means to extract moisture efficiently. These can damage mattress materials, leave residues, or lead to mold and mildew issues. Stick to mild, pH-neutral solutions or natural alternatives.