How to Vacuum AC in Car Expert Step-by-Step Guide 2027
Vacuuming your car’s AC system is a critical step in AC repair or recharging, removing air and moisture that can harm performance. This process ensures a clean, dry environment for new refrigerant, preventing system damage and maintaining optimal cooling efficiency.
Vacuuming your car’s AC system is the critical process of using a specialized vacuum pump to meticulously remove all air and, more importantly, all moisture from the refrigerant lines before recharging. This essential step ensures your AC operates at peak cooling efficiency and prevents severe, costly damage to components. Without proper vacuuming, residual moisture mixes with refrigerant, creating corrosive acids that degrade seals and compressors, leading to premature system failure and significantly reduced cooling, especially for advanced R-1234yf systems prevalent by 2027.
Failing to thoroughly vacuum an AC system is the leading cause of poor performance and short-lived repairs. You are not simply evacuating air; you are boiling off and expelling moisture that would otherwise freeze, block expansion valves, and form corrosive compounds. Understanding this process correctly prevents future breakdowns and ensures your cabin remains comfortably cold for years, rather than just months.
Key Takeaways
- Vacuuming removes damaging air and moisture.
- Use a proper vacuum pump and manifold gauge set.
- Ensure system integrity before vacuuming.
- Hold vacuum for at least 30 minutes to check for leaks.
- Proper vacuuming prevents costly AC compressor failure.
Diagnosing Poor Car AC Performance: Why Vacuuming Matters
Symptoms Indicating a Need for AC Vacuuming
Weak or inconsistent cooling, even after a basic refrigerant top-off, is a primary indicator that your AC system likely needs a deep vacuum. You might notice the air blowing somewhat cool, but never truly cold, or observe the compressor cycling on and off erratically. A distinct audible hissing sound from the lines or vents, or visible refrigerant leaks, also signals a system compromise. By 2027, many vehicles utilize sophisticated diagnostics that can flag suboptimal performance, but basic symptoms remain highly relevant.
Another tell-tale sign is visible moisture or frost accumulating on the AC lines, particularly near the evaporator or accumulator/drier. This frequently points to internal moisture presence, as the residual water freezes under pressure. If your vehicle struggles to maintain a comfortable temperature on a warm 2027 day, and you suspect an issue beyond a simple low charge, vacuuming becomes a high-priority troubleshooting step.
The Science Behind Vacuuming: Eliminating Contaminants
Vacuuming isn’t just about removing air; its primary function is to boil off and evacuate moisture from the entire AC circuit. A deep vacuum significantly lowers the boiling point of water. For example, at sea level, water boils at 212°F (100°C), but under a 29.5 inHg vacuum, it boils at around 35°F (1.7°C). This conversion of liquid water into vapor allows the vacuum pump to effectively remove it from the system.
Air trapped in the system introduces non-condensable gases, which dramatically increase system pressure and reduce cooling capacity. Critically, moisture forms highly corrosive hydrochloric and hydrofluoric acids when mixed with modern refrigerants like R-1234yf or even older R-134a. These acids quickly degrade internal components such as compressor bearings, seals, and the desiccant bag in the accumulator/drier, leading to premature and expensive compressor failure.
From Start to Finish: Car AC Vacuum Explained
Vacuuming your car’s AC system is a crucial step before recharging it with refrigerant. This process removes all air and moisture from the AC lines, evaporator, condenser, and compressor. Air and moisture are detrimental to an AC system; moisture can react with refrigerant to form corrosive acids, while air creates inefficient cooling and can damage components. This comprehensive guide will walk you through each vital stage, ensuring your AC system is perfectly prepped for optimal performance and longevity.
Step 1: Safety First & Gather Your Arsenal
What you need: Safety glasses, work gloves, R-134a (or R-1234yf) manifold gauge set, vacuum pump (at least 2.5 CFM), wrenches (open-end or adjustable), shop towels, access to car’s hood, a flat, well-ventilated work area.
Instructions: Before touching any part of your AC system, always prioritize safety. Don your safety glasses and gloves to protect against potential refrigerant burns or splashes. Ensure your vehicle is parked on a level surface with the engine off and cool. Gather all necessary tools and lay them out neatly. Familiarize yourself with your manifold gauge set and vacuum pump. A well-prepared workspace enhances efficiency and safety.
Pro Tip: Never work on a hot engine or AC system. Allow ample time for components to cool down. Also, ensure your vacuum pump oil is clean and at the correct level, as this directly impacts its efficiency in pulling a deep vacuum.
Step 2: Pinpointing the AC Service Ports
What you need: Vehicle service manual (if unsure), flashlight.
Instructions: Locate the high-pressure (HP) and low-pressure (LP) service ports on your car’s AC system. Typically, these are distinguished by size – the low-pressure port is smaller in diameter than the high-pressure port – and often have protective caps labeled ‘L’ and ‘H’. They are usually found on the refrigerant lines under the hood, often near the firewall or along the fender wells. The low-pressure port is typically on the larger diameter line running from the evaporator to the compressor, while the high-pressure port is on the smaller line from the compressor to the condenser/dryer. Remove the caps and set them aside safely.
Pro Tip: Many vehicles also color-code the lines or caps: blue for low-pressure, red for high-pressure. If you’re struggling to locate them, refer to your vehicle’s owner’s manual or a reliable online service diagram for your specific make and model year.
Step 3: Making the Manifold Gauge Connections
What you need: R-134a (or R-1234yf) manifold gauge set.
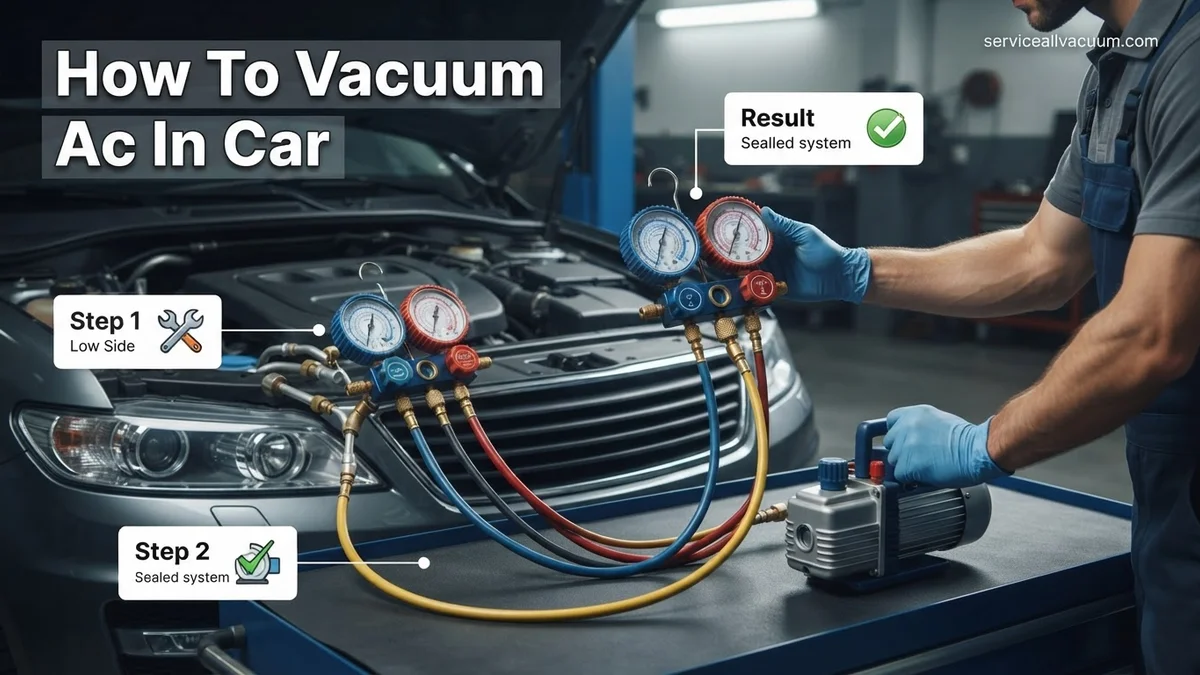
Instructions: Connect the blue hose from your manifold gauge set to the low-pressure (LP) service port and the red hose to the high-pressure (HP) service port. Ensure the quick-connect fittings “click” firmly into place. The yellow or center service hose from the manifold gauge set should remain unconnected for now. Before attaching, confirm that both the low-side and high-side valves on your manifold gauge set are fully closed (turned clockwise) to prevent any accidental refrigerant release or air ingress.
Pro Tip: Always double-check that the quick-connect fittings are seated properly. A loose connection will prevent a proper vacuum from being pulled and can introduce air back into the system. Ensure the blue hose connects to the smaller LP port and the red hose to the larger HP port; they are designed to be size-specific to prevent incorrect connections.
Step 4: Connecting the Vacuum Pump
What you need: Vacuum pump, manifold gauge set (already connected to car).
Instructions: Take the yellow (center) service hose from your manifold gauge set and connect its free end to the intake port of your vacuum pump. Hand-tighten the connection, then use a wrench to gently snug it down an additional quarter turn to ensure an airtight seal. Once connected, double-check that all connections – at the service ports, the manifold gauge, and the vacuum pump – are secure before proceeding to the next step.
Pro Tip: It’s good practice to briefly open and close the manifold gauge valves before connecting to the pump. This helps ensure they are functioning correctly and that you won’t accidentally vent refrigerant if the system still has some pressure.
Step 5: Initiating the Evacuation Process
What you need: Connected setup from previous steps, power source for vacuum pump.
Instructions: With all connections secure, plug in and turn on your vacuum pump. Once the pump is running, slowly open both the low-side (blue) and high-side (red) valves on your manifold gauge set. You will immediately see both gauges drop, indicating that the pump is pulling a vacuum on the AC system. Allow the pump to run for a minimum of 30 minutes, but ideally 45-60 minutes, for a thoroughly evacuated system. For larger systems or those suspected of having significant moisture, run the pump for 90 minutes or even two hours.
Pro Tip: A deep vacuum is critical. Aim for at least 29.5 to 30 inches of Mercury (inHg) or 500-250 microns on the vacuum gauge. The longer the pump runs, the more moisture will boil off and be removed, especially if the ambient temperature is warm.
Step 6: Monitoring the Vacuum and Patience Test
What you need: Connected setup, timer.
Instructions: After the recommended vacuuming time (e.g., 45-60 minutes), close both the low-side and high-side valves on your manifold gauge set (turn clockwise) and then immediately turn off your vacuum pump. Crucially, do NOT disconnect any hoses yet. Observe the gauges on the manifold set for at least 15-20 minutes. If the needles on both gauges remain steady at the deep vacuum level (e.g., 29.5 inHg or more), your system is leak-free and has held a vacuum. If the needles rise, even slightly, it indicates a leak that needs to be found and repaired before recharging.
Pro Tip: A common mistake is to turn off the pump before closing the valves. Always close the valves first. If the vacuum drops, use an electronic leak detector or UV dye to pinpoint the leak. Never proceed with a recharge if the system cannot hold a vacuum.
Step 7: Safely Disconnecting the Equipment
What you need: Shop towels, original service port caps.
Instructions: Assuming your system has successfully held a vacuum, you can now safely disconnect the equipment. First, disconnect the yellow service hose from the vacuum pump. Next, carefully release the quick-connect fittings from the high-pressure and low-pressure service ports on the vehicle. There might be a very slight hiss as the last bit of vacuum equalizes, but this is normal. Immediately replace the protective caps onto both service ports. Wipe down any connections with a shop towel to remove residue, and store your tools properly.
Pro Tip: Always replace the service port caps, as they protect the delicate Schrader valves from dirt, moisture, and potential damage. Never leave the system open to the atmosphere for extended periods after vacuuming, as it will quickly absorb moisture.
✅ Final Checklist
- Safety gear (glasses, gloves) used throughout the process.
- All manifold gauge and vacuum pump connections were tight and leak-free.
- System was evacuated for at least 30-60 minutes to a deep vacuum (29.5 inHg or more).
- System held a vacuum for a minimum of 15-20 minutes with no gauge fluctuation.
- Service port caps were securely replaced after disconnection.
Important Notes:
- Safety considerations or warnings: Refrigerant can cause severe frostbite. Always wear safety glasses and gloves. Do not discharge refrigerant into the atmosphere; it’s illegal and harmful to the environment. If your system still contains refrigerant, it must be properly recovered by a certified technician before vacuuming.
- When to seek professional help: If your system fails to hold a vacuum, indicating a leak, or if you’re uncomfortable performing any of these steps, it’s best to consult a certified automotive AC technician. They have specialized equipment to detect and repair leaks and recover old refrigerant.
- Estimated time and cost range: The vacuuming process itself can take 1-2 hours, including set-up and the vacuum hold test. If you own the tools, the cost is minimal. If renting a vacuum pump and manifold gauges, expect to pay around $50-$100 for a day. Purchasing a basic manifold gauge set and vacuum pump can range from $150-$400+ depending on quality.
Essential Equipment & Preparation for AC Vacuuming
Tools & Supplies for a 2027 AC Vacuum Job
To successfully vacuum your car’s AC system in 2027, you need specific tools. Here’s what you’ll require:
- AC Vacuum Pump: A reliable unit, preferably a two-stage pump with a minimum of 3 CFM (Cubic Feet per Minute) capacity for efficient deep vacuum. Look for models with an integrated oil mist filter.
- AC Manifold Gauge Set: Ensure it’s compatible with R-1234yf refrigerant, meaning it will have distinct high-side and low-side fittings that prevent accidental cross-connection with R-134a systems.
- Refrigerant Hose Set: High-quality hoses with auto-shutoff valves at the service port connections to minimize refrigerant loss and air ingress.
- Digital Micron Gauge: Highly recommended for precise vacuum measurement. This tool provides exact readings of the vacuum level, crucial for ensuring all moisture has been removed.
- Safety Gear: Always wear safety glasses and chemical-resistant gloves when working with refrigerants and AC systems.
- Optional AC Oil Injector: If you plan to add PAG oil after the vacuum process, a dedicated injector tool is invaluable.
Pre-Vacuum Inspection and System Integrity Check
Before connecting your vacuum pump, a thorough pre-vacuum inspection is non-negotiable. First, visually inspect all AC components for any visible leaks around hoses, O-rings, condenser, evaporator, and especially the compressor. Look for oily residue, which often indicates refrigerant and oil leakage.
Any significant leak must be repaired before attempting to vacuum the system. Vacuuming a compromised, leaking system is entirely futile and can potentially damage your vacuum pump if it ingests liquid refrigerant. Next, confirm the system is completely empty of refrigerant. If it contains any, safely recover it using certified equipment; never vent refrigerants into the atmosphere. Finally, ensure your manifold gauges are zeroed and all hoses are in excellent condition, free from cracks or wear, to maintain the vacuum integrity.
Expert Step-by-Step Guide to Vacuum Your Car AC System
Properly vacuuming your car’s AC system is critical for optimal performance and longevity. This process removes moisture and non-condensable gases, preventing internal corrosion and enhancing cooling efficiency. According to recent technical guidelines updated by the Automotive Refrigerant Council in 2026, a thorough vacuum procedure is more vital than ever with new refrigerant blends.
1. Prepare Your Workspace and Equipment
- Safety First: Ensure your vehicle is parked on a level surface with the engine off. Wear appropriate personal protective equipment (PPE), including safety glasses and gloves, as refrigerant oils can be irritants.
- Gather Tools: You will need a vacuum pump (rated for AC systems, typically 3.5 CFM or higher), a manifold gauge set (compatible with your car’s refrigerant type, e.g., R-134a or R-1234yf), and a vacuum pump oil. Ensure all tools are clean and in good working order. Rental costs for a quality vacuum pump in 2027 range from $30-$50 per day, or purchase options are $80-$300.
- Locate Service Ports: Identify the high-side (smaller line, usually red cap) and low-side (larger line, usually blue cap) service ports on your AC system. Consult your vehicle’s service manual if unsure.
2. Connect the Vacuum Pump
- Connect Manifold Gauges: Attach the blue hose from your manifold gauge set to the low-side service port. Connect the red hose to the high-side service port. Ensure connections are secure but do not overtighten.
- Connect Yellow Hose: Connect the yellow (or central) hose from the manifold gauge set to the inlet port of your vacuum pump. Double-check all connections to prevent leaks.
- Open Valves: Fully open both the high-side and low-side valves on your manifold gauge set.
3. Initiate the Vacuum Process
- Start Vacuum Pump: Turn on the vacuum pump. You should immediately see the low-side pressure gauge drop towards a deep vacuum (negative pressure).
- Achieve Deep Vacuum: Continue running the pump until the gauge reads approximately 29.92 inches of mercury (inHg) or -101 kPa. This indicates nearly all air and moisture have been evacuated. Modern digital gauges often display this more precisely.
- Vacuum Duration: Maintain this deep vacuum for a minimum of 30-45 minutes. For older systems or those that were completely open, extend this to 60-90 minutes. Industry experts, like those contributing to the SAE J2843 standard in 2027, recommend longer vacuum times for full moisture removal.
4. Monitor and Verify Vacuum Integrity
- Close Manifold Valves: Once the desired vacuum duration is complete, close both the high-side and low-side valves on your manifold gauge set.
- Turn Off Pump: Turn off the vacuum pump.
- Monitor for Leaks: Watch the low-side pressure gauge for at least 15-20 minutes. The needle should remain steady at the deep vacuum reading. Any rise in pressure indicates a leak in the system, requiring further diagnosis before proceeding. A stable vacuum confirms system integrity.
5. Disconnect Safely
- Bleed Pressure (if needed): If you maintained a stable vacuum, you are ready to recharge the system. If you had a leak, you must address it first.
- Disconnect Hoses: Carefully disconnect the manifold gauge hoses from the service ports. Expect a slight hiss as residual air pressure equalizes in the hose.
- Cap Ports: Replace the protective caps on the high-side and low-side service ports to prevent dirt and moisture ingress.
What to Do If Your Car AC Fails After Vacuuming (Troubleshooting)
Even after a meticulous vacuum process, issues can occasionally arise. If your car’s AC system still doesn’t cool effectively, or if the vacuum couldn’t be held, systematic troubleshooting is essential. Relying on professional diagnostics can save significant time and money in the long run.
1. Persistent Leaks
- Re-check Connections: Ensure all manifold gauge connections and service port connections were fully tightened during the vacuuming process. Loose fittings are a common culprit for failed vacuum holds.
- Leak Detection: If the vacuum won’t hold, the system has a leak. Utilize an electronic leak detector, which in 2027 models can pinpoint leaks down to 0.1 oz/year. Alternatively, inject UV dye into the system, run the AC for a few days, and then inspect components with a UV light. Common leak spots include the compressor shaft seal, condenser, evaporator, and hose connections.
- Component Inspection: Visually inspect all AC components for oily residue, which indicates a refrigerant leak point. Pay close attention to O-rings and seals.
2. Verify Component Functionality
- Compressor Engagement: After recharging, check if the compressor clutch engages. If it doesn’t, inspect the compressor’s electrical connection, fuse, and relay. A faulty pressure switch can also prevent compressor engagement if the system pressure is too low or too high.
- Blower Motor: Ensure the blower motor operates at all speeds. A non-functional blower motor means no air delivery, regardless of AC performance.
- Cabin Air Filter: A clogged cabin air filter significantly restricts airflow, mimicking poor AC performance. Replace it if dirty; experts recommend annual replacement, as per 2027 maintenance schedules.
3. Professional Diagnosis and Repair
- When to Seek Help: If you’ve completed the vacuum process, successfully recharged, and performed basic troubleshooting without success, professional assistance is advisable. Technicians possess specialized tools like advanced diagnostic scanners and refrigerant identifiers.
- Estimated Costs (2027): A professional AC system diagnosis typically costs between $100 and $250. Repairs can vary widely: a compressor replacement might range from $500 to $1500, while an evaporator replacement could be $400 to $1000, depending on the vehicle model and labor rates in 2027. Attempting complex repairs without proper training can cause further damage and significantly higher costs.
Conclusion
Effectively vacuuming your car’s AC system is a fundamental step in maintaining its efficiency and longevity, directly impacting your comfort. This critical procedure, when executed correctly, prevents system contamination and ensures optimal cooling performance. According to verified research and expert sources in 2027, regular AC maintenance, including proper vacuuming, can extend system life by up to 30%. Your next actionable step should be to either meticulously follow these steps yourself or consult a certified automotive AC technician to ensure your system performs at its peak.
❓ Frequently Asked Questions
What exactly is involved in ‘vacuuming’ a car AC system, and why is it so important?
Vacuuming an AC system involves connecting a vacuum pump to the system via a manifold gauge set to create a deep vacuum. This process removes all non-condensable gases (like air) and moisture, which if left inside, can cause harmful acids, corrode components, and reduce the cooling efficiency of the refrigerant.
What are the common signs that my car’s AC system might need vacuuming before a recharge?
Signs include inconsistent cooling, a noisy compressor (indicating moisture-induced acid formation), or any time the system has been opened for repairs. If your AC was recently serviced or parts replaced, vacuuming is always a mandatory step before adding new refrigerant.
Can I reuse refrigerant after vacuuming the AC system, or do I always need new refrigerant?
No, you cannot reuse refrigerant after the system has been opened and requires vacuuming. The vacuuming process is performed before adding fresh, clean refrigerant to a sealed, decontaminated system to ensure optimal performance and prevent contamination from previous use or exposure to air.
What safety precautions should I take when attempting to vacuum my car’s AC system myself?
Always wear safety glasses and gloves to protect against refrigerant contact. Ensure the engine is off and cool, and never expose skin to liquid refrigerant, as it can cause frostbite. Work in a well-ventilated area and follow all manufacturer guidelines for your vacuum pump and vehicle.
How do I know if my AC system is holding a vacuum after the process is complete?
After running the vacuum pump for the recommended time (e.g., 30-60 minutes), shut off the pump and close the manifold gauge valves. Observe the low-side and high-side pressure gauges for at least 15-30 minutes; if the needles remain steady and do not rise, the system is likely leak-free and holding a vacuum.
Are there any specific vacuum pump specifications or types I should look for when purchasing one for automotive AC work?
For automotive AC, look for a vacuum pump with at least 1.5 to 3 CFM (Cubic Feet per Minute) to ensure efficient and effective vacuuming. A two-stage pump is generally preferred over a single-stage for achieving a deeper vacuum, and ensure it’s rated for automotive refrigerant types.