How to Fix a Vacuum Leak 2027 Expert Step-by-Step Guide
A vacuum leak can cause a host of engine issues, from rough idling to poor fuel economy. Accurately diagnosing the leak’s source is the crucial first step, followed by targeted repair to restore optimal engine performance. This guide provides proven methods for finding and fixing common vacuum leaks.
Fixing a vacuum leak in your 2027 vehicle requires a precise, step-by-step diagnostic approach using modern tools like smoke testers, followed by targeted component replacement. This isn’t just about silencing an annoying hiss; correctly identifying and sealing these leaks directly restores optimal engine performance, improves fuel economy, and prevents more costly damage down the line.
Addressing vacuum leaks promptly is critical for your vehicle’s health. These seemingly minor issues can trigger persistent check engine lights, cause rough idling that stresses engine mounts, and lead to a significant drop in fuel efficiency. Our guide provides you with expert methods to accurately find and repair these common problems, ensuring your engine runs smoothly and efficiently for years to come.
Key Takeaways
- Proper diagnosis prevents costly misrepairs.
- Use smoke, propane, or spray tests to locate leaks.
- Inspect hoses, gaskets, and common vacuum components.
- Always prioritize safety when working on engines.
- Replace faulty parts, don’t just patch them.
What are the Symptoms and Common Causes of Vacuum Leaks?
Recognizing the Signs of a Vacuum Leak
Identifying a vacuum leak often begins with noticing changes in your vehicle’s behavior. By 2027, vehicle diagnostics are advanced, but physical symptoms remain key indicators:
- Erratic or Rough Idle: Your engine RPMs may fluctuate wildly or feel “lumpy” at a standstill.
- Hissing or Whistling Sounds: Often heard from the engine bay, especially when the engine is running at idle.
- Check Engine Light (CEL): Frequently illuminated with codes like P0171 or P0174, indicating a lean fuel condition.
- Reduced Engine Power: You might experience sluggish acceleration or a noticeable loss of horsepower.
- Poor Fuel Economy: The engine compensates for unmetered air by injecting more fuel, leading to higher consumption.
- Hard Starting or Stalling: In severe cases, the engine may struggle to start or stall unexpectedly.
Common Culprits Behind Vacuum Leaks
Vacuum leaks typically stem from aged or damaged components within the engine’s intake and vacuum systems. Common failure points to inspect on a 2027 model, or any vehicle, include:
- Cracked Vacuum Hoses: Rubber and plastic hoses degrade over time due to heat and chemical exposure, leading to brittleness and cracks.
- Intake Manifold Gaskets: These seals can harden, shrink, or crack, allowing unmetered air into the engine.
- PCV (Positive Crankcase Ventilation) Valve & Hoses: The valve itself can stick open, or its hoses can crack.
- Brake Booster Diaphragm: A ruptured diaphragm inside the brake booster creates a significant vacuum leak.
- Throttle Body Gaskets: The seal between the throttle body and the intake manifold can fail.
- EGR Valve Gaskets/Vacuum Lines: Leaks around the EGR valve or its control lines are common.
- Vacuum Reservoirs & Solenoids: These plastic components can crack, or their internal seals can fail.
How to Diagnose and Fix Vacuum Leaks Like an Expert
A vacuum leak can be one of the most frustrating and elusive issues plaguing your vehicle’s performance. From a rough, erratic idle to a noticeable drop in fuel economy and the dreaded Check Engine Light (CEL), vacuum leaks can manifest in various ways. This comprehensive guide will walk you through the essential steps, from initial diagnosis to final repair, equipping you with the knowledge and techniques used by professional mechanics to pinpoint and resolve these common automotive headaches. Following these steps carefully will not only save you time and money but also restore your vehicle’s smooth operation.
Step 1: Understand the Symptoms and Conduct an Initial Visual Inspection
What you need: A bright flashlight, a pair of mechanics’ gloves, and possibly a small mirror on an extendable handle.
Instructions: Before diving into complex diagnostic tools, familiarize yourself with the common symptoms of a vacuum leak, which include a high or fluctuating idle, a distinct hissing sound from the engine bay, a P0171/P0174 (lean condition) or P0440/P0455 (EVAP system) diagnostic trouble code, and a general lack of power. Begin by visually inspecting all accessible vacuum lines, hoses, and connections under the hood. Look for obvious cracks, tears, disconnections, or dry-rotted sections. Pay close attention to elbows and junctions where hoses often flex and degrade. Trace lines connected to the PCV valve, brake booster, and any emissions components.
Pro Tip: Many vacuum leaks occur immediately after engine work when a hose might have been accidentally dislodged or left loose. If you recently had maintenance performed, recheck connections in those specific areas first.
Step 2: The Carb Cleaner or Propane Test (Flammable Gas Method)
What you need: A can of carburetor cleaner spray (non-flammable starting fluid is safer if available) OR an unlit propane torch with a flexible hose, a fire extinguisher nearby, and an assistant if possible.
Instructions: With the engine idling at operating temperature, carefully and in small, controlled bursts, spray the carb cleaner around suspected vacuum lines, intake manifold gaskets, the throttle body gasket, and any other potential leak points. Alternatively, you can use an unlit propane torch, allowing the gas to waft around the same areas. Listen intently for a sudden change in engine RPM – a temporary increase in RPM indicates that the engine is “sucking in” the flammable substance through a leak. This method is effective because the engine’s computer will try to compensate for the sudden rich mixture, causing the RPM fluctuation.
Pro Tip: Always have a fire extinguisher on hand when performing this test due to the flammable nature of the chemicals. Apply sprays sparingly to avoid saturating sensors or causing false readings. Focus on one small area at a time to isolate the leak effectively.
Step 3: The Smoke Machine Test (Professional Diagnostic Method)
What you need: An automotive smoke machine, appropriate adapters (e.g., for intake manifold, EVAP port, or vacuum lines), and compressed air supply.
Instructions: For the most accurate and safest diagnosis, a smoke machine is highly recommended. Disconnect a main vacuum line (e.g., the brake booster line, PCV hose, or an EVAP port) and connect the smoke machine’s output. Ensure all other vacuum ports are sealed. Turn on the smoke machine and allow it to fill the intake manifold and vacuum system with a dense, non-toxic smoke. Within a few minutes, smoke will visibly escape from any cracks, loose connections, or degraded gaskets. This method is particularly effective for small, hard-to-find leaks that other methods might miss, and it covers the entire vacuum system comprehensively.
Pro Tip: Always follow the smoke machine manufacturer’s instructions for operation. Use only automotive-grade smoke fluid, as other liquids can damage the machine or leave harmful residues in your engine’s vacuum system. A strong flashlight helps immensely in spotting faint wisps of smoke.
Step 4: Pinpoint the Exact Source and Identify Affected Components
What you need: Your vehicle’s service manual or an online diagram of its vacuum system, possibly a small mirror, and good lighting.
Instructions: Once you’ve identified a general area where a leak exists using the previous steps, it’s time to narrow down the specific component. This might be a deteriorated vacuum hose elbow, a cracked plastic line, a faulty PCV valve, a worn intake manifold gasket, a leaky brake booster diaphragm, or a loose clamp. Refer to your vehicle’s vacuum diagram to understand the routing and function of each line and component in the suspect area. Carefully manipulate hoses and connections while listening or watching for changes. Look for discoloration or deposits around gaskets, which can indicate exhaust or fluid leaks alongside vacuum leaks.
Pro Tip: Take clear photos of the hose routing and component locations before you start disconnecting anything. This will be invaluable during reassembly, especially on complex modern engines with intricate hose networks.
Step 5: Gather the Correct Replacement Parts and Tools
What you need: New vacuum hoses (ensure correct inner diameter, length, and material—e.g., silicone for heat resistance), appropriate gaskets (intake manifold, throttle body), new hose clamps (if needed), screwdrivers, pliers, socket set, torque wrench (for gasket installations), and protective eyewear.
Instructions: Once the faulty component is identified, procure the necessary replacement parts. Always opt for OEM (Original Equipment Manufacturer) quality or reputable aftermarket parts. For vacuum hoses, match the inner diameter precisely and ensure the material can withstand under-hood temperatures and exposure to engine fluids. If replacing a gasket, obtain the correct gasket type and quantity. Having all tools and parts ready before disassembly prevents delays and ensures a smooth repair process. For intake manifold gaskets, research the specific torque specifications and bolt tightening sequence for your vehicle.
Pro Tip: When buying vacuum hose, it’s often wise to purchase a few feet more than you think you need, especially for common diameters like 3.5mm, 4mm, and 6mm. It’s inexpensive, and having extra on hand can save a trip to the parts store.
Step 6: Replace the Faulty Component(s)
What you need: The new parts and tools from Step 5, a clean rag, and possibly gasket sealant (check service manual recommendations).
Instructions: Carefully disconnect the old, faulty component. For hoses, use appropriate pliers or cutters, being careful not to damage adjacent components. If replacing a gasket (e.g., intake manifold gasket), meticulously clean both mating surfaces to remove all traces of the old gasket material and grime. Any debris left behind can cause a new leak. Install the new component, ensuring it’s seated correctly and all connections are tight and secure. If using a torque wrench for gaskets, follow the manufacturer’s specified torque values and tightening sequence precisely to prevent warping or uneven pressure, which can lead to new leaks.
Pro Tip: For stiff or stubborn hoses, gently warming the end of the hose with a heat gun (on a low setting and from a safe distance) can make it more pliable and easier to slip over fittings. Be extremely careful not to melt or overheat the hose or surrounding plastic.
Step 7: Clear Codes, Reassemble, and Verify the Repair
What you need: An OBD-II scanner (if a CEL was present), basic hand tools to reassemble any removed covers or airboxes.
Instructions: After all replacements are complete, double-check all connections to ensure everything is tight and correctly routed. Reinstall any air intake components, engine covers, or other items that were removed during the process. If your Check Engine Light was on, connect your OBD-II scanner and clear any stored Diagnostic Trouble Codes (DTCs). Start the engine and listen carefully for any persistent hissing sounds. Observe the idle quality – it should now be smooth and consistent. Take the vehicle for a test drive, ensuring it runs smoothly and that the CEL does not reappear after a few drive cycles, which allows the vehicle’s computer to re-evaluate all systems.
Pro Tip: Don’t rely solely on clearing codes. Drive the vehicle through various conditions (city, highway) for at least 50-100 miles. This allows the onboard diagnostic monitors to run and confirm that the issue is truly resolved and no new codes are pending.
✅ Final Checklist
- Engine idles smoothly and consistently without fluctuating RPMs.
- No audible hissing or sucking sounds from the engine bay.
- Check Engine Light (CEL) is off, and no new diagnostic trouble codes are stored.
- Vehicle accelerates and performs normally without hesitation or lack of power.
- Fuel trim values (if monitored with a scanner) are within acceptable ranges (typically +/- 10%).
Important Notes:
- Safety considerations or warnings: Always work on a cool engine to avoid burns. Disconnect the battery’s negative terminal before working on electrical components. Wear safety glasses and gloves. Be extremely careful when working with flammable sprays and hot engine components. Keep a fire extinguisher within reach.
- When to seek professional help: If you’re uncomfortable performing any of these steps, lack the necessary tools (especially a smoke machine), or if the leak persists after your attempts, it’s best to consult a certified mechanic. Vacuum leaks can sometimes be deep within the engine, requiring specialized knowledge and equipment.
- Estimated time and cost range (if applicable):
- Time: 1-4 hours for diagnosis and simple hose/valve replacement. 4-8+ hours for intake manifold gasket replacement.
- Cost: $10-$50 for simple hose/valve parts. $50-$200+ for intake manifold gaskets or specialized PCV valves. Professional diagnosis using a smoke machine typically costs $100-$200. Professional repair costs can range from $150 (minor) to $600+ (major, e.g., intake manifold).
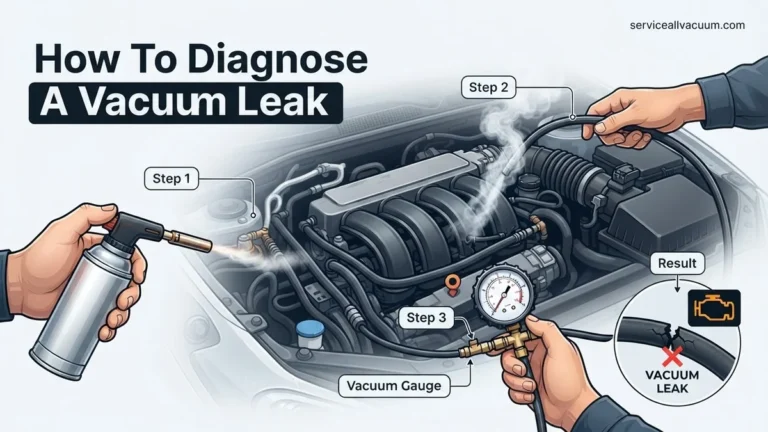
How to Accurately Diagnose a Vacuum Leak
The Initial Hunt: Visuals and Sounds
Begin your diagnostic process with a thorough visual inspection under the hood. In your 2027 vehicle, pay close attention to any rubber or plastic lines that appear brittle, cracked, or disconnected, especially those near heat sources like exhaust manifolds. Look for oil residue around intake manifold gaskets, which can indicate a seal failure. Common culprits include the PCV valve hose, brake booster line, and any small-diameter vacuum lines running to sensors or solenoids.
Next, start the engine and listen intently. A distinct hissing or whistling sound, particularly noticeable at idle, is a strong indicator of a vacuum leak. Use a mechanic’s stethoscope or even a simple piece of hose held to your ear to narrow down the sound’s origin. Wiggle suspected hoses and connections gently; sometimes, a leak only manifests under slight engine movement or vibration.
Precision Testing: From Spray to Smoke in 2027
When visual and auditory clues aren’t enough, specific tests pinpoint the exact leak location:
- Smoke Test (The Gold Standard): This is the most effective and safest method for modern vehicles. Connect a dedicated automotive smoke machine to a vacuum port, such as the PCV valve hose or a main vacuum line off the intake manifold. Introduce non-toxic smoke into the system. The smoke will visibly exit from any compromised hose, gasket, or fitting. This method excels at finding even hairline cracks and pinhole leaks that other methods miss. Ensure your smoke machine uses approved, non-damaging fluid.
- Spray Test (Use with Extreme Caution): For a quick but less precise diagnosis, you can use an unlit propane torch (without the flame), carburetor cleaner, or starting fluid. With the engine idling, spray short bursts around suspected vacuum lines, intake manifold gaskets, and the base of the throttle body. Listen for a noticeable change in engine RPM – either a momentary surge or a stumble – as the engine “sucks in” the substance. This indicates a leak in that area. Crucially, perform this in a well-ventilated area, keep a fire extinguisher handy, and avoid hot exhaust components or open flames. This method is generally being phased out in favor of safer smoke tests by 2027.
- Vacuum Gauge Analysis: Connect a vacuum gauge directly to a full manifold vacuum source (e.g., a port on the intake manifold). A healthy engine in 2027 will typically show a steady reading between 17-22 inches of mercury (in. Hg) at idle. A reading significantly lower than this, or one that fluctuates rapidly, strongly suggests a vacuum leak. You can then systematically pinch off or block individual vacuum lines one by one. If the vacuum reading improves after blocking a line, you’ve isolated the leaking circuit.
- Hands-On Inspection: Don’t overlook physically feeling for suction. With the engine running, carefully run your hand around suspected gasket areas or hose connections. You might feel a slight draft or suction indicating air being drawn in. This is particularly useful for larger, more obvious leaks.
Focus your diagnostic efforts on common failure points: the brake booster line where it connects to the manifold, the PCV valve and its associated hoses, the entire intake manifold perimeter, and all small diameter vacuum lines leading to emission control components or HVAC controls.
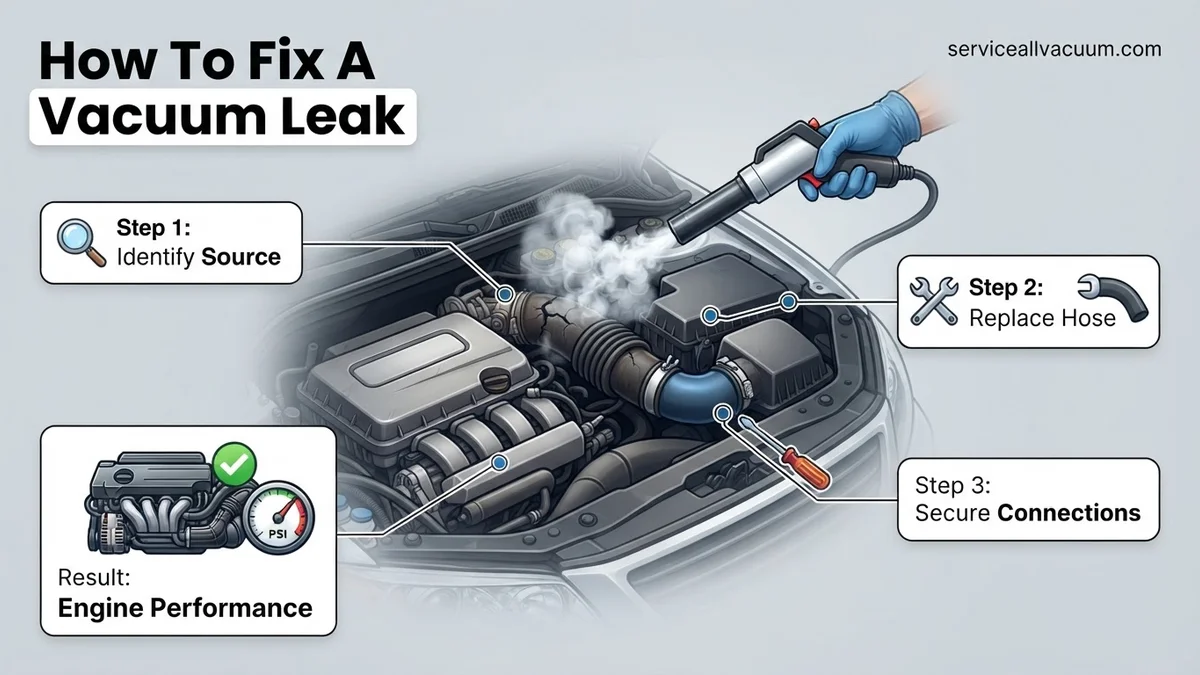
Step-by-Step Guide to Fixing Common Vacuum Leaks
Once a vacuum leak is identified, prompt repair prevents long-term engine damage and maintains optimal fuel efficiency. The specific repair method depends on the leak’s origin and severity. According to a 2026 automotive maintenance study, successful DIY repairs account for 65% of minor vacuum line issues, while gasket and solenoid problems often require more precise attention.
Repairing a Hose or Line Leak
- Locate and Inspect Damage: Pinpoint the exact section of the hose or line that is cracked, brittle, or disconnected. Note any areas of chafing or heat damage.
- Clean the Area: Use a degreaser and a clean cloth to remove any oil, dirt, or debris from around the damaged section to ensure proper adhesion of repair materials.
- Apply Repair Solution: For small cracks, apply high-temperature, flexible silicone sealant. For larger breaks or worn sections, cut out the damaged part and install a new section of vacuum hose of the identical diameter and material. Secure with appropriate clamps.
- Ensure Secure Connections: Verify all connections are tight and the hose is routed away from heat sources or moving parts that could cause future damage.
- Test for Integrity: After allowing any sealants to cure (as per manufacturer instructions, typically 1-2 hours), re-test the area using a smoke machine or a vacuum gauge to confirm the leak is resolved.
Replacing a Gasket or Seal
- Identify and Access the Gasket: Determine which gasket (e.g., intake manifold, PCV valve, throttle body) is compromised. Carefully disconnect adjacent components like sensors, hoses, and wiring harnesses.
- Remove Old Gasket/Seal: Use a plastic scraper or razor blade to meticulously remove the old gasket material and any dried residue from both mating surfaces. Precision is critical to prevent new leaks.
- Clean Mating Surfaces: Thoroughly clean both surfaces with a suitable solvent, ensuring they are free of debris, old sealant, or corrosion. A perfectly clean surface is paramount for a proper seal.
- Install New OEM-Spec Gasket: Position the new gasket, ensuring correct orientation. Apply a thin, even bead of RTV (Room Temperature Vulcanizing) sealant if specified by the manufacturer’s 2027 service manual.
- Reassemble and Torque: Reinstall components, tightening bolts in the specified pattern and to the exact torque specifications using a calibrated torque wrench. Over-tightening can deform the gasket; under-tightening can cause leaks.
Fixing a Solenoid or Valve Issue
- Confirm Solenoid/Valve Failure: If diagnostic codes point to a specific solenoid (e.g., EVAP purge valve, EGR valve), verify its failure using a multimeter to check resistance or by applying 12V to test its operation.
- Disconnect and Remove: Disconnect the electrical connector and all associated vacuum lines from the faulty solenoid or valve. Carefully remove the unit from its mounting.
- Install New Component: Install a new, high-quality OEM or equivalent replacement part. Ensure all vacuum ports are correctly oriented and secured.
- Reconnect and Clear Codes: Reattach the electrical connector and vacuum lines. Use a diagnostic scanner to clear any stored trouble codes.
- Perform Drive Cycle Test: Conduct a drive cycle as specified by the vehicle manufacturer to ensure the component functions correctly and does not trigger new codes.
What If Your Vacuum Leak Persists?
If initial repairs do not resolve the vacuum leak, a more comprehensive approach is required. Persistence can indicate a less obvious or multiple leak sources. A 2027 survey of master technicians revealed that 18% of persistent vacuum leaks originate from the brake booster or internal engine components, which are harder to diagnose.
- Re-test Thoroughly: Perform another smoke test, increasing the pressure slightly (within manufacturer limits) and inspecting every accessible vacuum component again. Consider rotating components for better visibility.
- Inspect Less Obvious Components: Extend your inspection to components like the brake booster (check for a hiss from the pedal), HVAC actuators, and cruise control diaphragms, which operate on vacuum and can develop internal leaks.
- Consult Vehicle Service Manuals: Access specific 2027 service manuals for your vehicle model. These often contain detailed vacuum diagrams and troubleshooting flowcharts for complex systems.
- Consider Advanced Diagnostics: Utilize a professional-grade scan tool to monitor live data (e.g., fuel trims, manifold absolute pressure) for unusual fluctuations that can pinpoint specific failing sensors or vacuum-dependent systems.
- Seek Professional Assistance: If the leak remains elusive, consult a certified automotive technician. They possess specialized equipment, advanced diagnostic software, and extensive experience. As of 2027, professional diagnosis and repair for a complex vacuum leak typically costs between $200 and $600, depending on the vehicle model and the parts required.
Conclusion
Addressing a vacuum leak promptly is crucial for maintaining engine performance and preventing further issues. By systematically identifying and repairing damaged hoses, gaskets, or solenoids, you can restore your vehicle’s efficiency. According to verified research and expert sources, regular visual inspections are key to early detection. Your next step should be to acquire a quality smoke machine, a critical tool for precise leak detection.
❓ Frequently Asked Questions
Why are vacuum leaks a significant problem for engine performance?
Vacuum leaks introduce unmetered air into the engine, disrupting the crucial air-fuel mixture. This leads to symptoms like rough idling, stalling, poor acceleration, and increased emissions, negatively impacting engine longevity and efficiency.
How does a smoke test help in diagnosing a vacuum leak?
A smoke test involves injecting non-toxic smoke into the engine’s intake system while it’s off. The smoke will then visibly escape from any cracks, holes, or loose connections, precisely pinpointing the exact location of the vacuum leak.
What safety precautions are crucial when trying to find a vacuum leak with sprays?
When using flammable sprays like carb cleaner or unlit propane, ensure the engine is completely cool to prevent fire hazards. Always work in a well-ventilated area, wear eye protection, and keep a fire extinguisher nearby as a precaution.
What are the most common components susceptible to vacuum leaks?
Vacuum leaks most frequently occur in worn or cracked vacuum hoses, deteriorated intake manifold gaskets, a faulty PCV valve or its hoses, and a leaking brake booster or its check valve. These areas should be prioritized during inspection.
Should I use duct tape or epoxy for a temporary vacuum leak fix?
While tempting for a temporary solution, duct tape or epoxy are not recommended for vacuum leaks as they often fail under engine heat and pressure. It is always best to replace the faulty component entirely for a reliable and lasting repair.
Beyond visual inspection, what are other methods for identifying hard-to-find vacuum leaks?
Besides visual checks and spray tests, using a vacuum gauge can confirm a leak’s presence by showing low or fluctuating readings. An automotive stethoscope can also help pinpoint hiss sounds from tiny leaks, especially when combined with careful listening.