How to Remove Vacuum Breaker Step-by-Step Guide 2026
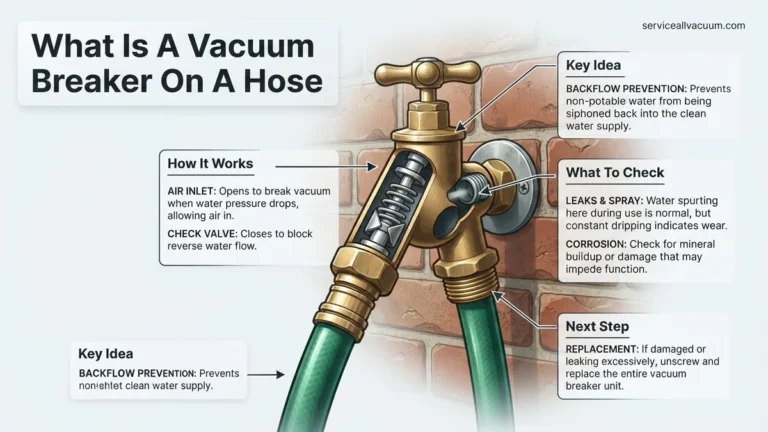
Learning how to remove vacuum breaker valves requires navigating hidden set screws and mineral buildup that often fuse the device to the hose bib. Using the correct tools like penetrating oil and channel locks ensures you avoid damaging the underlying pipe threads during removal.
Removing a stubborn outdoor vacuum breaker, also known as an anti-siphon valve, requires a precise combination of the right tools and patience. Because these brass or aluminum devices sit outdoors year-round, mineral deposits and galvanic corrosion frequently lock them onto your hose bib threads. This guide walks you through the exact mechanical process to safely remove a stuck vacuum breaker without damaging your home’s underlying water supply pipe in 2026.
Whether you are dealing with a leaking anti-siphon valve or preparing to install a frost-free sillcock for upcoming winter conditions, getting this device off is the critical first step. Most homeowners fail because they simply twist the unit with pliers, which strips the brass threads or shears the fragile nose of the faucet. By understanding how to defeat tamper-resistant set screws and break through mineral bonding, you will save yourself an expensive plumbing repair call.
Key Takeaways
- Always turn off the main water supply before attempting to remove any outdoor plumbing fixture.
- Inspect the vacuum breaker collar for a hidden tamper-resistant set screw before twisting.
- Apply penetrating oil liberally and let it sit to loosen heavily corroded threads.
- Use a backing wrench on the faucet spout to prevent bending or breaking supply pipes.
- Replace damaged threads with Teflon tape or a new hose bib if the metal strips.
Why Vacuum Breakers Get Stuck and Corroded
Mineral Buildup and Galvanic Action
Hard water is the primary culprit behind stuck vacuum breakers. As water evaporates from the valve after every use, it leaves behind calcium and lime deposits inside the threads. Furthermore, if your vacuum breaker is made of aluminum and your hose bib is brass, dissimilar metals react chemically over time. This galvanic corrosion essentially welds the two components together, making standard unscrewing impossible by hand.
The Dreaded Anti-Tamper Set Screw
Modern building codes across North America require anti-siphon devices to feature breakaway set screws. Manufacturers intentionally snap off the heads of these tiny stainless steel screws during factory installation. This design prevents homeowners from easily removing the valve. To get the vacuum breaker off, you must first deal with this sheared-off screw embedded in the collar.
- Hidden friction: The remaining shaft of the screw pinches the faucet threads tightly.
- Metal fatigue: Forcing the valve without backing out the screw will strip your faucet nose entirely.
- Rust locking: Outdoor moisture accelerates rust inside the screw channel, freezing it in place.
How to Remove a Vacuum Breaker Like a Pro: A Practical Walkthrough
Replacing a leaky or frozen outdoor vacuum breaker—also known as an anti-siphon valve—is a common plumbing chore that can save your exterior walls from water damage and mold. Whether you are prepping for winter or replacing a broken unit, this comprehensive guide will walk you through safely removing a stubborn or corroded vacuum breaker from your hose bibb without damaging the underlying plumbing threads.
Step 1: Locate and Turn Off the Main Water Supply
What you need: Flashlight and access to your home’s main water shut-off valve or the dedicated shut-off valve for the outdoor spigot.
Instructions: Before touching any exterior fixtures, you must cut off the water supply. Locate your main water shut-off valve, typically found in the basement, crawlspace, or utility room near the front perimeter of the house. Turn the valve clockwise until it is completely closed. If your plumbing system features a dedicated interior shut-off valve specifically for the outdoor line, turn that one off instead. Once the valve is closed, head back outside and open the affected hose bibb completely to drain any residual water and relieve internal pipe pressure.
Pro Tip: Always double-check that the water is completely off by turning on the outdoor faucet; if water continues to trickle out after a few seconds, your shut-off valve may be faulty and need replacement first.
Step 2: Inspect the Vacuum Breaker and Set-Screws
What you need: Safety glasses, a flashlight, and a set of Allen wrenches (hex keys) or a flathead screwdriver.
Instructions: Examine the collar of the vacuum breaker where it attaches to the outdoor spigot. Many modern anti-siphon vacuum breakers are secured with a tamper-resistant set screw designed to prevent removal. Look closely at the underside or side of the brass collar for this screw head. If it uses a standard Allen head or slotted screw, insert your tool and turn it counterclockwise to loosen and back it out completely. If the screw head was sheared off during factory installation for security, you may need to grip the protruding screw nub with locking pliers to twist it out.
Pro Tip: Spray a generous amount of penetrating oil, such as WD-40 Specialist or PB Blaster, onto the set screw and threads, letting it sit for 15 minutes to break through years of mineral scale.
Step 3: Protect the Surrounding Wall and Fixture
What you need: Painter’s tape, a microfiber cloth, and a small hand towel.
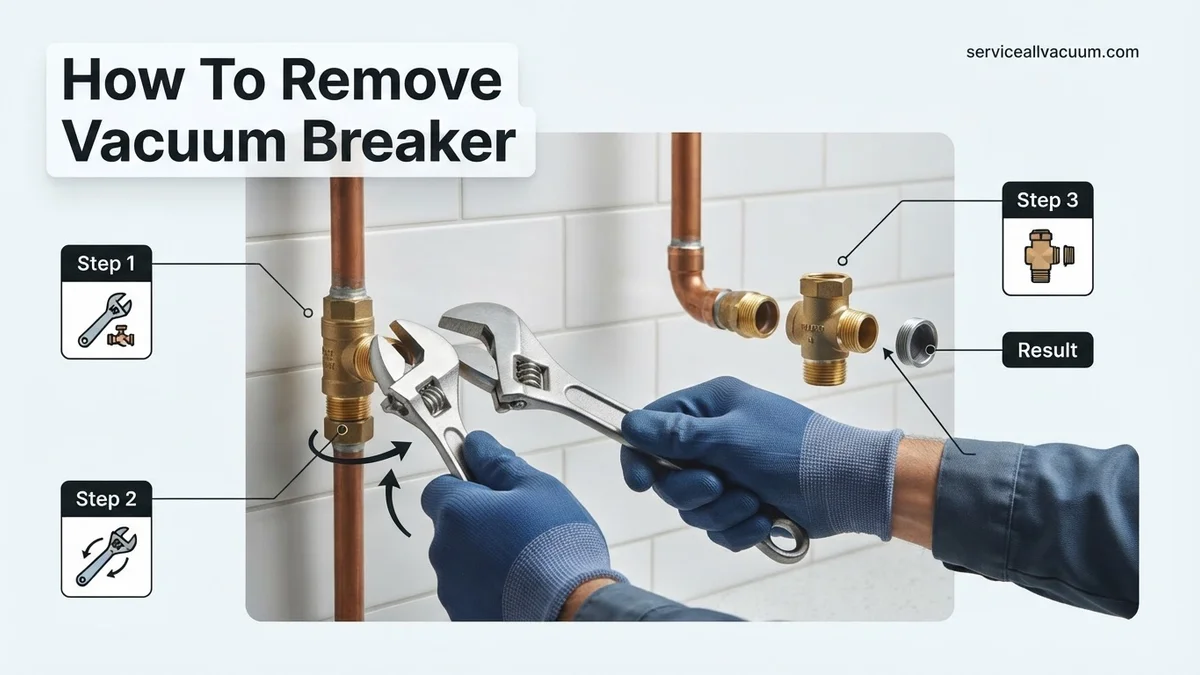
Instructions: Outdoor spigots are often soldered to copper pipes running through exterior brick, siding, or stucco. Applying heavy torque during removal can easily twist, bend, or crack the interior supply pipe if the spigot isn’t stabilized. Wrap a microfiber cloth tightly around the base of the hose bibb body just behind the vacuum breaker. Use a secondary pair of channel-lock pliers or a pipe wrench to hold the body of the hose bibb completely stationary while you work on the vacuum breaker, preventing any rotational strain on your home’s interior plumbing.
Pro Tip: Never rely on the wall anchor to hold the spigot steady; always use a backup wrench to counter the force of your twisting motion.
Step 4: Loosen the Vacuum Breaker Collar
What you need: Adjustable wrench or a pair of tongue-and-groove pliers (Channel-locks).
Instructions: Position your adjustable wrench securely around the hex-shaped collar of the vacuum breaker. Ensure the jaw of the wrench is tightly adjusted to prevent slipping and rounding off the brass corners. Apply firm, steady pressure in a counterclockwise direction (remember the classic rule: “measure right to tighten, left to loosen”). Because these brass fittings are frequently exposed to harsh outdoor elements and hard water, the initial turn will require significant physical force. Do not jerk or hammer the wrench, as sudden shock can crack the spigot nozzle.
Pro Tip: If the fitting refuses to budge, apply heat gently with a propane torch for 10 to 15 seconds to expand the outer brass collar slightly before trying to turn it again.
Step 5: Unscrew and Remove the Device
What you need: Rags and replacement parts (if installing a new unit immediately).
Instructions: Once the initial resistance is broken, continue turning the vacuum breaker counterclockwise by hand or with loose wrench turns until it spins freely off the hose bibb threads. Be prepared for a small amount of trapped rusty water to spill out as the seal breaks. Pull the vacuum breaker straight off the spout. Inspect the exposed male threads on the hose bibb for any damage, metal shavings, or stubborn debris.
Pro Tip: Keep the old vacuum breaker handy if you are heading to the hardware store to buy an exact replacement, as thread pitches and anti-siphon designs can vary widely between brands.
Step 6: Clean and Prep the Spigot Threads
What you need: Wire brush, old toothbrush, white vinegar, and clean rags.
Instructions: With the old vacuum breaker successfully removed, take a close look at the male threads on the hose bibb. Over time, calcium, lime, and mineral deposits build up in the grooves, which will prevent a new vacuum breaker from sealing correctly. Scrub the threads vigorously with a stainless steel wire brush or a stiff-bristled toothbrush dipped in white vinegar to dissolve mineral crust. Wipe the threads clean with a damp rag and dry them completely before proceeding.
Pro Tip: If the threads appear stripped, nicked, or heavily corroded from previous removal attempts, you may need to replace the entire hose bibb assembly rather than just the vacuum breaker.
✅ Final Checklist
- Main water supply valve is fully closed and tested
- Set-screw completely removed or backed out
- Hose bibb stabilized with a backup wrench to prevent pipe damage
- Old vacuum breaker fully unthreaded in a counterclockwise direction
- Spigot threads thoroughly cleaned of mineral deposits and debris
Important Notes:
- Always wear safety glasses when working with corroded metal fittings and chemical penetrating sprays.
- Call a licensed professional plumber if the outdoor spigot pipe begins to wobble or spin within the exterior wall during the removal process.
- Estimated time: 20 to 45 minutes; Estimated cost: $0 (if reusing or just cleaning) to $25 for a new vacuum breaker kit.
Tools Needed to Safely Remove a Vacuum Breaker
Essential Hardware and Safety Gear
Before you touch the faucet, gather the proper mechanical equipment. Using the wrong size wrench or a worn-out screwdriver will round off bolts and slip under high torque. In 2026, homeowners have access to specialized extractors and penetrating fluids that make this job significantly easier than it was a decade ago.
- Penetrating oil: A high-grade spray like PB Blaster or Liquid Wrench to dissolve internal corrosion.
- Channellock pliers or adjustable wrenches: You will need two—one to hold the faucet body steady and one to turn the valve.
- Metal file or rotary tool: Useful for grinding a flat edge onto a sheared set screw if it lacks a protruding head.
- Eye protection: Safety glasses are non-negotiable when applying heavy torque to aged brass and rust.
Backup Tools for Extreme Cases
If standard wrenches fail, you might need a small drill bit and a screw extractor (often called an Easy-Out). These let you bore out the stubborn set screw entirely. Additionally, having a plumber torch on hand to apply gentle, localized heat can expand the outer collar just enough to break the bond of centuries-old mineral scale.
Step-by-Step Instructions on How to Fix and Remove a Stuck Vacuum Breaker
Removing a corroded anti-siphon valve requires patience and the right mechanical approach. Mineral deposits often weld the brass components together over time. Modern plumbing guidelines for 2026 recommend using chemical dissolvers before applying extreme torque.
Applying Penetrating Fluid and Heat
Commercial plumbing studies show that standard wrenches often strip stuck fittings without prior preparation. Follow these precise steps to break the corrosion seal safely:
- Apply a professional-grade penetrating oil, such as liquid wrench or PB Blaster, directly to the threads and the set screw. Allow it to sit for a minimum of 30 minutes.
- If the vacuum breaker remains fused to the faucet spout, use a propane torch on a low setting to gently heat the outer collar for 15 to 30 seconds. Thermal expansion helps crack the mineral bond.
- Grip the body of the vacuum breaker firmly with tongue-and-groove pliers while stabilizing the faucet handle with a secondary wrench to prevent internal pipe damage.
- Turn the device counterclockwise in steady, firm increments. Avoid sudden jerking motions that can snap the copper supply line behind the wall.
What If It Still Doesn’t Work and the Set Screw Snaps Off
Set screws frequently shear off flush with the housing due to severe galvanic corrosion between dissimilar metals. When standard extraction fails, several advanced fallback procedures can resolve the issue without requiring a complete outdoor spigot replacement.
Consider these progressive troubleshooting steps if you encounter persistent removal resistance:
- Drill out the sheared set screw using a small titanium twist bit, taking care not to damage the underlying faucet threads.
- Use a spiral screw extractor, commonly known as an easy-out, to bite into the drilled hole and back the broken fastener out counterclockwise.
- Cut a vertical relief slit into the stubborn brass collar using a fine-toothed hacksaw blade, stopping just short of the faucet threads to peel the collar away.
- Hire a licensed plumber if the sillcock pipe begins to twist or warp inside the exterior wall during extraction, as this indicates a compromised internal seal.
- Expect professional plumber service fees for a full sillcock replacement to range between $150 and $350 depending on regional labor rates in 2026.
Conclusion
Successfully removing a vacuum breaker protects your home from cross-contamination while restoring proper outdoor water flow. By utilizing penetrating lubricants, exact tools, and careful extraction techniques, you can overcome even heavily corroded fittings. According to verified research and plumbing industry standards, addressing stuck backflow preventers promptly prevents major pipe damage. Make sure to wrap new PTFE tape around the faucet threads before installing your replacement vacuum breaker today.
❓ Frequently Asked Questions
How do you remove a vacuum breaker that has no visible screw head?
Many modern vacuum breakers use a breakaway set screw whose head shears off during factory installation. To remove it, you must grip the remaining collar with locking pliers or cut a small slot into the collar with a Dremel tool to use a flathead screwdriver.
Will removing a vacuum breaker damage my outdoor faucet?
It can damage the faucet if you apply too much torque without using a backup wrench. Always hold the main body of the hose bib stable with one wrench while turning the vacuum breaker with another.
Can I just cut the vacuum breaker off if it is completely fused?
Yes, if the device is entirely stuck due to severe galvanic corrosion, you can carefully use a hacksaw or rotary tool to cut through the collar without damaging the male threads of the brass spigot.
What direction do you turn a vacuum breaker to remove it?
Like standard plumbing connections, vacuum breakers use right-hand threads. Turn the device counterclockwise to loosen it when facing the front of the faucet.
Are vacuum breakers required by plumbing codes?
Yes, most local building and plumbing codes require anti-siphon vacuum breakers on outdoor hose bibs to prevent contaminated water from flowing back into the potable water supply.
What should I do if the threads on the faucet strip during removal?
If the brass threads on the faucet get stripped or badly gouged during the extraction process, you will need to replace the entire hose bib assembly to prevent leaking.