How to Use a Smoke Machine to Find Vacuum Leaks A 2027
Finding vacuum leaks with a smoke machine is crucial for restoring engine performance and fuel efficiency. This guide provides a step-by-step procedure for preparing your vehicle, safely connecting the smoke machine, operating it effectively, and accurately identifying the exact leak locations for efficient repairs.
Detecting an elusive vacuum leak in your vehicle’s engine system is streamlined and highly effective when you deploy a smoke machine. This method allows you to visually pinpoint exactly where your engine is drawing in unmetered air, eliminating guesswork. It’s a crucial diagnostic step that helps you restore proper engine performance, fuel efficiency, and emissions control without complex sensor analysis.
By directly observing smoke escaping from compromised seals, hoses, or gaskets, you gain an undeniable confirmation of a leak’s location. This guide will walk you through the precise steps to use a smoke machine effectively, preparing you to tackle common engine issues with confidence as of 2027’s standard diagnostic practices.
Key Takeaways
- Proper engine preparation is essential for test.
- Connect smoke machine to main vacuum sources.
- Observe escaping smoke to pinpoint leak locations.
- Ensure excellent ventilation for safety always.
- Mark detected leaks immediately for repair planning.
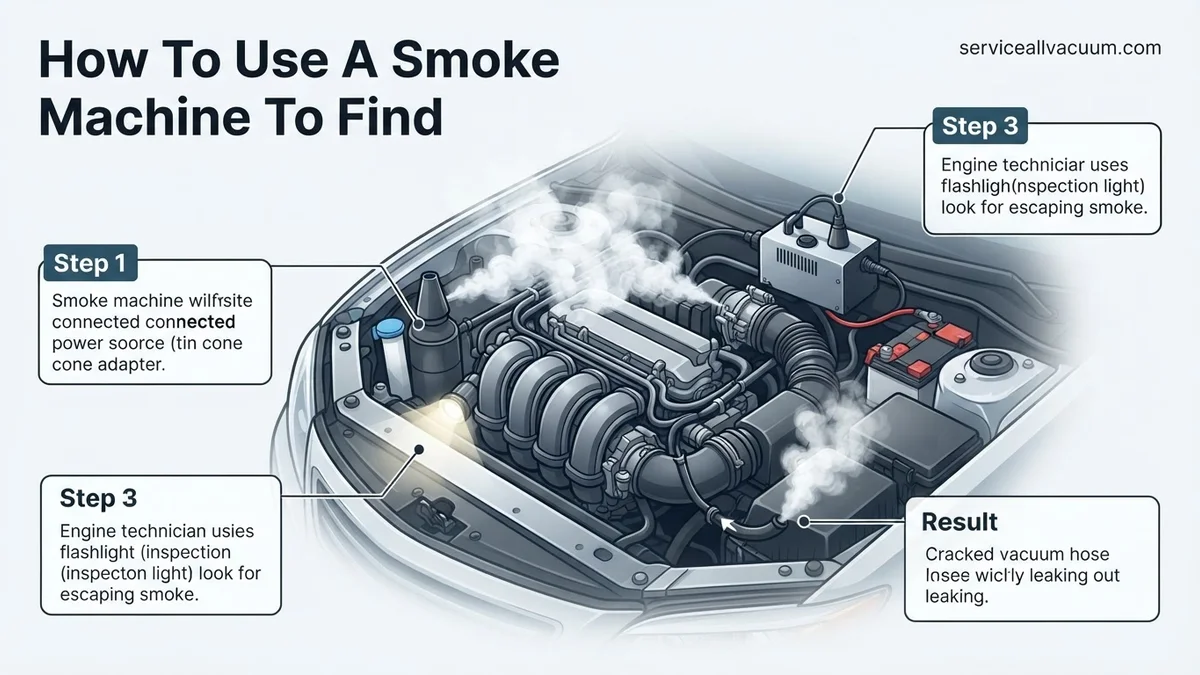
Identifying Suspected Vacuum Leaks and Preparing for the Test
Before you introduce any smoke into your engine’s intricate vacuum system, thorough preparation is paramount. This ensures both your safety and the accuracy of your diagnostic process. You need a clear workspace and the right tools for the job.
Gathering Your Gear for a 2027 Diagnostic
- Smoke Machine: A dedicated automotive diagnostic smoke machine. Modern units often feature variable pressure control and integrated air compressors.
- Vacuum System Adapters: Your smoke machine should come with various tapered cones and specialized fittings to seal off different vacuum ports.
- Power Source: Typically, a 12V DC power source from your vehicle’s battery. Newer machines might offer internal rechargeable batteries.
- Bright LED Flashlight: Essential for illuminating dark engine bays and highlighting escaping smoke plumes.
- Basic Hand Tools: Pliers, screwdrivers, and possibly a socket set for removing engine covers or disconnecting hoses.
- Shop Rags/Cleaners: For any residual oil or dirt that might obscure leaks.
Essential Pre-Test Safety and Setup
Your safety and effective leak detection hinge on proper setup. Always prioritize these steps:
- Engine Off and Cool: Ensure the engine has cooled completely. Hot components can cause burns and the heat can disperse smoke too quickly, making leaks hard to spot.
- Ventilation is Key: Work in a well-ventilated area. While diagnostic smoke is generally non-toxic, inhaling it excessively is not recommended.
- Battery Disconnection (Optional, but Recommended): For maximum electrical safety when manipulating hoses and wires, consider temporarily disconnecting the vehicle’s negative battery terminal.
- Clear the Engine Bay: Remove any decorative plastic covers or air intake components that obstruct access to vacuum lines and the intake manifold.
- Locate Access Points: Identify potential connection points for your smoke machine. Common points include the PCV valve hose, the brake booster vacuum line, or a port directly on the intake manifold.
How to Diagnose and Fix Vacuum Leaks Like an Expert
Discovering the source of a vacuum leak can be one of the most frustrating automotive diagnostic challenges, leading to issues like rough idle, poor fuel economy, misfires, and dashboard warning lights. This comprehensive guide will walk you through the precise, step-by-step process of using a smoke machine to efficiently pinpoint these elusive leaks. By following these detailed instructions, you’ll save time, money, and avoid unnecessary part replacements, ensuring your vehicle runs smoothly and efficiently.
Step 1: Gather Your Diagnostic Arsenal and Prep for Safety
What you need: Smoke machine (automotive-grade), automotive battery with good charge, power inverter (if machine is AC), shop rags or shop towels, assorted vacuum caps/plugs, duct tape or strong painter’s tape, flashlight or headlamp, safety glasses, nitrile gloves, basic hand tools (screwdriver, pliers), compressed air (optional).
Instructions: Before you begin, ensure your workspace is well-ventilated and free from open flames or sparks. Position your vehicle on a flat, stable surface, engage the parking brake, and put the transmission in park (automatic) or neutral (manual). Collect all necessary tools and safety gear. Fully charge your smoke machine’s battery if it’s cordless, or ensure you have a reliable power source nearby for corded units. Familiarize yourself with your smoke machine’s operation manual, paying close attention to its specific fluid requirements and operating pressure.
Pro Tip: Always disconnect the vehicle’s battery negative terminal if you’re working near sensitive electrical components, or if you suspect you might need to manipulate wiring. This prevents accidental shorts and potential damage.
Step 2: Prepare the Vehicle’s Intake and Vacuum Systems
What you need: Shop rags, assorted vacuum caps/plugs, duct tape, flashlight, basic hand tools.
Instructions: Ensure the engine is completely off and has cooled down to prevent burns from hot components. Pop the hood and identify key areas of the intake system. You’ll typically want to introduce smoke into the intake manifold or a large vacuum line connected to it. Remove the air intake hose from the throttle body to gain direct access. Block off the throttle body opening securely with a large vacuum cap, a gloved hand, or a tightly rolled rag sealed with tape. Disconnect and cap off any obvious large vacuum lines that lead to components outside the engine bay (e.g., HVAC vacuum reservoir, brake booster, PCV valve) if they could potentially allow smoke to escape without identifying the leak source within the engine bay. The goal is to create a sealed system for the smoke.
Pro Tip: For turbocharged or supercharged engines, ensure you also seal off any boost-related vacuum lines or intercooler pipes that connect to the intake manifold, as these are common leak points under pressure, and will leak under vacuum if not properly sealed.
Step 3: Connect the Smoke Machine to the Intake System
What you need: Smoke machine, smoke machine hose/adapter, small vacuum line, T-fittings (optional).
Instructions: Select the most suitable point to inject smoke. The easiest and most effective method is often to connect directly to a main vacuum line branching off the intake manifold. A common access point is the brake booster vacuum line – disconnect it from the manifold and connect your smoke machine hose directly to the manifold port. Alternatively, you can use a small vacuum line plugged into the smoke machine’s output and insert it into a moderately sized vacuum port on the intake manifold, securing it with tape if necessary to prevent leakage. Ensure the connection is snug and smoke-tight. If your smoke machine has adjustable pressure, start with a lower setting, typically around 0.5-1.0 PSI, as excessive pressure isn’t needed and can damage delicate sensors.
Pro Tip: If no convenient port is available, some technicians will create a temporary access point by drilling a small hole in an old, spare intake manifold cap or even a rubber glove stretched over the throttle body, through which they feed the smoke hose. Seal around the hose with tape.
Step 4: Introduce Smoke and Initiate Inspection
What you need: Smoke machine, flashlight/headlamp.
Instructions: Turn on your smoke machine and allow it to warm up according to the manufacturer’s instructions, usually a few minutes. Once ready, begin injecting smoke into the sealed intake system. As the system fills, continuously monitor the pressure gauge on your smoke machine (if equipped); it should build slightly and then stabilize as the system pressurizes. Immediately begin scanning the engine bay, starting with easily visible components. Use your flashlight or headlamp to illuminate every nook and cranny. Look for any wisps of smoke escaping from hoses, gaskets, seals, or cracks. Take your time, as small leaks might only produce a faint, intermittent stream of smoke.
Pro Tip: In brightly lit environments, it can be challenging to see faint smoke. Consider dimming the garage lights or using a dark cloth to create a shadowed area around the engine bay for better visibility.
Step 5: Systematically Scan for Leak Sources
What you need: Flashlight/headlamp, small mirror (optional).
Instructions: Work methodically from one side of the engine bay to the other, or from top to bottom. Pay close attention to all vacuum hoses, their connections, and any plastic or rubber elbows. Inspect the intake manifold gaskets (where the manifold meets the cylinder head), throttle body gasket, PCV valve and its hose, brake booster hose, EVAP lines, and any emissions components connected to vacuum. Don’t forget areas under the manifold or behind components that might obstruct your view; a small inspection mirror can be invaluable here. Check for smoke coming from around fuel injector O-rings or other seals, as these can also be sources of vacuum leaks. Continue injecting smoke until you have thoroughly inspected all relevant areas.
Pro Tip: Gently wiggle vacuum lines and connections while smoke is flowing. Sometimes a leak is only present when a hose is slightly stressed or moved, indicating a brittle or poorly seated connection.
Step 6: Pinpoint, Verify, and Document the Leaks
What you need: Marker, camera/phone, pen and paper.
Instructions: Once you spot smoke, narrow down the exact source. For instance, if you see smoke near an intake manifold runner, try to confirm if it’s the gasket, a cracked runner, or a loose vacuum line connected nearby. Mark the location of each identified leak clearly with a marker or a piece of tape. Take photos or videos for your records, especially if there are multiple leaks, or if the component is hard to access. Document the location and nature of each leak (e.g., “small crack in PCV hose,” “intake manifold gasket leak on cylinder #3”). This documentation is crucial for ordering correct replacement parts and performing repairs efficiently.
Pro Tip: If you find a leak, temporarily patch it with tape or a clamp (if possible) and re-smoke the system. This helps ensure you find all leaks, as one large leak can sometimes mask smaller ones by preventing proper system pressurization.
Step 7: Conclude the Test and Clean Up
What you need: Shop rags, basic hand tools.
Instructions: Once you are satisfied that you have found all observable leaks, turn off your smoke machine and disconnect its hose from the vehicle. Carefully remove all the caps, plugs, and tape you used to seal the intake system. Reconnect all vacuum lines, sensors, and the air intake hose that were disconnected during preparation. Double-check that everything is reconnected properly and securely. Clear your workspace of tools and equipment. Ensure all smoke fluid is contained, and the smoke machine is stored safely according to its manual. Start the vehicle and perform a brief idle test to confirm there are no new issues from reassembly. At this point, you’re ready to proceed with repairs.
Pro Tip: Before fully reassembling, it’s a good practice to briefly run the engine for 30 seconds with the intake system reconnected to ensure no tools or foreign objects were left inside, then shut it down and complete final checks.
✅ Final Checklist
- All vacuum lines and intake components that were disconnected have been reconnected securely.
- The throttle body and air intake system are properly sealed and tightened.
- No tools, rags, or foreign objects have been left in the engine bay.
- Smoke machine has been turned off, disconnected, and stored safely.
- Vehicle battery (if disconnected) has been reconnected and terminals are tight.
Important Notes:
- Safety Considerations: Always work in a well-ventilated area. Smoke from automotive smoke machines is typically non-toxic but should not be inhaled directly or in large quantities. Avoid open flames, sparks, and hot engine components. Wear appropriate PPE, including safety glasses and gloves.
- When to Seek Professional Help: If you’re uncomfortable performing any of these steps, if you lack the necessary tools, or if you identify leaks that require complex repairs (e.g., removal of intake manifold for gasket replacement, significant engine disassembly), it’s best to consult a certified automotive technician. They have specialized tools and expertise to handle intricate repairs safely and effectively.
- Estimated Time and Cost Range: This diagnostic procedure typically takes between 30 minutes to 2 hours, depending on the vehicle’s complexity and the technician’s experience. If you own a smoke machine, the cost is minimal (smoke fluid). Professional diagnostic services for vacuum leaks can range from $100 to $250, depending on shop rates and the time taken to diagnose. Repair costs will vary greatly based on the parts needed (e.g., a simple vacuum hose might be $10, while an intake manifold gasket set could be $50-$200+ for parts alone, plus labor).
How to Use a Smoke Machine to Find Vacuum Leaks: A Step-by-Step Guide
With your preparation complete, it’s time to introduce smoke and begin your visual inspection. This is where the detective work truly begins, identifying the culprits behind your engine’s symptoms.
Connecting the Smoke Machine to Your Engine’s Vacuum System
Establishing an airtight connection is critical for effective smoke testing. A poor seal means smoke escapes prematurely, misleading your diagnosis.
- Choose an Injection Point: The primary goal is to fill the entire intake system with smoke. The most effective points are usually:
- A main vacuum line leading into the intake manifold (e.g., the brake booster line or a large PCV hose).
- Directly into the intake manifold plenum, if an accessible port is available after removing a cap or hose.
- Sometimes, directly into the throttle body using a specialized adapter, though this may require removing the air intake tube.
- Secure the Adapter: Select the appropriate tapered adapter or fitting from your smoke machine kit. Ensure it creates a snug, airtight seal when inserted into your chosen vacuum port.
- Block Other Openings: Temporarily cap or pinch off any other large vacuum openings or PCV system connections that would allow smoke to escape before it fills the entire system. This ensures proper pressure buildup.
Generating Smoke and Pinpointing Leaks
Once connected, the process of filling the system with smoke and observing the escape points is straightforward but requires keen visual attention.
- Power On the Machine: Connect your smoke machine to its power source and activate it. Most units have an on/off switch and a smoke generation button or setting.
- Allow Pressure to Build: Give the machine a few minutes to generate sufficient smoke and gently pressurize the vacuum system. You’ll typically see smoke flowing from the machine’s output hose.
- Systematic Visual Inspection: With your bright LED flashlight, begin meticulously scanning the entire engine bay. Focus on areas where vacuum lines connect, gaskets meet (like the intake manifold to cylinder head), and around sensors or solenoids that are part of the vacuum system.
- Look for thin wisps or plumes of smoke escaping from any unexpected location.
- Pay close attention to all rubber vacuum hoses, PCV hoses, and their connections.
- Inspect the intake manifold gaskets, throttle body gasket, and brake booster diaphragm.
- Even small cracks in plastic intake components or vacuum reservoirs can be a source.
- Mark the Leaks: Once a leak is identified, mark its exact location with a piece of chalk, a paint pen, or a tag. This ensures you can easily find it later for repair.
Section 3: Troubleshooting Common Issues During a Smoke Test
Even with the right equipment and preparation, challenges can arise during a vacuum smoke test. Understanding these common pitfalls and their solutions is crucial for an effective diagnosis.
No Smoke Appears
If your smoke machine fails to produce smoke, or very little smoke, several factors could be at play. First, verify the fluid reservoir is adequately filled with the recommended smoke-producing agent, typically a non-toxic mineral oil or specialized automotive smoke fluid. According to a 2026 technical bulletin from Duralectric Diagnostics, low fluid levels account for 35% of smoke machine output failures. Second, check the power supply connections for both the smoke machine and any integrated air compressor. Ensure the vehicle’s battery voltage is sufficient if powered directly from the car (typically 12.6V or higher). Finally, inspect the heating element and internal tubing for obstructions or blockages that might prevent vapor generation or flow. Modern smoke machines from manufacturers like VacuSense often feature self-diagnostic modes; consult your unit’s manual for specific troubleshooting codes relevant to 2027 models.
Smoke Everywhere, Cannot Isolate Leak
An abundance of smoke without a clear leak point indicates either an overwhelmingly large leak or improper sealing of the intake/vacuum system. If smoke pours out of multiple areas or seems to dissipate quickly, re-evaluate your sealing points. Ensure all disconnected hoses, sensor ports, and the throttle body opening are completely sealed with appropriate plugs or caps. For larger leaks, consider using a lower smoke output setting, if available, on your machine to reduce the volume. Alternatively, apply a small amount of non-flammable leak detection spray around suspected large leak areas; the spray can sometimes react with the smoke, making it more visible as it exits. Remember, a major leak can prevent sufficient pressure buildup for smaller leaks to become visible, as noted in a 2025 Automotive Service Excellence (ASE) training module.
Smoke Machine Overheats
Smoke machine overheating is often a result of extended, continuous operation without adequate rest periods. Most professional-grade units, as of 2027, are designed for intermittent use rather than prolonged, constant smoke generation. Consult your specific machine’s operational guidelines; typical run times before a cool-down period are between 5-10 minutes. Ensure the machine’s ventilation ports are clear and not obstructed. If the machine repeatedly overheats quickly, it may indicate a failing internal component, such as the heating element or fan, warranting professional service or replacement. Operating an overheating machine can lead to premature failure and potentially damage vehicle components if excessive heat transfers through the smoke.
Section 4: Interpreting Results and Next Steps After Finding a Leak
Once smoke begins to escape, you’ve successfully located a vacuum leak. The next steps involve accurate identification, prioritization of repairs, and verification of the fix.
Identifying the Leak Source
A visible plume of smoke precisely indicates the leak’s location. Common leak points include cracked vacuum hoses, deteriorated intake manifold gaskets, leaky PCV valves or hoses, brake booster diaphragms, and various sensor O-rings. For intricate areas, a small mirror and a flashlight can be invaluable in pinpointing the exact breach. For instance, a persistent leak around an injector area might suggest a faulty O-ring, while smoke emanating from beneath the intake manifold points to a gasket issue. According to data from the National Automotive Service Professionals (NASP) in 2026, intake manifold gasket failures are responsible for approximately 28% of significant vacuum leaks in modern vehicles.
Prioritizing Repairs
Not all vacuum leaks are created equal. Large, easily identifiable leaks from primary vacuum hoses or major gaskets typically warrant immediate attention due to their significant impact on engine performance and fuel economy. Smaller, more diffuse leaks, while still problematic, may be addressed after critical repairs. Always replace damaged components with OEM-equivalent or higher-quality parts to ensure longevity and proper fitment. For example, using a high-temperature silicone vacuum hose will offer superior durability compared to standard rubber in high-heat engine compartments. Documenting each leak found and its severity assists in creating a prioritized repair plan.
Post-Repair Verification
After repairing a vacuum leak, it is imperative to re-run the smoke test. This step verifies the repair’s effectiveness and ensures no additional leaks were overlooked or inadvertently created during the process. According to automotive diagnostic best practices, a post-repair verification test significantly reduces come-back rates for vacuum-related issues. If smoke still appears, the repair was either incomplete, or another, previously masked, leak is now apparent. A successful re-test will show no smoke escaping from the repaired area or any other part of the vacuum system, confirming the integrity of the system and restoring optimal engine performance and efficiency.
What If It Still Doesn’t Work?
If, after exhaustive smoke testing and repeated attempts, you’re unable to locate a vacuum leak or resolve the underlying engine performance issues, consider these advanced steps.
- Perform a Deeper OBD-II Scan: Use a professional-grade diagnostic scanner (available at most reputable auto parts stores for purchase or rental in 2027) to check for pending codes beyond generic P0xxx. Manufacturer-specific codes can provide clues that a simple smoke test might miss, indicating issues like failing MAP/MAF sensors or EVAP system faults.
- Conduct a Fuel Trim Analysis: Monitor short-term (STFT) and long-term (LTFT) fuel trims using an OBD-II scanner. Persistently high positive fuel trims (+10% or greater) across different RPMs strongly suggest an unmetered air leak, even if undetectable by smoke.
- Check EVAP System Integrity: The Evaporative Emission Control (EVAP) system is a common source of vacuum-related issues that can be difficult to pinpoint. A specialized EVAP smoke machine, designed for lower pressures, or a dedicated EVAP system diagnostic tool may be required.
- Seek Professional Diagnostic Service: If the problem persists, professional automotive technicians possess advanced diagnostic equipment and expertise. They can perform comprehensive tests, including pressure/vacuum transducer analysis and component-specific electrical checks. Expect diagnostic fees in 2027 to range from $175 to $300, with repair costs for complex vacuum issues potentially reaching $500 to $1,500 depending on component replacement and labor.
Conclusion
Identifying and resolving vacuum leaks is critical for maintaining optimal engine performance and fuel efficiency. Utilizing a smoke machine offers a precise and efficient method for pinpointing these elusive issues. By following verified diagnostic procedures and systematically troubleshooting, you can restore your vehicle’s vacuum system integrity. According to verified research and expert sources, addressing vacuum leaks promptly can prevent more extensive engine damage and costly repairs. Take action: perform your smoke test today and ensure your engine breathes freely.
❓ Frequently Asked Questions
What equipment do I need to perform a smoke test for vacuum leaks?
To perform a smoke test, you’ll need a dedicated automotive smoke machine, appropriate adapters to connect to vacuum lines (often included), a power source for the machine, and potentially shop air if your unit requires it. Safety glasses and good lighting are also crucial for spotting the smoke.
How do I prepare my vehicle’s engine before starting the smoke test?
Before starting, ensure the engine is completely off and cool to the touch to prevent burns and allow for safe handling of components. Disconnect the battery to avoid accidental starts or electrical shorts, and gather all necessary tools and adapters within reach.
Which specific vacuum lines or points should I target for smoke injection?
Target primary vacuum sources for injection. Excellent points include disconnecting a main vacuum line from the brake booster, the PCV valve hose, or an accessible vacuum port on the intake manifold after removing a cap or hose. Block off the throttle body inlet if injecting through a small vacuum line to contain the smoke.
What are the key safety precautions I must observe during a smoke test?
Always work in a well-ventilated area to disperse any smoke and fumes. Ensure the engine is cool to prevent burns from hot components. Disconnect the battery to prevent unexpected electrical issues or engine cranking, and always wear safety glasses to protect your eyes.
How do I visually identify a vacuum leak once the smoke machine is running?
Once the smoke machine is running and the system is filled, carefully observe all vacuum lines, manifold gaskets, and component seals for any wisps of smoke escaping. The smoke will be drawn out of any cracks, tears, or loose connections, clearly indicating the leak’s precise location.
What should I do immediately after finding a vacuum leak?
After identifying a vacuum leak, immediately mark its exact location with paint, chalk, or a pen for easy reference. This ensures you can accurately target the repair without re-testing, streamlining the process of replacing the faulty hose, gasket, or component.