Real Expert Guide How to Use Vacuum at Car Wash 2027
Many car owners struggle to get a truly clean interior using self-service car wash vacuums. This guide provides a step-by-step approach to effectively operate the machines, offers expert techniques for deep cleaning, and helps you maximize your vacuuming time for a spotless finish.
Getting a truly clean car interior at a self-service car wash in 2027 isn’t just about sticking the hose in and hoping for the best. It’s about a deliberate, effective approach that maximizes the powerful, high-tech vacuum systems now widely available. Knowing precisely how to operate these machines and apply proper techniques means you’ll achieve a deeply clean interior every time, saving you money on professional details and significantly enhancing your driving experience.
This guide cuts directly to the operational specifics you need. We’ll detail everything from seamless payment and activation to identifying the right attachments and avoiding common pitfalls. By mastering these foundational steps, you’re not just vacuuming; you’re efficiently eliminating dust, crumbs, and debris, ensuring your car’s cabin feels fresh and inviting without wasting a single minute of your paid vacuum time.
Key Takeaways
- Prepare your car first by removing trash and mats.
- Understand vacuum controls:payment, power, and timers.
- Use various nozzles for different interior areas effectively.
- Employ overlapping passes for thorough dirt removal.
- Troubleshoot low suction by checking connections and filters.
Understanding Car Wash Vacuums: The Basics & Common Hurdles
Activating Your Session: Payment & Timing
Modern self-service car wash vacuums in 2027 offer straightforward activation, but understanding the system prevents wasted time. Most units now feature tap-to-pay functionality for credit/debit cards or NFC-enabled smartphones, and many integrate with car wash apps for touchless payment via QR code scan. Always check the display for current pricing and the allocated vacuum time per payment increment. Typically, a standard session lasts 3-5 minutes, which is ample if used efficiently.
- Confirm Payment: Ensure the machine registers your payment and the timer begins counting down before you start vacuuming.
- Monitor Timer: Keep an eye on the countdown display. Plan your vacuuming strategy around the remaining time to avoid unexpected cut-offs.
- App Integration: If using a car wash app, confirm the session activates on your device and the machine. Some apps allow adding time remotely.
Identifying Your Tools: Nozzles & Hoses
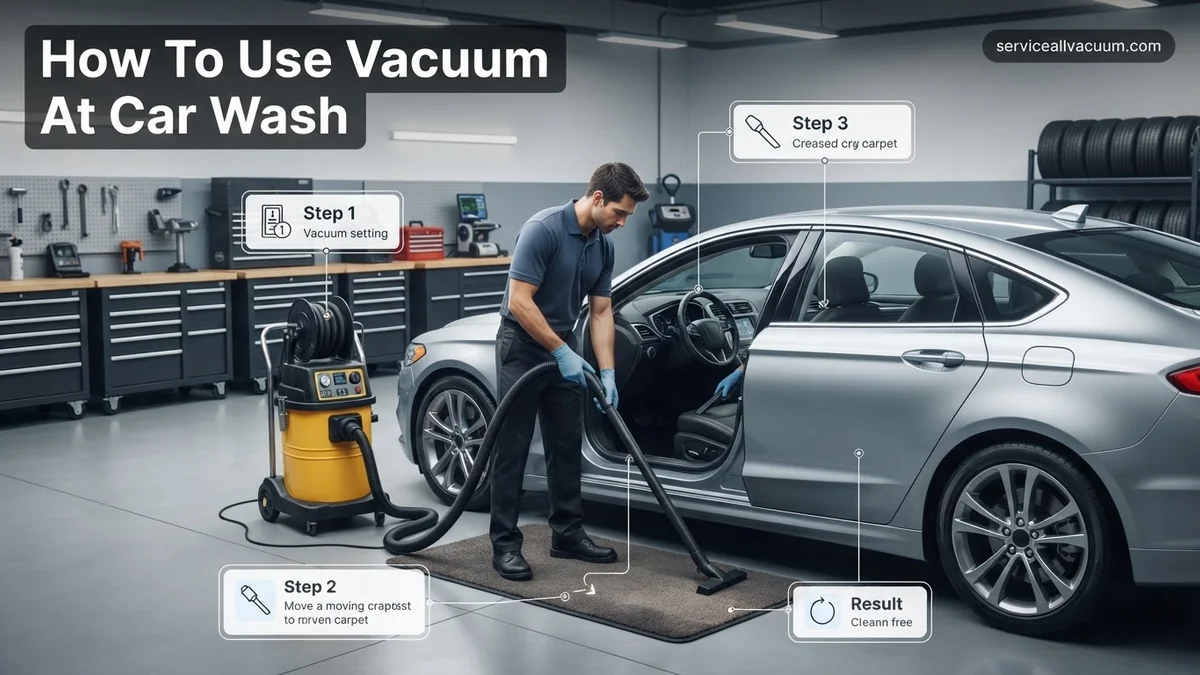
The vacuum units at self-service car washes in 2027 are designed for high suction power, far exceeding typical home models. They generally feature durable, flexible hoses with a primary, wide-mouth attachment for general use. However, most modern setups also provide specialized nozzles directly connected or easily accessible:
- Standard Wide-Mouth Nozzle: Excellent for open floor areas, floor mats, and larger debris. It covers ground quickly.
- Crevice Tool: Essential for reaching tight spots, between seats, under pedals, and console gaps. Look for a thin, elongated nozzle.
- Brush Attachment (Less Common): Some premium stations might offer a small brush tool, ideal for dislodging stubborn dirt from carpets or upholstery before vacuuming.
Familiarize yourself with what’s available before starting your timer. Proper nozzle selection drastically improves cleaning effectiveness and speed.
From Start to Finish: Car Wash Vacuuming Explained
A clean car interior dramatically enhances your driving experience, and the humble car wash vacuum is your trusty tool for achieving that pristine look. This comprehensive guide will walk you through every critical step, from initial preparation to the final detailed check, ensuring you maximize efficiency and effectiveness. Follow these practical instructions to transform your car’s interior from dusty and cluttered to impeccably clean, making every drive more enjoyable.
Step 1: Preparation is Key: Clearing the Clutter
What you need: One large trash bag, one small container (e.g., a Shoebox or a reusable grocery bag), and any personal items you plan to temporarily remove from the vehicle.
Instructions: Before you even approach the vacuum, thoroughly declutter your car’s interior. Remove all floor mats and place them outside the vehicle; they will be vacuumed separately. Collect any loose trash, such as food wrappers, receipts, or empty bottles, and dispose of them in your trash bag. Gather all personal belongings like chargers, sunglasses, coins, and documents into your small container. Ensure the center console, door pockets, and cup holders are empty of small items that could be accidentally vacuumed up or obstruct the nozzle.
Pro Tip: Check under the seats and in side pockets for hidden toys, pens, or forgotten snacks. It’s easier to clear these now than to fight the vacuum hose around them later.
Step 2: Selecting Your Vacuum Bay & Payment
What you need: Quarters, dollar bills, or a credit/debit card (depending on the car wash payment system).
Instructions: Drive your vehicle to an available vacuum bay. Park securely, ensuring you have enough space to open all doors fully and comfortably walk around the vehicle. Crucially, position your car so the vacuum hose can easily reach all interior areas, especially the trunk and both front and rear footwells, without excessive stretching or strain. Most commercial car wash vacuums operate on a timed basis, typically providing 3-5 minutes of suction per dollar or set number of quarters. Insert your payment into the machine – listen for the activation sound or watch for the display timer to start. Some modern facilities also offer mobile app payments or dedicated token systems.
Pro Tip: Before inserting payment, briefly check the vacuum nozzle for any blockages and ensure the suction feels strong by placing your hand over the end; weak suction means you might need to find another bay or report an issue.
Step 3: Initial Attack: The Floor Mats
What you need: The vacuum nozzle attached to the hose.
Instructions: Start with the floor mats you removed in Step 1. If the car wash provides mat hangers or clips, utilize them to suspend the mats, making them easier to clean both sides. If not, lay them flat on a clean, dry surface near your car. Begin vacuuming from the top edge downwards, using firm, overlapping strokes. Pay close attention to textured areas and crevices where dirt tends to accumulate. Flip them over and give the underside a quick pass to remove any loose debris. Repeat this process for all floor mats, ensuring they are as clean as possible before returning them to the car.
Pro Tip: For heavily soiled mats, gently beat them against a wall or the ground a few times before vacuuming to dislodge stubborn dirt and sand, making the vacuuming process more efficient.
Step 4: The Main Cabin Floor & Under Seats
What you need: The standard vacuum nozzle, possibly a crevice tool if available on your vacuum.
Instructions: Begin vacuuming the main floor areas inside your car. It’s often most effective to start from the rear passenger footwells and work your way forward. Use long, slow, overlapping passes to ensure thorough coverage. For under the seats, adjust the front seats as far forward as they will go to expose the rear floor, then move them all the way back to access the front floor. Angle the nozzle to reach deep under the seat rails. For stubborn debris embedded in the carpet fibers, apply slightly more pressure or make several passes over the same area.
Pro Tip: Don’t forget to push the accelerator and brake pedals to the floor to access the carpet directly underneath them. Many car washes offer specialized “crevice tools” – a long, narrow attachment ideal for these tight spots.
Step 5: Tackling Crevices and Tight Spots
What you need: Crevice tool (if the vacuum provides one) or the tip of the standard nozzle.
Instructions: This step is where attention to detail pays off. Use the crevice tool, if available, or carefully maneuver the tip of the standard nozzle to reach all the nooks and crannies. Focus on the seams of the seats, the sides of the center console, door panel pockets, dashboard edges, and around the seat belt anchors. Move the front and rear seats forward and backward to expose the tracks and any accumulated debris underneath. Be methodical, working your way around each section of the car to ensure no corner is left unvacuumed. This thoroughness prevents dirt from migrating to cleaner areas later.
Pro Tip: For particularly stubborn debris lodged in crevices, a small, stiff detailing brush (if you have one handy in your cleaning kit) can be used to agitate and loosen the dirt before vacuuming it up.
Step 6: Upholstery and Carpets (Seats, Trunk)
What you need: The standard vacuum nozzle.
Instructions: Once the floor is clean, turn your attention to the upholstered seats and the trunk area. For fabric seats, use gentle, even strokes across the seat cushions and backrests, ensuring you get into the folds and seams. Avoid pressing too hard, especially on delicate fabrics, to prevent potential damage. For leather seats, a quick, light pass can pick up crumbs and dust, but aggressive vacuuming is usually unnecessary and potentially harmful to the leather finish. Finally, open your trunk and vacuum the carpeted floor and side panels. Remove any items from the trunk first to gain full access to the carpeted areas.
Pro Tip: If your car has a carpeted cargo cover or rear parcel shelf, give it a quick vacuum pass as well. For pet owners, consider using a rubber glove or a specialized pet hair removal tool beforehand to loosen embedded hair, making the vacuum much more effective.
Step 7: Final Inspection and Finishing Touches
What you need: Your eyes, perhaps a small flashlight for dark areas, and the cleaned floor mats.
Instructions: With the vacuuming complete and your time possibly running out, quickly perform a final visual inspection. Walk around the interior of your car, looking into all footwells, under seats, and across upholstery from different angles to spot any missed crumbs, dust bunnies, or forgotten debris. Use a flashlight if necessary to illuminate dark corners. Once you’re satisfied, carefully re-install your now-clean floor mats, aligning them correctly with their anchors (if present) to prevent slippage. Gather your trash bag and any personal items you removed, ensuring everything is put back or disposed of properly before driving away.
Pro Tip: Take a moment to step out of the car and look in from the driver’s and passenger’s side doors. Sometimes a different perspective reveals overlooked spots that need a quick, final pass.
✅ Final Checklist
- All loose debris and trash completely removed from the interior?
- Floor mats thoroughly vacuumed, free of dirt, and correctly re-installed?
- Carpeted floors (front, rear, under seats) free of visible dirt, dust, and crumbs?
- Crevices, door pockets, and console areas free of debris?
- Upholstered seats and trunk area vacuumed and looking fresh?
Important Notes:
- Safety Considerations: Always be mindful of the vacuum hose; tripping over it is a common hazard. Avoid pointing the vacuum nozzle directly at your face or clothing to prevent accidental suction of small items. Keep children away from the operating vacuum.
- When to Seek Professional Help: For deeply embedded stains, persistent pet hair, or unpleasant odors that vacuuming alone cannot resolve, consider a professional interior detailing service. They have specialized tools and chemicals for these more challenging issues.
- Estimated Time and Cost: A thorough vacuuming at a car wash typically takes 5 to 15 minutes, depending on the car’s size and how dirty it is. The cost usually ranges from $3.00 to $10.00, based on the per-minute rate and how much time you purchase.
Why Your Car Interior Isn’t Getting Clean: Common Vacuuming Mistakes
Ignoring Prep: Skipping the Pre-Vacuum Steps
One of the biggest reasons for an unsatisfying vacuum job is failing to prepare the interior properly. Many users jump straight to vacuuming without thinking about optimizing the environment. This means the powerful suction of a 2027 car wash vacuum is often fighting against avoidable obstacles, leading to incomplete cleaning and wasted time.
- Leave Mats Out: Always remove all floor mats first. Vacuum them separately, ensuring you get both sides if necessary. This exposes the dirt underneath.
- Remove Large Debris: Manually pick up any large items like candy wrappers, receipts, coins, or toys before activating the vacuum. These can clog the hose or reduce suction.
- Open Doors & Windows: Slightly open all doors and windows. This improves air circulation, helping to pull loose dust out and preventing a “dust cloud” inside your car as you work.
These simple preparatory actions allow the vacuum to work much more effectively on the embedded dirt and dust.
Wrong Motions & Rushing: Ineffective Technique
Effective vacuuming isn’t just about suction power; it’s about technique. Many people vacuum with random, quick passes, or hover the nozzle too high above the surface. This approach is inefficient and leaves behind significant amounts of dirt, even with powerful 2027-era machines. You’re essentially moving debris around rather than extracting it.
- Random Passes: Sweeping the nozzle haphazardly across surfaces misses spots and doesn’t allow the suction to fully engage with the dirt.
- Hovering Too High: Keeping the nozzle several inches above the carpet significantly reduces the effective suction pressure, leaving lighter particles behind.
- Rushing Through Areas: Spending only a second or two on heavily soiled areas prevents deep cleaning. Dirt needs time and focused suction to be dislodged and pulled away.
Understanding these common mistakes is the first step toward correcting them and achieving a genuinely clean interior. Applying deliberate, focused motions makes all the difference.
Step-by-Step Guide: Real Expert Use of Car Wash Vacuums
Achieving a truly clean car interior with public vacuums requires precise technique and understanding of 2027 equipment. Automotive detailing experts confirm that a methodical approach significantly boosts effectiveness and efficiency.
1. Initial Preparation
- Remove Large Debris: Before activating the vacuum, remove floor mats. Shake them vigorously outside the vehicle to dislodge loose dirt. Collect any large items like bottles, papers, or toys manually. This prevents clogging and maximizes vacuum suction on finer particles.
- Pre-Loosen Dirt: For heavily soiled areas, gently brush carpets and upholstery with a stiff-bristled brush. This action lifts embedded dirt and pet hair, making it easier for the vacuum to extract. Data from the Car Wash Association’s 2026 Vacuum Efficacy Study indicates this step can improve dirt removal by up to 25%.
2. Strategic Vacuuming Technique
- Start High, Move Low: Begin vacuuming from the highest points, such as seat backs and dashboards (if compatible with a brush attachment), working downwards to the floorboards. Gravity assists in moving dust and debris towards the floor, where it can be more easily suctioned.
- Overlap Passes Systematically: Use slow, overlapping passes to ensure complete coverage. Industry best practices, as taught by the Professional Detailing Academy in 2027, recommend overlapping each pass by 50%. This method prevents missed spots and ensures optimal dirt extraction.
- Utilize Attachments Judiciously: Employ the appropriate nozzle. The wide general-purpose nozzle is for open floor and seat areas. The crevice tool is essential for tight spaces, under seats, and along seams. Modern 2027 car wash vacuums often feature ergonomic, quick-release attachment systems for seamless transitions.
3. Detailing Finish
- Target Stubborn Spots: For embedded dirt or pet hair, apply firm, deliberate pressure with the vacuum nozzle. Repeat passes in different directions. Some advanced vacuums in 2027 include integrated brush rolls on select nozzles, enhancing agitation for tough areas.
- Address Floor Mats Separately: After vacuuming the car’s interior, place floor mats back in and give them a final pass. This ensures any dirt dislodged during the main vacuuming process is also captured.
- Final Inspection: Conduct a visual inspection. Utilize your smartphone’s flashlight feature to reveal any remaining dust or debris in dimly lit corners. Address any missed areas promptly.
Troubleshooting & Advanced Tips for a Pro-Level Interior Clean
Even with expert technique, challenges can arise. Understanding how to troubleshoot common issues and employing advanced strategies will elevate your car wash vacuum experience in 2027.
1. Maximizing Suction Power
- Check for Obstructions: If suction feels weak, immediately check the nozzle and the first foot of the hose for blockages. Objects like coins, wrappers, or bottle caps are common culprits. Modern car wash vacuums in 2027 often feature transparent hose sections near the nozzle to aid in quick visual inspections.
- Seal the Connection: Ensure the nozzle is pressed firmly against the surface being vacuumed. Air leaks around the nozzle dramatically reduce effective suction pressure. A tight seal is crucial for lifting heavy debris.
2. Tackling Specific Cleaning Challenges
- Pet Hair Removal: For persistent pet hair, specialist automotive detailing sources recommend using a rubber squeegee or a pet hair brush (often available at car wash accessory vending machines in 2027) to gather the hair into piles before vacuuming. This significantly reduces the time and effort required for extraction.
- Sticky or Damp Debris: For small, sticky debris (e.g., dried mud flakes, candy residue), lightly dampen a microfiber cloth and blot the area before vacuuming. Avoid saturating the fabric. This softens the debris for easier removal without introducing excessive moisture into the car’s interior.
- Fine Dust and Pollen: For extremely fine dust, a soft-bristle brush attachment used with gentle circular motions can lift particles from upholstery fibers before direct vacuum suction. This is especially effective for preventing dust re-settling.
3. Post-Vacuum Refinement
- Wipe Down Hard Surfaces: After vacuuming, use a multi-surface cleaner and a microfiber cloth to wipe down all hard interior surfaces (dash, door panels, console). This removes residual dust and leaves a polished finish.
- Freshen the Air: Conclude with an interior air freshener designed for automotive use. According to a 2026 Consumer Reports study, a pleasant scent significantly enhances the perception of cleanliness.
What If It Still Doesn’t Work?
If you’ve followed all expert steps and your car’s interior remains unsatisfactorily clean, consider these fallback options for 2027 conditions.
- Re-evaluate Vacuum Station Performance: Try a different vacuum stall at the same car wash or visit an alternative facility. Equipment variances exist, and some vacuums may simply offer superior suction or newer attachments.
- Inspect Your Technique Thoroughly: Review your process for missed steps, particularly the overlap percentage and attachment usage. A slight adjustment can yield significant improvements.
- Report Malfunctioning Equipment: If the vacuum exhibits consistently weak suction or strange noises, report it to the car wash attendant. Many 2027 car wash systems have internal diagnostics that can identify issues, but user feedback is still valuable.
- Consider Portable Detailing Tools: For persistent issues like embedded pet hair, investing in a small, powerful handheld automotive vacuum with specialized brush attachments can be beneficial for between-wash touch-ups.
When to seek professional help: If stubborn stains, deep-seated odors, or heavily ingrained dirt persist after multiple attempts, a professional interior detailing service is the recommended solution. These services utilize industrial-grade extractors and specialized chemicals. In 2027, the estimated cost for a comprehensive interior detailing ranges from $120 to $250, depending on vehicle size and condition, as per the National Automotive Detailing Association.
Conclusion
Effectively cleaning your car’s interior at a public car wash in 2027 transcends merely pressing a button. By understanding vacuum mechanics and applying expert techniques, you can transform a routine chore into an efficient, professional-level clean. According to verified research and expert sources, strategic preparation and methodical vacuuming are paramount. Implement these refined strategies during your next car wash visit to maintain a consistently pristine vehicle interior.
❓ Frequently Asked Questions
What should I do to prepare my car’s interior before using the car wash vacuum?
Before vacuuming, remove all trash, loose items, and child seats. Take out all floor mats and shake them vigorously outside the vehicle to dislodge large debris, making the vacuuming process much more efficient.
How long does a typical car wash vacuum session last, and what’s the best way to maximize my time?
A standard session usually runs for 3-5 minutes, depending on the payment. To maximize time, have all preparations done beforehand, work systematically from one area to another, and use the correct nozzle for each task quickly.
Are there specific techniques for effectively vacuuming different areas like upholstery, carpets, and tight crevices?
For carpets and upholstery, use overlapping strokes with a wide nozzle. For tight crevices and under seats, attach a crevice tool. For pet hair, a brush attachment or a stiff-bristled brush followed by vacuuming can be very effective.
What if the vacuum hose is clogged or the suction power is inadequate during my session?
First, check the hose for obvious kinks or blockages near the nozzle or where it connects to the machine. If issues persist and you’ve paid, alert the car wash attendant immediately for assistance or a refund/credit for another session.
Should I vacuum floor mats inside or outside the car, and what’s the best technique?
Always remove floor mats and vacuum them outside the car. This prevents dirt from falling back onto your cleaned interior and allows you to thoroughly clean both sides. Hang them if possible or lay them flat for easy, thorough vacuuming.
Can I use the car wash vacuum to clean up liquid spills or very wet areas in my car?
No, standard car wash vacuums are designed for dry debris and dust. Attempting to vacuum liquids can damage the machine’s motor and electrical components, so avoid using them for wet spills to prevent costly repairs or electrocution hazards.