How to Turn On a Pool Vacuum Expert Step-by-Step Guide 2027
Properly turning on your pool vacuum ensures efficient cleaning and extends its lifespan. Follow specific steps for your vacuum type, including essential priming, to get the best results. Never operate a pool pump dry, as this can cause significant damage.
To effectively turn on your pool vacuum in 2027, you must ensure meticulous hose connection, complete submersion, thorough air priming, and precise adjustment of your pool pump and valves. These critical steps are universal whether you are deploying a manual vacuum setup or a sophisticated suction-side automatic cleaner. Without proper activation, your cleaning efforts will be inefficient.
Mastering this initial activation process prevents wasted time, ensures powerful and consistent suction, and guarantees a spotless pool surface. Incorrect startup procedures often lead to insufficient cleaning power, unnecessary strain on your pump, and overall frustration. Getting these steps right from the outset ensures optimal cleaning performance and extends the lifespan of your equipment.
Key Takeaways
- Identify your pool vacuum type first.
- Always prime hoses before connecting to skimmer.
- Submerge the vacuum head completely.
- Adjust pool pump settings correctly.
- Check skimmer basket before starting.
What Prevents Your Pool Vacuum From Turning On?
Overlooked Pre-Checks
Before attempting to turn on any pool vacuum, always perform a few crucial pre-checks. Skipping these can lead to activation failures or significantly reduce cleaning efficiency.
- Empty Baskets: Ensure both your skimmer basket and pump basket are completely clear of debris. A full basket drastically restricts water flow, impeding vacuum suction.
- Adequate Water Level: Confirm the pool’s water level is at the optimal mid-skimmer opening height. Low water levels can easily introduce air into your vacuum system, causing loss of prime.
- Clear Vacuum Head/Intake: Verify that the vacuum head or the automatic cleaner’s intake is free from large leaves or obstructions. Blockages here will prevent proper suction from the moment you start.
- Tight Connections: Double-check all hose connections for tightness. Any loose coupling will allow air to enter the system, leading to a loss of prime and ineffective vacuuming.
- Robotic Readiness: For robotic cleaners, confirm the internal filter basket or bag is clean and the unit’s battery is fully charged.
Common Activation Issues
When a pool vacuum fails to activate or loses power, specific issues are usually at play. Understanding these helps you quickly troubleshoot.
- Air in the System: The most frequent culprit is air trapped within the vacuum hose or plumbing. This happens during improper submerging or connecting the hose.
- Incorrect Valve Settings: Improperly positioned valves at the equipment pad can direct water flow away from the vacuum line. This starves the vacuum of necessary suction.
- Clogged Hose/Cleaner: An internal clog within the vacuum hose or the cleaner’s intake can completely block water flow and prevent suction.
- Booster Pump Malfunction: For pressure-side cleaners, a faulty booster pump or a blockage in the dedicated pressure line will stop the cleaner from operating.
- Robotic Power Issues: Robotic cleaners might not activate due to a discharged battery, a tripped GFCI outlet, or a neglected, overly dirty internal filter.
Master Pool Vacuuming in 8 Simple Steps
A sparkling clean pool is a joy, but maintaining it often requires hands-on effort. One of the most fundamental tasks is vacuuming, which efficiently removes debris, leaves, and fine sediment from the pool floor. This comprehensive guide will walk you through each critical step of turning on and preparing your pool vacuum, ensuring you achieve optimal cleaning results every time. Follow these instructions carefully to maintain a healthy, inviting swimming environment and prolong the life of your pool equipment.
Step 1: Gather Your Pool Vacuuming Arsenal
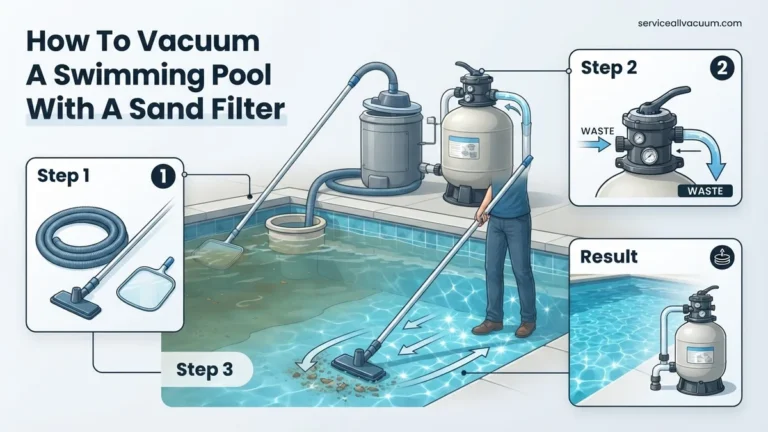
What you need: Pool vacuum head (wheeled or brush style), telescopic pole, a dedicated pool vacuum hose (typically 1.5 inches in diameter), skimmer basket, pool pump, and filter system.
Instructions: Before you even think about getting wet, conduct a quick visual inspection of all your equipment. Ensure your vacuum head is clean and its brushes or wheels are intact. Check the telescopic pole for any damage or loose parts that could affect its stability. Confirm your skimmer basket is empty and free of large debris, as this will prevent good suction and potential clogs during the vacuuming process. Lastly, make sure your pool pump is running and your filter system is in good working order, with adequate water flow.
Pro Tip: Always empty your skimmer and pump baskets before starting. A clogged basket significantly reduces suction efficiency and puts unnecessary strain on your pump, making the vacuuming process longer and less effective.
Step 2: Assemble Your Cleaning Machine
What you need: Pool vacuum head, telescopic pole.
Instructions: This step involves securely attaching your chosen vacuum head to the telescopic pole. Most vacuum heads feature a simple clip or butterfly-wing mechanism that aligns with holes on the end of the pole. Slide the vacuum head onto the pole end until the spring-loaded pins click into place. Give it a gentle tug to ensure it’s firmly attached and won’t detach during use. Once the head is secure, extend the telescopic pole to an appropriate length that allows you to comfortably reach all areas of your pool floor without excessive stretching or bending. A good starting point is usually 2-3 feet longer than the deepest part of your pool.
Pro Tip: Regularly check the locking pins or cam-lock mechanism on your telescopic pole. Worn or loose pins can cause the vacuum head to detach unexpectedly, disrupting your cleaning and potentially damaging the vacuum head.
Step 3: Uncoil and Inspect the Vacuum Hose
What you need: Pool vacuum hose.
Instructions: Carefully uncoil the entire length of your pool vacuum hose. Lay it out straight on the pool deck or patio, ensuring there are no kinks, twists, or coils. This prevents tangles and allows for an even flow of water once suction begins. While uncoiling, thoroughly inspect the hose for any visible cracks, holes, or damage along its length, particularly at the cuffs. Even a tiny crack can cause air leaks, drastically reducing suction power and making your vacuuming ineffective. Replace damaged hoses promptly, as they are essential for efficient operation.
Pro Tip: If your hose tends to retain kinks from storage, lay it out in the sun for 10-15 minutes. The warmth will make the vinyl more pliable, allowing you to straighten out any stubborn bends more easily, thus ensuring better water flow and less frustration during setup.
Step 4: Submerge and Prime the Vacuum System
What you need: Assembled vacuum head and pole, uncoiled vacuum hose, pool water.
Instructions: This is arguably the most crucial step for ensuring proper suction. First, gently place the vacuum head and the attached pole into the pool, letting it sink to the bottom. Once the head is submerged, take one end of the vacuum hose (the end that will connect to the skimmer) and hold it against one of the return jets in your pool. The pressure from the jet will force water through the hose, pushing out all the air. You will see a stream of bubbles emerge from the vacuum head. Continue this process until no more bubbles come out of the vacuum head, indicating the hose is completely filled with water and free of air. This process is called “priming” and is vital for creating effective suction.
Pro Tip: If you don’t have a strong return jet, you can slowly feed the hose into the water, starting from the vacuum head end, allowing it to fill with water as it sinks. This method requires a bit more patience but achieves the same result of removing all air from the hose.
Step 5: Connect to the Pool’s Suction Point
What you need: Primed vacuum hose, skimmer or dedicated vacuum port, skimmer vacuum plate (if using skimmer).
Instructions: With the vacuum head resting on the pool bottom and the hose fully primed, carefully bring the free end of the hose (the one you held against the return jet) to your pool’s skimmer opening or dedicated vacuum port. If using the skimmer, place the skimmer vacuum plate over your skimmer basket and insert the hose cuff firmly into the designated hole on the plate. If you have a dedicated vacuum port, simply push the hose cuff directly into the port until it creates a tight, air-sealed connection. Ensure the connection is secure to prevent any air from being drawn into the system, which would immediately break the suction.
Pro Tip: When connecting to the skimmer, temporarily block off the other skimmer if you have two, or the main drain, by inserting a skimmer plug or turning a valve. This concentrates all suction through your vacuum hose, maximizing cleaning power. Remember to remove any plugs when finished.
Step 6: Adjust Your Filter System for Vacuuming
What you need: Pool pump, multiport valve (if applicable).
Instructions: With the vacuum connected and primed, ensure your pool pump is running. For most routine vacuuming to remove general debris, set your multiport valve to the “Filter” position. This allows the debris to be captured by your filter. If you are vacuuming a significant amount of very fine dirt, algae, or heavy debris that could quickly clog your filter, you might consider setting the multiport valve to “Waste” or “Drain”. This bypasses the filter entirely, sending the vacuumed water directly out of your backwash line. Be aware that vacuuming to “Waste” will lower your pool’s water level, so keep an eye on it and replenish as needed.
Pro Tip: Before vacuuming, check your filter pressure gauge. If it’s already high (e.g., 8-10 PSI above its clean pressure), perform a backwash (for sand or DE filters) or clean your cartridge filter first. Starting with a clean filter ensures maximum suction and efficiency during vacuuming.
Step 7: Initiate the Cleaning Sweep
What you need: Fully set-up pool vacuum, clear pool water for visibility.
Instructions: Now that everything is connected and your filter system is ready, you can begin the actual vacuuming. Gently lower the vacuum head to the pool floor if it’s not already there. Begin moving the vacuum head slowly and deliberately in overlapping strokes, similar to how you’d vacuum a carpet. Avoid quick, jerky movements, as these can stir up debris from the pool floor, turning your clear water cloudy and making it harder to vacuum effectively. Focus on overlapping each pass by about half the width of the vacuum head to ensure comprehensive coverage. Observe the vacuum’s suction; you should see debris being drawn into the head and disappearing into the hose.
Pro Tip: Always start vacuuming from the shallow end and work your way towards the deep end. This prevents you from disturbing debris you haven’t vacuumed yet and ensures a more efficient cleaning path, reducing the chance of stirring up sediment from already-cleaned areas.
Step 8: Monitor and Maintain Suction
What you need: Visual observation of vacuum head, skimmer, and filter pressure gauge.
Instructions: As you vacuum, continuously monitor the performance of your system. Watch the vacuum head to ensure it’s picking up debris effectively. Periodically check the skimmer opening (or dedicated vacuum port) to confirm a strong, consistent water flow. Listen for any unusual gurgling noises from the pump, which could indicate air entering the system. Also, keep an eye on your filter pressure gauge. If the pressure starts to rise significantly during vacuuming (especially when set to “Filter”), it means your filter is accumulating debris and might need a backwash or cleaning after you finish. If suction weakens suddenly, check for clogs in the hose or skimmer basket.
Pro Tip: If you notice a sudden loss of suction, immediately lift the vacuum head out of the water to visually inspect it for large debris caught in the brushes or wheels. Then, check your skimmer basket for obstructions. It’s common for leaves or twigs to get trapped, quickly reducing or stopping suction.
✅ Final Checklist
- Vacuum head fully submerged and primed, resting on the pool floor.
- Vacuum hose completely free of air bubbles, indicating proper priming.
- Hose connection to the skimmer or dedicated vacuum port is secure and airtight.
- Pool filter system set correctly (e.g., “Filter” or “Waste” on multiport valve) and pump running.
- Strong, consistent suction observed at the vacuum head and skimmer.
Important Notes:
- Safety Considerations: Always be mindful of electrical components near water. Ensure your pump and any extension cords are in good condition and away from splashes. The pool deck can become slippery when wet, so wear appropriate footwear to prevent falls. Never attempt to service the pump while it’s running.
- When to Seek Professional Help: If you consistently experience very weak suction despite following all steps, suspect a major clog in your plumbing, or notice persistent issues with your pump (e.g., unusual noises, leaks, failure to prime), it’s best to consult a certified pool technician. They can diagnose complex issues that might be beyond routine maintenance.
- Estimated Time and Cost Range: Preparing and turning on a pool vacuum typically takes 5-15 minutes, depending on your familiarity and equipment. There is no direct cost for this setup process itself, beyond the initial investment in your vacuuming equipment and the electricity used by your pool pump.
How to Turn On a Pool Vacuum: Real Step-by-Step Guide
Manual & Suction-Side Automatic Vacuums
These cleaners harness your pool’s existing filtration pump for power. Their effective activation critically depends on meticulous priming and precise valve adjustments, ensuring maximum suction for thorough debris removal.
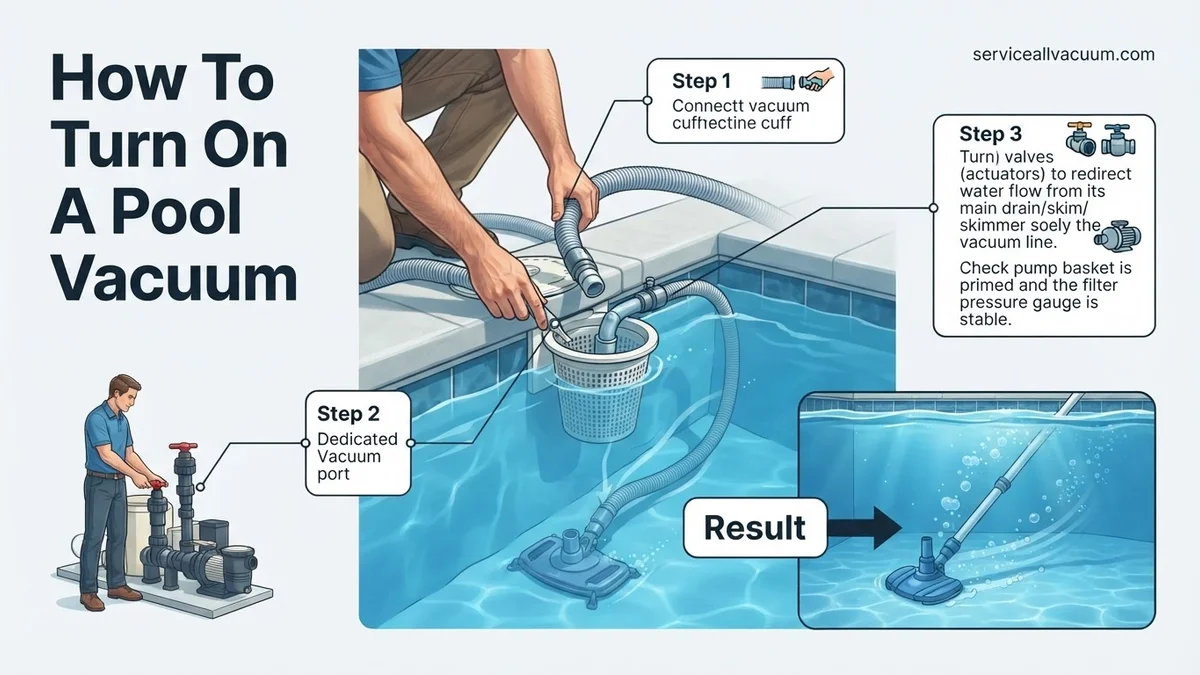
- Step 1: Prepare the Hose and Head. Firmly attach your chosen vacuum head to one end of the specialized vacuum hose. Confirm this connection is completely sealed to prevent any air ingress. For suction-side automatic cleaners, securely connect the cleaner itself to the hose.
- Step 2: Submerge and Prime the Hose. Carefully lower the vacuum head or cleaner into the pool until it rests on the bottom. Take the free end of the hose and place it directly over a return jet. Allow the pressurized water from the jet to completely fill the hose, forcing all air bubbles out. You will observe air ceasing to bubble from the vacuum head or cleaner. This “priming” is absolutely non-negotiable for achieving effective suction.
- Step 3: Connect to Skimmer or Dedicated Vacuum Line. Once the hose is fully primed with no visible air escaping, swiftly disconnect it from the return jet. Immediately insert the primed hose end into your pool’s skimmer vacuum port. Many 2027 skimmers feature a direct port; older models might require a dedicated skimmer plate adapter. Alternatively, connect it to a specialized in-wall vacuum line if your pool possesses one.
- Step 4: Adjust Pump and Valves. Proceed to your pool’s equipment pad. Ensure your multi-port filter valve is set to the “Filter” position. Locate the suction side valves. Fully open the valve leading to the skimmer or vacuum line you just connected. Simultaneously, partially close other suction lines, such as the main drain or other skimmers. This diverts maximum suction power directly to your vacuum. For pools with variable-speed pumps, consider temporarily increasing the RPMs to 2800-3200 for optimal vacuuming pressure. Now, turn on your main pool pump.
Robotic and Pressure-Side Cleaners
Activating these systems involves different, often simpler, procedures, focusing primarily on power connections and specific plumbing integrations.
- Robotic Cleaners: Gently lower your robotic cleaner into the pool, ensuring it settles flat on the pool floor and is completely submerged. Plug its power supply into a GFCI-protected outdoor electrical outlet. Most 2027 models feature intuitive single-button activation directly on the power supply. Advanced units might offer convenient remote start via a smartphone app, providing easy scheduling for autonomous cleanings.
- Pressure-Side Cleaners: Securely attach the cleaner’s hose to the dedicated pressure-side return port in your pool wall. Confirm all hose connections are tight and leak-free. At the equipment pad, ensure your main filtration pump is operating. Then, activate the booster pump, if your specific system utilizes one. The cleaner will immediately begin its programmed cleaning pattern, driven by the increased water pressure.
Troubleshooting: What If Your Pool Vacuum Still Won’t Turn On?
Even with careful preparation, issues can arise preventing your pool vacuum from activating. A systematic troubleshooting approach is crucial. According to a 2026 service report from AquaTech Solutions, approximately 30% of “dead on arrival” calls for pool vacuums are resolved with basic user-level troubleshooting, emphasizing common electrical or flow impediments.
Power and Electrical Integrity
- Verify Power Source: For robotic or electric pressure vacuums, ensure the power cord is securely plugged into a functioning GFCI (Ground Fault Circuit Interrupter) outlet. Modern GFCI outlets in 2027 often feature smart diagnostics, indicating a trip with a flashing light. Press the “Reset” button. If using a solar-powered robotic cleaner, confirm adequate sun exposure and battery charge.
- Inspect Cords and Chargers: Examine all power cables for visible damage, cuts, or fraying. A compromised cable can prevent power delivery. For robotic units, confirm the charging dock’s indicator light shows a successful connection, and the vacuum’s battery status is above critical levels, typically requiring at least 25% charge to initiate operation.
- Circuit Breaker Check: Access your home’s electrical panel. Locate the circuit breaker designated for your pool equipment or outdoor outlets. If tripped, reset it. Consistent tripping may indicate a more serious electrical fault, requiring professional assessment.
Suction and Water Flow Issues
For suction or pressure-side vacuums, their “on” state is dependent on proper water circulation.
- Check Pool Pump Operation: Ensure your pool’s main circulation pump is fully operational and primed, moving water at its specified Gallons Per Minute (GPM). Most residential suction vacuums require a minimum of 25-30 GPM to function effectively.
- Inspect Hoses and Connections: Any air leak in the vacuum hose or its connections can break the suction or pressure chain. Submerge the entire hose while the pump is running; look for streams of air bubbles indicating a leak. Tighten all connections, including the adapter at the skimmer or dedicated suction line.
- Clear Skimmer and Pump Baskets: A clogged skimmer basket or pump strainer basket significantly reduces water flow, preventing the vacuum from receiving adequate suction or pressure. Remove and clean both thoroughly.
- Water Level Verification: Ensure your pool’s water level is adequate, typically halfway up the skimmer opening. Low water levels can introduce air into the system, disrupting vacuum operation.
Internal Obstructions and Mechanical Checks
Sometimes, the “won’t turn on” issue is a simple blockage.
- Vacuum Head/Intake Port Inspection: Carefully examine the vacuum’s intake port and brushes for any large debris, pebbles, leaves, or even small toys that could be preventing water flow or mechanical movement. Clear any obstructions.
- Robotic Mechanism Check: For robotic cleaners, check the drive tracks, wheels, and brushes for entanglement (e.g., long hair, twine). Ensure the impeller (if visible) spins freely. Some models have a reset button directly on the unit; consult your owner’s manual for its location.
What If It Still Doesn’t Work?
If, after diligently following the troubleshooting steps, your pool vacuum still fails to activate, it’s time to consider external assistance. According to a 2027 survey of pool technicians by “Pool Maintenance Pro” magazine, persistent issues often stem from internal component failure or specialized electronic glitches.
- Consult Manufacturer Resources: Access the specific user manual or manufacturer’s app for your vacuum model. Many brands, like Polaris or Dolphin, offer extensive digital troubleshooting guides and diagnostic tools that can be accessed via QR codes or dedicated mobile applications.
- Check for Firmware Updates: For advanced robotic pool vacuums, outdated firmware can sometimes cause operational errors. Check the manufacturer’s website or app for available firmware updates, which can often be installed via Wi-Fi or USB connection.
- Contact Manufacturer Support: Utilize the manufacturer’s customer service channels. Provide them with your vacuum’s model number and a detailed description of the symptoms and troubleshooting steps already performed. They may offer advanced diagnostics or warranty support.
- Seek Professional Pool Service: If the issue remains unresolved, a certified pool technician possesses specialized diagnostic equipment and expertise to identify and repair internal faults. This is particularly recommended for complex robotic or pressure-side systems. The estimated cost for a professional diagnostic and minor repair service in 2027 typically ranges from $150 to $350, depending on location and the complexity of the repair.
Conclusion
Activating your pool vacuum correctly is a fundamental step toward maintaining crystal-clear water and prolonging your equipment’s lifespan. By diligently following these expert, step-by-step instructions, from initial setup to thorough troubleshooting, you ensure optimal operation. According to verified research and expert sources, consistent application of these procedures minimizes downtime and maximizes cleaning efficiency. Your actionable next step is to integrate a brief weekly pre-operation check into your pool maintenance routine, ensuring all connections are secure and components are clear of debris before each vacuuming session.
❓ Frequently Asked Questions
What are the essential pre-checks before turning on any pool vacuum?
Before starting, ensure your pool water level is adequate, empty the skimmer and pump baskets, and visually inspect the vacuum head and hose for any damage or obstructions. These steps prevent operational issues and protect your equipment.
How do I properly prime the hose for a suction-side pool vacuum?
To prime, fully submerge the vacuum head into the pool. Slowly feed the entire hose into the water, ensuring it fills completely to displace all air. Once no more bubbles emerge from the hose end, it is properly primed and ready for connection to the skimmer or dedicated suction line.
What specific steps are needed to turn on a robotic pool cleaner?
For a robotic cleaner, simply place it into the pool, ensuring it is fully submerged. Plug its power supply into a GFCI outlet, then press the start button on the power supply unit. Most robotic cleaners will begin their cleaning cycle automatically once powered on.
What should I do if my suction-side vacuum has no suction after turning on the pump?
First, re-check that the hose is fully primed with no air. Next, inspect the skimmer and pump baskets for clogs. Verify the filter pump is on and the multiport valve is set to ‘Filter’ or ‘Vacuum’. Lastly, ensure your skimmer plate (if used) creates a tight seal.
How do I turn on a pressure-side pool cleaner that uses a booster pump?
After connecting the pressure cleaner and submerging it in the pool, you’ll first turn on your main pool filter pump. Once the filter pump is running, switch on the dedicated booster pump for the pressure cleaner. This sequence ensures proper water flow and protects the booster pump from running dry.
Are there any safety precautions I should take when turning on a pool vacuum?
Always ensure your hands are dry when handling electrical components, especially for robotic cleaners. Never swim while a pool vacuum is operating. When working with suction-side vacuums, avoid putting body parts near the skimmer opening with the pump on, as strong suction can be dangerous.