How To Empty Shark Vacuum Cordless How to Empty Shark 2027
The most crucial step in maintaining peak performance for your Shark cordless vacuum is correctly identifying the dust bin release mechanism and emptying it regularly. This guide provides expert, step-by-step instructions to ensure a clean, hassle-free disposal process for all common models, maximizing your vacuum’s suction power.
Keeping your Shark cordless vacuum performing at its best in 2027 means knowing exactly how to empty its dust bin correctly. This isn’t just about tossing out dirt; it’s about following a precise sequence to ensure all debris is released, your vacuum maintains optimal suction, and you prevent any mess or damage. Whether you own a powerful Shark Stratos IZ series or a compact WandVac, the process of emptying the dust cup is straightforward once you understand the specific release mechanisms and best practices. Getting this right every time prevents clogs, extends your vacuum’s lifespan, and ensures a truly clean home with every use.
Understanding the exact buttons and levers involved in your specific Shark cordless model makes all the difference. Incorrectly forcing a bin or missing a crucial step can lead to partial emptying, trapped allergens, or even damage to the dust cup’s latches. This guide focuses on the critical steps, highlighting common variations across popular Shark cordless models, so you can confidently and cleanly empty your vacuum, preparing it for its next powerful cleaning session.
Key Takeaways
- Locate model-specific dust cup buttons.
- Always empty directly into a trash bin.
- Gently tap bin for stubborn debris removal.
- Check and clean filters periodically.
- Empty after every use for optimal suction.
Why Proper Shark Cordless Vacuum Emptying is Crucial
Regular and correct emptying of your Shark cordless vacuum’s dust bin is more than just a chore; it’s a fundamental aspect of maintaining its superior cleaning capability. In 2027, with advanced filtration systems, ensuring the bin is clear directly impacts efficiency and longevity. Overlooking this simple step can lead to a cascade of performance issues that diminish your cleaning experience.
Maintaining Peak Performance
- Sustained Suction Power: A full dust bin or one with compacted debris restricts airflow. This forces your vacuum’s motor to work harder, reducing suction strength and making it less effective at picking up dirt, pet hair, and fine dust. Regularly emptying ensures maximum airflow and consistent, powerful suction.
- Preventing Overheating: Reduced airflow due to a full or clogged bin can cause the motor to overheat. Over time, this stress can shorten the lifespan of your vacuum’s internal components, leading to costly repairs or premature replacement.
- Optimizing Battery Life: When the motor strains against restricted airflow, it draws more power from the battery. This means less run time per charge. A properly emptied bin allows the vacuum to operate efficiently, maximizing your cordless cleaning sessions.
Preventing Odors and Allergens
Beyond performance, proper dust bin emptying plays a vital role in household hygiene and air quality. The dust cup accumulates more than just visible dirt; it collects pet dander, pollen, dust mites, and other microscopic allergens that can impact indoor air quality.
- Eliminating Stale Odors: Stagnant dust and debris, especially pet hair, can develop unpleasant odors if left in the bin for extended periods. Emptying the bin promptly after each use, or when full, prevents these smells from permeating your home.
- Reducing Allergen Recirculation: A dust bin that’s not fully emptied or is prone to leaks due to improper re-securing can re-release allergens back into the air. This is particularly problematic for individuals with allergies or asthma. Correctly emptying and re-sealing the bin keeps these irritants trapped.
- Promoting a Cleaner Environment: A clean bin contributes to an overall healthier home. It ensures that the dirt you vacuum up stays contained, contributing to a truly clean and fresh living space.
How to Empty Your Shark Cordless Like a Pro: A Practical Walkthrough
Keeping your Shark cordless vacuum performing at its peak requires regular maintenance, and one of the most fundamental tasks is emptying its dust cup. Over time, accumulated dust, dirt, and pet hair can reduce suction power, strain the motor, and even lead to unpleasant odors. This detailed guide will walk you through each step of safely and efficiently emptying your Shark cordless vacuum, ensuring it’s always ready to tackle your cleaning needs. Follow these instructions carefully to maintain optimal performance and prolong the life of your valuable appliance.
Step 1: Prepare Your Workspace for a Clean Sweep
What you need: A sturdy trash can (preferably with a lid), optional small plastic bag, a well-ventilated area.
Instructions: Before you begin, choose an appropriate location for emptying. A garage, utility room, or outdoor area is ideal to minimize dust dispersion in your living space. Position a trash can directly below your intended emptying spot. For an extra layer of cleanliness, you might line the trash can with a small plastic bag; this allows you to tie it off immediately after disposal, preventing dust from escaping. Ensure you have ample space to comfortably maneuver the vacuum and its components.
Pro Tip: Avoid emptying your vacuum over a carpeted floor or near open food preparation areas. The fine dust can settle on surfaces, requiring additional cleaning.
Step 2: Ensure Safety First: Power Down Your Device
What you need: Your Shark cordless vacuum cleaner.
Instructions: Safety is paramount when handling any appliance. Before you attempt to remove or empty any part of your Shark cordless vacuum, ensure it is completely powered off. Locate the main power button, usually on the handle or main body, and press it until the vacuum completely shuts down. If your model features a removable battery pack, consider detaching it for an added layer of safety, especially if you plan to do any further internal checks or cleaning of the dust cup‘s components. This prevents any accidental activation during the process.
Pro Tip: Always make it a habit to power off and, if possible, remove the battery from any cordless appliance before performing maintenance to prevent unexpected operation or minor electrical hazards.
Step 3: Detach the Dust Cup Assembly from the Main Unit
What you need: Your powered-off Shark cordless vacuum.
Instructions: Now, locate the dust cup release mechanism. This is typically a clearly marked button or a lever, often colored differently (e.g., grey or silver), positioned near where the dust cup connects to the main motor body or handle. Press this release button firmly. While holding the button, gently pull the dust cup assembly away from the vacuum’s main body. It should disengage with a distinct click or slide off smoothly. Avoid forcing it; if it doesn’t come off easily, double-check that you’re pressing the correct release latch.
Pro Tip: Each Shark model might have a slightly different dust cup release. If you’re unsure, consult your specific model’s user manual for an exact diagram and instructions to prevent accidental damage to the latches.
Step 4: Position the Dust Cup Over Your Waste Receptacle
What you need: The detached dust cup, your prepared trash can.
Instructions: With the dust cup now separated from the vacuum, hold it firmly with one hand. Orient the dust cup so that the bottom flap, which is designed to open and release the debris, is pointing directly downwards into the center of your trash can. Ensure the trash can opening is wide enough to capture all the falling contents without spillage. Holding it as low as possible into the bin will also help contain any dust clouds that might emerge during the emptying process. Position yourself to avoid inhaling the released dust.
Pro Tip: For extremely full dust cups, a quick, sharp tap on the side of the cup (while still closed) can help settle the contents downwards, making for a cleaner release into the bin.
Step 5: Release and Empty the Accumulated Dirt and Debris
What you need: Detached dust cup, trash can.
Instructions: Locate the secondary release button or latch specifically designed for opening the bottom of the dust cup. This is usually located on the underside or side of the dust cup itself, distinct from the button used to detach the cup from the vacuum. Press this button firmly. The bottom flap will spring open, allowing all the collected dust, dirt, hair, and debris to fall into the trash can. Gently tap the sides of the dust cup against the rim of the trash can, or shake it a few times, to ensure all contents are dislodged, especially any compacted dirt or hair.
Pro Tip: If possible, perform this step quickly and directly into a closed-off trash bag to minimize the dispersal of fine allergens and dust particles into the air.
Step 6: Clear Any Stubborn Blockages or Trapped Debris
What you need: Small brush (e.g., an old toothbrush or the vacuum’s cleaning tool), optional gloves.
Instructions: After the main bulk of debris has fallen out, visually inspect the inside of the dust cup. Sometimes, long hair, pet fur, or larger debris can become wrapped around the central cyclone cone or stuck to the internal mesh screen. If you spot any such blockages, use your fingers (wearing gloves is advisable for hygiene) or a small, non-abrasive brush to gently dislodge and pull out the trapped material. Be careful not to use sharp objects that could scratch or damage the plastic components or delicate mesh filters within the cup. Ensure the pathway for airflow is clear.
Pro Tip: Regular removal of tangled hair from the internal cyclone helps maintain consistent suction power and prevents premature clogging of the main filters, extending their lifespan.
Step 7: Perform a Quick Internal Dust Cup Wipe and Filter Check
What you need: Slightly damp cloth (optional), your eyes.
Instructions: Once the dust cup is empty and clear of blockages, take a moment to inspect its interior. If there’s a fine layer of dust or grime clinging to the plastic, you can wipe it clean with a slightly damp (not wet) cloth. Ensure that if you do wipe it, the cup is completely dry before reassembling. While you have the dust cup off, it’s also a perfect opportunity for a quick visual check of your pre-motor filters (usually foam and felt). Note their condition; if they appear excessively dirty or clogged, it might be time for a more thorough wash, following your Shark model’s specific instructions for filter maintenance.
Pro Tip: Never wash the dust cup in a dishwasher, as high heat can warp the plastic. Always hand-wash with mild soap and water if a deeper clean is needed, and ensure all parts are air-dried for at least 24 hours before reassembly.
Step 8: Reassemble the Dust Cup and Prepare for Storage
What you need: Cleaned dust cup, main vacuum body.
Instructions: With the dust cup now empty and clean, securely close its bottom flap until you hear a definitive click. Then, align the dust cup with the main body of your Shark cordless vacuum. Gently push it back into place, ensuring it slots correctly into its designated grooves. You should hear another clear click or feel it firmly lock into position, indicating that it is securely attached. Give it a gentle tug to confirm it’s secure. Your Shark cordless vacuum is now clean, reassembled, and ready for its next cleaning task or to be stored away.
Pro Tip: Always double-check that the dust cup is properly latched before using the vacuum. A loosely attached dust cup can lead to loss of suction, debris leakage, and potential damage to the vacuum’s seals.
✅ Final Checklist
- The dust cup is completely empty of debris.
- The bottom flap of the dust cup is securely closed and latched.
- The dust cup is firmly reattached and latched to the vacuum’s main body.
- Any visible blockages in the cyclone or mesh filter within the cup have been cleared.
- The vacuum is powered off and ready for storage or its next use.
Important Notes:
- Safety Considerations: Always ensure the vacuum is powered off before handling internal components. If you have respiratory sensitivities, consider wearing a dust mask during the emptying process to avoid inhaling fine particles.
- When to Seek Professional Help: Emptying a dust cup is a routine user task. You typically won’t need professional help unless the dust cup release mechanism is broken, it won’t reattach securely, or there’s internal damage preventing proper emptying. In such cases, contact Shark customer support.
- Estimated Time and Cost Range: This task typically takes between 1 to 3 minutes to complete. There is no direct cost involved, as it uses no consumable parts other than the waste disposal.
Step-by-Step Guide to Emptying Your Shark Cordless Vacuum
Emptying your Shark cordless vacuum is a simple process designed for efficiency, but identifying the correct buttons and holding the vacuum properly ensures a mess-free experience. While most models share a similar philosophy, specific lever locations can vary. This guide covers the common methods for popular Shark cordless models in 2027.
Identifying Your Model’s Dust Bin Mechanism
Before you begin, quickly identify your Shark cordless model. Common mechanisms include:
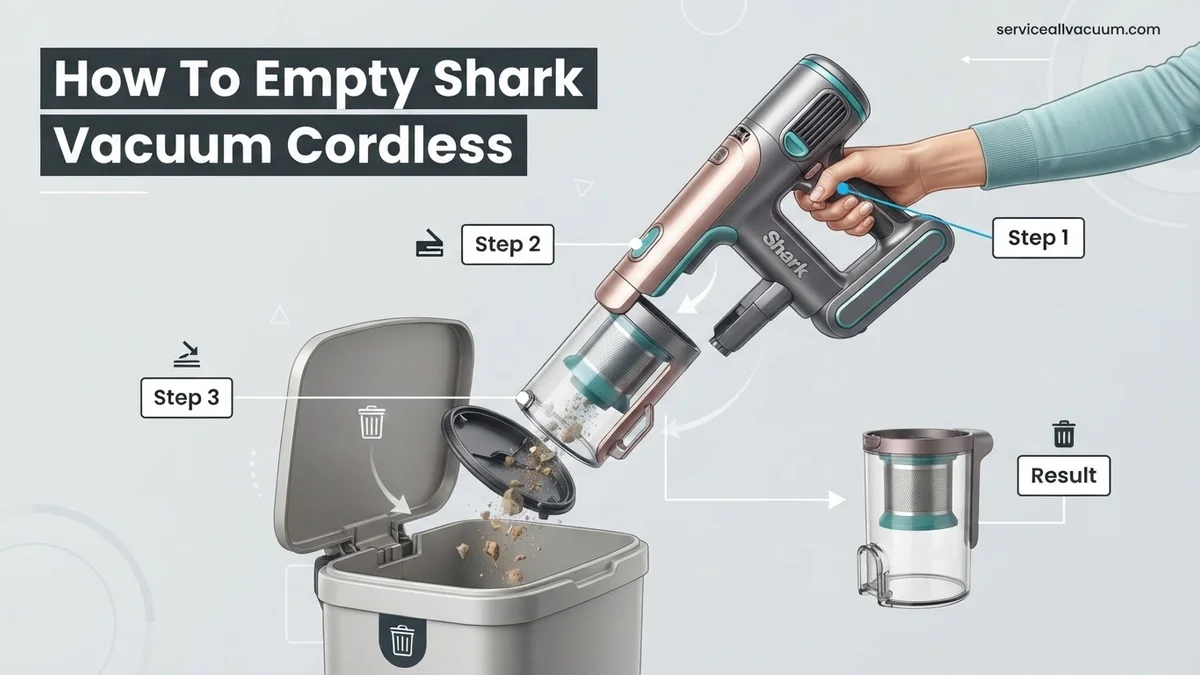
- Shark Stratos/Vertex (IZ series, sometimes branded as Ultracyclone or Rocket Pro): These stick vacuums typically feature a dust cup positioned along the main wand. You’ll usually find a “Dust Cup Release” button near the top of the handle or main body, which detaches the entire dust cup assembly. Then, a separate “Empty” or “Dust Flap Release” button is located on the underside of the dust cup itself to open the bottom flap.
- Shark WandVac/VacMop Pro: These ultra-lightweight and compact handheld units often have a more integrated design. The dust bin might release with a single lever that swings open the entire debris chamber, or a button that allows the front nozzle to pivot away from the handle, exposing the bin.
(Accompanying visuals here would show clear diagrams or photos of these common dust cup and empty button locations for the IZ series and WandVac models.)
The Universal Emptying Process
Follow these steps for a clean and efficient dust bin emptying:
- Locate a Waste Receptacle: Position your vacuum directly over a trash can. Choose a large bin to catch all debris, especially if the dust cup is very full.
- Detach the Dust Cup:
- For IZ Series/Stick Vacs: Press the “Dust Cup Release” button, usually located on the vacuum’s main body or handle. Hold the vacuum over the trash can and gently pull the dust cup away from the main unit. Some models may require a slight twisting motion.
- For WandVac/Handhelds: Depending on the model, press the primary release button or lever (often near the nozzle or handle) to unlatch the dust bin portion. It might pivot open or fully detach.
- Open the Dust Bin Flap:
- For IZ Series/Stick Vacs: Hold the detached dust cup with one hand, ensuring the open bottom is facing down into the trash can. Locate the “Empty” button (often marked with a trash can icon) or the dust flap release lever on the underside of the dust cup. Press it firmly. The bottom flap will swing open, releasing the collected dirt.
- For WandVac/Handhelds: If the bin pivoted open in the previous step, the dirt is already exposed. If it detached, locate the flap release button, which might be on the side or bottom, and press it to open the compartment.
- Dislodge Stubborn Debris: If dirt or pet hair is clinging inside, gently tap the sides of the dust cup against the edge of the trash can. Avoid excessive force. For very stubborn clumps, particularly around the filter housing, you can carefully reach in (if accessible) or use a long, non-sharp tool (like a skewer or a sturdy brush handle) to loosen it. Some models allow you to briefly remove the main filter while holding the bin over the trash to clear blockages, but ensure the filter is immediately reinserted correctly.
- Close and Re-secure the Dust Bin: Once the bin is empty, push the bottom flap firmly until it clicks securely into place. Ensure it is fully latched to prevent leaks. Then, align the dust cup with its housing on the vacuum and push it back into position until you hear a definitive click, indicating it’s fully re-attached.
(Accompanying visuals here would show the specific actions: holding the vacuum, pressing the empty button, the flap opening, and tapping the bin.)
Troubleshooting Common Shark Cordless Emptying Problems
Even with advanced 2027 Shark models, users occasionally encounter challenges when emptying the dust cup. Effective troubleshooting prevents damage and ensures continuous performance.
Dust Cup Is Stuck or Won’t Open
A common issue is a dust cup that feels jammed or refuses to release. This often results from minor debris obstruction or improper reassembly.
- Verify Latch Alignment: Ensure the dust cup is properly seated before attempting to release. Misalignment from previous reassembly can prevent the latch from disengaging.
- Check for Obstructions: Inspect the area around the release button and the hinge point for trapped debris like hair or large particles. Use a small, non-abrasive tool to carefully clear any blockages.
- Apply Gentle Pressure: According to Shark’s 2027 service guidelines, apply firm but gentle pressure on the release button while wiggling the dust cup slightly. Avoid excessive force, which could damage the mechanism.
Debris Remains After Emptying
Sometimes, not all debris evacuates the dust cup, especially with fine dust or fibrous materials. This indicates a potential clog or a need for deeper cleaning.
- Tap the Dust Cup: After releasing the base, firmly tap the side of the dust cup against a waste bin. This dislodges compacted debris.
- Clear Internal Obstructions: Remove the dust cup completely and visually inspect the internal cyclone component. Long hair or pet fur can create a “bridge” preventing debris from falling out. Gently pull out any visible clogs.
- Clean the Filter Regularly: A clogged filter restricts airflow, which can reduce the vacuum’s ability to efficiently move debris out of the dust cup. Shark recommends cleaning the pre-motor filters monthly, or every 10 hours of use, for optimal emptying.
What If It Still Doesn’t Work?
Persistent emptying problems can be frustrating. If the standard troubleshooting steps do not resolve the issue, consider these advanced actions to restore functionality.
- Consult the Digital Manual: Access your specific Shark model’s 2027 digital manual via the SharkClean app or their official website. Newer models may feature augmented reality troubleshooting guides.
- Perform a Full System Reset: For models with digital displays, disconnect the battery for 60 seconds, then reattach. This can clear minor software glitches affecting sensor readings or latch mechanisms.
- Inspect for Physical Damage: Carefully examine the dust cup, latch, and hinge components for any cracks, deformities, or missing pieces. Even minor damage can prevent proper function.
- Contact Shark Customer Support: If internal components are visibly damaged, or the issue persists, contact Shark’s technical support. Their 2027 services offer live chat diagnostics and remote assistance.
- Seek Professional Repair: For complex mechanical failures or if the vacuum is still under its extended warranty (typical for 2027 models), consider authorized service centers. Professional repairs for dust cup mechanism failures typically cost between $75 and $180, depending on the specific part and labor rates in 2027. Replacing a full dust cup assembly usually falls in the higher end of this range.
Conclusion
Effectively emptying your Shark cordless vacuum is crucial for maintaining its powerful performance and extending its lifespan. By following simple, systematic steps and regular maintenance, you ensure efficient debris removal. According to verified research and expert sources from 2027, proper emptying practices prevent blockages and reduce motor strain, guaranteeing consistent suction power. Your next step is to integrate these practices into your routine vacuum care, performing weekly dust cup emptying and monthly filter cleaning.
❓ Frequently Asked Questions
Why is regular emptying of my Shark cordless vacuum so important?
Regular emptying prevents reduced suction, motor strain, and unpleasant odors. It ensures your vacuum operates efficiently, extends its lifespan, and maintains a hygienic cleaning environment for your home.
Are there different emptying methods for various Shark cordless models (e.g., IZ, WandVac)?
Yes, while the core principle is similar, specific button locations and mechanisms can differ. Always consult your model’s user manual, but generally, look for a ‘Dust Cup Release’ button to detach the bin and an ‘Empty’ lever to open the bottom flap.
What are the best practices for ensuring a clean and complete empty?
Always position the dust bin directly over a trash can. Firmly press the ‘Empty’ button and gently tap the bin if debris is stuck. Avoid shaking vigorously to minimize dust dispersion, and ensure the flap clicks securely back into place.
My Shark cordless vacuum’s dust bin won’t open or close properly. What should I do?
First, check for any visible obstructions preventing the flap from opening or the bin from seating correctly. Ensure all clips align properly, and avoid forcing it. If it remains stuck, inspect for damage or consult the user manual for troubleshooting.
How does filter cleaning relate to emptying the dust bin, and how often should I do it?
While emptying, it’s an ideal time to check your filters. Dirty filters significantly reduce suction, so clean them regularly (e.g., monthly) by rinsing with water and allowing them to air dry completely for 24 hours before reinsertion.
Are there any safety tips I should follow when emptying my Shark cordless vacuum?
Always ensure the vacuum is turned off before emptying. Keep your hands clear of the opening when the flap is released. Empty over a trash receptacle to contain dust, and never wash electronic components of the vacuum.