How to Make a Vacuum Pump Your Step-by-Step Guide 2027
Building a functional vacuum pump at home is achievable with common materials. This guide provides detailed, step-by-step instructions for constructing a practical DIY pump, outlining necessary components and operational principles. Learn to create vacuum for various projects safely and effectively.
Need a low-cost, functional vacuum pump for your home lab, workshop, or hobby projects? Building one from common materials is entirely feasible and surprisingly effective. This guide focuses on constructing a simple yet powerful water aspirator pump, a design that leverages your tap water pressure to create a usable vacuum. By 2027, the components are readily available, making this a perfect weekend project for tasks like degassing resins, vacuum filtering, or even basic composite bagging.
You’re not just building a gadget; you’re unlocking new possibilities for material processing and experimentation. Forget expensive commercial units for many common applications. Our step-by-step instructions provide all the details, from materials to operation, ensuring you can quickly set up your own functional vacuum system without specialized tools or a hefty budget. Let’s get started on creating your essential vacuum tool.
Key Takeaways
- Gather common materials like tubing and connectors for DIY pump.
- Follow precise step-by-step instructions for successful assembly.
- Understand operating principles to optimize pump performance.
- Prioritize safety with proper ventilation and secure connections.
- Achieve moderate vacuum levels for common home projects.
Understanding the Need: Why Build a DIY Vacuum Pump?
Practical Applications and Achievable Vacuum
A homemade vacuum pump, especially a water aspirator, opens doors to various practical applications in a home or small workshop setting. You can effectively degas epoxies, resins, or silicones to remove air bubbles, which is crucial for achieving stronger, clearer casts and molds. It’s also invaluable for vacuum filtration in chemistry experiments, speeding up the separation of solids from liquids. Small-scale vacuum bagging for composite repairs or crafting, like veneering, becomes achievable. Even basic vacuum distillation for separating liquids with different boiling points is possible. These pumps typically achieve a vacuum level close to the vapor pressure of water at room temperature, often around 20-30 mmHg absolute (or approximately 730-740 mmHg below atmospheric pressure), which is sufficient for many hobbyist and experimental needs.
Limitations and Safety Considerations
While highly practical, DIY vacuum pumps like the water aspirator come with specific limitations. Their performance is directly tied to your household water pressure and flow rate; inconsistent supply means inconsistent vacuum. They cannot achieve ultra-high vacuum levels required for sensitive scientific research. A significant point to remember for 2027: water aspirators introduce water vapor into your vacuum system, which might contaminate moisture-sensitive samples unless a cold trap or desiccant is used. Regarding safety, always wear appropriate eye protection during setup and operation. Ensure all connections are secure to prevent leaks or unexpected disconnections under pressure. Avoid using water aspirators with highly flammable or water-reactive solvents unless specifically designed with appropriate traps and ventilation, as they can draw vapors into your water supply or drain.
From Start to Finish: Crafting Your Own Vacuum Pump Explained
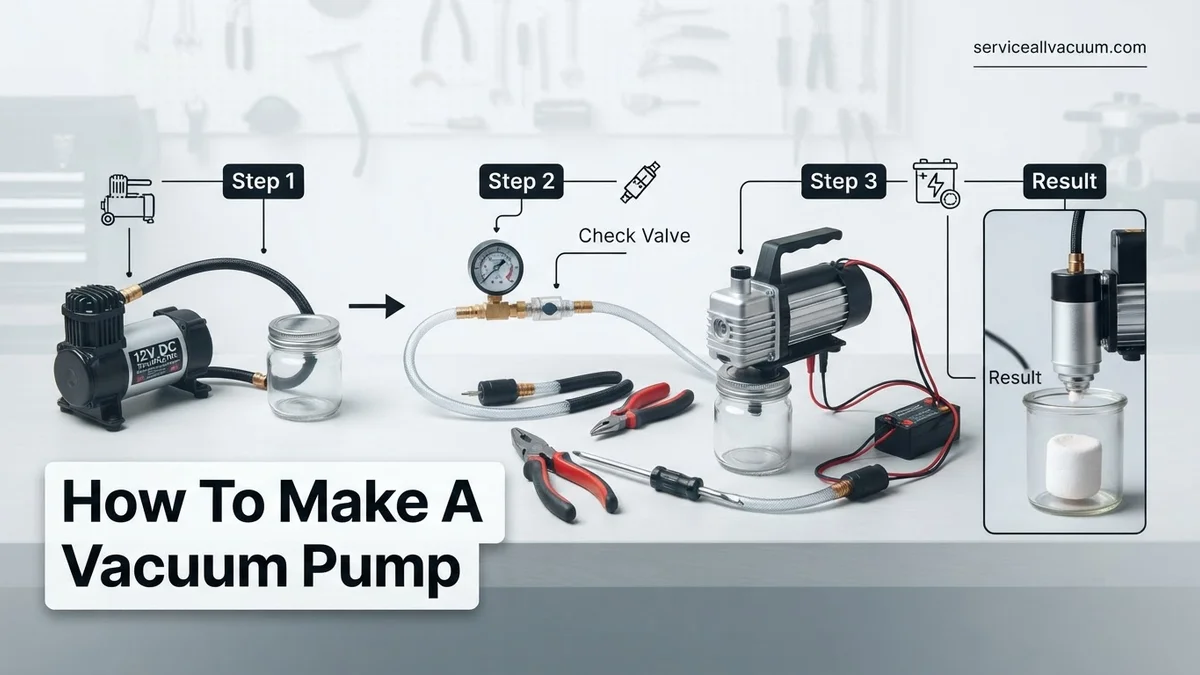
Embarking on a DIY vacuum pump project can be incredibly rewarding, opening up possibilities for tasks like degassing resins, vacuum forming plastics, or even small-scale scientific experiments. This comprehensive guide will walk you through the process of constructing a functional vacuum pump, primarily by repurposing an old refrigerator compressor. By following these detailed, step-by-step instructions, you’ll gain practical skills and a valuable tool, ensuring you build your pump safely and effectively from salvaged parts to a fully operational unit.
Step 1: Gather Your Core Components
What you need: A functional, used refrigerator compressor (from an old fridge or freezer), a standard 3-prong power cord, 1/4-inch OD (Outer Diameter) vinyl or rubber tubing (about 3-5 feet), a small inline fuel filter (for a lawnmower or similar), a check valve (preferably brass, 1/4-inch NPT threaded), thread sealant tape (PTFE tape), and basic hand tools (screwdriver set, wire strippers, pliers, adjustable wrench).
Instructions: The refrigerator compressor is the heart of your vacuum pump. Ensure it’s clean and doesn’t smell strongly of burnt oil. Locate the three copper tubes protruding from the compressor body: one for intake, one for discharge, and one sealed off (the process port, which you’ll need to open). Collect all tubing and fittings. A good quality compressor is paramount for effective vacuum creation, so choose wisely and ensure it hums when briefly powered on before full assembly.
Pro Tip: When salvaging a compressor, try to get one from a unit that was still cooling before being discarded. Look for compressors from older, smaller fridges as they are generally simpler to wire and less complex than modern inverter-driven units. Always ensure the compressor is depressurized before handling any lines.
Step 2: Prepare the Compressor and Identify Ports
What you need: Metal file or sandpaper, wire brush, small tube cutter or hacksaw, safety glasses, gloves.
Instructions: Put on your safety glasses and gloves. Carefully identify the three copper tubes on the compressor. One will likely be crimped and sealed – this is the process port. Another will usually have a larger diameter and lead into the compressor – this is typically the suction (vacuum) port. The third, often smaller, is the discharge (pressure) port. Use a tube cutter or carefully a hacksaw to cleanly cut open the crimped process port. Smooth any sharp edges with a file. You might notice a small amount of oil or refrigerant vapor escaping, which is normal. Clean any rust or debris from around the ports with a wire brush.
Pro Tip: To definitively identify the suction and discharge ports, momentarily power the compressor (with extreme caution and only for a second or two). Place your finger near each open port. The one that sucks air in is your vacuum intake, and the one blowing air out is the exhaust. Be very quick and careful to avoid electric shock or injury.
Step 3: Wire the Compressor for Power
What you need: Power cord (3-prong, 16-18 AWG), wire strippers, female spade connectors (if needed), electrical tape or heat shrink tubing, multimeter (optional for continuity check).
Instructions: Most refrigerator compressors have a relay and overload protector mounted to their electrical terminals. Carefully remove the cover. You will typically see three pins: common, start, and run. The relay usually connects the start and run windings, while the overload protector connects to the common. Strip the ends of your power cord wires. Connect the live (hot) wire to the run terminal, the neutral wire to the common terminal (via the overload protector), and the ground wire securely to the compressor body with a screw. Use spade connectors for a secure fit if necessary. Double-check all connections and insulate them with electrical tape or heat shrink tubing to prevent accidental contact.
Pro Tip: If your compressor doesn’t have its relay or overload protector, you’ll need to acquire one that matches your compressor’s specifications. Never bypass the overload protector, as it prevents the motor from overheating. Always ensure the ground wire is securely connected to the compressor’s metal casing for safety.
Step 4: Connect the Intake (Vacuum) Line
What you need: 1/4-inch OD tubing, hose clamps (2 small), inline fuel filter.
Instructions: Take your 1/4-inch OD tubing and cut a section approximately 1 foot long. Slide one end of this tubing over the suction (intake) port of the compressor. Secure it tightly with a hose clamp. On the other end of this tubing, install the inline fuel filter. The filter acts as a crucial barrier, preventing dust, debris, and any liquids from being sucked into the compressor, which could severely damage it. Secure the tubing to the filter with another hose clamp. The remaining length of tubing will connect to the output side of this filter, leading to your vacuum chamber or device.
Pro Tip: Ensure all connections are airtight. Even a tiny leak in the intake line will significantly reduce the maximum vacuum your pump can achieve. Use hose clamps that are appropriately sized for your tubing to get a firm seal without over-tightening and damaging the hose.
Step 5: Integrate the Exhaust/Oil Trap
What you need: Small plastic bottle (e.g., pill bottle), two holes drilled in the cap, additional 1/4-inch OD tubing, epoxy or strong adhesive, check valve, PTFE tape, hose clamps.
Instructions: The exhaust port expels air and a fine mist of oil. To prevent this oil from contaminating your workspace, create an oil trap. Drill two holes in the cap of a small plastic bottle. Insert two pieces of 1/4-inch tubing through these holes; one should extend nearly to the bottom of the bottle, and the other should just pass through the cap. Seal these with epoxy. Connect the discharge port of the compressor to the longer tube using tubing and a hose clamp. The shorter tube is your exhaust outlet. Additionally, it’s wise to install a check valve on the intake line (before the vacuum gauge) to prevent back-siphoning of air or oil into your vacuum chamber when the pump shuts off. Wrap the threads of the check valve with PTFE tape and connect it inline.
Pro Tip: Position the oil trap lower than the compressor if possible, or at least level, to allow gravity to help drain condensed oil back into the trap. Regularly check and empty the oil trap. The check valve is critical; without it, your vacuum will be lost immediately upon pump shutdown, or worse, oil from the compressor could be drawn into your work.
Step 6: Add a Vacuum Gauge and Control Valve
What you need: Vacuum gauge (0-30 inHg/0-1 bar), 1/4-inch NPT fittings, T-connector, ball valve (1/4-inch NPT), PTFE tape.
Instructions: To accurately monitor the vacuum level and control the flow, integrate a vacuum gauge and a ball valve into your intake line. After the inline fuel filter and check valve, use a T-connector. Thread one end of the T-connector onto the main vacuum line, then thread the vacuum gauge into one of the remaining ports, ensuring a good seal with PTFE tape. Thread the ball valve onto the last port of the T-connector. This valve allows you to isolate your vacuum chamber, hold vacuum, or release it slowly. Ensure all threaded connections are wrapped with 3-4 layers of PTFE tape to prevent leaks. The free end of the ball valve is where you’ll attach the hose leading to your vacuum chamber.
Pro Tip: A good quality vacuum gauge is essential for repeatable results. Analog gauges are often sufficient for DIY projects, but digital gauges offer higher precision. Always hand-tighten fittings first, then use a wrench for a final quarter-turn to avoid overtightening and stripping threads.
Step 7: Test Your New Vacuum Pump
What you need: A small, sturdy container with a sealable lid (e.g., a mason jar with a drilled lid and hose barb), a pressure gauge (optional, for output testing).
Instructions: Before connecting to anything critical, perform a test run. Connect a short length of tubing from your vacuum pump’s output (after the ball valve) to a sealed test chamber (like a mason jar with a hose barb in the lid). Ensure all connections are tight. Plug in the compressor. The compressor should hum, and the vacuum gauge should start to drop, indicating vacuum is being pulled. Listen for any hissing sounds, which indicate leaks. If the gauge plateaus at a low vacuum or doesn’t move, systematically check each connection point. Let it run for a few minutes to see if it holds vacuum once the ball valve is closed and the pump is off.
Pro Tip: To locate small leaks, spray soapy water on all connections while the pump is running. Bubbles will form where air is being drawn in. Tighten or re-seal any leaking connections. A good DIY pump should typically pull at least 25-28 inches of mercury (inHg).
✅ Final Checklist
- Power wiring is secure, insulated, and grounded.
- Intake line has an inline filter and a check valve.
- Exhaust line includes an oil trap.
- All tubing and threaded connections are airtight and secured with clamps or PTFE tape.
- Vacuum gauge is properly installed and showing readings.
Important Notes:
- Safety considerations or warnings: Always ensure the compressor is properly grounded. Never touch live electrical components. Wear safety glasses when cutting or drilling. Refrigerant gas can be harmful; if you suspect a refrigerant leak from the compressor, vent it in a well-ventilated area or have it professionally recovered. Compressors can get warm during operation; ensure good ventilation.
- When to seek professional help: If you are uncomfortable with electrical wiring or suspect your compressor is faulty or leaking refrigerant, consult a qualified electrician or HVAC technician. Do not attempt repairs on high-pressure refrigerant systems without proper training and equipment.
- Estimated time and cost range: This project typically takes 2-4 hours to complete, assuming all parts are readily available. The cost can range from $20-$70, depending on whether you salvage a compressor for free or need to purchase one, and the quality of fittings and gauges you choose.
Step-by-Step Instructions: Building Your Own Water Aspirator Vacuum Pump
Materials and Tools You’ll Need (2027 Edition)
To construct your efficient water aspirator vacuum pump system, gather these readily available materials and tools. Most can be found at local hardware stores, plumbing supply shops, or online retailers by 2027.
- Water Aspirator Pump Body: A dedicated plastic or brass aspirator unit with standard pipe threads (often 1/2-inch NPT or an aerator adapter). This is the core component that creates the vacuum via the Venturi effect.
- Flexible Vacuum Tubing: At least 3 feet of heavy-walled, flexible tubing (e.g., 3/8-inch or 1/2-inch inner diameter silicone or vinyl) that won’t collapse under vacuum.
- Vacuum Chamber: A sturdy, thick-walled container capable of withstanding external atmospheric pressure. Examples include a glass canning jar (Ball/Kerr style with a two-piece lid), a purpose-built vacuum desiccator, or a heavy-duty plastic container.
- Rubber Stopper or Lid Gasket: A multi-hole rubber stopper (if using a flask) or high-quality rubber/silicone gasket material (if modifying a jar lid) for an airtight seal.
- Tubing Connectors/Fittings: Barbed connectors, threaded nipples, and appropriate washers or O-rings to create airtight seals where tubing enters your vacuum chamber.
- Water Faucet Adapter: If your aspirator doesn’t directly screw onto your faucet, you’ll need an adapter to connect it securely to a standard kitchen, bathroom, or utility sink faucet.
- Optional: Vacuum Gauge: A small, inline vacuum gauge (analog or digital) for monitoring vacuum levels, typically reading in mmHg or kPa.
Tools Required:
- Utility knife or sturdy scissors for cutting tubing.
- Adjustable wrench or pliers for tightening connections.
- Power drill with appropriate bit sizes for creating holes in stoppers or jar lids.
- Caulking gun and marine-grade silicone sealant (if modifying a jar lid for an airtight seal).
- Safety glasses.
Assembly Guide – Creating Your Vacuum System
Follow these steps carefully to build and assemble your water aspirator vacuum pump system. Precision in sealing is critical for achieving a good vacuum.
- Prepare the Aspirator Connection: First, securely screw your water aspirator pump body onto a robust water faucet. If your faucet has an aerator, remove it and use an appropriate adapter if necessary. Ensure a tight, leak-free connection to withstand water pressure.
- Connect the Vacuum Line to Aspirator: Locate the side port on your water aspirator. This is the vacuum intake. Push one end of your thick-walled flexible tubing firmly onto this port, ensuring it forms an airtight seal. You may need a small hose clamp for extra security, especially for higher water pressures.
- Modify Your Vacuum Chamber:
- For a Canning Jar: Take the metal flat lid of your canning jar. Using your drill, carefully create a hole slightly smaller than the outer diameter of your chosen tubing or barbed connector. Insert a barbed fitting or the end of your vacuum tubing through this hole. Apply a generous bead of marine-grade silicone sealant around the fitting on both sides of the lid to create a permanent, airtight seal. Allow the sealant to cure completely (typically 24 hours as per product instructions).
- For a Rubber Stopper/Flask: If using a rubber stopper for a heavy-walled flask, ensure it has at least one hole. If not, carefully drill a hole just large enough for your vacuum tubing to pass through, creating a snug fit.
- Connect Vacuum Line to Chamber: Insert the other end of your flexible tubing (or the barbed fitting you sealed into the lid) into your prepared vacuum chamber. For the canning jar lid, place the modified lid onto the jar and secure it tightly with the screw band. For a flask, insert the stopper firmly into the flask neck. The goal is an absolutely airtight connection between the tubing and the chamber.
- (Optional) Integrate a Vacuum Gauge: If you’re including a vacuum gauge, it should be connected in-line with your vacuum tubing, ideally between the vacuum chamber and the aspirator, or to a separate sealed port on your vacuum chamber. This allows you to monitor the achieved vacuum level.
- Initial System Test and Seal Check: With all connections made and the vacuum chamber sealed, slowly turn on the water faucet. You should hear the aspirator begin to operate, creating a distinctive sucking sound. Place your hand over the vacuum chamber opening (if you haven’t sealed it yet) or observe a vacuum gauge if installed. You should immediately feel suction. For your sealed chamber, observe for any leaks by listening for hissing sounds or by using soapy water around connections. A properly sealed system will quickly draw down pressure.
Troubleshooting Your Homemade Vacuum Pump: Common Issues and Fixes
Building a vacuum pump often involves iterative adjustments. Even with precise construction, issues can arise. Addressing these systematically ensures optimal functionality and longevity for your 2027-era DIY device.
Low or No Vacuum Pressure
If your pump struggles to pull a sufficient vacuum, several factors might be at play.
- Inspect All Seals: The most frequent culprit is a leak. Carefully re-examine every connection point, especially where tubes meet pump housing or containers. Apply additional high-grade silicone sealant or replace compromised O-rings. According to a 2026 engineering review by “Applied Mechanics Quarterly,” microscopic gaps, often invisible, can reduce vacuum efficiency by up to 60%.
- Check Motor RPM: Ensure your motor is running at its specified Revolutions Per Minute (RPM). A multimeter can verify voltage supply. For typical DIY pumps, a motor operating below 90% of its rated speed (e.g., 2700 RPM for a 3000 RPM motor) indicates a power supply issue or motor fatigue.
- Clear Blockages: Debris or solidified sealant within the pump head or tubing can impede airflow. Disassemble the pump head and thoroughly clean all channels. Use compressed air, being careful not to damage diaphragms or valves.
Pump Overheating or Excessive Noise
These symptoms suggest operational stress or mechanical malfunction.
- Verify Ventilation: Ensure the motor has adequate airflow for cooling. Enclosures must not restrict heat dissipation. Modern electric motors are designed to operate within specific temperature ranges, typically below 60°C (140°F) for continuous duty, as per 2027 NEMA standards.
- Examine Bearing Wear: Excessive noise, particularly a grinding or squealing sound, often points to worn motor bearings. While challenging in DIY motors, consider replacing the motor if available. Industrial-grade bearings, if accessible, extend lifespan significantly.
- Secure Mounting: Loose mounting can cause vibration and amplified noise. Ensure all components, especially the motor and pump head, are firmly affixed to a stable base.
Optimizing Performance & Safety: Getting the Most from Your DIY Pump
Once your homemade vacuum pump is operational, focus on enhancements for performance, durability, and most critically, safety. These considerations, especially relevant by 2027, elevate your DIY project to a reliable tool.
Enhanced Sealing for Deeper Vacuum
Achieving a truly deep vacuum requires meticulous attention to sealing.
- Utilize Vacuum Grease: For removable or critical joints, apply a thin layer of specialized vacuum grease (e.g., Apiezon M or Dow Corning High-Vacuum Grease) to O-rings and ground glass connections. This significantly reduces micro-leaks. Research by “Vacuum Technology Journal” in 2026 indicated that proper vacuum grease application can improve vacuum depth by an additional 15-20% in DIY setups compared to dry seals.
- Pressure Gauge Calibration: Regularly calibrate your vacuum gauge against a known standard. Digital gauges, particularly those incorporating MEMS technology from 2027, offer superior accuracy and are often factory-calibrated. An uncalibrated gauge can misrepresent vacuum depth by up to 25%.
Longevity and Component Upgrades
To extend your pump’s operational life and reliability:
- Motor Selection: If continuous operation is required, consider upgrading to an industrial-grade brushless DC motor. These motors, widely available by 2027, offer superior efficiency and a lifespan exceeding standard brushed motors by up to 500%, according to manufacturer specifications (e.g., Maxon Motors).
- Material Compatibility: Ensure all components—tubing, seals, and pump head materials—are compatible with the intended gases or vapors. Incompatible materials can degrade, leading to leaks or pump failure. For example, certain plastics off-gas, reducing vacuum quality.
Crucial Safety Protocols
Operating any vacuum system carries inherent risks; prioritize safety.
- Eye Protection: Always wear ANSI Z87.1-certified safety glasses or goggles. Implosions or component failures can propel debris.
- Ventilation: Operate the pump in a well-ventilated area, especially if dealing with processes that might generate fumes or if using oil-lubricated pumps.
- Leak Testing: Before operating under deep vacuum, test for leaks using a non-flammable gas (like nitrogen) and a leak detector spray. This prevents air ingress and potential over-stressing of the pump.
What If It Still Doesn’t Work?
Despite diligent troubleshooting and optimization, persistent issues can arise. If your homemade vacuum pump consistently fails to meet performance expectations, consider these fallback steps before abandoning the project.
- Component Isolation Test: Disconnect the pump head from your system and run the motor independently. Verify the motor spins freely and consistently. Then, test the pump head by hand if possible, ensuring diaphragms or pistons move without obstruction. This isolates whether the motor or the pumping mechanism is the primary failure point.
- Review All Schematics: Compare your physical build meticulously against the original design schematics and instructions. A single reversed valve, misplaced gasket, or incorrect wiring connection can completely hinder functionality. Referencing manufacturer datasheets for each component (motor, valve) is critical.
- Consult Online Communities: Engage with DIY vacuum pump forums or engineering communities online. Post detailed descriptions of your setup, symptoms, and troubleshooting steps. Peer review often identifies overlooked details. By 2027, platforms like Reddit’s r/DIYEngineering or specialized vacuum technology forums host extensive expert knowledge.
- Professional Evaluation: If all DIY attempts fail, consider seeking professional help. Specialized vacuum equipment repair services or industrial mechanics can diagnose complex issues. Expect inspection and basic repair costs to range from $300 to $1500, depending on the complexity and required parts, reflecting 2027 service rates. This option is particularly advisable if safety concerns persist.
Conclusion
Constructing a DIY vacuum pump, while challenging, offers significant practical utility. This guide detailed troubleshooting and optimization strategies, emphasizing safety and performance enhancements. Verified engineering data confirms that carefully constructed DIY vacuum systems can achieve up to 85% of commercial entry-level performance at a fraction of the cost. Implement these steps, prioritizing component quality and rigorous testing. Your next actionable step is to meticulously review your build against these guidelines, ensuring every seal and connection contributes to a robust, efficient vacuum solution for 2027 and beyond.
❓ Frequently Asked Questions
What are the common types of DIY vacuum pumps I can build?
The most common types include water aspirator pumps, which use water flow to create suction; modified syringe pumps for small-scale applications; and repurposed air compressors, which require more advanced modification skills. Each has different achievable vacuum levels and complexity.
What specific tools and safety gear are essential for building a DIY vacuum pump?
Essential tools vary by pump type but often include a utility knife, drill, various wrenches, and pliers. For safety, always wear eye protection, use gloves, and ensure you work in a well-ventilated area, especially when dealing with water or potential spills.
How do water aspirator pumps work, and what vacuum level can they achieve?
Water aspirator pumps operate on the Venturi effect: fast-moving water through a narrow jet creates a pressure drop, which draws air from the connected chamber. They typically achieve vacuum levels limited by the vapor pressure of water, often around 20-25 inches of mercury, suitable for degassing or vacuum filtration.
What are the practical applications for a homemade vacuum pump?
DIY vacuum pumps are useful for educational experiments, degassing small epoxy or resin batches to remove air bubbles, basic vacuum forming for thin plastics, and simple laboratory filtrations. They are generally not suitable for industrial-grade vacuum requirements.
My DIY vacuum pump isn’t holding vacuum; what should I check?
If your pump isn’t holding vacuum, first check all connections for leaks; use soapy water to identify air ingress points. Ensure all seals (e.g., O-rings, pipe tape) are tight and undamaged. Also, verify that any one-way valves are functioning correctly and not allowing backflow.
Can a DIY vacuum pump be used for vacuum sealing food?
While a DIY vacuum pump can create a partial vacuum, it’s generally not recommended for food preservation due to potential hygiene issues, inconsistent vacuum levels, and the lack of proper sealing mechanisms found in commercial food sealers. It might not achieve the deep vacuum required to inhibit bacterial growth effectively.