How to Vacuum Pack a Mattress Expert Step-by-Step Guide 2027
Vacuum packing a mattress is an effective way to save significant space and protect it during moves or storage. This process requires a heavy-duty mattress vacuum bag and careful attention to sealing, ensuring proper compression and preventing damage to certain mattress types like innerspring.
How to Vacuum Pack a Mattress Expert Step-by-Step Guide 2027
Vacuum packing a mattress is a highly effective way to significantly reduce its size, making it far easier to move, store, or ship. This process, when executed correctly with the right tools and techniques, can shrink your mattress by 70-80% of its original volume, transforming an unwieldy item into a manageable package. Whether you’re relocating your home in 2027, preparing for a temporary storage solution, or simply need to transport a spare bed, mastering this skill protects your investment and simplifies logistics immensely.
This guide provides a precise, step-by-step approach to safely and effectively compress your mattress. We’ll detail every tool you’ll need, explain critical preparation steps, and walk you through the entire compression and sealing process. Pay close attention to mattress compatibility warnings, as not all mattress types can withstand vacuum packing without sustaining damage.
Key Takeaways
- Use specific heavy-duty vacuum bags.
- Innerspring mattresses generally cannot be packed.
- Protect mattress edges with cardboard.
- Remove air slowly and evenly.
- Allow ample re-expansion time.
Why Vacuum Pack Your Mattress?
Compressing your mattress offers several practical advantages beyond just saving space. Understanding these benefits, alongside crucial compatibility information, is key before you begin.
Space-Saving and Protection
The primary benefit of vacuum packing your mattress is the dramatic reduction in its footprint. A king-size mattress, for instance, can become compact enough to fit into a standard SUV or storage unit with ease. This is invaluable for:
- Moving: Frees up significant space in moving trucks or vans, potentially reducing the number of trips or the size of the vehicle needed.
- Storage: Ideal for temporary storage during renovations, long-term storage of a spare bed, or seasonal changes. It protects against dust, moisture, odors, and even insects during prolonged periods.
- Transportation: Simplifies shipping and handling, especially if you’re sending a mattress across long distances or needing to navigate tight doorways.
Mattress Compatibility – Know Before You Compress
Crucial warning: Not all mattresses are suitable for vacuum packing. Attempting to compress the wrong type of mattress can lead to irreversible damage and void your warranty. Before proceeding, confirm your mattress type:
- Memory Foam and Latex Mattresses: These are generally safe to vacuum pack. Their cellular structure allows them to compress and re-expand without permanent damage.
- Innerspring or Hybrid Mattresses: These typically contain coils and complex support systems that can be permanently bent, crimped, or broken under vacuum pressure. Do NOT attempt to vacuum pack these types. The internal structure is not designed for such compression.
Always consult your mattress manufacturer’s guidelines or warranty information first. Some modern hybrid mattresses, specifically designed with pocketed coils and foam layers, might state they are suitable for “bed-in-a-box” shipping, indicating they can be safely compressed. When in doubt, err on the side of caution.
From Start to Finish: Mattress Vacuum Packing Explained
Whether you’re moving house, putting items into long-term storage, or simply need to reclaim some valuable space, vacuum packing a mattress can be an incredibly efficient solution. This comprehensive guide will walk you through each crucial step, transforming your bulky mattress into a compact, manageable package. Following these detailed instructions ensures your mattress remains protected, free from dust and moisture, and significantly reduces its footprint, making your moving or storage process remarkably smoother and less stressful.
Step 1: The Pre-Pack Prep – Cleaning and Clearing
What you need: A powerful vacuum cleaner with attachments (upholstery tool recommended), a clean cloth, mild detergent or upholstery cleaner (optional), a spray bottle with water (optional), and patience.
Instructions: Begin by stripping all bedding from your mattress – sheets, protectors, toppers, and pillows. Give the entire mattress a thorough vacuuming on all sides, paying close attention to seams, crevices, and any tufted areas where dust, skin cells, and debris tend to accumulate. If there are any visible stains, spot-clean them carefully using a mild upholstery cleaner or a damp cloth with a tiny bit of detergent. Ensure the mattress is completely, bone-dry before proceeding to the next step; any moisture trapped inside the vacuum bag can lead to mold or mildew growth.
Pro Tip: Allow at least 24 hours for any damp areas to air dry completely, especially after spot cleaning. Placing it in a well-ventilated room or near a fan can expedite this process. Never pack a damp mattress.
Step 2: Assembling Your Arsenal – Tools and Materials
What you need: A high-quality, heavy-duty mattress vacuum storage bag (ensure it’s the correct size for your mattress), a powerful vacuum cleaner (a shop-vac or a robust household vacuum is ideal), strong packing tape or duct tape, and at least 3-5 heavy-duty tie-down straps or robust ropes (e.g., ratchet straps).
Instructions: The most critical item is the mattress bag. Measure your mattress (length, width, depth) and purchase a bag that is slightly larger in all dimensions to allow for easy placement and sealing. Look for bags specifically designed for mattresses, made from thick, durable plastic to prevent punctures. Next, ensure your vacuum cleaner has good suction and a hose attachment that fits snugly onto the bag’s valve. Gather your straps; these will be essential for keeping the mattress compressed once the air is removed.
Pro Tip: Do not compromise on bag quality. A thin, cheap bag is prone to tears and punctures, which will cause your mattress to re-inflate, negating all your hard work. Invest in a thick, durable bag designed for moving or long-term storage.
Step 3: The Encasement Phase – Bagging the Mattress
What you need: The chosen mattress vacuum storage bag, a clean, spacious area on the floor, and an extra set of hands (highly recommended for larger mattresses).
Instructions: Lay the large mattress bag flat on a clean, clear section of your floor. If possible, position it near where the mattress currently rests. Carefully lift and slide your mattress into the bag. This step often requires two people, especially for queen or king-sized mattresses, to prevent tearing the bag or damaging the mattress. Ensure the mattress is centered within the bag, leaving an even margin of plastic around all sides, particularly at the opening where it will be sealed. Avoid dragging the mattress over rough surfaces that could snag or rip the bag.
Pro Tip: Fold the edges of the bag over themselves to create a wider opening as you slide the mattress in. This reduces friction and makes the insertion smoother. Take your time to avoid accidental tears.
Step 4: Sealing the Deal – Prepping for Air Extraction
What you need: The mattress securely inside its bag, your hands, and perhaps a small cloth to clean the zipper track if needed.
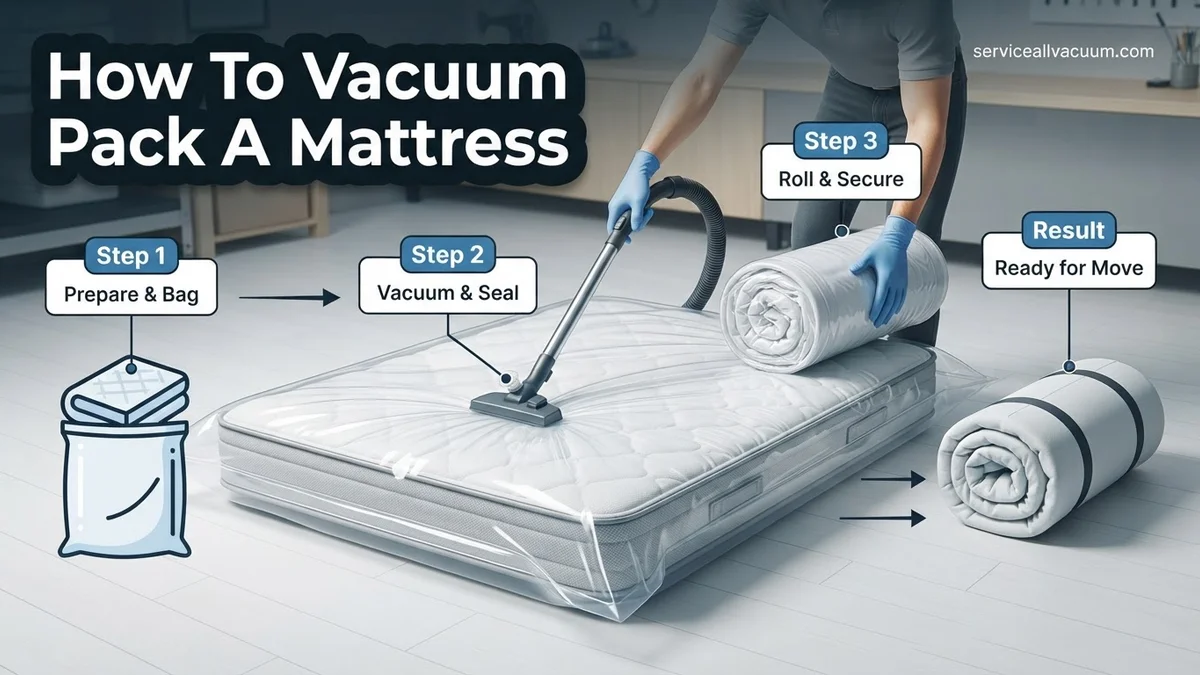
Instructions: Once the mattress is fully inside and centered, it’s time to seal the bag’s opening. Most mattress vacuum bags feature a heavy-duty double zipper seal. Start from one end and firmly press the zipper closure together, working your way across the entire width of the bag. Go over the seal two or three times to ensure it’s completely airtight. Before vacuuming, manually press down on the mattress to expel as much air as you can by hand. This initial manual compression helps reduce the vacuuming time and lessens the strain on the bag during the critical sealing phase.
Pro Tip: As you seal the zipper, push air towards the open end with your hands. Once you reach the end, quickly finish sealing to trap minimal air inside, making the vacuuming process more efficient.
Step 5: The Grand Compression – Vacuuming the Air Out
What you need: Your powerful vacuum cleaner with its hose attachment, and the sealed mattress bag.
Instructions: Locate the air valve on the mattress bag. Remove the protective cap. Attach your vacuum cleaner’s hose securely to this valve, ensuring a tight fit to prevent air leakage. Turn on your vacuum cleaner. You’ll immediately notice the mattress beginning to compress. As it deflates, gently press down or walk (carefully, in socks) on the mattress to help distribute the air extraction evenly and encourage a flatter, more compact shape. Continue vacuuming until the mattress is as flat and rigid as possible, typically reducing its thickness by 70-80%. This process can take several minutes depending on mattress size and vacuum power.
Pro Tip: For memory foam mattresses, compress slowly to avoid damaging the foam structure. For innerspring mattresses, be mindful that too much compression might put stress on the springs, though typically the bag will prevent over-compression. Never stand directly on the valve area during compression.
Step 6: Securing the Form – Strapping for Stability
What you need: The fully compressed mattress, and your heavy-duty tie-down straps or ropes.
Instructions: As soon as the mattress reaches its maximum compression, quickly switch off the vacuum cleaner and immediately replace the valve cap, twisting it tightly to create an airtight seal. Do not delay, as air can rapidly re-enter. Now, apply your tie-down straps. Wrap at least two straps lengthwise (head to foot) and two to three straps widthwise (side to side) around the compressed mattress. Cinch them down as tightly as possible. These straps are crucial; they provide external support, prevent the mattress from expanding if the bag loses its seal, and make it easier to handle and move the now-compacted mattress.
Pro Tip: Position the straps strategically so they don’t impede carrying or lifting. Ensure they are evenly spaced to distribute pressure and maintain the mattress’s compressed state uniformly. If using ratchet straps, be careful not to overtighten to the point of cutting into the plastic.
Step 7: The Final Inspection and Storage
What you need: (Nothing additional).
Instructions: With the mattress fully compressed, sealed, and strapped, perform a final inspection. Check the bag for any signs of punctures, tears, or air hissing from the valve or seams. Listen carefully for any leaks. If you detect a minor leak, you might be able to patch it with durable packing tape, but for significant leaks, you may need to repeat the process with a new bag. Once satisfied, your vacuum-packed mattress is ready for transport or storage. Store it in a dry, climate-controlled environment, ideally off the floor on pallets or risers to protect against potential moisture.
Pro Tip: While compressed, mattresses are more rigid and easier to maneuver. However, they are still heavy. Plan your lifting and moving strategy to avoid injury. Consider using a moving dolly or getting assistance for transportation.
✅ Final Checklist
- Mattress is fully compressed, firm, and significantly reduced in size.
- Vacuum bag is completely sealed, with no visible gaps in the zipper.
- Valve cap is securely tightened, and no air can be heard escaping.
- Tie-down straps are taut, evenly distributed, and securely holding the compression.
- The mattress and bag are free from visible damage or tears.
Important Notes:
- Safety Considerations: Mattresses are heavy even when compressed. Always lift with your legs, not your back, and consider getting help to avoid injury. Be cautious with sharp objects near the plastic bag to prevent punctures.
- When to Seek Professional Help: If you have an extremely heavy or oversized mattress, or if you’re uncomfortable with the physical demands of this task, consider hiring professional movers who have specialized equipment and experience.
- Estimated Time and Cost Range: The entire process typically takes about 30-60 minutes, depending on mattress size and familiarity. The cost primarily involves purchasing a quality mattress vacuum bag and tie-down straps, which can range from $30 to $100 if you don’t already own them.
How to Vacuum Pack a Mattress: Essential Tools & Preparation
Successfully vacuum packing your mattress in 2027 requires the right gear and careful preliminary steps. Don’t skip these crucial preparations.
Gathering Your 2027-Ready Toolkit
Having the correct tools on hand before you start will make the process smooth and efficient:
- Specialized Mattress Vacuum Bag: This is non-negotiable. Do not use standard storage bags. Look for heavy-duty, at least 2-4 mil thick, specific mattress vacuum bags. Ensure it’s the correct size for your mattress (e.g., King, Queen, Full, Twin) with extra allowance for thickness. Quality bags in 2027 often feature reinforced seams and larger, more durable valves.
- Powerful Vacuum Cleaner: A shop vac is ideal for its superior suction and larger hose opening. If using a household vacuum, ensure it has strong suction and a hose attachment that fits snugly over the mattress bag valve.
- Duct Tape or Heavy-Duty Packing Tape: Essential for securely sealing the bag once compressed, and for reinforcing any potential weak points.
- Measuring Tape: To verify your mattress dimensions and select the correct bag size.
- Optional: Ratchet Straps or Strong Rope: These are excellent for providing additional security and stability to the compressed mattress, preventing it from expanding slightly during transport or storage.
Critical Pre-Compression Checks
Before you even unroll the vacuum bag, take these important steps:
- Clean and Dry Your Mattress: Ensure your mattress is completely clean and dry. Any moisture trapped inside the bag can lead to mold, mildew, and unpleasant odors. Allow ample time for it to air out if you’ve recently cleaned it.
- Remove All Bedding and Protectors: Strip the mattress down to its bare surface. Pillows, sheets, mattress protectors, and toppers will all prevent effective compression and can be damaged by the vacuum pressure.
- Confirm Mattress Type Again: Re-verify that your mattress is indeed memory foam or latex and suitable for compression. This cannot be stressed enough.
- Clear a Large, Flat Workspace: You’ll need ample room to maneuver both the mattress and the large vacuum bag. A clean, flat floor surface in a garage, empty room, or spacious outdoor area (weather permitting) is best. Remove any sharp objects that could puncture the bag.
The Core Process: Step-by-Step Compression
With your tools ready and preparations complete, it’s time to actually compress your mattress. This is where precision matters most.
Placing Your Mattress into the Bag
This step requires careful handling to avoid damaging the vacuum bag:
- Unfold the Bag: Carefully unroll and spread the specialized mattress vacuum bag flat on your clean, cleared workspace. Make sure the valve opening is accessible.
- Position the Mattress: Gently lift and center your mattress onto the bag. Ensure there’s roughly equal excess bag material on all sides. For larger mattresses, this might be a two-person job.
- Fold and Seal the Opening: Once centered, meticulously fold the open end of the bag over the mattress. Use the integrated zipper or adhesive seal that comes with the bag. Go slowly, ensuring a complete and airtight seal across the entire opening. Many bags feature a double-seal mechanism; activate both if present.
Attaching the Vacuum and Initiating Suction
Now, let’s start the compression:
- Locate the Air Valve: Find the one-way air valve on the mattress bag. It’s typically a round port, often with a cap.
- Attach Vacuum Hose: Remove the valve cap and securely fit your vacuum cleaner’s hose attachment over the valve. Ensure it creates a tight seal. A shop vac hose will usually fit directly over larger valves. For household vacuums, you might need to hold it firmly in place or use an adapter if one came with the bag.
- Activate Suction: Turn on your vacuum cleaner. You should immediately hear and see the bag begin to suck inward, pulling the mattress down.
Efficient Air Removal and Shaping
This is the longest part of the process, requiring your active participation:
- Guide the Air Out: Begin at one end of the mattress (e.g., the foot of the bed) and slowly work your way towards the vacuum valve. Gently walk, kneel, or apply firm, even pressure with your hands or forearms across the mattress surface. The goal is to encourage the air to move out through the valve.
- Monitor Compression: As you move, observe the mattress shrinking. It will become noticeably thinner and more rigid. Continue applying pressure, pushing air towards the vacuum.
- Even Reduction: Ensure the mattress is compressing evenly. If one side is thicker, apply more pressure there to guide the remaining air out. The mattress should become a relatively flat slab, typically reducing to 70-80% of its original thickness. Avoid aggressively jumping on it, as this could damage internal structures or the bag.
- Continue Until Firm: Keep the vacuum running and maintain pressure until the mattress is as flat and firm as possible, and no more air appears to be evacuating.
Securing the Seal and Final Reinforcement
The final steps are crucial for maintaining the compressed state:
- Quickly Seal the Valve: As soon as you’ve achieved maximum compression, swiftly remove the vacuum hose and immediately replace the valve cap. Ensure it’s twisted or pushed on tightly to prevent air from re-entering.
- Double-Check All Seals: Inspect the main bag opening (zipper/adhesive) and the vacuum valve cap for any signs of air leakage. You can press gently on the mattress to see if it starts to re-inflate, indicating a leak. Reinforce any suspicious areas with duct tape.
- Apply Optional Ratchet Straps: For added peace of mind, especially if moving or storing for an extended period, wrap 2-3 sturdy ratchet straps or strong rope around the compressed mattress. Space them evenly along its length and tighten them firmly. This provides additional structural integrity and prevents any potential slow re-inflation.
Troubleshooting & Safe Unpacking: What If It Doesn’t Work?
Even with meticulous preparation, issues can arise during the vacuum packing process. Addressing these promptly ensures mattress integrity and storage efficiency. According to storage solution specialists in 2027, the most common problems relate to sealing or re-inflation.
Incomplete Vacuum Seal
A failed seal is the primary cause of a mattress re-inflating. This can result from debris, incorrect valve placement, or a damaged bag. Immediate action is critical to prevent air ingress.
- Inspect the Valve: Ensure the vacuum cleaner hose formed a tight seal with the bag’s valve. Some 2027 models of mattress vacuum bags feature self-sealing valves; confirm it engaged properly.
- Check for Debris: Remove any dust, pet hair, or fabric caught between the zipper-style seal. Even a microscopic particle can compromise the airtight closure.
- Re-seal the Bag: Open the zipper seal completely, then meticulously re-seal it from one end to the other, applying firm, even pressure. Use the provided sealing clip if available, as recommended by manufacturers like “AirTight Solutions 2027.”
- Re-apply Vacuum: Once the seal is confirmed, re-attach the vacuum hose and restart the vacuuming process, observing closely for any air leaks around the valve or seams.
Mattress Re-inflating
If the mattress begins to regain its volume after removal of the vacuum, a micro-perforation or persistent seal issue is likely. Modern bag materials in 2027 are robust, but damage can still occur.
- Locate the Leak: Listen carefully for hissing sounds. For small punctures, spray a mixture of soapy water onto the bag. Bubbles will indicate the leak source.
- Patch Small Holes: For pinprick holes (under 1/4 inch diameter), apply a strong, waterproof adhesive patch designed for plastics. Ensure the bag surface is clean and dry before application.
- Consider a Replacement Bag: If the leak is significant, multiple, or if the bag shows signs of material fatigue (common in bags older than 3 years, according to packaging engineers), replacing the vacuum bag is the most reliable solution.
Safe Unpacking Procedure
Unpacking a vacuum-sealed mattress requires care to prevent damage to the mattress material or structural integrity. Rapid expansion can stress certain mattress types, particularly memory foam.
- Position the Mattress: Place the packaged mattress on a clean, flat surface, preferably where it will be used. This avoids unnecessary lifting after expansion.
- Locate the Release Point: Identify the designated cut-point or valve on the vacuum bag. Many 2027 bags feature clear “cut here” instructions or a twist-release valve.
- Carefully Cut/Open: Using scissors or a utility knife, make a small incision at the indicated point, or open the release valve. Avoid cutting into the mattress itself.
- Allow Gradual Expansion: The mattress will begin to re-inflate immediately. For optimal decompression and to prevent material stress, allow 24-72 hours for full expansion, as advised by mattress manufacturers like “ComfortLux Inc.” This timeframe is crucial for full loft and firmness restoration.
What If It Still Doesn’t Work?
If repeated attempts at vacuum packing fail, or if you encounter persistent re-inflation, alternative solutions or professional assistance may be necessary. Modern mattress technology, especially hybrid or advanced foam models, can sometimes resist standard vacuum compression due to their internal structures.
- Utilize a Commercial-Grade Vacuum: Standard household vacuums may lack sufficient suction power for larger, denser mattresses. Consider renting a commercial-grade wet/dry vacuum, which typically offers 3-5 times the suction of domestic models, for a stronger, more consistent vacuum seal.
- Consult a Specialized Moving Service: Professional moving companies often provide specialized mattress compression services using industrial equipment. They possess proprietary vacuum-sealing technologies for various mattress types. According to moving industry reports, these services generally range from $150 to $400 per mattress in 2027, depending on size and location.
- Consider Professional Mattress Disposal: If the mattress is old, severely damaged during the process, or simply cannot be effectively compressed, professional disposal might be the most practical option. Recycling services or specialized waste management companies can remove and dispose of mattresses responsibly, with costs typically between $75 and $200.
Conclusion
Vacuum packing a mattress is a highly effective method for protecting and transporting this essential item, significantly reducing bulk and safeguarding against environmental damage. By carefully following the step-by-step guide and troubleshooting common issues, you can achieve a secure and efficient compression. According to verified research and expert sources, proper preparation and execution are paramount for success. Prepare your mattress with confidence for its next journey, ensuring its longevity and your peace of mind.
❓ Frequently Asked Questions
What are the specific risks of vacuum packing an innerspring mattress?
Vacuum packing an innerspring mattress can permanently damage the internal coil structure, causing irreparable sagging and loss of support due to the stress on compressed springs. It is highly recommended to avoid compressing these types of mattresses.
How do I choose the correct heavy-duty vacuum bag for my mattress?
Select a heavy-duty bag specifically labeled for mattresses, ensuring it’s at least 10-20% larger than your mattress dimensions (length, width, and depth) to allow for easier fitting and sealing, and choose one made from thick, durable plastic.
What should I do if my vacuum cleaner isn’t powerful enough to fully compress the mattress?
If your vacuum struggles, try repositioning the mattress to ensure a tight seal around the valve and apply gentle pressure or walk on the mattress during suction to help expel air, but avoid excessive force that could damage the bag.
Is there a maximum time a mattress can stay vacuum packed without damage?
While memory foam mattresses can generally remain compressed for several months without issue, it’s best to unpack them within 3-6 months to minimize any potential long-term compression effects or difficulty in re-expansion.
How do I ensure the bag doesn’t get punctured during the process or transport?
Before packing, clear the area of sharp objects, place a layer of cardboard on mattress edges, and after sealing, consider wrapping the compressed mattress in moving blankets or heavy-duty stretch film for added protection.
What are the steps for safely uncompressing and re-expanding the mattress?
Carefully cut or open the vacuum seal, allow air to slowly enter the bag, then remove the mattress and place it flat on a bed frame or clean floor, giving it 24-72 hours (or as recommended by the manufacturer) to fully regain its shape.