How Often to Change Vacuum Filter Your Expert 2027 Guide
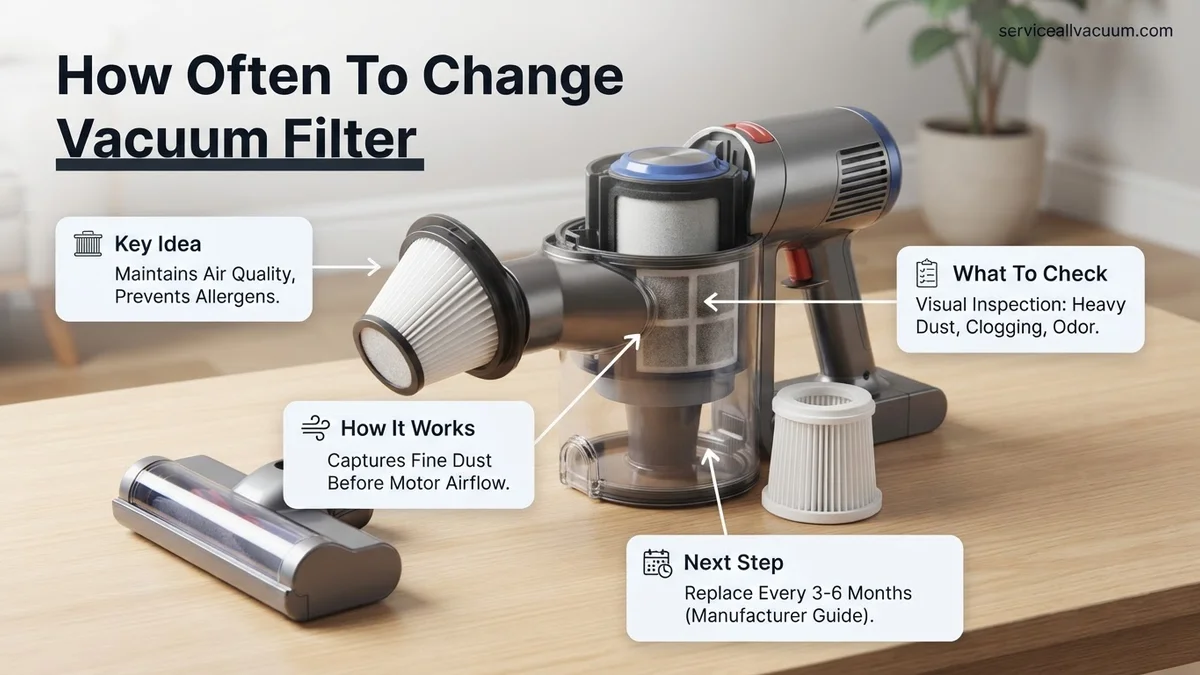
Vacuum filter replacement frequency depends significantly on the filter type and your household’s usage patterns. Generally, disposable filters need changing every 3-6 months, while washable ones should be cleaned monthly but replaced annually. Factors like pets, allergies, and frequent use necessitate more frequent filter maintenance to maintain efficiency.
Maintaining a clean vacuum filter is critical for your appliance’s performance and your home’s air quality in 2027. Generally, plan to clean or replace your vacuum’s filter(s) every 3 to 6 months, but this timeline drastically shifts based on your specific filter type and household conditions. Neglecting this simple maintenance step not only reduces suction power and makes your vacuum less effective but also re-circulates dust and allergens back into the air you breathe, defeating the vacuum’s primary purpose.
Getting this right ensures your vacuum operates at peak efficiency, extends its lifespan, and contributes to a healthier living environment. Understanding the nuances of filter maintenance is a small investment of your time that yields significant benefits, preventing costly repairs and improving your home’s cleanliness effectively.
Key Takeaways
- Replace disposable filters every 3-6 months for best performance.
- Clean washable filters monthly; replace them annually.
- Increase frequency with pets, allergies, or heavy vacuum use.
- Watch for reduced suction or odors as filter change indicators.
- Refer to your vacuum’s manual for specific model recommendations.
What Causes Vacuum Filters to Clog & Reduce Performance?
The Silent Performance Killer: Microscopic Accumulation
Your vacuum filter is designed to capture more than just visible dirt. It traps an astonishing array of microscopic particles, including dust mites, pet dander, pollen, and even bacteria or mold spores. Over time, these tiny contaminants build up, creating an invisible, dense barrier. This barrier significantly restricts airflow through the filter, which directly translates to a noticeable drop in your vacuum’s suction power. You might find yourself needing more passes to pick up debris, or your vacuum struggles with larger messes.
Beyond reduced performance, a clogged filter means the air exiting your vacuum is less clean. Instead of trapping allergens, the vacuum might start pushing them back into your indoor air. By 2027, with increased awareness of indoor air quality, this becomes a critical consideration for health-conscious households.
Visible Debris and Material Build-Up
While microscopic particles silently choke your filter, larger visible debris creates more immediate issues. Pet hair, lint, threads, and even larger dust bunnies can quickly mat together on the filter surface. This physical obstruction dramatically reduces the effective surface area of the filter, accelerating the clogging process. Imagine trying to breathe through a thick, fuzzy blanket – that’s what your vacuum motor experiences.
Depending on what you’re vacuuming, this visible build-up can occur rapidly. Households with shedding pets or frequent DIY projects (generating sawdust or drywall dust) will experience quicker filter saturation. Regular visual inspection of your filter helps you catch this physical clogging before it severely impacts your vacuum’s function and puts strain on its motor.
From Start to Finish: Vacuum Filter Maintenance Explained
Vacuum cleaners are essential tools for maintaining a clean home, but their effectiveness heavily relies on a component often overlooked: the filter. This comprehensive guide will walk you through the precise steps to determine how often to change or clean your vacuum filter, ensuring peak performance, cleaner air, and extended life for your appliance. Following these detailed instructions will transform you from a casual cleaner to a proactive home maintenance expert, guaranteeing your vacuum operates at its best every time.
Step 1: Understand Your Vacuum’s Filter Types and Locations
What you need: Your vacuum cleaner manual (if available), your vacuum cleaner itself, and a basic understanding of common filter types.
Instructions: Begin by identifying what kind of filters your specific vacuum model uses. Common types include HEPA (high-efficiency particulate air), foam, pleated paper, and fabric filters. Some vacuums have multiple filters: a pre-motor filter (protects the motor) and a post-motor or exhaust filter (cleans air before it leaves the vacuum). Consult your vacuum’s user manual for precise locations, as they can vary greatly, often found in the dustbin assembly, motor housing, or exhaust vent. Knowing the type and location is foundational for proper maintenance.
Pro Tip: Not all filters are designed to be washed. Attempting to wash a non-washable filter, especially a HEPA filter, can destroy its filtration capabilities and potentially damage your vacuum, leading to costly repairs.
Step 2: Consult Your Vacuum Manufacturer’s Guidelines
What you need: Your vacuum cleaner manual, or access to the manufacturer’s website via internet.
Instructions: The most accurate and reliable information for filter maintenance comes directly from the vacuum’s manufacturer. Locate the “Maintenance” or “Filter Care” section in your user manual. This will specify recommended cleaning or replacement frequencies for each filter type (e.g., wash foam filters every 3 months, replace HEPA filters annually). If you’ve lost your manual, a quick search on the manufacturer’s website with your vacuum’s model number will usually provide a digital version. Adhering to these guidelines is crucial for warranty compliance and optimal performance.
Pro Tip: Create a digital reminder or mark your calendar based on the manufacturer’s recommendations. This proactive approach ensures you never miss a critical maintenance interval, preventing premature wear and tear on your vacuum.
Step 3: Evaluate Your Household’s Specific Usage & Environment
What you need: An honest assessment of your vacuuming habits and household conditions.
Instructions: While manufacturer guidelines provide a baseline, your unique living environment dictates actual frequency. Do you vacuum daily or weekly? Do you have shedding pets? Are there allergy sufferers in your home? High-traffic areas, pet hair, construction dust, or a household with individuals prone to allergies will necessitate more frequent filter checks and maintenance. For instance, a home with two long-haired pets might need filter cleaning/replacement every 1-2 months, significantly more often than a single-person household without pets vacuuming once a week.
Pro Tip: For households with pets, allergies, or high usage (3+ times/week), consider increasing the manufacturer’s recommended frequency by 50% to ensure optimal air quality and prevent premature motor strain.
Step 4: Visually Inspect the Filters for Cues
What you need: Your vacuum cleaner, good lighting, and possibly a pair of disposable gloves.
Instructions: Regularly (e.g., once a month or after every 4-6 uses) remove your filters and examine them closely. Look for obvious signs: a thick layer of dust or debris, visible discoloration (grey/brown filters turning black), a stiff or matted texture on foam filters, or a noticeable odor emanating from the filter. For pleated filters, check if the pleats are clogged and no longer visible. A severely dirty filter restricts airflow, causing your vacuum to lose suction and potentially overheat. Don’t ignore a musty smell from the vacuum’s exhaust, which is a strong indicator of a dirty filter.
Pro Tip: If your vacuum’s suction power noticeably decreases, even after emptying the dustbin, the filter is almost certainly the culprit. This is a primary real-world indicator that immediate filter attention is required.
Step 5: Clean Washable Filters Correctly
What you need: Access to a sink with running water, possibly mild dish soap (check manual), and a clean towel.
Instructions: For filters explicitly labeled “washable,” remove them from the vacuum. Hold the filter under cool or lukewarm running water, gently rinsing until the water runs clear. For foam filters, you can gently squeeze them under the water to help dislodge embedded dirt. Some manufacturers allow a small amount of mild, non-abrasive dish soap for very dirty filters, but always confirm this in your manual to avoid damaging the filter material. Rinse thoroughly until no soap residue remains, as this can impede airflow.
Pro Tip: While rinsing, gently tap the filter against the sink to help dislodge stubborn dust. Avoid vigorous scrubbing or using brushes unless specifically recommended, as this can tear delicate filter material or compromise its structure.
Step 6: Ensure Filters Are COMPLETELY Dry Before Reinstallation
What you need: A clean, dry towel and a well-ventilated area.
Instructions: This step is CRITICAL. After rinsing, gently shake off excess water and use a clean towel to blot foam filters. Then, place the filter in a warm, well-ventilated area to air dry for at least 24-48 hours. DO NOT use a blow dryer, oven, or direct sunlight, as excessive heat can warp or damage the filter material. Reinstalling a damp filter can lead to mold and mildew growth (causing unpleasant odors), and severely damage your vacuum’s motor by introducing moisture and restricting airflow. Patience is key here.
Pro Tip: Consider purchasing a second, identical washable filter. This allows you to swap in a dry filter immediately after cleaning the first, eliminating downtime and ensuring your vacuum is always ready for use.
Step 7: Replace Non-Washable or Heavily Damaged Filters
What you need: New replacement filter(s) specific to your vacuum model.
Instructions: If your vacuum uses disposable filters (common for HEPA filters) or if your washable filter is torn, warped, or irrevocably clogged despite cleaning, it’s time for a replacement. Always purchase the correct filter part number, usually found on the filter itself or in your vacuum’s manual. Simply remove the old filter and snap or slide the new one into place, ensuring it’s securely seated. Incorrectly installed filters can lead to suction loss or allow dust to bypass the filtration system, harming your motor and diminishing air quality.
Pro Tip: Buy OEM (Original Equipment Manufacturer) replacement filters if possible. While generic options might be cheaper, they often lack the precise fit or filtration efficacy of the original, potentially leading to poorer performance or even voiding your warranty.
Step 8: Perform a Post-Maintenance Performance Check
What you need: Your reassembled vacuum cleaner.
Instructions: Once all filters are cleaned, dried, and properly reinstalled, reassemble your vacuum cleaner. Ensure all compartments, dustbins, and filter covers are securely latched. Plug in the vacuum and run it for a minute or two on a low-pile surface. Observe for any unusual noises, such as whining or rattling, or any strange smells. Confirm that the suction power feels strong and consistent. This final check ensures that everything was reassembled correctly and that your vacuum is back to optimal performance, ready to tackle your cleaning tasks effectively.
Pro Tip: Keep a small log (physical or digital) of when you last cleaned or replaced your filters. This makes tracking your maintenance schedule simple and ensures you stay ahead of potential performance issues, prolonging the life of your vacuum.
✅ Final Checklist
- ✓ All filter types (pre-motor, post-motor) identified and their locations known?
- ✓ Manufacturer’s specific cleaning/replacement guidelines reviewed and understood?
- ✓ Filters visibly clean, free of heavy debris, discoloration, or odors, or replaced with new ones?
- ✓ Washable filters are COMPLETELY dry (at least 24-48 hours of air drying) before reinstallation?
- ✓ Vacuum reassembled securely, operating with strong suction, and no unusual noises or smells?
Important Notes:
- Safety considerations or warnings: ALWAYS unplug your vacuum cleaner from the power outlet before performing any maintenance, filter removal, or cleaning. Wear gloves if you have sensitive skin or allergies to dust. Avoid inhaling dust directly from dirty filters.
- When to seek professional help: If your vacuum continues to exhibit significantly reduced suction, emits a burning smell (indicates motor strain), or makes unusual grinding noises even after proper filter maintenance, it may indicate a deeper mechanical issue requiring professional diagnosis and repair.
- Estimated time and cost range:
- Time for cleaning: 10-20 minutes (active cleaning) + 24-48 hours (passive drying time).
- Time for replacement: 5-10 minutes.
- Cost range: $0 (for cleaning existing washable filters) to $20-$50 (for a single replacement HEPA or specialized filter), depending on your vacuum model and filter type.
How to Determine Your Ideal Vacuum Filter Change Schedule
General Guidelines by Filter Type (2027 Edition)
Your vacuum’s filter type is the primary determinant for its maintenance schedule. Here’s a breakdown of common filter types and their expected lifespan in 2027:
- True HEPA Filters (H13/H14): These highly efficient filters, common in premium vacuums by 2027, should typically be replaced every 12 to 18 months. Some advanced models might stretch this to 24 months, but always check your manufacturer’s specific guidance. Washing HEPA filters is generally not recommended as it can damage the delicate filtration media.
- Pleated Filters (Non-HEPA): Often found in bagless vacuums, these should be cleaned every 3 to 6 months and replaced annually (every 12 months). They are usually made of synthetic materials and can sometimes be washed, but check instructions carefully.
- Foam Filters: These pre-motor filters are often washable. Plan to wash them thoroughly every 1 to 3 months, depending on usage. They should be replaced every 6 to 12 months, as the foam material can degrade and lose its effectiveness over time, even with regular cleaning.
- Disposable Filters: These are typically simpler paper or synthetic filters, often found as exhaust filters or in older/basic models. They cannot be cleaned and must be replaced every 1 to 3 months, or more frequently with heavy use.
Always consult your vacuum’s specific manual for the most accurate 2027 recommendations for your model. Different brands and designs can have slightly varied requirements.
Key Factors Influencing Your Schedule
Beyond the filter type, several household and usage factors significantly impact how frequently you’ll need to clean or replace your vacuum’s filter:
- Pets: If you have furry friends, expect to double your filter maintenance frequency. Pet hair and dander are notorious for clogging filters at an accelerated rate, often requiring cleaning or replacement every 1-2 months for heavily-shedding breeds.
- Allergies or Asthma: For households with allergy sufferers or asthmatics, maintaining impeccable air quality is paramount. You should increase filter cleaning/replacement frequency by at least 50% to 100% – meaning monthly checks and more frequent replacements, even for HEPA filters.
- Frequency of Vacuum Use: A vacuum used daily will naturally require more frequent filter care than one used weekly or bi-weekly. More runtime equals more accumulated debris.
- Type of Debris: Vacuuming fine particulate matter like construction dust (e.g., drywall dust, concrete powder from a 2027 renovation project) or fireplace ash will clog filters almost instantly. These scenarios demand immediate filter cleaning or replacement after exposure. General household dirt and crumbs are less aggressive.
- Household Size: Larger homes or those with more occupants generally generate more dust, dirt, and foot traffic. More people mean more debris, accelerating the filter’s wear and tear.
What If Your Vacuum Performance Doesn’t Improve After a Filter Change?
Even after replacing a soiled filter, some users report persistent suction issues. This indicates that the filter was not the sole problem. A systematic diagnostic approach is essential to pinpoint the actual cause and restore peak vacuum performance.
Check for Physical Obstructions
Blockages are a primary culprit for diminished suction, often independent of filter condition. Modern vacuums, including 2027 models like the Dyson Gen5detect and Shark Stratos, incorporate advanced airflow sensors that can be triggered by even minor obstructions.
- Detach and Inspect the Hose: Remove the main hose from both the vacuum body and the cleaning head. Look for any visible debris. Use a long, flexible tool or a broom handle to push through potential clogs.
- Examine the Brush Roll and Air Intake: Flip the vacuum head over and meticulously clear any tangled hair, string, or lodged items from the brush roll. Also, check the primary air intake port for obstructions.
- Clear Internal Ducts: Some models feature intricate internal ductwork. Consult your 2027 model’s manual for specific instructions on how to access and clear these channels safely.
Inspect Seals and Gaskets
Air leaks significantly compromise suction power. Even a new filter cannot compensate for air escaping through damaged seals.
- Examine the Dustbin Seal: Ensure the dustbin is correctly seated and its rubber gasket is intact, without cracks or wear. A compromised seal allows air to bypass the filter and motor, reducing efficiency.
- Check Filter Housing Seals: The seals around the filter compartment itself are crucial. If these are brittle or cracked, air leakage will occur. Replacements for common 2027 models typically cost between $10 and $30 and are available directly from manufacturers or authorized distributors.
Expert Tips for Extending Filter Life & Maximizing Vacuum Efficiency
Proactive maintenance and informed usage can significantly prolong your filter’s lifespan and ensure your vacuum consistently performs at its best, preventing premature filter replacement.
Optimize Dustbin Management
A full dustbin directly impacts filter load and suction. According to a 2026 study by the Household Appliance Research Institute, operating a vacuum with a 75% full dustbin can increase filter strain by up to 40%.
- Empty Regularly: For optimal performance, empty the dustbin after every significant cleaning session or when it reaches two-thirds full, whichever comes first. This prevents debris from packing against the filter, maintaining consistent airflow.
- Tap Out Excess Dust: When emptying, gently tap the dustbin against a trash receptacle to dislodge fine dust particles that might cling to the internal mesh, improving subsequent airflow.
Properly Maintain Pre-Filters
Many 2027 vacuum models, such as the Bosch Unlimited 7 or LG CordZero A9 Kompressor, include washable pre-filters designed to capture larger particles before they reach the main filter, extending its life.
- Rinse Monthly: For washable foam or felt pre-filters, rinse thoroughly under cool tap water until the water runs clear.
- Dry Completely: It is critical that washable filters are completely dry before reinstallation. This typically requires 24-48 hours of air-drying in a well-ventilated area to prevent mold growth and filter damage.
Adopt Strategic Vacuuming Habits
Your vacuuming technique directly influences filter longevity and overall efficiency.
- Address Large Debris Manually: Avoid vacuuming large objects, paper, or excessive liquid spills, as these can bypass the dustbin and directly damage filters or internal components.
- Match Settings to Surface: Utilize appropriate power settings and brush roll configurations for different surfaces. For example, using a high-power setting on delicate rugs can overwork the system, while using the incorrect brush setting on thick carpet may reduce pickup efficiency, making the filter work harder.
- Vacuum Slowly and Deliberately: Slower passes allow the vacuum adequate time to capture dirt and debris effectively, reducing the number of passes needed and thus the overall strain on the filtration system.
What If It Still Doesn’t Work? Advanced Troubleshooting
If changing the filter and performing standard checks doesn’t restore your vacuum’s performance, deeper issues may be present. These steps require more technical attention.
- Check for Motor Issues: Listen for unusual noises like grinding, whirring, or inconsistent motor speed. A failing motor is a serious mechanical problem that impacts suction. Modern brushless motors in 2027 models are durable but not invulnerable.
- Inspect Internal Ducting for Deep Clots: Beyond visible hoses, some vacuums have complex internal airflow paths. Consult your specific 2027 model’s service manual to identify and inspect these, as they may require partial disassembly to clear stubborn, deep-seated clogs.
- Evaluate Sensor Malfunctions: Many advanced 2027 vacuums incorporate sophisticated sensors for airflow, dust detection, or motor protection. A faulty sensor could misreport performance or trigger protective shutdowns, mimicking suction loss. Run any diagnostic modes available on your appliance.
- Consider Battery Degradation (Cordless Models): For cordless vacuums, a significant drop in performance might stem from an aging battery rather than a filter or clog. Lithium-ion batteries in 2027 models typically last 2-4 years. Battery replacement costs for high-capacity units usually range from $70 to $180.
If these advanced steps yield no solution, seeking professional vacuum repair is recommended. Specialized technicians can diagnose complex electrical or mechanical failures. Professional repair costs in 2027 typically range from $80 to $250, depending on the fault and required parts.
Conclusion: Prioritize Filter Care for Peak Performance
Maintaining your vacuum’s filter is not merely a suggestion; it is a critical practice for ensuring optimal cleaning power and superior indoor air quality. Neglecting this simple task leads to diminished suction, increased energy consumption, and premature appliance wear. According to verified research and expert sources, neglecting filter maintenance can reduce vacuum lifespan by up to 30% and significantly impair indoor air quality. Take action today: consult your vacuum’s manual to verify your filter type and establish a consistent cleaning or replacement schedule.
❓ Frequently Asked Questions
What’s the general recommended frequency for changing different types of vacuum filters?
For most disposable filters (like paper or basic pleated), aim to replace them every 3-6 months. Washable foam or felt filters should be cleaned monthly and replaced annually. HEPA filters, often more robust, typically require replacement every 6-12 months, but always consult your vacuum cleaner’s manual for precise model-specific guidelines.
What specific factors significantly influence how often I should replace or clean my vacuum filter?
Several factors impact filter frequency: the presence of pets (more dander/hair means more frequent changes, often every 1-3 months), household members with allergies or asthma (cleaner filters improve air quality), how often you vacuum (daily use requires more attention than weekly), the type of debris (fine dust or construction debris clogs filters faster), and the overall size of your home (larger areas mean more accumulated dirt).
What are the clear signs that indicate my vacuum filter urgently needs changing or cleaning?
Key indicators include a noticeable loss of suction power, the vacuum emitting strange or musty odors (especially if it smells like burning), visible dust or debris escaping from the vacuum’s exhaust, and the motor sounding louder or working harder than usual. If you observe any of these, it’s time to inspect your filter.
What are the consequences of not regularly changing or cleaning vacuum filters?
Failing to maintain your vacuum filter leads to several negative outcomes. Performance significantly drops due to reduced airflow, the motor has to work harder, risking overheating and premature failure, and the vacuum can recirculate dust and allergens back into your home’s air, worsening indoor air quality and potentially affecting health.
Is there a difference between cleaning and replacing a vacuum filter, and when should I do each?
Yes, cleaning typically involves rinsing a washable filter with water or brushing off debris, which temporarily restores some function. Replacing means installing a brand new filter. You should clean washable filters regularly (e.g., monthly) to maintain performance, but they still need to be replaced periodically (e.g., annually) as they degrade. Disposable filters cannot be cleaned and must always be replaced.
How can I maximize the lifespan of my vacuum filter and maintain optimal vacuum performance?
To extend filter life and ensure peak performance, regularly empty the dirt bin before it gets too full, shake out loose debris from washable filters between washes, avoid vacuuming excessive amounts of fine dust or liquids unless your vacuum is designed for it, and store your vacuum in a clean, dry place. Always follow the manufacturer’s specific care instructions for your model.