How to Vacuum Seal Mattress Step-by-Step Guide 2026
Compressing a bulky bed requires the right materials and technique to prevent permanent damage. Using a heavy-duty mattress bag and a standard vacuum allows you to shrink your bed safely for moving or storage.
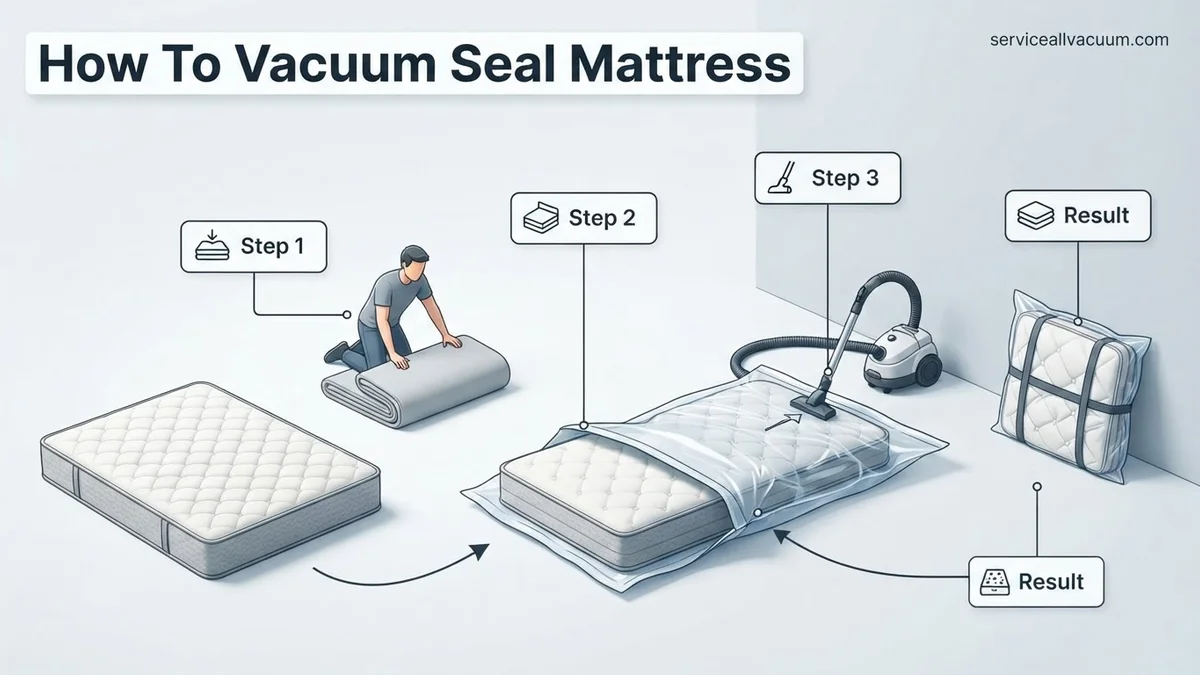
Vacuum sealing a mattress reduces its volume by up to 80 percent, transforming a bulky bedroom staple into a flat, manageable panel that easily fits into a car trunk or a tight storage unit. To compress your bed at home, you need to thoroughly clean the surface, encase it in a puncture-resistant plastic mattress bag, attach a household vacuum hose to the extraction valve, and rapidly roll or strap the mattress tight as the air sucks out.
Whether you are moving across the country in 2026, preparing a guest room for a remodel, or packing up a dorm-sized twin bed, this physical compression technique saves you from renting a larger moving truck. Done correctly, it also shields your expensive memory foam or innerspring mattress from dust, moisture, and pests during transit.
Key Takeaways
- Check your mattress type; traditional innerspring beds should never be rolled or bent.
- Clean and thoroughly dry the mattress before sealing to prevent mold and mildew growth.
- Use a puncture-resistant, heavy-duty plastic mattress bag designed specifically for compression.
- Secure the rolled mattress tightly with heavy-duty straps before turning off the vacuum.
- A standard household vacuum or shop vac works effectively to extract air.
Why You Need to Vacuum Seal a Mattress Safely
Protecting Your Investment from Environmental Damage
Exposing an unsealed mattress to a damp basement, a dusty garage, or the back of a moving truck invites mold, mildew, and unpleasant odors. When you tightly seal your mattress in heavy-duty plastic, you create an airtight barrier against environmental hazards. This keeps your sleeping surface fresh, clean, and structurally sound until you are ready to unpack it.
Maximizing Space for Efficient Transport
Standard mattresses consume massive amounts of floor and vertical space. By pulling out every last ounce of air, you flatten the core materials—especially flexible memory foam and polyfoam layers. This dramatic reduction in thickness lets you slide the bed vertically against a wall or flat on the floor of a standard SUV, eliminating the need for expensive professional freight delivery.
Master Mattress Compression in 7 Simple Steps
Whether you are moving across the country, placing furniture into a storage unit, or simply trying to reclaim valuable square footage in a cramped guest bedroom, learning how to properly vacuum seal a mattress is a game-changer. A standard mattress is notoriously bulky, awkward to carry down narrow hallways, and prone to taking up an entire moving van. By compressing and sealing it into a fraction of its original size, you not only make transportation effortless, but you also protect your valuable investment from dust, moisture, bed bugs, and unpleasant odors. However, rushing through the process can lead to punctured plastic, trapped humidity, or even permanent damage to your mattress’s internal support coils and memory foam layers. This comprehensive walkthrough provides the exact methodology required to safely shrink-wrap your bed without risking structural integrity.
Step 1: Gather Your Specialized Equipment
What you need: A heavy-duty mattress vacuum bag (sized specifically to your twin, full, queen, or king mattress), a standard household vacuum cleaner with a hose attachment, a roll of heavy-duty packing tape, and a helper to assist with heavy lifting.
Instructions: Before touching the mattress, lay out all your supplies in a wide, unobstructed workspace like a clean living room floor or a spacious garage. Inspect the mattress vacuum bag for any manufacturing defects or microscopic tears. Ensure your household vacuum cleaner is in good working order and that the suction hose is completely free of debris. Having everything within arm’s reach prevents you from having to awkwardly pause halfway through the physical compression process, which can cause the plastic to shift out of alignment and ruin the airtight seal.
Pro Tip: Never use standard garbage bags or thin plastic sheeting; you must purchase a puncture-resistant, multi-layer polyethylene mattress bag designed specifically for vacuum compression.
Step 2: Strip and Deep Clean the Mattress
What you need: A high-powered vacuum with an upholstery attachment, baking soda, and a mild fabric cleaner for spot treatment.
Instructions: Remove all bedding, including fitted sheets, flat sheets, blankets, and mattress protectors. Wash and dry these separately. Run your vacuum’s upholstery attachment systematically across the entire surface of the mattress, paying close attention to seams and tufts where dust mites, pet dander, and dead skin cells accumulate. If you notice any minor stains, treat them now and wait at least 4 to 6 hours for the mattress to dry completely. Sealing a mattress that contains even a trace amount of moisture is a recipe for catastrophic mold and mildew growth during storage.
Pro Tip: Sprinkle a generous layer of baking soda over the mattress after vacuuming, let it sit for 30 minutes to neutralize trapped odors, and vacuum it off thoroughly before bagging.
Step 3: Maneuver the Mattress Into the Bag
What you need: Your stripped mattress and the heavy-duty mattress vacuum bag.
Instructions: Stand the mattress upright if possible, or leave it flat on a clean floor. Unfold the large plastic bag completely. Slide the open end of the bag over one end of the mattress, working it downward like putting a giant pillowcase on a pillow. Work slowly and methodically with your helper, gently easing the plastic over the corners to prevent snagging or tearing. Push out as much excess air from inside the bag as you manually can before attempting to seal the opening mechanism. Ensure the valve designated for the vacuum hose remains exposed and accessible near the edge of the mattress.
Pro Tip: Never drag the bag across rough concrete or sharp debris while sliding it on, as this will immediately puncture the polyethylene film and ruin the airtight seal.
Step 4: Seal the Double-Zip Closure
What you need: The plastic slider tool included with your mattress bag or your fingers.
Instructions: Carefully align the interlocking plastic tracks of the bag’s double-zip closure mechanism. Take the plastic slider clip and run it firmly from one end of the opening to the other, ensuring the track clicks completely into place. For absolute security, run the slider back and forth a second time. To provide an extra layer of defense against slow air leaks, take your heavy-duty packing tape and run a continuous strip directly over the sealed zipper track from edge to edge. Press down firmly along the entire length of the tape to eliminate air pockets.
Pro Tip: Inspect the entire length of the zipper track visually and by touch; a single millimeter of unsealed gap will cause the mattress to slowly re-inflate while in storage.
Step 5: Evacuate the Air Using Your Vacuum
What you need: A household vacuum cleaner and the bag’s integrated valve cap.
Instructions: Unscrew the cap covering the vacuum valve on the mattress bag. Insert your vacuum cleaner hose nozzle directly into the rubberized opening of the valve, ensuring a snug fit. Turn on your vacuum cleaner. As the machine begins drawing air out, use your hands to smooth out the collapsing plastic sheeting, guiding it flat against the top and bottom surfaces of the mattress. Watch closely as the mattress compresses. You will notice the material thinning out and the edges pulling inward tightly. Depending on your vacuum’s suction power, this active extraction process will take between 3 to 7 minutes.
Pro Tip: If your vacuum hose does not fit tightly into the valve, wrap a rubber band or a piece of duct tape around the connection point to create an airtight seal.
Step 6: Secure the Valve and Apply Compression Straps
What you need: The valve cap and 2 to 3 heavy-duty luggage or ratchet straps.
Instructions: Once the mattress has been compressed to your satisfaction and the vacuum is still running, quickly screw the plastic valve cap tightly back onto the valve housing to lock the vacuum pressure inside. Turn off your vacuum cleaner and detach the hose. To keep the compressed mattress manageable during transport, wrap heavy-duty luggage straps or ratchet straps around the width and length of the package. Pull the straps taut and buckle them securely. This prevents the bulky package from expanding if the plastic happens to encounter a minor puncture later on.
Pro Tip: Do not over-tighten ratchet straps to the point where they cut into the compressed plastic bag, as this will immediately compromise the airtight environment.
Step 7: Transport or Store Safely
What you need: Your newly compressed, sealed mattress and a vehicle or storage unit.
Instructions: With your helper, lift the slim, manageable mattress package and transport it to your destination. Because the mattress is now flat and rigid, it can easily fit into the back of a standard SUV, a small moving van, or slide neatly against the wall of a climate-controlled storage unit. Avoid stacking heavy, sharp-edged furniture directly on top of the sealed mattress, as concentrated weight can puncture the plastic over extended periods. Check the package periodically if stored long-term to ensure no air has leaked back inside.
Pro Tip: Never store a vacuum-sealed memory foam or innerspring mattress in extreme heat, such as an uninsulated attic or shed, as high temperatures can degrade the foam’s internal cell structure.
✅ Final Checklist
- The mattress was completely bone-dry and thoroughly vacuumed prior to bagging.
- The heavy-duty plastic bag is completely free of tears, rips, or punctures.
- The double-zip closure is fully locked and reinforced with packing tape.
- The valve cap is screwed on tightly, and the mattress remains compressed.
- Transport straps are securely fastened without damaging the outer plastic wrap.
Important Notes:
- Never leave memory foam mattresses compressed in airtight storage for longer than 6 months, as prolonged extreme compression can permanently distort the foam cells and prevent full expansion.
- If you suspect water damage or mold was present before sealing, do not attempt to vacuum seal; discard the mattress immediately for health safety reasons.
- Estimated time required: 30 to 45 minutes. Estimated cost: $15 to $35 for specialized bags and straps.
Essential Supplies Required to Compress Your Bed
Heavy-Duty Plastic Bags and Straps
Standard trash bags or thin moving film will tear immediately under the intense pressure of vacuum suction. You need a specialized, extra-thick polyethylene mattress bag designed specifically for compression. Look for these key items to get the job done right in 2026:
- Puncture-resistant mattress bag: Ensure it matches your specific size, whether that is Twin, Queen, or King.
- Heavy-duty packing tape: Essential for sealing the open end and reinforcing any stressed seams.
- Ratchet straps or heavy duty luggage belts: You need at least two strong straps to physically tie down the compressed mattress before the air has a chance to leak back inside.
Choosing the Right Vacuum Equipment
You might wonder if your standard household upright vacuum can handle the job. While you can use a regular canister or upright vacuum hose for temporary suction, a wet/dry shop vacuum is far superior for this task. Shop vacs handle continuous airflow much better and feature secure hose attachments that fit tightly into the specialized valve ports found on modern vacuum seal bags. Avoid running any household vacuum for longer than five minutes continuously to prevent the motor from overheating during heavy air extraction.
Step-by-Step Guide on How to Vacuum Seal a Mattress
Executing the compression process correctly prevents damage to the internal foam and spring structures. Industry experts recommend working with a partner to ensure the mattress rolls evenly without pinching the plastic lining.
Executing the Roll and Seal Process
- Thoroughly clean and dry the surface: Vacuum the mattress meticulously and ensure zero moisture remains to prevent mold growth during storage.
- Insert the mattress into the bag: Slide the mattress entirely inside the heavy-duty plastic storage bag, aligning the open end with the sealing mechanism.
- Seal the double-zip opening: Slide the plastic closure clip back and forth twice to ensure an airtight seal along the entire opening.
- Attach the vacuum hose: Unscrew the valve cap on the bag, place your household vacuum hose directly over the valve port, and turn the vacuum on.
- Monitor the compression: Watch as the air extracts and the mattress flattens. Guide the sides inward to maintain a uniform rectangular shape as it shrinks.
- Secure and store: Once fully compressed, quickly screw the valve cap tightly shut, slide packing straps around the rolled mattress, and move it to a climate-controlled area.
What If Your Mattress Won’t Stay Compressed or Leaks Air
A mattress that slowly reinflates inside its storage bag indicates a compromised seal or a puncture in the plastic. Maintaining a vacuum seal is critical for preventing humidity infiltration during long-term storage in 2026.
Troubleshooting Air Leaks
- Inspect the dual-zip track: Check the plastic closure for trapped fabric, debris, or incomplete closure. Re-run the sealing clip firmly across the entire length.
- Check the valve cap: Ensure the rubber gasket inside the valve is properly seated and the external cap is screwed down tightly.
- Patch micro-punctures: Run your hands along the plastic surface to feel for escaping air. Apply heavy-duty waterproof packing tape or a vinyl repair patch over any tears.
- Double-bag the mattress: If the primary bag continues to fail, slide the entire compressed unit inside a second heavy-duty mattress bag for guaranteed airtight protection.
What If It Still Doesn’t Work?
If persistent air leaks ruin your storage attempt despite multiple patching efforts, advanced intervention is required. Defective bags should be discarded immediately to protect the mattress core.
- Replace the bag entirely: Low-gauge plastic stretches and tears easily. Upgrade to a puncture-resistant, industrial-grade polyethylene mattress bag rated for long-term compression.
- Consult professional packing services: Local moving and storage companies offer professional shrink-wrapping and compression services using commercial-grade heat sealers, with typical service fees ranging from $45 to $90.
- Evaluate mattress age and structure: Mattresses older than eight to ten years often lose their structural integrity and resilience, making them unsuitable for successful re-expansion after tight compression.
Conclusion
Successfully vacuum sealing a mattress protects your investment by reducing its volume by up to 75 percent while shielding it from dust, pests, and moisture. According to verified research and sleeping-product manufacturing standards, utilizing high-grade polyethylene bags and maintaining a dry storage environment ensures your mattress springs back to full comfort. Take action today by gathering your heavy-duty supplies and securing your mattress properly for your upcoming move or storage need.
❓ Frequently Asked Questions
Can I use a regular trash bag to vacuum seal a mattress?
Regular trash bags are too thin, prone to tearing, and lack the proper size to create an airtight seal. Always use a heavy-duty mattress compression bag.
Will vacuum sealing ruin my memory foam mattress?
Memory foam handles compression well, but leaving it compressed for over six months can damage the cell structure and prevent it from expanding fully.
How do I get the air out of the mattress bag without a vacuum?
While a vacuum is fastest, you can manually press air out by rolling the mattress tightly from one end to the other while sealing the zipper gradually.
What should I do if the plastic bag punctures during the process?
Immediately patch any tears or punctures with heavy-duty packing tape or duct tape to maintain an airtight seal before continuing air extraction.
How long does it take a mattress to expand after unsealing?
Most memory foam mattresses take anywhere from 24 to 72 hours to fully regain their original shape and thickness after being unrolled.
Can I store a vacuum-sealed mattress on its side?
Yes, once securely strapped and sealed, you can store the mattress on its side, but laying it flat is safer to prevent warping.