How to Vacuum Under Bed Step-by-Step Guide for 2026
Cleaning dust and pet hair from spaces with minimal clearance requires specialized tools and proven techniques. Using flat nozzle attachments or DIY hose hacks allows you to effectively reach deeply embedded debris that standard vacuums miss. Follow this step-by-step guide to conquer hard-to-reach dust without heavy lifting.
Cleaning deeply embedded dust, pet hair, and mystery debris from underneath a low-clearance bed requires specialized attachments and a strategic approach rather than standard upright vacuuming. When your bed frame sits only two to four inches off the floor, traditional cleaning heads simply will not fit.
Mastering this hidden zone in 2026 relies on leveraging ultra-slim vacuum attachments, flexible wands, and proper spatial preparation. By utilizing the right sequence of tools, you can extract years of accumulated allergens from beneath your mattress without breaking your back or completely dismantling your bedroom furniture.
Key Takeaways
- Use a pantyhose trick over a vacuum hose to trap small debris easily.
- Clear all storage bins and surrounding clutter before beginning the cleaning process.
- Flat crevice tools are essential for reaching under frames with minimal clearance.
- Dust the top surfaces of your bedroom furniture after clearing under the bed.
- A microfiber flat duster can substitute for a vacuum if your clearance is extremely tight.
Why Traditional Vacuums Fail in Low-Clearance Spaces
Standard upright vacuums are bulky by design. Their massive motorized brush rolls and rigid collection canisters create a physical barrier that prevents them from sliding into tight spaces.
The Clearance Deficit Problem
Most modern platform beds and low-profile frames offer a mere 2 to 5 inches of vertical clearance. Standard vacuum heads typically require 6 to 9 inches of clearance just to tilt underneath. When you try to force a standard machine under your bed, the main body hits the frame long before the suction nozzle reaches the center dust bunnies.
Rigid Wand Limitations
Even if you detach the hose from an upright vacuum, the included plastic extension wands lack flexibility. You cannot angle them flat enough against the floor to maintain proper suction. Furthermore, standard floor nozzles lose suction seal the moment they tilt past a 45-degree angle, rendering them useless for flat-floor reach.
- Standard upright vacuums average 8 to 10 inches in height.
- Traditional floor nozzles lose airtight seals when tilted horizontally.
- Rigid plastic wands prevent low-angle parallel movement along the floor.
Clearing the Dust Bunnies Made Easy: Your Essential Action Plan
Conquering the hidden dust, lost socks, and accumulated allergens lurking beneath your bed can feel like an overwhelming task. This comprehensive, room-refreshing guide is designed to transform a dreaded chore into a streamlined, highly effective cleaning routine. By following these methodical steps, you will drastically improve your indoor air quality, protect your flooring, and reclaim a truly clean sanctuary for rest and relaxation without straining your back or missing a single hidden spot.
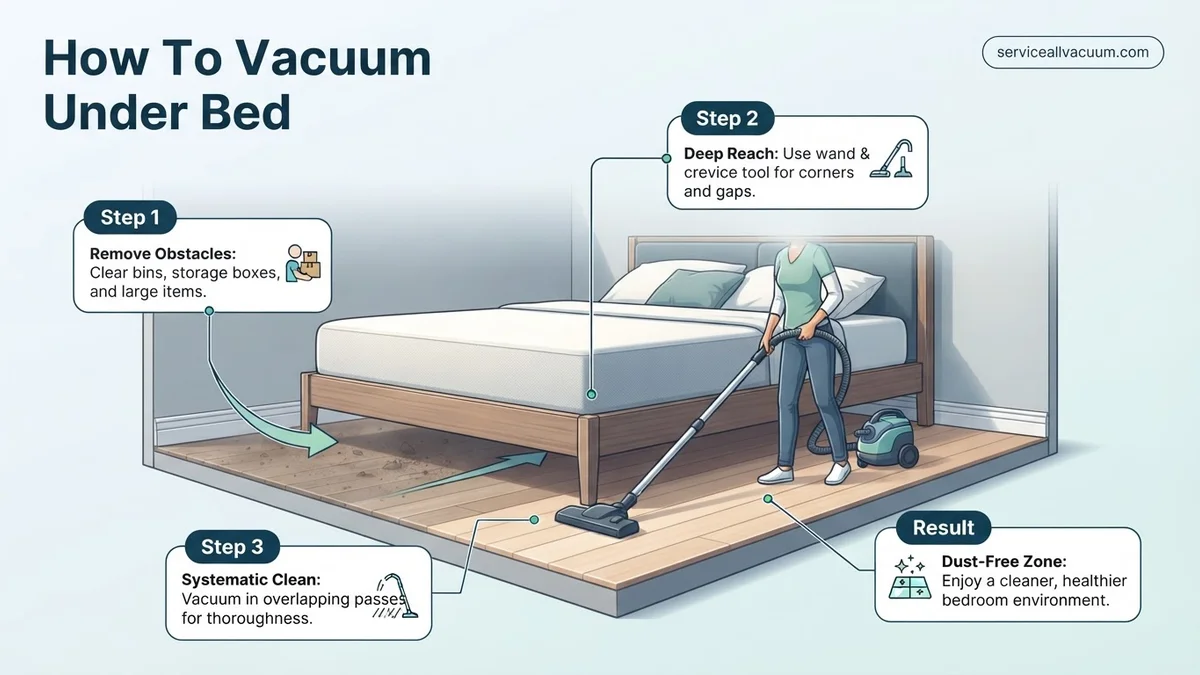
Step 1: Prep the Perimeter and Clear the Obstacles
What you need: Large plastic storage bins, a laundry basket, and a microfiber cloth for dusting.
Instructions: Before touching your vacuum cleaner, you need to clear the battlefield. Retrieve all storage boxes, rogue shoes, stray books, and laundry items currently resting underneath or immediately beside the bed frame. Sort these items using a laundry basket and a staging area. Wipe down the exterior of any plastic storage containers with a damp microfiber cloth to ensure you are not reintroducing settled dust back into the newly cleaned space once the vacuuming is complete.
Pro Tip: Never drag heavy plastic bins directly across hardwood or delicate laminate flooring, as trapped grit underneath the containers can cause permanent scratches.
Step 2: Strip Away the Bedding Obstructions
What you need: Clean hooks or a designated chair to hold hanging bed skirts.
Instructions: Long dust ruffles and heavy bed skirts often drape directly onto the floor, trapping debris and completely blocking your vacuum nozzle. Carefully lift or untuck your mattress overhang, and pin or drape any low-hanging bed skirts securely over the top of the mattress or onto a nearby chair. This ensures an unobstructed path for your vacuum tools and prevents the delicate fabric of the bed skirt from being accidentally sucked into the vacuum roller brush.
Pro Tip: Take this opportunity to inspect the hem of your bed skirt for dust accumulation; give it a quick shake outside if it hasn’t been laundered recently.
Step 3: Assess Lighting and Visibility Conditions
What you need: A high-lumens smartphone flashlight, a headlamp, or a flexible utility work light.
Instructions: The area beneath your bed is naturally shadowed and notorious for hiding small objects like jewelry, charging cables, and stubborn dust bunnies. Position a bright portable light or your smartphone flashlight flat on the floor, pointing directly inward beneath the frame. This low-angle illumination acts as a detection grid, casting dramatic shadows behind debris and allowing you to spot embedded hairballs, pet dander, and structural obstacles before you begin vacuuming.
Pro Tip: Avoid relying solely on overhead room lighting, which casts downward and leaves the deep center of the bed completely in shadow.
Step 4: Retrieve Lost Treasures and Large Debris
What you need: Protective cleaning gloves and a long-handled grabber tool.
Instructions: Running a vacuum straight over hard objects like coins, small toys, paperclips, or plastic pieces can crack plastic internal components, jam vacuum roller bars, or puncture vacuum bags. Put on your cleaning gloves and manually sweep your hands across the entire floor surface underneath the bed, or use a long-handled grabber tool. Retrieve any large or rigid items and place them safely aside so they do not cause mechanical damage during the active vacuuming phase.
Pro Tip: Check thoroughly in the absolute center underneath the bed, which is the prime gravitational zone for lost charging bricks and small accessories.
Step 5: Select and Attach the Correct Vacuum Tooling
What you need: A canister vacuum or cordless stick vacuum equipped with a low-profile crevice tool or flat upholstery attachment.
Instructions: Standard bulky upright vacuum cleaner heads are usually too tall to fit under standard bed frames, which typically offer only 4 to 10 inches of clearance. Disconnect your vacuum’s primary floor head and snap on a specialized low-profile flat tool, a flexible extension hose, or an angled crevice attachment. Test the clearance height by sliding the wand gently beneath the frame edge to ensure it can reach the absolute center of the mattress platform without forcing or bending the plastic wand.
Pro Tip: If your vacuum has adjustable suction settings, turn it up to maximum power to compensate for the narrow airflow of specialized low-profile attachments.
Step 6: Execute Systematic Overlapping Vacuum Passes
What you need: Your prepared vacuum cleaner with extension wands locked firmly into place.
Instructions: Begin at the far left corner underneath the bed and push your low-profile vacuum attachment slowly inward toward the opposite side or center seam. Pull the tool back in a straight, overlapping line, moving systematically across the entire width of the bed frame in a grid pattern. Make at least two perpendicular passes—one running front-to-back and a second pass running side-to-side—to lift deeply embedded carpet fibers or capture fine dust settled between hardwood floor planks.
Pro Tip: Move slowly; rushing the vacuum wand over thick dust clumps will only scatter the debris rather than sucking it into the canister.
Step 7: Perform Final Edge Detailing and Baseboard Sweeping
What you need: A soft-bristled dusting brush attachment.
Instructions: Once the main under-bed floor space is clear, switch your vacuum attachment to a soft-bristled dusting brush. Run this attachment along the interior edges where the bed legs meet the floor, around center support beams, and along any exposed baseboards hidden beneath the frame. These tight perimeter junctions frequently accumulate dense webs of dust and pet hair that standard wide vacuum heads miss entirely.
Pro Tip: Pay special attention to wooden or metal bed slats, which collect a surprising amount of airborne dust on their horizontal top surfaces.
✅ Final Checklist
- All personal items, storage bins, and obstructions safely removed and wiped down
- Bed skirts lifted and secured away from the floor zone
- Large debris, coins, and small objects manually cleared to prevent vacuum damage
- Correct low-profile attachment securely fitted to the vacuum hose
- Systematic overlapping passes completed across the entire under-bed floor space
- Perimeter legs, support slats, and baseboard junctions detailed thoroughly
Important Notes:
- Always unplug or power down corded vacuums if you need to physically shift a heavy wooden bed frame to access tight spaces.
- Seek professional help or enlist a partner if your bed frame is exceptionally heavy or built with integrated hydraulic storage systems that require careful handling.
- Estimated time: 15 to 25 minutes per bed. Cost: $0 (using existing household tools).
How to Clear and Prepare the Under-Bed Area
Before introducing any vacuum tools to the space, you must eliminate physical obstructions. Rushing straight to vacuuming will only cause your attachments to snag on stray items.
Decluttering and Removing Storage Bins
Pull out all plastic storage bins, extra duvets, and rogue items stored underneath. Check the bottoms of these containers, as they often accumulate a thick layer of felted dust and pet hair that needs to be wiped down separately before you return them to the space in 2026.
The Dry-Sweep Sweep-Out Technique
Use a long-handled flat micro-fiber dusting tool to pull deeply embedded larger debris, pet toys, and lint clumps out toward the open room first. Vacuuming works best when you are dealing with fine dust and hair rather than blocking your suction path with bulky obstructions.
- Remove all plastic storage boxes and inspect their bases for trapped dust.
- Pull out loose items toward the room perimeter using a flat sweeper.
- Clear a 3-foot workspace around the entire perimeter of the bed frame.
Step-by-Step Guide on How to Vacuum Under Bed Using DIY Hacks
When standard vacuum attachments fail to reach deep into low-clearance spaces, smart DIY modifications can bridge the gap. According to cleaning equipment engineers, adapting household items safely prevents damage to both flooring and vacuum motors.
Using the Pantyhose and Cardboard Tube Hack
This classic airflow extension trick allows you to reach deep dust bunnies without expensive accessories. Follow these steps to set up the hack safely:
- Take a sturdy cardboard mailing tube or an empty wrapping paper roll measuring at least 30 inches.
- Stretch a pair of old nylon pantyhose through the tube, securing one end over the vacuum hose nozzle with a rubber band.
- Leave the other end loose inside the tube to catch large debris while letting air flow freely.
- Tape the cardboard tube securely to your vacuum extension wand using heavy-duty duct tape.
- Glide the flat tube smoothly across the floor beneath the bed frame, checking the nylon trap periodically for trapped items.
Creating a Flat Crevice Tool Extender
If you lack a flexible hose attachment, a flattened plastic bottle can serve as a custom low-profile nozzle.
- Clean and dry a flexible plastic 1-liter soda bottle thoroughly.
- Cut the bottom off the bottle and snip the body lengthwise to create a flattened plastic funnel shape.
- Attach the narrow neck of the bottle to your vacuum hose, sealing any air gaps with duct tape.
- Flatten the wider end gently so it slips into clearances under two inches high.
What If It Still Doesn’t Work and Your Clearance Is Too Tight?
If your bed frame sits flush against the floor or leaves less than one inch of clearance, standard vacuuming methods become completely impossible. When DIY hacks and slim attachments fail to solve the problem, consider these fallback steps:
- Use heavy-duty furniture risers to elevate the bed frame by 3 to 5 inches, which instantly creates enough space for standard vacuum heads.
- Invest in an ultra-slim robotic vacuum designed specifically for low-profile furniture, with models in 2026 measuring under 2.5 inches in height.
- Disassemble and move the bed frame completely during your semi-annual deep cleaning schedule.
- Hire a local cleaning service for a single deep-clean session if heavy lifting is not an option; professional deep-cleaning services typically charge between $100 and $250 depending on your region.
Conclusion
Mastering how to vacuum under the bed keeps hidden dust, allergens, and pet dander from compromising your indoor air quality. By utilizing specialized low-profile attachments, creative DIY hose extensions, or proper bed risers, you can easily conquer this notoriously neglected zone. According to verified research and expert sources from indoor air quality associations, maintaining a dust-free bedroom significantly reduces nighttime allergy symptoms. Take your next actionable step today by measuring your bed clearance and selecting the right attachment method for your home in 2026.
❓ Frequently Asked Questions
What are the best attachments for vacuuming under a low bed?
Flat multi-angle adapter wands and flexible flat crevice tools are specifically designed to slip into gaps as narrow as one inch. Many modern stick vacuums also feature bendable wands built for this exact purpose.
How do I prevent dust from accumulating so quickly under my bed?
Minimize under-bed storage clutter, use closed plastic bins instead of open cardboard boxes, and run an air purifier in your bedroom to capture airborne dust before it settles.
Is it better to sweep or vacuum under the bed first?
Vacuuming is always superior because it captures fine dust particles and allergens rather than kicking them up into the air and onto your surrounding furniture and bedding.
What can I do if my vacuum hose is too short?
You can purchase universal vacuum hose extensions online or use a lightweight cordless stick vacuum that provides extended reach without being tethered to a wall outlet.
How do I handle pet hair that is tightly matted under the bed?
Use a rubber squeegee or a damp rubber utility glove to gather matted pet hair into manageable clumps before vacuuming them up.
Should I wash my bedding after cleaning under the bed?
Yes, cleaning underneath the bed inevitably stirs up hidden dust mites and allergens that frequently settle onto nearby sheets, blankets, and dust ruffles.
![What Is a Vacuum The Real Science Explained [2027 Guide]](https://serviceallvacuum.com/wp-content/uploads/2026/09/what-is-a-vacuum-featured-768x432.webp)