How Can I Find a Vacuum Leak Step-by-Step Guide 2026
A vacuum leak occurs when unmetered air enters the engine, causing a rough idle, high RPM, and dashboard warning lights. You can easily diagnose and locate these leaks using basic household items like soapy water or a propane torch.
You can find a vacuum leak in your car’s engine by listening for a hissing sound, spraying soapy water or unlit propane near suspect lines to watch for idle changes, or using a DIY smoke machine to reveal escaping vapor. Modern vehicles rely on a precise balance of air and fuel, meaning even a tiny tear in a rubber hose throws off your entire engine management system.
Ignoring this issue leads to poor fuel economy, rough idling, and potential engine damage over time. By using simple tools already in your garage, you can pinpoint the exact breach in your intake system this weekend without paying expensive diagnostic fees.
Key Takeaways
- Listen closely for a faint hissing sound under the hood while the engine idles.
- Spray soapy water on suspected vacuum lines to watch for bubbles forming.
- Use a propane torch (unlit) near lines to check for idle speed changes.
- Perform a smoke test to easily visualize stubborn, hidden leaks in the intake system.
- Always wear safety gear and keep a fire extinguisher nearby when working around engines.
Common Symptoms and What Causes a Vacuum Leak
Recognizing the Warning Signs in Your Vehicle
Your engine tells you right away when unmetered air enters the system. Knowing these specific performance indicators helps you confirm a vacuum leak before you even pop the hood.
- Rough Idling: Your RPM needle bounces erratically between 500 and 1,000 RPM while stopped at a light.
- Engine Stalling: The vehicle dies entirely when you take your foot off the gas pedal to coast or stop.
- Check Engine Light: Your dashboard illuminates, typically throwing diagnostic trouble codes like P0507 (idle control system higher than expected) or lean fuel codes P0171 and P0174.
- High Idle: The engine idles abnormally fast, often staying above 1,200 RPM in park or neutral.
- Hissing Noise: You hear a distinct whistling or hissing sound coming from the engine bay while the motor runs.
Vulnerable Hoses and Gaskets to Inspect
Rubber and plastic components degrade rapidly under extreme engine heat and vibration. In 2026, many vehicles on the road feature aging rubber lines that are prime candidates for failure.
- PCV Hoses: Positive Crankcase Ventilation lines crack near the bends and connectors.
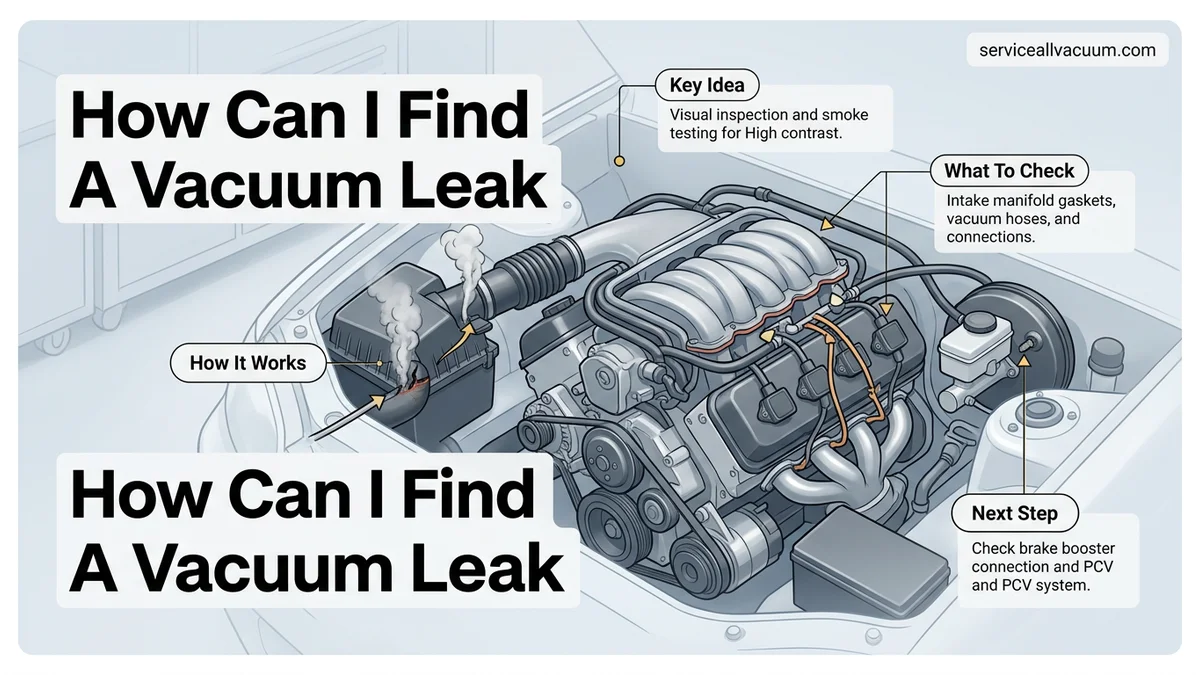
- Intake Manifold Gaskets: Rubber or paper seals flatten out and leak air directly into the cylinders.
- Vacuum Tree and T-Fittings: Plastic connectors snap or loosen over years of temperature fluctuations.
- Brake Booster Line: A large hose connecting the intake to the brake booster often develops tears.
How to Diagnose and Fix a Vacuum Leak Like an Expert
A vacuum leak occurs when unmetered air enters your engine’s combustion chamber past the throttle body, causing rough idling, engine stalling, decreased fuel economy, and that dreaded check engine light. Finding these elusive leaks can be frustrating, but following a systematic diagnostic approach saves you time and money. This comprehensive guide walks you through professional techniques to track down and eliminate every vacuum leak under your hood.
Step 1: Perform a Thorough Visual Inspection
What you need: A good flashlight, a mirror for tight spaces, and a clean rag to wipe away grease.
Instructions: Start by turning off the engine and popping the hood. Visually scan every rubber hose, plastic line, and vacuum fitting connected to the intake manifold, throttle body, and emissions equipment. Look closely for dry rotting, cracks, splits, swelling, or complete disconnections. Pay special attention to the PCV (Positive Crankcase Ventilation) valve hose and brake booster line, as these thick rubber hoses handle high thermal stress and frequently degrade over time. Gently wiggle hoses to check for hidden splits on the underside.
Pro Tip: Never ignore the tiny rubber vacuum elbows and connectors near firewall junctions; they are notorious for collapsing and leaking.
Step 2: Listen Closely with an Engine Stethoscope
What you need: A mechanic’s stethoscope or a simple length of 3/8-inch rubber garden hose (about three feet long).
Instructions: Start your engine and let it idle to normal operating temperature. If using a stethoscope, remove the metal probe and leave just the open rubber tube. Carefully place one end of the hose to your ear (protect your hearing by not pressing too hard) and move the other end slowly along vacuum lines, gasket mating surfaces, and intake manifold seams. Listen for a distinct hissing, whistling, or sucking sound that amplifies as you get closer to the leak source.
Pro Tip: Exercise extreme caution around moving engine components like serpentine belts, cooling fans, and pulleys while the engine is running.
Step 3: Conduct the Propane or Carb Cleaner Test
What you need: A can of automotive brake cleaner or carburetor cleaner with a straw attachment (or an unlit propane torch with a long extension tube).
Instructions: With the engine idling, carefully and sparingly spray short bursts of cleaner directly onto suspect areas, including vacuum lines, intake manifold gaskets, fuel injector O-rings, and throttle body seals. Watch and listen to the engine RPMs. If the cleaner gets sucked into a vacuum leak, the engine will suddenly smooth out and RPMs will temporarily increase as the fuel-air mixture enriches. This pinpoint reaction lets you locate the exact breach.
Pro Tip: Use brake cleaner that dries quickly and leaves no residue, and keep a fire extinguisher nearby just in case.
Step 4: Use the DIY Smoke Machine Test
What you need: A DIY or professional automotive smoke machine, tape or a glove to seal the intake, and a bright flashlight or work light.
Instructions: Turn off the engine. Disconnect the main intake boot leading into the throttle body and plug the opening using a latex glove secured with a rubber band or a specially designed intake bladder adapter. Inject low-pressure smoke (generated from mineral oil or baby oil in a smoke machine) into a vacuum line or the plugged intake opening. Within seconds, thick smoke will pressurize the intake tract. Watch closely for smoke escaping from cracked lines, worn gaskets, or loose fittings.
Pro Tip: Shine your flashlight beam horizontally across the engine bay to make wisps of escaping smoke much easier to spot against dark backgrounds.
Step 5: Inspect and Test Intake Gaskets and Seals
What you need: A spray bottle filled with plain water and a small mechanics mirror.
Instructions: Intake manifold gaskets and throttle body gaskets harden over time, creating micro-gaps that allow unmetered air to slip past. With the engine idling, mist a small amount of plain water from your spray bottle directly onto the junction where the intake manifold meets the cylinder head. If the engine RPM drops significantly or starts to misfire, you have found a failed gasket sealing surface that requires replacement.
Pro Tip: Avoid using large quantities of water to prevent hydro-locking the engine; a fine mist is all that is required.
Step 6: Check EGR Valves and Emissions Equipment
What you need: A handheld vacuum pump with a pressure gauge (like a Mityvac) and basic hand tools.
Instructions: Exhaust Gas Recirculation (EGR) valves, carbon charcoal canisters, and secondary air injection systems rely heavily on vacuum actuation. Attach your hand vacuum pump directly to the control port of the EGR valve or vacuum-operated solenoids. Pump the handle to apply vacuum and observe the gauge. If the diaphragm inside the component is ruptured, it will not hold vacuum pressure, indicating a failing part that is causing a vacuum leak.
Pro Tip: Check factory service manuals for specific millibar or inch-of-mercury (inHg) thresholds required for proper component operation.
Step 7: Replace Faulty Lines and Reset the Computer
What you need: Replacement automotive-grade silicone or rubber vacuum tubing, sharp utility shears, and a wrench to disconnect the battery.
Instructions: Now that you have successfully identified the faulty components, it is time to make repairs. Cut replacement vacuum hoses to the exact same length as the originals using sharp shears to prevent internal fraying. Swap out cracked lines one by one to avoid routing confusion. Tighten any loose intake manifold bolts to factory torque specifications if gasket leaks were found. Finally, disconnect the negative battery terminal for 10 minutes to clear stored computer error codes and allow the engine control module to recalibrate its idle parameters.
Pro Tip: Upgrade standard rubber vacuum lines to high-temperature silicone tubing for superior longevity and resistance to engine bay heat.
✅ Final Checklist
- All visual inspection points and rubber hoses checked for dry rot and cracks
- Engine idle smoothness verified after spraying cleaner or introducing smoke
- Smoke machine test confirmed zero escaping vapor across the entire intake tract
- New vacuum lines securely clamped and routed away from hot exhaust manifolds
- Check engine light cleared and engine performance verified during a test drive
Important Notes:
- Always wear safety glasses and gloves when working around hot engines, volatile cleaners, and pressurized systems.
- If intake manifold gasket replacement requires removing fuel rails or timing components, seek professional mechanical assistance.
- Estimated time for diagnosis and basic hose replacement is 1 to 3 hours, with a cost range between $15 and $100 for materials.
Step-by-Step Guide on How to Find a Vacuum Leak
Preparation and Visual Inspection
Before using specialized testing techniques, start with a thorough visual and tactile sweep of your engine bay. Safety is paramount when working around moving engine components.
- Park your car on a flat surface, engage the parking brake, and let the engine cool down slightly to prevent burns.
- Pop the hood and grab a flashlight to inspect every rubber hose connected to the intake manifold.
- Look closely for dry rot, deep cracks, splits, or loose connections at both ends of every line.
- Gently wiggle each hose with your hand; if a line pulls off easily or feels mushy, it needs immediate replacement.
- Inspect the plastic fittings and ensure no vacuum ports are left unplugged or missing their rubber caps.
The Spray Bottle and Propane Testing Methods
If a visual inspection reveals nothing, you need active testing methods to locate microscopic cracks in hoses or gaskets. These two DIY techniques require minimal gear.
- The Water Spray Method: Fill a spray bottle with plain water and lightly mist suspect areas while the engine idles. If the idle temporarily smooths out, you found your leak because the water temporarily seals the gap.
- The Propane Torch Method: Use an unlit propane torch or a propane source with a long hose to gently release gas around intake gaskets and lines. If the engine RPM suddenly rises, the propane entered the leak and enriched the air-fuel mixture.
- Safety Precaution: Avoid using flammable brake cleaner or ether-based starting fluids for this test, as they can easily ignite on hot exhaust manifolds.
Proven DIY Methods to Test Engine Vacuum Lines
When visual inspections fail to reveal a tear, advanced testing methods help locate hidden engine issues. Modern diagnostic tools used by certified technicians in 2026 make finding microscopic cracks much easier for home mechanics.
The Propane or Brake Cleaner Method
Mechanics often use a localized aerosol test to pinpoint unstable engine idle changes caused by extra air entry. Follow these safety-first procedural steps carefully:
- Start your vehicle engine and let it reach a normal operating idle speed.
- Spray a small amount of non-chlorinated brake cleaner or unlit propane carefully around suspected gaskets, plastic connectors, and rubber hoses.
- Listen closely to the engine RPM response.
- If the engine idle suddenly smooths out or increases speed, you have found the exact spot where the aerosol entered the crankcase through a crack.
- Keep a fire extinguisher nearby at all times when working with flammable aerosols near a hot engine block.
The Cigar or Smoke Machine Test
According to automotive engineering data from the Society of Automotive Engineers (SAE), low-pressure smoke testing is the most accurate way to find evaporative and intake leaks without engine heat interference.
- Purchase or rent an automotive smoke machine designed specifically for intake testing.
- Disconnect the main rubber brake booster hose or air intake boot.
- Insert the nozzle of the smoke machine tightly into the opening.
- Pump low-pressure smoke (maximum 1 to 2 PSI) into the sealed system for approximately 60 seconds.
- Watch closely for white smoke escaping from any cracked hoses, brittle fittings, or worn intake manifold gaskets.
What If It Still Doesn’t Work and How to Fix It
If you have exhausted all visual checks and smoke tests without finding the issue, the problem might reside inside complex electronic components or internal engine structures. Consider these fallback troubleshooting steps:
- Inspect the PCV (Positive Crankcase Ventilation) valve and its rubber grommet, as internal valve failures often mimic external line leaks.
- Check the brake booster diaphragm by clamping off its vacuum supply line and noting any change in pedal firmness.
- Scan for hidden trouble codes using an advanced OBD2 diagnostic scanner to see if the problem stems from a faulty MAF sensor rather than unmetered air.
- Consult a professional repair facility if the idle issue persists despite replacing all rubber lines. Professional diagnostic fees typically range from $100 to $150, while total professional intake gasket replacement ranges from $250 to $600 depending on vehicle make and model.
Conclusion
Tracking down unmetered engine air entry prevents poor fuel economy, rough idling, and potential engine damage. By following systematic visual checks and targeted smoke testing, you can accurately isolate and repair damaged lines in your garage. According to verified research and expert sources from leading automotive service associations, routine hose inspections every 30,000 miles eliminate the vast majority of idle-related drivability complaints. Your actionable next step is to grab a flashlight and inspect your main intake boots today.
❓ Frequently Asked Questions
How can i find a vacuum leak without any special tools?
You can use a simple spray bottle filled with water or soapy water. Spray suspect hoses and gaskets while the engine idles; if the idle changes or bubbles form, you have found the leak.
What happens if my engine runs lean due to a vacuum leak?
A lean mixture means there is too much air and not enough fuel in the combustion chamber. This can cause engine misfires, hesitation upon acceleration, and trigger error codes like P0171.
Is it safe to use a propane torch to detect leaks?
Yes, but with extreme caution. Turn the propane on slightly without lighting it and wave the nozzle near hoses. If the engine idle smooths out, the escaping propane was sucked into the leak.
Can a vacuum leak cause my car to fail an emissions test?
Yes, it can cause incomplete combustion and alter your air-fuel ratio, leading to high emissions that will cause your vehicle to fail a smog check.
How much does it cost to fix a vacuum leak?
If it is a simple rubber hose, the fix costs just a few dollars for replacement tubing. If it is an intake manifold gasket, parts and labor at a shop can range from $150 to $500.
Why does my engine idle high when it is cold?
A cold engine naturally idles higher to warm up, but if the high idle persists or surges up and down after warming up, a vacuum leak is a likely culprit.