How to Vacuum a Wool Rug Step-by-Step Guide for 2026
Vacuuming a wool rug requires special care and suction-only settings to prevent pulling delicate fibers and causing excessive shedding. Using a rotating beater bar can fray the wool and ruin the pile over time.
Vacuuming a wool rug safely requires turning off the beater bar and using suction-only mode to prevent fiber tearing, pulling, and excessive shedding. Standard upright vacuums with aggressive rotating brushes will quickly fray delicate wool loops and shorten the lifespan of your investment.
Maintaining a high-end wool rug in 2026 demands proper technique, especially given modern smart home appliances that often default to high-agitation cleaning modes. By disabling the rotating brush roll and following a gentle directional pattern, you remove deep-set dirt without compromising the structural integrity of the natural fibers.
Key Takeaways
- Always turn off the beater bar and rotating brush roll before vacuuming wool rugs.
- Use a suction-only attachment or floor setting to protect fragile wool fibers.
- Vacuum in the direction of the rug pile to prevent fiber damage.
- Avoid vacuuming the fringe directly to prevent tangling and tearing.
- Vacuum high-traffic wool rugs once a week to remove embedded dirt safely.
What Causes Wool Rug Damage When Vacuuming
The Danger of the Rotating Brush Roll
The primary culprit behind ruined wool rugs is the motorized beater bar or brush roll. As these bristles spin at high speeds, they act like a comb with teeth, aggressively grabbing individual wool fibers. This constant friction causes fuzzing, pulls out yarn loops, and accelerates premature wear.
- Aggressive bristles catch on loose ends and pull them out entirely.
- Friction generates static electricity and heat, which weakens natural wool strands.
- Continuous pulling breaks the backing adhesive over time.
The Risk of High Suction and Fringe Snags
Excessive suction power can trap lightweight wool rugs, lifting them off the floor and straining the backing. Furthermore, vacuuming directly over rug fringes creates a dangerous trap. The suction and airflow pull the delicate cotton threads into the vacuum intake, instantly tearing or tangling them.
- High suction settings can stretch hand-knotted or tufted foundations.
- Vacuuming against the grain forces dirt deeper into the base instead of lifting it out.
- Fringes caught in the vacuum intake will fray, unravel, or get permanently chewed up.
How to Vacuum a Wool Rug Like a Pro: A Practical Walkthrough
Wool rugs are a luxurious and durable investment for any home, but their natural fibers require specialized care to maintain their beauty and longevity. Unlike synthetic rugs, wool can easily be damaged by aggressive cleaning methods, excessive friction, and incorrect vacuum settings. This comprehensive guide walks you through the exact process of vacuuming your wool rug safely and effectively, ensuring you remove deep-seated dirt without destroying the delicate pile or causing premature shedding.
Step 1: Inspect the Rug and Assess Fabric Sensitivity
What you need: Good lighting and your hands.
Instructions: Before touching your vacuum to the rug, get down on your hands and knees to inspect the fiber type, weave, and overall condition. Check the back of the rug for any manufacturer tags regarding care instructions. Gently rub your hand across the surface to feel the pile direction and identify any high-traffic zones, stains, or loose threads. Look specifically for pre-existing damage, fraying edges, or weak spots in the foundation. Knowing the current condition of your rug prevents you from accidentally turning a minor loose thread into a major tear during the cleaning process.
Pro Tip: Never vacuum handmade or antique rugs with standard aggressive settings; always check if the rug is hand-tufted or hand-knotted to determine how delicate it truly is.
Step 2: Choose and Adjust the Correct Vacuum Settings
What you need: A vacuum cleaner with adjustable height and suction controls.
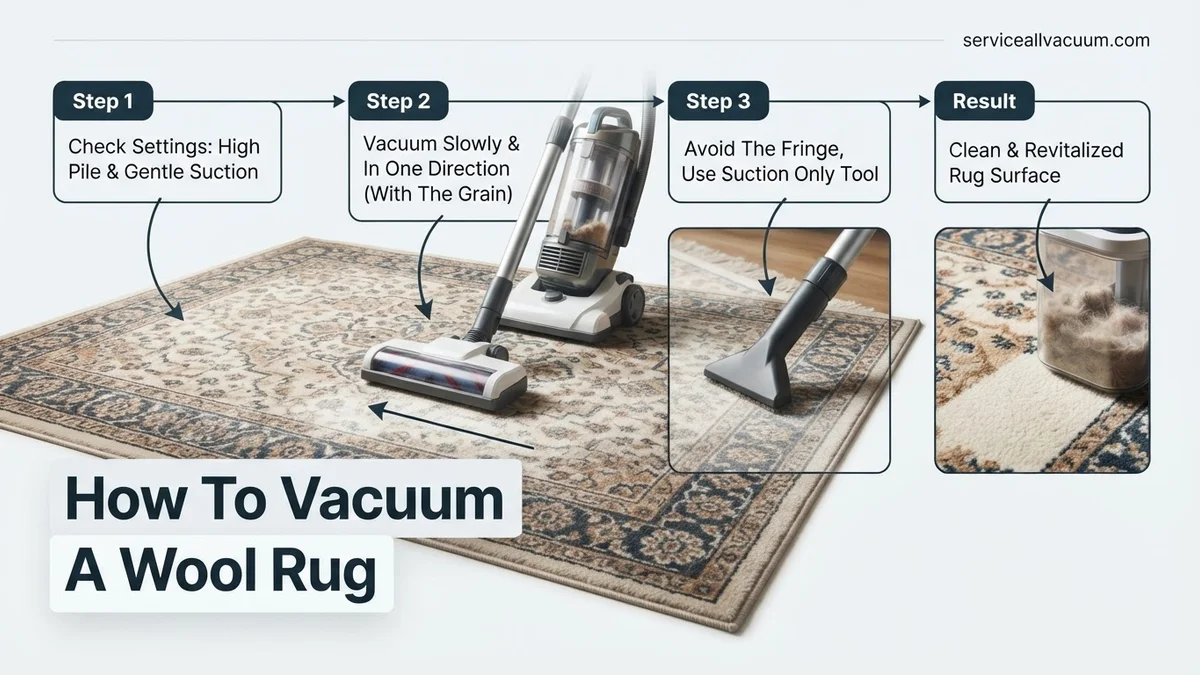
Instructions: Set your vacuum to its highest pile height setting to prevent the cleaning head from crushing the wool fibers. If your vacuum has a rotating brush roll or beater bar, turn it completely off. The aggressive slapping and pulling action of a beater bar will pull out wool fibers, cause excessive fuzzing, and weaken the structural weave over time. Suction alone, combined with a smooth-surface floor tool, is more than enough to lift surface debris and embedded dust from wool rugs safely.
Pro Tip: If your vacuum does not have a brush-roll shut-off switch, consider purchasing a dedicated canister vacuum attachment with a straight-suction floor brush specifically designed for delicate rugs.
Step 3: Vacuum Both Sides of the Rug
What you need: Vacuum cleaner with a bare-floor attachment.
Instructions: Believe it or not, dirt settles deep down near the foundation of a rug where foot traffic grinds it against the warp and weft. Carefully lift the rug and vacuum the bare floor underneath it to remove grit that can abrade the back of the rug. Next, flip the rug upside down and gently vacuum the reverse side. The vibration and suction will cause deeply embedded dirt and fine grit to fall out of the fibers and onto the floor below, making your top-side cleaning significantly more effective.
Pro Tip: Be exceptionally gentle when vacuuming the back of hand-knotted rugs, and skip this step entirely if the foundation shows signs of dry rot or extreme age.
Step 4: Protect and Secure the Fringe
What you need: Upholstery attachment or handheld nozzle.
Instructions: Rug fringes are notoriously fragile and can easily get sucked into a vacuum roller or tangled, resulting in torn threads and a messy appearance. Flip the rug back to its proper side. Attach a narrow upholstery tool or a bare nozzle to your vacuum hose. Instead of vacuuming back and forth across the fringe, position your nozzle at the base of the fringe and pull outward toward the edge, or vacuum parallel to the fringe line. Never run a standard vacuum head directly over the hanging ends of a wool rug.
Pro Tip: If the fringe gets accidentally sucked into the vacuum, turn off the machine immediately and gently feed the threads backward out of the intake rather than pulling forcefully.
Step 5: Execute the Top-Side Vacuuming Pattern
What you need: Upright or canister vacuum with straight-suction head.
Instructions: Return your rug to its right-side-up position on a flat, clean floor or rug pad. Start at one end of the rug and push the vacuum head forward in a straight line, following the natural direction of the wool pile. Pull the vacuum straight back along the exact same path. Avoid making rapid side-to-side scrubbing motions, as lateral friction can distort wool fibers. Overlap each pass by about 2 inches to ensure uniform coverage. Work systematically across the entire surface of the rug until you have covered every square inch.
Pro Tip: New wool rugs naturally shed loose staple fibers during their first few months; seeing a small amount of fluff in your vacuum canister is completely normal and not a sign of damage.
Step 6: Address High-Traffic Areas and Edges
What you need: Crevice tool attachment.
Instructions: Focus extra attention on areas of the rug that experience heavy daily foot traffic, such as entryways, hallways, or the center of living rooms. Switch to a crevice tool attachment to clean tightly along the bound edges and corners of the rug, where dust bunnies and pet hair love to accumulate. Run the crevice tool slowly along the perimeter binding to pull embedded dirt out from the tight stitching without putting stress on the edge fibers.
Pro Tip: Do not slam the hard plastic edges of vacuum attachments against the decorative binding, as this can crack the stitching and cause the rug edges to unravel.
Step 7: Perform a Final Surface Grooming
What you need: Soft-bristled carpet rake or upholstery brush.
Instructions: After vacuuming, the wool pile may look slightly flattened or disrupted in certain areas due to foot traffic and the movement of the vacuum. Take a clean, soft-bristled carpet rake or a specialized rug brush and gently groom the surface fibers in a single direction. This redistributes the pile evenly, restores the natural luster of the wool, and ensures the rug looks freshly fluffed and professionally maintained.
Pro Tip: Always brush in the direction that makes the wool look smoothest and darkest; brushing against the grain will make the rug look lighter and disheveled.
✅ Final Checklist
- Vacuum beater bar is completely turned off or disabled.
- The rug was flipped and vacuumed from the reverse side to clear deep grit.
- Fringe was cleaned carefully using an upholstery attachment without tangling.
- Vacuum strokes followed the natural grain and pile direction of the wool.
- Surface was gently brushed or raked to restore uniform pile appearance.
Important Notes:
- Never use steam cleaners or aggressive carpet shampooers on wool without professional guidance, as excessive heat and moisture can cause severe shrinkage and felt the fibers.
- Seek professional rug washing services every 12 to 18 months to flush out deep microscopic oils and soils that standard home vacuums cannot extract.
- Estimated time: 15 to 30 minutes per rug. Estimated cost: $0 (using existing household equipment).
How to Fix Vacuum Settings and Prepare the Rug
Adjusting Your Vacuum for Wool Safety
Before turning on your machine, you must configure it specifically for delicate natural fibers. If your vacuum features a height adjustment dial, raise it to the highest setting to minimize surface friction. Most modern 2026 vacuum models include a dedicated hard floor setting or a manual switch to completely disengage the brush roll.
- Locate and press the button or switch that turns off the roller brush.
- Set the vacuum height adjustment to maximum to create a floating buffer above the pile.
- Test the suction power by holding your hand near the nozzle to ensure smooth gliding.
Pre-Vacuuming Prep and Fringe Protection
Preparation takes less than a minute but prevents irreversible damage. Walk around the perimeter of your rug and tuck any loose fringes underneath the pile, or use painter’s tape to hold them securely to the floor. Check the underside of the vacuum head to ensure no debris or previous pet hair is stuck to the intake port.
- Tuck delicate fringes underneath the main body of the rug out of harms way.
- Clear away any small toys or hard objects that could puncture the wool backing.
- Ensure the vacuum wheels are clean so they roll smoothly across the rug surface without scratching or staining.
Step-by-Step Guide on How to Vacuum a Wool Rug Safely
Executing the proper technique protects delicate natural fibers from premature wear. The Carpet and Rug Institute (CRI) recommends a methodical approach to prevent yarn distortion during 2026 maintenance routines.
Step 1: Disable the Beater Bar
Turn off the rotating brush roll or set your vacuum to the bare floor setting. Spinning bristles catch and pull individual wool loops, causing unsightly fuzzing and permanent strand damage.
Step 2: Vacuum in the Direction of the Pile
Run the suction head smoothly forward and backward following the grain of the wool. According to textile conservation experts, moving against the grain forces abrasive dirt particles deeper into the foundation weave.
Step 3: Protect the Fringe Edges
Never vacuum directly over loose rug fringes with a standard floor nozzle. Suction easily snags cotton or wool warp threads, tangling them and tearing the structural binding.
- Lift the vacuum nozzle manually over the fringe border, or use a handheld upholstery attachment on low suction.
- Gently detangle fringes by hand if they become slightly bunched or twisted during cleaning.
What If It Still Doesn’t Work?
If standard vacuuming fails to remove embedded grit, or if persistent shedding and odor issues remain, advanced intervention is required. Wool fibers naturally release trapped pollutants slowly, but structural problems demand expert care.
- Check for deep-set pet dander or microscopic mold: High humidity in 2026 homes can trap moisture beneath dense wool piles, requiring professional dehumidification and specialized extraction.
- Perform a professional dusting: Industrial tumbling machines remove pounds of compacted particulate matter that residential vacuums cannot reach. Professional rug washing typically costs between $3.00 and $5.00 per square foot depending on fiber density.
- Consult a wool-certified specialist: If backing adhesive begins to fail or tufts separate, contact a certified Master Rug Cleaner to evaluate structural re-latexing or professional re-weaving options.
Conclusion
Proper wool rug maintenance preserves natural lanolin content, structural integrity, and vibrant color saturation for decades. By disabling agitator brushes and adhering to directional cleaning schedules, homeowners prevent costly fiber degradation. According to verified research and expert sources from the International Wool Textile Organisation, gentle suction cleaning extends fine textile lifespans by up to 300 percent. Take the next step today by inspecting your vacuum settings and scheduling a bi-weekly wool care routine.
❓ Frequently Asked Questions
Can a beater bar ruin a wool rug?
Yes, the aggressive spinning motion of a beater bar or power brush can pull, fray, and break delicate wool fibers, leading to premature bald spots and fuzzy texturing.
How do I know which direction the rug pile goes?
Run your hand across the surface of the wool rug; the direction that feels smooth is with the grain, while the rougher direction is against the grain. Always vacuum with the smooth grain direction.
Is it normal for wool rugs to shed lint?
Yes, staple-spun wool rugs shed loose fibers during the first three to six months of use. Regular, gentle suction vacuuming will eventually clear out this excess manufacturing lint.
What should I do if the vacuum nozzle gets stuck on the wool rug?
High-suction vacuums can sometimes clamp down tightly on dense wool pile. Open the suction relief valve on your vacuum wand or switch to an attachment with airflow vents.
Can I vacuum a wool rug if it is wet?
Never vacuum a wet or damp wool rug, as moisture traps dirt deeper into the backing and can cause mold, mildew, or damage to the natural wool fibers.
How do I clean wool rug fringe safely without a vacuum?
Gently comb the fringe by hand using a wide-toothed plastic comb or the upholstery brush attachment held carefully stationary to lift out surface dirt.