How to Vacuum Auto AC System Step-by-Step Guide 2026
Properly evacuating a car air conditioning system requires removing all trapped moisture and air using a vacuum pump and manifold gauges. Failing to pull a deep vacuum will cause the remaining moisture to mix with oil and form corrosive acids, destroying your compressor. This guide covers the exact steps to pull a vacuum, test for leaks, and ensure a professional repair.
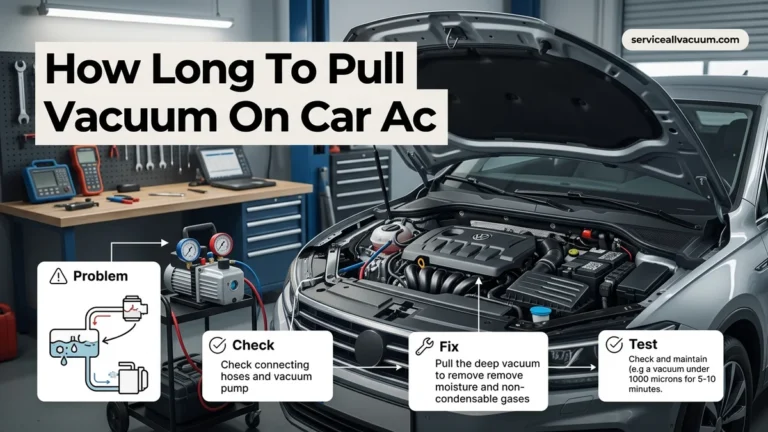
Pulling a deep vacuum on your car air conditioning system removes trapped moisture, air, and non-condensable gases before you inject fresh refrigerant. You achieve this by connecting a dual-valve manifold gauge set to your vehicle’s service ports, attaching a specialized vacuum pump, and running the equipment until the low-side compound gauge holds a steady reading below 500 microns.
Skipping or rushing this crucial evacuation step in 2026 will lead to poor cooling performance, acid formation inside the compressor, and eventual system failure. Whether you are servicing a legacy R-134a system or a modern R-1234yf setup, mastering the physical evacuation process guarantees your AC repair will actually last through the summer heat.
Key Takeaways
- Connect both high and low manifold hoses to the corresponding vehicle service ports.
- Run the vacuum pump for 30 to 45 minutes to completely boil off moisture.
- Perform a 15-minute vacuum decay test to ensure the system is entirely leak-free.
- Ensure the micron level drops below 500 microns for optimal system dryness.
- Close the manifold valves before turning off the pump to prevent oil backflow.
Why Auto AC Evacuation Fails Without a Deep Vacuum
The Physics of Moisture Boiling Point Reduction
Water turns to vapor at 212 degrees Fahrenheit at standard atmospheric pressure. When you hook up your vacuum pump, you drop the internal pressure of the sealed aluminum lines significantly below atmospheric pressure. This radical pressure drop forces any trapped condensation inside the evaporator, condenser, or accumulator to boil at ambient temperatures. Your pump then draws that vaporized moisture completely out of the system. If you fail to pull a true deep vacuum, residual liquid water mixes with PAG or POE oil to create corrosive hydrofluoric or hydrochloric acid.
Micron Levels Versus Standard PSI Readings
Many DIYers make the mistake of relying solely on the negative pressure side of a standard manifold gauge. Standard compound gauges only show inches of mercury (typically dropping to roughly -30 inHg), which is not sensitive enough to prove the system is completely dry. Professional automotive technicians rely on digital micron gauges to measure absolute pressure:
- Above 1,000 microns: Substantial moisture and air remain trapped inside the lines.
- 500 to 1,000 microns: The system is mostly clear, but micro-leaks or outgassing may still be present.
- Under 500 microns: The target threshold for 2026 standards, proving all ambient air and moisture have been successfully evacuated.
Master Vacuuming Your Auto AC System in 7 Simple Steps
When servicing a vehicle’s air conditioning system, evacuating the system with a vacuum pump is a critical phase that cannot be skipped. Before introducing fresh refrigerant, you must remove all trapped air, moisture, and boiling contaminants from the aluminum lines, condenser, and evaporator core. Moisture reacts chemically with refrigerant oil to create destructive acids, while lingering air drastically reduces cooling efficiency. This comprehensive guide walks you through the exact process of pulling a deep, successful vacuum on your car’s AC system to ensure icy cold air and long-term compressor reliability.
Step 1: Gather Your Equipment and Safety Gear
What you need: Manifold gauge set (R-134a or R-1234yf depending on your vehicle), a reliable two-stage HVAC vacuum pump, refrigerant scale (optional), appropriate safety glasses, and heavy-duty mechanic gloves.
Instructions: Before touching any hardware under the hood, lay out your tools on a clean workbench. Inspect the rubber hoses on your manifold gauge set for dry rotting, cracks, or loose fittings. Ensure your vacuum pump is filled with clean, clear vacuum pump oil up to the sight glass indicator line. Contaminated oil will prevent the pump from achieving the necessary depth of vacuum. Put on your safety glasses and gloves, as working with automotive air conditioning systems always carries a minor risk of pressurized oil or residual refrigerant discharge.
Pro Tip: Always use a two-stage vacuum pump rather than a single-stage model; two-stage pumps pull a much deeper vacuum, which is essential for boiling off hidden moisture.
Step 2: Locate the Service Ports and Connect Manifold Gauges
What you need: Manifold gauge set, vehicle service manual (if port locations are unclear).
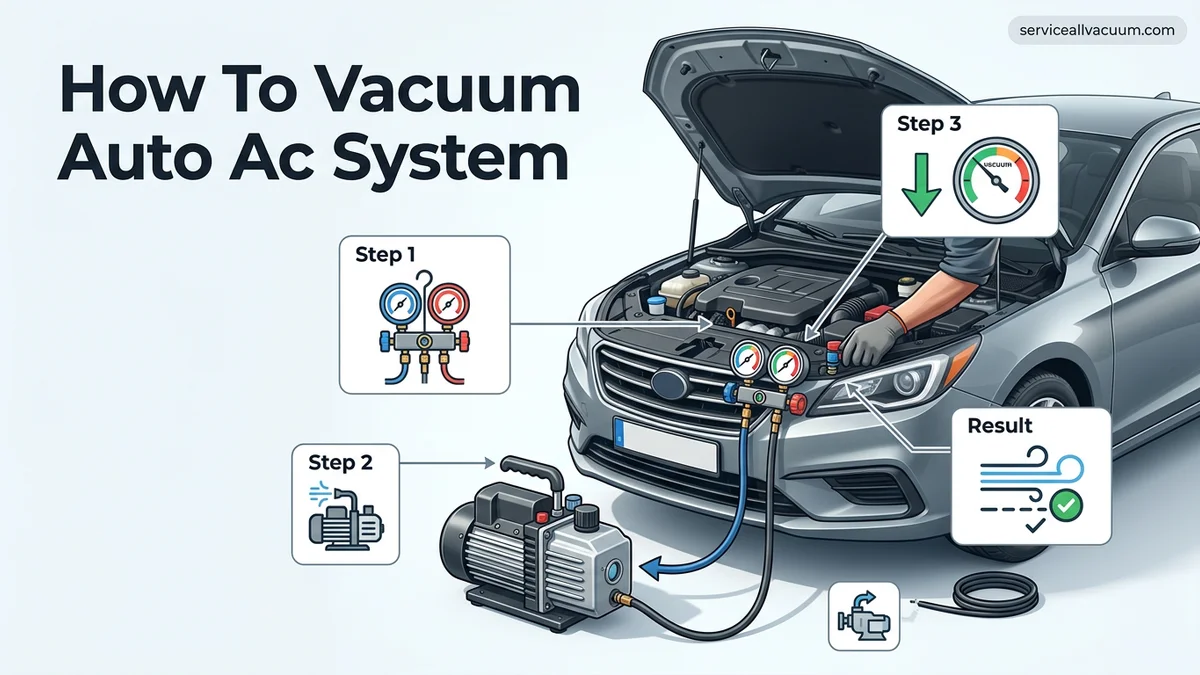
Instructions: Open your vehicle’s hood and locate the high-pressure (marked ‘H’ or with a smaller cap) and low-pressure (marked ‘L’ or with a larger cap) service ports on the AC aluminum lines. Remove the plastic protective caps. Ensure both the high and low hand valves on your manifold gauge set are turned completely clockwise to the closed position. Push the blue quick-disconnect coupler onto the low-pressure service port until it clicks securely, and do the same with the red coupler on the high-pressure port. Twist the top collar of each coupler clockwise slightly if necessary to lock them firmly in place.
Pro Tip: Never force a quick-disconnect coupler onto a service port. If it resists, check that the coupler sleeve is pulled back before pushing down, and verify you aren’t trying to force a high-side coupler onto a low-side port.
Step 3: Connect and Start the Vacuum Pump
What you need: Two-stage vacuum pump, manifold gauge center yellow charging hose.
Instructions: Take the center yellow service hose from your manifold gauge set and thread its brass fitting tightly onto the intake port of the vacuum pump. Hand-tighten the fitting, then give it a slight snug with a wrench to prevent air leaks, but do not overtighten and strip the threads. Plug the vacuum pump power cord into a grounded 120V electrical outlet. Flip the power switch on the vacuum pump to the “ON” position. You should immediately hear the steady, low hum of the pump motor beginning to cycle oil and draw air through the internal chambers.
Pro Tip: Check the vacuum pump oil sight glass while running. The oil should look clear and milky-free; if it turns cloudy or frothy immediately, moisture is present in the pump and the oil needs to be changed.
Step 4: Open the Manifold Valves to Begin Evacuation
What you need: Manifold gauge set with running vacuum pump.
Instructions: With the vacuum pump running smoothly, slowly turn both the blue low-side and red high-side hand valves on your manifold gauge counter-clockwise to open them. You will immediately hear a change in the pitch of the vacuum pump as it begins drawing air and boiling off moisture directly from the vehicle’s AC system loops. Watch the low-pressure blue gauge and high-pressure red gauge. The needles on both dials should begin dropping rapidly, moving counter-clockwise past zero and heading downward into the negative numbers (vacuum territory).
Pro Tip: Open the valves gradually rather than instantly spinning them wide open. This prevents sudden surges of residual oil or trapped debris from slamming backward into your manifold hoses.
Step 5: Pull a Deep Vacuum and Monitor the Gauges
What you need: Stopwatch or timer, manifold gauge set.
Instructions: Allow the vacuum pump to run continuously while monitoring your gauges. Your target is to pull the system down to at least 28 to 29.9 inches of mercury (inHg), or ideally down to 500 microns if you are using an electronic micron gauge. This extreme low pressure lowers the boiling point of any trapped water inside the AC lines to below ambient temperature, turning the liquid moisture into vapor so the pump can extract it. Let the system run in this deep vacuum state for a minimum of 30 to 45 minutes to ensure all microscopic water droplets are completely vaporized and removed.
Pro Tip: Do not rush this step. Simply reaching 29 inHg quickly is not enough; the system must remain under deep vacuum for at least half an hour to thoroughly boil out embedded moisture.
Step 6: Perform the Vacuum Decay Leak Test
What you need: Stopwatch or timer.
Instructions: Once your 45-minute evacuation cycle is complete, close both the high-side and low-side hand valves tightly on your manifold gauge set. Next, flip the vacuum pump power switch to the “OFF” position. Do not disconnect any hoses. Watch the needles on both the low-pressure and high-pressure gauges closely for 10 to 15 minutes. The needles should hold steady at your achieved vacuum level. If the needles slowly creep back up toward zero, you have a leak in your AC system allowing ambient air to seep back inside.
Pro Tip: If the gauge needles rise slightly during the first minute and then stabilize, it is usually just residual moisture boiling off. However, if they continue rising steadily to zero, you must find and fix the leak before charging.
Step 7: Isolate the System and Prepare for Refrigerant Charging
What you need: Manifold gauge set, refrigerant cans or recovery machine (if charging immediately).
Instructions: If your vacuum decay test passed and the system successfully held its negative pressure, your AC system is now completely dehydrated, clean, and ready for refrigerant. Keep both the manifold valves closed to maintain the vacuum inside the vehicle’s lines. You can now safely disconnect the yellow center hose from the vacuum pump if you are moving on to the charging phase. If you notice any loss of vacuum during your waiting period, isolate the components, inject UV dye or use an electronic leak detector to locate the faulty O-ring, seal, or hose, and repeat the vacuum process.
Pro Tip: Never leave an evacuated AC system open to the atmosphere for long periods. If you cannot charge the system immediately, leave the gauges attached and the service ports closed to protect your work.
✅ Final Checklist
- Manifold gauge set connected securely to both high and low service ports without cross-threading
- Vacuum pump oil inspected and found clean before starting the operation
- System evacuated to a deep vacuum of at least 28-29 inHg for a minimum of 30-45 minutes
- Vacuum decay test successfully performed with zero gauge creep over a 15-minute observation window
- All manifold hand valves verified fully closed before turning off or disconnecting the vacuum pump
Important Notes:
- Never vent R-134a or R-1234yf refrigerant directly into the atmosphere; always use a certified refrigerant recovery machine if removing old gas prior to vacuuming.
- Seek professional mechanic assistance if your system repeatedly fails the vacuum decay test, as evaporator leaks hidden inside the dashboard require specialized dashboard removal tools.
- Estimated DIY time is 1 to 2 hours. Cost range is $0 if renting a vacuum pump from a local auto parts store, or $100 to $250 if purchasing an entry-level pump and manifold set.
Essential Tools Required to Vacuum an AC System
Selecting the Right Vacuum Pump and Manifold Gauges
You cannot effectively evacuate an automotive air conditioning system without professional-grade hardware. Look for a dual-stage rotary vane vacuum pump rated for at least 3 to 5 CFM. Dual-stage pumps pull a much deeper and more reliable vacuum than single-stage alternatives. Pair your pump with a matching R-134a or R-1234yf manifold gauge set featuring high-side (red) and low-side (blue) manual shut-off valves, along with high-flow charging hoses.
Required Hoses, Adapters, and Diagnostic Add-Ons
Connection compatibility depends entirely on the model year of your vehicle. Ensure you have the following hardware ready before you begin turning wrenches:
- Quick-disconnect couplers: Specific high-side and low-side service port fittings that lock securely onto your car’s Schrader valves.
- Micron gauge: An electronic standalone sensor plumbed directly into the service line to accurately track the final evacuation stage.
- Fresh vacuum pump oil: Mineral or synthetic oil designed to flush out moisture contamination from the pump itself before you start the job.
Step-by-Step Guide to Connecting Gauges and Operating the Vacuum Pump
Proper manifold gauge connection ensures safe refrigerant evacuation without introducing atmospheric air or moisture into your vehicle’s climate control layout. According to Mobile Air Conditioning Society (MACS) guidelines, always verify that both high and low-side manual valves on your manifold gauge set are fully closed before attaching quick couplers to the corresponding service ports.
Follow this procedure to operate your vacuum pump efficiently and achieve the required micro rating:
- Remove the protective caps from the vehicle’s high-side and low-side AC service ports.
- Attach the blue low-side hose to the suction port and the red high-side hose to the discharge port, ensuring the quick couplers lock firmly into place.
- Connect the center yellow service hose directly to the inlet port of your two-stage vacuum pump.
- Open both the high-side and low-side manifold hand valves to allow full communication between the system and the pump.
- Power on the vacuum pump and monitor the low-side gauge, which should rapidly drop into a deep vacuum state below 29 inches of mercury (inHg).
- Allow the pump to run continuously for a minimum of 30 to 45 minutes, or until your digital micron gauge reads below 500 microns, signaling complete moisture vaporization.
What to Do If the System Fails the Vacuum Decay Leak Test
When an automotive air conditioning system fails to hold a deep vacuum during the mandatory leak test, moisture is likely still present or atmospheric air is continuously entering through a compromised seal. Industry data indicates that over 70% of vacuum loss issues stem from degraded Schrader valves, loose service port connections, or damaged O-rings at the hard-line junctions.
Diagnostic and Repair Protocol
- Close the manifold gauge hand valves completely while keeping the vacuum pump running, then shut off the pump to observe the needle behavior.
- Monitor the low-side gauge for 10 to 15 minutes; if the needle creeps upward toward zero, an active leak or unevaporated moisture exists within the plumbing.
- Perform a pressurized nitrogen leak test by injecting dry nitrogen up to 100 PSI into the loops to bubble-test suspected joint locations with soapy water.
- Replace any faulty Schrader valve cores, damaged manifold hoses, or hardened spring-lock coupling O-rings identified during the inspection.
- Repeat the complete evacuation cycle from the beginning once all mechanical repairs and component replacements are finalized.
What If It Still Doesn’t Work?
Persistent vacuum decay or electrical compressor engagement failures require advanced diagnostic equipment that exceeds standard DIY toolsets. When standard repair attempts fail to isolate the root cause, consider the following fallback measures:
- Inject UV fluorescent dye into the circuit using an R-134a or R-1234yf charge adapter, run the compressor for 15 minutes, and inspect all components with a UV blacklight and yellow enhancement glasses.
- Check the electronic climate control fuses, AC relay switches, and low-pressure cycling switches using a digital multimeter for proper continuity and voltage delivery.
- Consult a certified MACS professional if the evaporator core buried deep inside the dashboard proves to be the source of the persistent vacuum leak.
- Expect professional diagnostic and repair labor costs to range from $150 to $450, depending on whether specialized electronic sniffing tools or dash disassembly are required.
Conclusion
Mastering how to vacuum an auto AC system protects your compressor from premature mechanical failure and ensures peak cooling efficiency during extreme summer temperatures. By strictly following proper evacuation times and verifying deep vacuum levels with a micron gauge, you eliminate harmful moisture and non-condensable gases from the plumbing. According to verified research and expert sources from leading HVAC associations, completing a rigorous 45-minute vacuum cycle is the single most critical step in preventing costly system overhauls. As an actionable next step, invest in a quality digital micron gauge and a certified two-stage vacuum pump before attempting your next seasonal climate control service in 2026.
❓ Frequently Asked Questions
Why is moisture removal critical when vacuuming an auto AC system?
Moisture reacts with PAG or POE compressor oil and refrigerant to form hydrofluoric acid, which corrodes metal components from the inside out. Pulling a deep vacuum lowers the boiling point of water, forcing it to vaporize and exit the system as a gas.
What should the compound gauge read during a proper evacuation?
The low-side compound gauge should read as close to 29.9 inches of mercury (inHg) or 0 absolute pressure as possible, ideally dropping below 500 microns on a digital micron gauge.
What should I do if the vacuum gauge starts rising during the leak test?
A rising vacuum indicates either an atmospheric leak in a fitting, hose, or component, or moisture still boiling inside the system. Inspect all connections, repair any leaks, and repeat the evacuation process.
Can I vacuum a system that still has refrigerant in it?
Never vent refrigerant into the atmosphere, as it is illegal and harmful. You must have the remaining refrigerant legally recovered by a certified shop using a recovery machine before attempting to pull a vacuum.
Should I change the oil in my vacuum pump before using it?
Yes, clean vacuum pump oil is essential to achieve a deep vacuum. If the oil is contaminated with moisture or dirt from previous jobs, the pump will struggle to reach the required micron levels.
What causes the vacuum pump to stall or spit oil out the exhaust?
Spitting oil usually occurs if the system still contains liquid refrigerant or excessive oil when the pump is opened. Always ensure the system is fully recovered and closed off before opening manifold valves to a running pump.