How to Clean Vacuum HEPA Filter Step-by-Step 2027
A clogged HEPA filter significantly reduces your vacuum’s suction power and air purification effectiveness. This expert guide provides clear, step-by-step instructions for properly cleaning both washable and non-washable HEPA filters, ensuring optimal performance and extending your vacuum’s lifespan.
Your vacuum’s HEPA filter is crucial for trapping tiny particles and keeping your home air clean. Knowing whether your specific filter is washable or non-washable is the absolute first step to effective cleaning, and critically extends its lifespan, preventing unnecessary replacements in 2027. Improper cleaning can ruin the filter, reduce suction power, and release dust back into your air.
This guide will provide clear, actionable steps for both filter types, ensuring you maintain peak vacuum performance and indoor air quality. Following these instructions will save you money on replacement filters and keep your vacuum operating efficiently, a practical benefit for any household.
Key Takeaways
- Identify filter type:washable vs. non-washable.
- Always air dry washable filters completely.
- Never wash non-washable HEPA filters.
- Tap or brush non-washable filters gently.
- Replace filters if damaged or worn.
What Causes a Clogged Vacuum HEPA Filter?
Your vacuum’s HEPA filter acts as a critical barrier, meticulously trapping microscopic airborne particles that often escape other filter layers. Over time, this filter collects an impressive amount of allergens, pet dander, pollen, dust mites, and fine dust, often as small as 0.3 microns. These trapped particles, while beneficial for your indoor air, gradually accumulate within the filter’s dense fibrous material, reducing its porosity.
The Impact of Accumulation
When these microscopic pores become saturated with debris, airflow through the filter is significantly impeded. This direct blockage causes your vacuum’s motor to work harder, leading to a noticeable drop in suction power. A clogged filter also compromises its ability to purify the air effectively; rather than capturing new particles, it simply pushes air around the trapped grime or, worse, allows finer particles to escape back into your living space. Regular cleaning, typically every 1 to 3 months depending on vacuum usage and household allergens in 2027, prevents this detrimental buildup and maintains consistent performance.
From Start to Finish: HEPA Filter Cleaning Explained
Maintaining your vacuum cleaner’s HEPA (High-Efficiency Particulate Air) filter is not just about extending the life of your appliance; it’s crucial for ensuring optimal air quality in your home and maximizing your vacuum’s suction power. A clogged HEPA filter can reduce efficiency, strain the motor, and reintroduce allergens and dust back into your environment. This comprehensive guide will walk you through each vital step to properly clean your vacuum’s HEPA filter, ensuring it continues to trap microscopic particles effectively.
Step 1: Preparation and Safety First
What you need: Rubber gloves, dust mask (N95 recommended), large trash can or outdoor area, a designated workspace (e.g., utility sink, garage, or outdoors).
Instructions: Before you even think about touching the filter, always ensure your vacuum cleaner is unplugged from the wall socket. This is a critical safety measure to prevent accidental activation. Move to a well-ventilated area, preferably outdoors or in a garage, to minimize the inhalation of dust and allergens released during the cleaning process. Put on your rubber gloves and dust mask to protect your hands and respiratory system from fine particulate matter.
Pro Tip: Cleaning your filter outdoors on a breezy day or in a well-ventilated garage reduces the risk of fine dust settling back into your living space, making the entire process cleaner and healthier.
Step 2: Locating and Removing the HEPA Filter
What you need: Your vacuum cleaner manual (if unsure of filter location).
Instructions: Most vacuum cleaners house the HEPA filter in an easily accessible compartment, often near the motor or exhaust vent. Refer to your vacuum’s user manual if you cannot immediately locate it. Typically, there will be a latch, button, or twist mechanism to release the filter cover. Once the cover is open, carefully extract the HEPA filter. These filters are often pleated and made of delicate fibrous material, so handle them gently to avoid tearing or damaging the pleats. Note its orientation upon removal, as this will help with correct reinstallation.
Pro Tip: Some filters are designed with a handle or a specific grip point. Always use these points for removal and reinstallation to prevent accidental damage to the filter material itself.
Step 3: Initial Dry Debris Removal (Tapping Method)
What you need: A large trash can with a liner, or an open outdoor space.
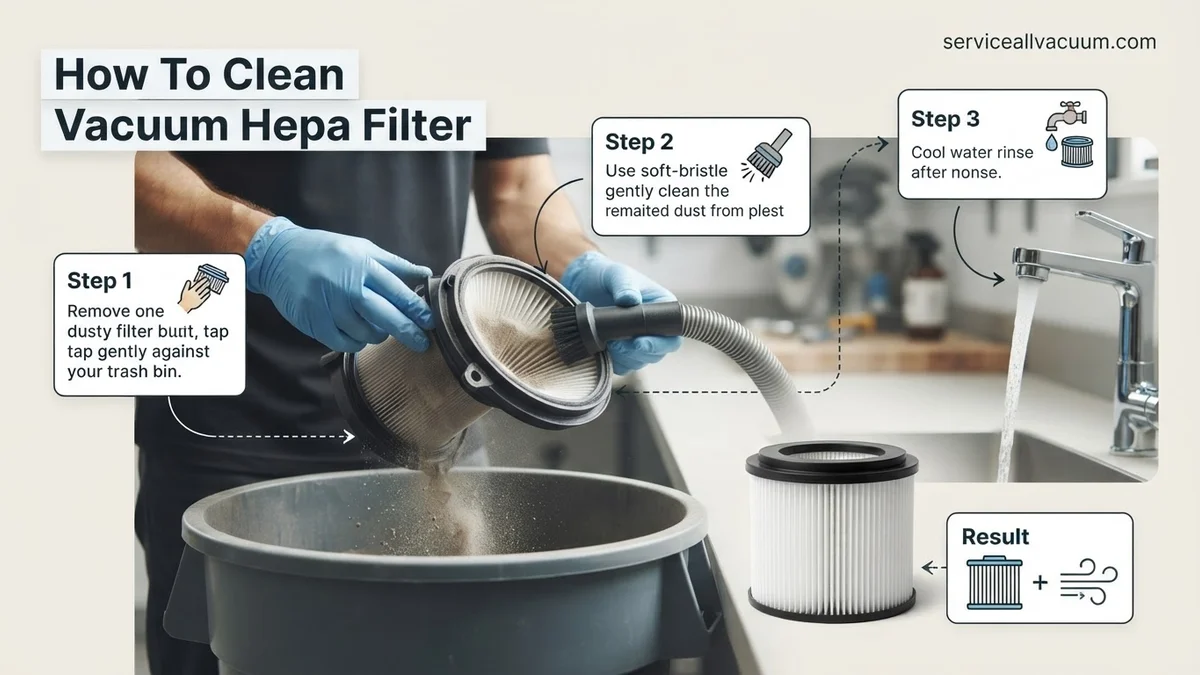
Instructions: With the filter removed and while wearing your gloves and mask, hold the filter over a large trash can or away from your body outdoors. Gently tap the filter repeatedly against the inside edge of the trash can or a hard surface. The goal is to dislodge the larger, loose debris and dust trapped within the pleats. Avoid aggressive banging or hitting the filter too hard, as this can damage the delicate filter material or dislodge the pleats from their frame. Continue tapping until you see significantly less dust falling out.
Pro Tip: Tapping the filter from multiple angles will help release dust from all sides of the pleats. This initial dry cleaning is crucial as it removes the bulk of the trapped particles before any potential washing.
Step 4: Brushing Away Fine Dust
What you need: A soft-bristled brush (e.g., an old toothbrush, paintbrush, or soft detailing brush).
Instructions: After tapping, much of the finer, more embedded dust will still remain. Take your soft-bristled brush and gently brush along the pleats of the HEPA filter. Brush in the direction of the pleats, from the top down, and always brush away from the filter material, not into it. Use light, sweeping motions to dislodge the remaining dust. Continue this process, turning the filter as needed, until you’ve brushed all accessible pleats. Repeat the tapping step from time to time to help release the brushed-off dust.
Pro Tip: For extremely tight pleats, use the corner of the brush head to carefully get into the crevices. Be patient and gentle; forcing the bristles too deep can fray the filter material and reduce its efficacy.
Step 5: Washing the Filter (If Washable)
What you need: A sink or basin, lukewarm running water, mild dish soap (ONLY if recommended by manufacturer).
Instructions: IMPORTANT: ONLY proceed with washing if your vacuum’s manufacturer explicitly states the HEPA filter is washable. Non-washable filters will be ruined by water. If washable, hold the filter under lukewarm running water, allowing the water to flow through the pleats from the clean side (the side facing the motor) to the dirty side. Gently squeeze and rinse the filter until the water runs clear. If extremely dirty and the manual permits, a tiny amount of very mild, non-foaming dish soap can be used, but rinse thoroughly to remove all soap residue.
Pro Tip: Avoid using hot water, harsh detergents, or a high-pressure spray, as these can degrade the filter material. Focus on gentle rinsing to preserve the filter’s integrity and filtration capabilities.
Step 6: Thorough Drying is Paramount
What you need: A clean, dry towel; a well-ventilated area or drying rack.
Instructions: After rinsing (or dry cleaning if non-washable), gently shake off any excess water. Place the filter on a clean, dry towel and pat it to absorb as much moisture as possible. The most crucial step for washable HEPA filters is ensuring they are completely dry before reinstallation. Place the filter in a well-ventilated area, out of direct sunlight but with good airflow, for at least 24 to 48 hours. Depending on humidity levels, it might take even longer. Any residual moisture can lead to mold growth and damage the vacuum motor.
Pro Tip: Never attempt to accelerate the drying process with a hairdryer, oven, or direct heat source. High heat can melt or warp the delicate filter fibers, rendering the filter ineffective and potentially damaging your vacuum.
Step 7: Reinstallation and Final Checks
What you need: The now-clean and completely dry HEPA filter.
Instructions: Once you are absolutely certain the filter is bone dry, carefully reinsert it into its compartment within the vacuum cleaner. Ensure it is aligned correctly, following the orientation you noted during removal. Secure any latches, buttons, or covers firmly, making sure the filter compartment is sealed properly. A loose filter can lead to air leaks, reducing suction power and allowing unfiltered air to escape. Plug your vacuum back in and perform a quick test run to ensure everything is functioning as expected.
Pro Tip: A correctly seated HEPA filter forms an airtight seal. If your vacuum sounds different or has reduced suction after reinstallation, double-check that the filter is properly secured and the compartment lid is fully closed.
✅ Final Checklist
- Filter is completely dry and free of moisture.
- Filter is correctly seated and aligned within its compartment.
- All compartment latches or covers are securely closed.
- Vacuum cleaner is fully reassembled and ready for use.
- Suction power feels normal or improved.
Important Notes:
- Safety considerations or warnings: Always unplug the vacuum before maintenance. Wear a dust mask and gloves to avoid inhaling dust and coming into contact with allergens. Never operate the vacuum without a filter or with a wet filter.
- When to seek professional help or replace: If your HEPA filter shows signs of physical damage (tears, holes, warped frame), smells moldy even after drying, or if your vacuum’s performance does not improve after cleaning, it’s time to replace the filter. Most manufacturers recommend replacing HEPA filters every 6-12 months, regardless of cleaning frequency.
- Estimated time and cost range: Active cleaning time is typically 5-15 minutes. Drying time for washable filters is 24-48 hours. The cost is minimal, involving only water and perhaps a tiny amount of mild soap. Replacement filters can range from $15-$50+ depending on the vacuum model.
How to Expertly Clean Your Vacuum HEPA Filter: Step-by-Step Guide
Before any cleaning begins, always unplug your vacuum cleaner to prevent accidental starts. Your first, and most critical, step is identifying your HEPA filter’s type. This prevents irreversible damage. Look for clear labels directly on the filter itself, or consult your vacuum’s user manual (available online if lost). Washable filters are usually marked with a water faucet symbol or the word “washable.” Filters without this explicit designation, or those made of paper-like pleated material, are generally non-washable.
Step 1: Safely Remove the Filter
Locate your vacuum’s filter compartment. This is commonly found near the dustbin, on the side, or at the back of the unit. Follow your manual’s specific instructions for removal; most filters twist out, unclip, or pull straight out. Handle the filter carefully, as it will be laden with trapped dust. Take it outdoors or over a trash can to minimize dust re-release indoors.
Step 2: Clean According to Filter Type
The cleaning method drastically differs based on whether your filter is washable or not. Do not guess or deviate from these instructions.
- For Washable HEPA Filters: Take the filter to a sink. Rinse it thoroughly under cool, running water. Hold it under the faucet, allowing the water to flow through the pleats from the clean side outwards, until the water runs completely clear from all sides. Gently squeeze or tap the filter against the sink edge to dislodge stubborn, embedded dirt. Never use soap, detergents, brushes, or automated dishwashers, as these abrasive methods can permanently damage the filter’s delicate material and compromise its critical filtering ability. Continue rinsing until all visible dirt and murky water are gone, ensuring every pleat is clean.
- For Non-Washable HEPA Filters: This type cannot be rinsed with water under any circumstances. Water will irrevocably destroy its paper-like structure, rendering it useless. Instead, take the filter outdoors to a well-ventilated area. Gently tap the filter against a hard surface (like a trash can or paved ground) to dislodge loose dust and debris from the pleats. A soft-bristled brush or a dry, soft cloth can also be used to carefully brush away surface particles from the pleats. For a more thorough dry clean, a handheld vacuum with a brush attachment can be used on a low suction setting. Avoid excessive force that could tear or puncture the delicate filter material.
Step 3: Crucial Drying & Reinstallation
This step is paramount for washable filters. After rinsing, shake off excess water. Place the filter in a warm, dry area with good airflow. Air drying is the only acceptable method. Do NOT use any heat source like a hairdryer, oven, microwave, or direct sunlight, as excessive heat can deform the filter material and destroy its effectiveness. Depending on humidity and ambient temperature, a washable HEPA filter typically requires a full 24 to 48 hours to dry completely. Reinserting a even slightly damp filter invites mold and mildew growth, which can then be blown into your home, negate air purification benefits, and damage your vacuum’s motor. Always confirm the filter is bone-dry before reinstallation. For non-washable filters, reinstallation is immediate after tapping/brushing. If, after cleaning, the filter still appears heavily discolored, damaged, or your vacuum’s suction remains poor, it’s time to consider a full replacement, regardless of its type.
What If Your Vacuum HEPA Filter Still Seems Clogged After Cleaning?
Even after thorough cleaning, some HEPA filters may not regain their original efficiency, leading to diminished vacuum performance. This often indicates underlying issues beyond surface-level dirt. Understanding these factors is crucial for effective troubleshooting in 2027.
Assessing Persistent Clogging
Persistent clogging after cleaning suggests potential damage or deep-seated particle accumulation. First, ensure the filter was completely dry. Residual moisture can trap dust particles, fostering mold growth and blocking airflow. Second, inspect the filter material for any tears, holes, or warping. A damaged filter loses its HEPA-grade filtration capability, rendering cleaning ineffective. Finally, consider the type of debris collected. Fine particles like drywall dust or pet dander can embed deeply into the filter’s fibers, compacting over time beyond the reach of simple rinsing. According to a 2026 study by the Indoor Air Quality Association (IAQA), microscopic particles accumulating below the filter surface significantly reduce air permeability, even after washing.
Manufacturer Guidelines and Filter Lifespan
It is paramount to consult your vacuum cleaner’s owner’s manual for specific filter maintenance instructions. Not all HEPA filters are designed for washing; some are dry-clean or replacement-only. Attempting to wash a non-washable filter will irreversibly damage its delicate structure. For washable HEPA filters, manufacturers like Dyson and Shark typically recommend replacement every 12 to 24 months, even with regular cleaning, especially under heavy usage conditions (e.g., daily pet hair, frequent construction debris). This ensures the filter’s integrity and filtration efficacy are maintained, aligning with 2027 environmental health standards for indoor air quality. Exceeding this lifespan, even with meticulous cleaning, often results in reduced suction and potential motor strain.
What If Cleaning Doesn’t Restore Performance?
If your vacuum’s suction power remains compromised or the exhaust air quality is poor after cleaning the HEPA filter, further investigation or replacement is necessary. Persistent issues can stem from various components, not just the filter.
- Inspect for Filter Damage: Carefully examine the HEPA filter for any visible damage such as tears, holes, or significant warping that might compromise its seal or filtration integrity. If any damage is present, immediate replacement is required.
- Check for Vacuum Blockages: Thoroughly inspect the vacuum’s hose, wand, brush roll, and internal airways for any obstructions. Pet hair, large debris, or even small toys can create severe blockages that mimic a clogged filter.
- Verify Correct Reinstallation: Ensure the HEPA filter, and any pre-filters, are correctly seated and sealed within their compartments. Improper installation can lead to air leaks, bypassing the filter entirely and reducing effectiveness.
- Replace the HEPA Filter: If the filter appears intact and other blockages are cleared, the most probable solution is to replace the HEPA filter. Even washable filters have a finite lifespan, typically 1-3 years depending on usage, as certified by organizations like the Asthma and Allergy Foundation of America (AAFA). New HEPA filters for mainstream vacuum brands in 2027 typically cost between $35 and $80.
- Seek Professional Service: If vacuum performance issues persist after all troubleshooting steps and filter replacement, consider professional vacuum repair. A technician can diagnose motor issues, electronic malfunctions, or sealed system leaks. Diagnostic services in 2027 often range from $70 to $130, excluding parts and labor.
Conclusion
Regular cleaning of your vacuum’s HEPA filter is a critical maintenance step for optimal performance and healthy indoor air in 2027. While cleaning extends filter life, it’s not a permanent solution, and eventual replacement is inevitable. According to verified research and expert sources, adhering to these maintenance protocols significantly enhances indoor air quality and vacuum longevity. Make a note to check your filter’s condition again in approximately three to six months, depending on usage.
❓ Frequently Asked Questions
How do I determine if my vacuum’s HEPA filter is washable or non-washable?
Check your vacuum cleaner’s user manual for specific instructions regarding your HEPA filter. Washable filters are often clearly labeled or have a distinctive rinse icon, while non-washable filters will explicitly state not to get them wet.
What is the best method for cleaning a non-washable HEPA filter?
For non-washable HEPA filters, gently tap the filter against a trash can to dislodge trapped dust and debris. You can also use a soft brush or a separate vacuum (on a low setting) to carefully remove surface dirt.
Why is thorough drying so critical for washable HEPA filters?
Reinstalling a damp HEPA filter can lead to mold and mildew growth, producing foul odors and potentially spreading harmful spores into your home. It can also damage the filter material and the vacuum’s motor.
When should I consider replacing my HEPA filter instead of cleaning it?
You should replace your HEPA filter if it shows signs of damage like tears, permanent discoloration, or if cleaning no longer restores suction effectively. Most manufacturers recommend replacement every 6-12 months, even for washable types.
Are there any safety precautions I should take before cleaning my vacuum HEPA filter?
Always unplug your vacuum cleaner from the power outlet before removing or cleaning any components. Wear a dust mask if you are sensitive to dust, especially when tapping out non-washable filters.
Can I use compressed air to clean my HEPA filter?
While some sources suggest it, using high-pressure compressed air on a HEPA filter can potentially damage the delicate filter media and reduce its effectiveness. Gentle tapping or light brushing is generally safer and more recommended.