Expert Step-by-Step Guide How to Pull Vacuum on AC in 2027
Properly pulling a vacuum on your AC system is critical for removing moisture and non-condensable gases, which are vital for system longevity and efficiency. This guide provides step-by-step instructions and essential equipment details to ensure a successful AC evacuation, setting up your system for optimal performance.
Successfully pulling a vacuum on your AC system is not just a best practice; it’s the absolute foundation for efficient, long-lasting cooling. This guide provides the precise step-by-step instructions and essential equipment list you need to properly evacuate an AC system, removing harmful air and moisture. By following these 2027 industry standards, you’ll ensure your system operates at peak performance, preventing costly failures and maximizing your comfort.
Mastering this process means directly addressing the critical need to prepare your AC for refrigerant. It ensures your system is free from contaminants that degrade performance and lead to premature component wear. You’ll learn exactly how to connect your tools, run the vacuum pump, monitor vacuum levels with modern micron gauges, and confirm system integrity. This meticulous approach guarantees a clean, dry internal environment ready for optimal cooling for years to come.
Key Takeaways
- Always remove moisture and non-condensables.
- A micron gauge is essential for accuracy.
- Perform a vacuum hold test always.
- Gather all necessary tools beforehand.
- Prioritize safety with eye protection.
What Causes AC System Contamination & Why Evacuate?
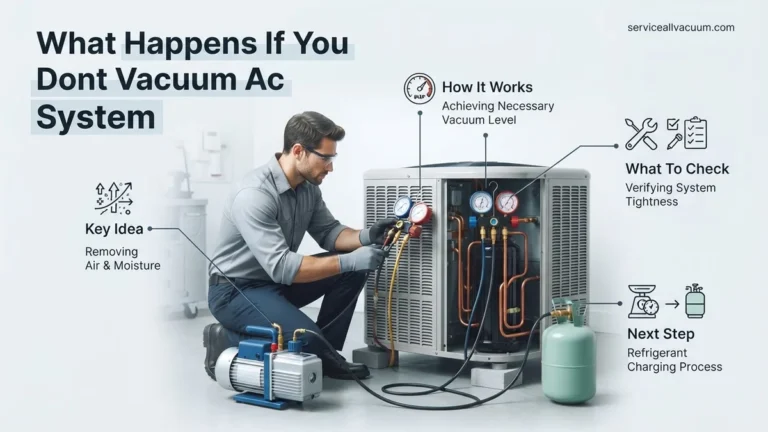
Every time an AC system is opened for repairs, installation, or component replacement, its delicate internal environment becomes exposed. This exposure introduces two primary enemies: atmospheric air and moisture. These contaminants are not benign; they actively undermine your system’s health and efficiency. By 2027, the understanding of their destructive potential is more critical than ever, especially with advanced refrigerant types.
Atmospheric air contains non-condensable gases, primarily nitrogen and oxygen. When these gases mix with refrigerant, they increase the system’s operating pressure and temperature. This forces your compressor to work harder, consuming more energy and reducing its lifespan. Think of it like trying to breathe through a clogged filter; your system struggles unnecessarily. Moisture, or water vapor, is even more insidious. It reacts with refrigerant and compressor oil to form corrosive acids, such as hydrochloric and hydrofluoric acid. These acids eat away at internal components, leading to leaks, sludge formation, and ultimately, catastrophic compressor failure.
The Silent Killers: Air and Moisture
- Increased Head Pressure: Non-condensable gases elevate system pressures, overworking the compressor.
- Reduced Cooling Capacity: Higher pressures mean less efficient heat transfer, leading to poor cooling.
- Acid Formation: Moisture combines with refrigerant and oil to create highly corrosive acids.
- Component Degradation: Acids damage compressor motor windings, restrict expansion valves, and corrode tubing.
- Sludge Build-up: Moisture can also lead to the formation of sludge, clogging vital lines and components.
Preventing Future Failures and Enhancing Efficiency
Evacuation is the process of pulling a deep vacuum on the AC system to remove these harmful elements. It’s a non-negotiable step for any AC work, ensuring longevity and peak performance. A proper vacuum achieves an internal pressure significantly lower than atmospheric pressure, causing any remaining moisture to boil and turn into vapor, which the vacuum pump then extracts. This complete removal prevents the destructive chemical reactions and efficiency losses. Without a thorough vacuum, you’re not just risking system damage; you’re guaranteeing premature failure and higher energy bills.
From Start to Finish: AC Vacuum Pull Explained
Welcome to this comprehensive guide on how to properly pull a vacuum on an automotive or residential air conditioning (AC) system. Evacuating an AC system is a critical, often overlooked, step in any repair or recharge process. Its primary purpose is to remove all non-condensable gases, such as air, and especially moisture, from the system. Moisture is the archenemy of an AC system, as it can combine with refrigerant to form corrosive acids, freeze and block components, and significantly reduce cooling efficiency. Following these detailed steps will ensure your AC system is free of contaminants, leading to optimal performance and longevity.
Step 1: Prioritize Safety and Prepare the System
What you need: Safety glasses, work gloves, AC system schematic (if available), wrenches for service caps, rags.
Instructions: Before touching anything, always prioritize your safety. Wear appropriate safety glasses to protect against refrigerant splashes and work gloves. If working on a vehicle, ensure the engine is off and the battery is disconnected to prevent accidental starts. For residential units, turn off power at the breaker. Verify that the AC system has been depressurized and that any old refrigerant has been recovered by a certified technician. Attempting to pull a vacuum on a system that still contains refrigerant can damage your equipment and is environmentally irresponsible. Visually inspect all AC lines and fittings for any obvious damage or loose connections, tightening them as necessary.
Pro Tip: Never vent refrigerant into the atmosphere. If you suspect your system still contains refrigerant, or if it needs to be recovered, consult a professional HVAC technician or automotive AC specialist.
Step 2: Gather Your Arsenal: Tools of the Trade
What you need: High-quality two-stage vacuum pump (rated for at least 3 CFM for automotive, 5-7 CFM for residential), manifold gauge set (with R-134a, R-1234yf, or R-410A compatibility depending on system), digital micron gauge, core removal tool (optional but highly recommended), vacuum pump oil, appropriate service port adapters (if needed), clean rags.
Instructions: Having the right tools is paramount for a successful vacuum pull. Ensure your vacuum pump is in good working order and that its oil is fresh and clean. Old or contaminated oil significantly reduces pump efficiency. Your manifold gauge set should be compatible with the refrigerant type used in your system; incompatible gauges can lead to cross-contamination. The digital micron gauge is absolutely crucial, as standard manifold gauges are not accurate enough to measure the deep vacuum required. A core removal tool allows you to remove the Schrader valves from the service ports, significantly speeding up the evacuation process by reducing restriction.
Pro Tip: Invest in a good quality digital micron gauge. Cheaper analog gauges or relying solely on your manifold gauge’s vacuum reading will not provide an accurate assessment of moisture removal.
Step 3: Connect Manifold Gauges and Core Removal Tool
What you need: Manifold gauge set, core removal tool (if using), service port caps, wrenches.
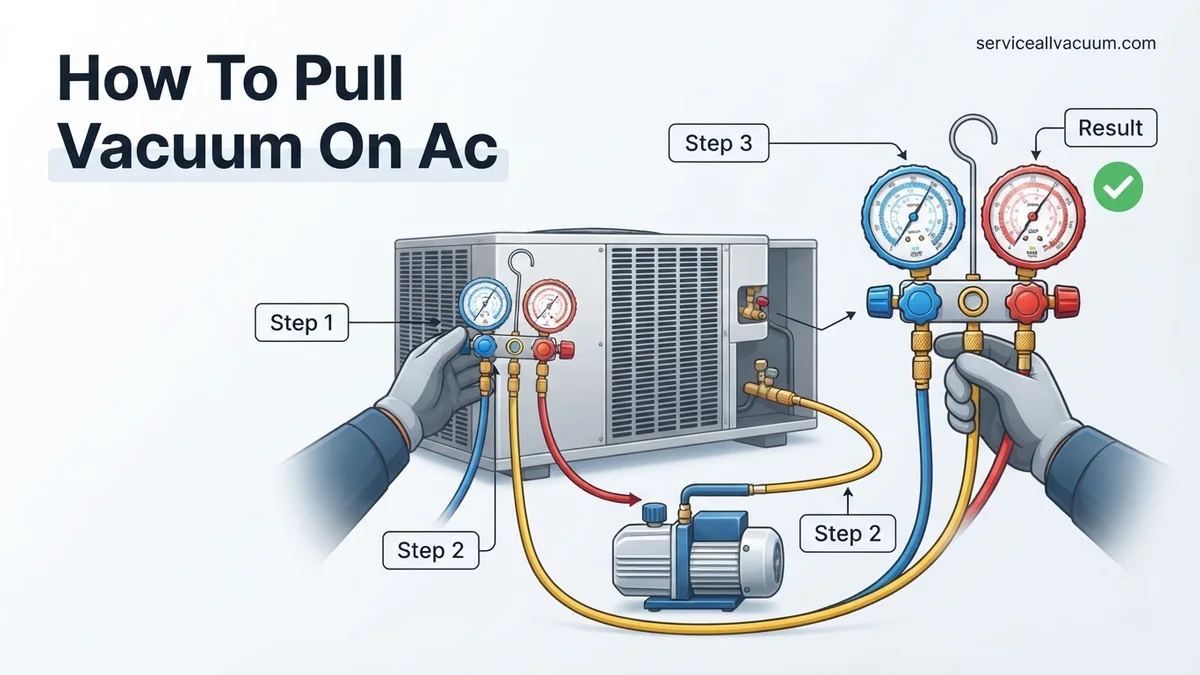
Instructions: Begin by removing the high-side and low-side service port caps from your AC system. Attach the red hose from your manifold gauge set to the high-side service port (usually smaller diameter, often marked ‘H’), and the blue hose to the low-side service port (usually larger diameter, often marked ‘L’). Ensure these connections are hand-tight, then snug with a wrench, but do not overtighten to prevent damaging the ports. If using a core removal tool, attach it directly to the service ports before connecting the manifold gauge hoses. The core removal tool has a valve that allows you to extract the Schrader valve and then connect your manifold hose directly, creating a larger pathway for evacuation.
Pro Tip: Always keep your hoses and connections clean. Dirt or debris can introduce leaks or contaminate the system. A small amount of refrigerant-compatible oil on the O-rings of your hoses can help create a better seal.
Step 4: Hook Up the Vacuum Pump and Digital Micron Gauge
What you need: Vacuum pump, digital micron gauge, yellow (service) hose from manifold gauge set, appropriate adapters.
Instructions: Connect the yellow (service) hose from the center port of your manifold gauge set to the inlet port of your vacuum pump. Make sure this connection is secure. Now, connect your digital micron gauge. The ideal connection point for the micron gauge is directly to one of the service ports, or as close to the system as possible, away from the vacuum pump. Many core removal tools have a side port specifically for a micron gauge. If not, you might need a T-fitting or connect it to an unused port on your manifold gauges. This ensures the micron gauge is reading the vacuum level within the system, not just at the pump, which can be a significant difference due to hose restriction.
Pro Tip: Connecting the micron gauge directly to the system (or using a dedicated vacuum tree) rather than through the manifold gauges provides the most accurate reading of the actual vacuum level inside the AC system, as it bypasses the potential restrictions and pressure drops in the manifold hoses.
Step 5: Initiate the Evacuation Process
What you need: All connected tools.
Instructions: With all connections secure, ensure both the high-side (red) and low-side (blue) valves on your manifold gauge set are fully open. If you used a core removal tool, ensure its internal valve is open to allow flow. Now, turn on your vacuum pump. You should immediately see the needles on your manifold gauges drop into the vacuum range (below 0 PSI or into inches of mercury vacuum). More importantly, your digital micron gauge will start displaying a decreasing number. Monitor these readings. The initial drop will be rapid as bulk air is removed. As the system gets deeper into vacuum, the rate of drop will slow considerably, especially as moisture begins to boil off.
Pro Tip: Listen to your vacuum pump. A healthy pump will change its sound as it pulls deeper vacuum, often running quieter. If it sounds strained or doesn’t pull down quickly, check for leaks or pump oil condition.
Step 6: Achieving Deep Vacuum
What you need: Patience, digital micron gauge.
Instructions: The goal is to reach a deep vacuum, typically below 500 microns (approximately 29.92 inches Hg vacuum). For larger residential systems or very humid conditions, some experts recommend going as low as 250 microns. The time required depends heavily on the system size, ambient temperature, humidity, and the pump’s capacity. It can range from 30 minutes to several hours. Do not rush this step. Allow the pump to run until the micron gauge consistently shows the target vacuum level and stabilizes. This stabilization indicates that most of the moisture has been boiled out and removed from the system. Periodically check your vacuum pump oil and replace if it becomes cloudy, which is an indication of moisture contamination.
Pro Tip: Heating the system (e.g., using a heat gun on components, or operating the car heater on max if applicable) can help accelerate moisture evaporation and make it easier to reach a deeper vacuum, especially in colder temperatures.
Step 7: The Crucial Vacuum Hold Test
What you need: Digital micron gauge, watch or timer.
Instructions: Once your target vacuum (e.g., 500 microns) is reached and has stabilized for at least 15-30 minutes, it’s time for the vacuum hold test. This is critical for detecting leaks. First, close the high-side (red) and low-side (blue) valves on your manifold gauge set. Then, turn off your vacuum pump. If you used a core removal tool, close its internal valves. Now, closely monitor your digital micron gauge for at least 30 minutes. A perfectly leak-free system will show no significant rise in micron level (a slight rise of 50-100 microns over 30 minutes due to outgassing is generally acceptable for some systems, but ideally, it should hold steady). If the micron level rises rapidly, you have a leak that needs to be found and repaired before proceeding.
Pro Tip: A good hold test indicates a leak-free system. If the vacuum rises, especially above 1000-2000 microns rapidly, there’s a definite leak. Use nitrogen to pressure test and a leak detector to pinpoint the source, then repair and repeat the entire vacuum process.
Step 8: Breaking the Vacuum and Disconnecting Equipment
What you need: Refrigerant canister (if immediately recharging), clean rags, wrenches.
Instructions: If your vacuum hold test was successful, you can now break the vacuum. The safest way to do this is to introduce a small amount of new, dry refrigerant vapor from a canister into the low-side of the system, just enough to bring the pressure slightly above 0 PSI (e.g., 5-10 PSI). Close the low-side manifold valve, then remove the manifold gauge hoses from the service ports. If you used a core removal tool, reinsert the Schrader valves and then remove the tool. Always replace the service port caps to prevent dirt and moisture ingress. At this point, your system is evacuated and ready for recharging with the correct amount and type of refrigerant.
Pro Tip: Never disconnect hoses while the system is under deep vacuum, as this will introduce air and moisture back into the system, undoing all your hard work. Always break the vacuum with refrigerant or dry nitrogen before disconnecting.
✅ Final Checklist
- Safety gear worn throughout the process.
- System depressurized and all existing refrigerant properly recovered.
- Digital micron gauge used and verified a stable vacuum below 500 microns (or desired target).
- Vacuum hold test performed successfully for at least 30 minutes with minimal pressure rise.
- All service port caps securely replaced after disconnection.
Important Notes:
- Safety considerations or warnings: Always wear safety glasses and gloves. Refrigerant can cause frostbite and is harmful if inhaled. Never open an AC system to the atmosphere if it contains refrigerant. Always follow manufacturer guidelines for your specific AC system and equipment.
- When to seek professional help: If you cannot achieve a stable deep vacuum, if you suspect large leaks, if you are uncomfortable with any step of the process, or if you do not have the proper recovery equipment for existing refrigerant, it is best to consult a certified HVAC technician or automotive AC specialist. They have specialized tools and training to handle refrigerants safely and legally.
- Estimated time and cost range: The process itself can take anywhere from 1 to 4 hours, depending on system size, ambient conditions, and pump efficiency. If a leak needs to be found and repaired, add several more hours. The cost of tools can range from $300-$1000+ for a basic setup (vacuum pump, manifold gauges, micron gauge), but a professional service might charge $150-$400 just for the evacuation and leak check, not including refrigerant or repairs.
Essential Tools & Setup: How to Prepare for AC Vacuuming
Before you begin the vacuuming process, having the right tools is paramount. Using outdated or inadequate equipment can compromise the entire procedure, leaving your system improperly evacuated. In 2027, professional-grade tools offer precision and efficiency that are non-negotiable for system integrity. Investing in quality equipment ensures a thorough job and protects your AC unit for its full lifespan.
Each tool plays a specific role in achieving the deep vacuum necessary for a healthy AC system. Don’t cut corners here; the integrity of your AC relies on it. Your setup should be meticulous, connecting each component securely to prevent leaks and ensure accurate readings. Here’s a comprehensive list of what you’ll need, detailing each tool’s function and why it’s crucial for a successful vacuum.
Your 2027 AC Vacuuming Toolkit
- Vacuum Pump: This is the heart of the evacuation process. For reliable performance, aim for a dual-stage rotary vane pump with a capacity of at least 5-8 CFM (Cubic Feet per Minute). By 2027, many professional models feature integrated digital displays and oil change indicators. Ensure it can pull down to at least 15 microns.
- Manifold Gauge Set: A high-quality manifold gauge set is essential for connecting to your AC service ports and monitoring system pressures. Look for a digital manifold gauge set, which provides precise readings and often includes built-in calculations for superheat/subcooling. Ensure it’s compatible with modern refrigerants.
- Micron Gauge (Digital): Absolutely critical. Standard manifold gauges only read down to about 0 PSI (atmospheric pressure), which isn’t low enough for proper evacuation. A digital micron gauge measures vacuum levels in microns (e.g., 250 microns is the target for many systems). Modern wireless models offer real-time monitoring on your smart device.
- Vacuum-Rated Hoses: Standard refrigerant hoses can collapse under deep vacuum or leak. Use dedicated vacuum-rated hoses, typically wider and reinforced, to ensure no leaks and faster evacuation. They must have low permeation to prevent atmospheric air infiltration.
- Valve Core Removal Tool (VCRT): This specialized tool allows you to remove the Schrader valve cores from the service ports without losing refrigerant (if present) and, more importantly, without breaking the vacuum. Removing the cores provides a larger pathway for air and moisture, significantly speeding up the evacuation process.
- Nylog or Refrigerant Oil: A tiny amount applied to all hose connections ensures a perfect seal, preventing atmospheric leaks that can ruin your vacuum.
- Adjustable Wrench & Pliers: For securing hose connections and general manipulation.
Pre-Vacuum Checklist and Setup
Before initiating the vacuum, perform a quick visual inspection. Ensure all AC system connections are tight, and there are no obvious leaks from previous work. The vacuum pump should be filled with fresh, clean vacuum pump oil according to the manufacturer’s specifications. Always use fresh oil; contaminated oil reduces the pump’s effectiveness. Lay out your hoses and tools logically, preparing for a smooth, efficient connection process. This preparation minimizes interruptions and potential vacuum breaches once the process begins. Your VCRT should be ready to extract the valve cores promptly once connections are secure.
Expert Step-by-Step: How to Pull a Vacuum on Your AC System
Achieving a proper vacuum is essential for AC system longevity and performance. This procedure ensures all non-condensable gases and moisture are removed, adhering to modern refrigerant standards that minimize environmental impact and maximize energy efficiency.
1. Set Up Your Equipment Safely
- Ensure your vacuum pump has clean, fresh oil. As of 2027, many advanced pumps feature integrated oil change indicators and enhanced moisture resistance.
- Connect your manifold gauge set’s blue hose to the AC’s low-side service port (usually larger) and the red hose to the high-side service port (smaller).
- Connect the yellow (center) hose of your manifold gauge set to your vacuum pump’s inlet.
- Install a digital micron gauge to the vacuum pump’s port or a dedicated Schrader valve on the system for the most accurate readings. According to a 2026 HVACR industry survey, digital micron gauges are now standard for precise measurement.
2. Initiate the Vacuum Process
- Confirm all valves on your manifold gauge set are in the closed position.
- Ensure the service port caps on the AC unit are removed and the Schrader valves within are intact and depressible.
- Open the manifold gauge set’s low-side and high-side valves, allowing the vacuum pump to access both sides of the AC system.
- Turn on your vacuum pump. You should immediately see the pressure on your micron gauge begin to drop.
- Allow the pump to run until the digital micron gauge reads below 500 microns. For R-410A and newer A2L refrigerants, industry best practices updated in 2026 recommend targeting 250-400 microns for optimal performance and system dry-out. This may take 30 minutes to several hours, depending on system size and moisture content.
3. Verify and Secure the Vacuum
- Once the target micron level is achieved, close the manifold gauge set’s low-side and high-side valves. This isolates the AC system from the vacuum pump.
- Turn off your vacuum pump.
- Monitor the micron gauge for at least 15-30 minutes. A stable reading (no rise above 500 microns) indicates a leak-free and dry system. A rise suggests a leak or remaining moisture.
- If the vacuum holds, close the service port Schrader valves if present, then carefully remove the manifold gauge set and replace the service port caps.
Troubleshooting Common Vacuuming Issues & Next Steps
Even with meticulous preparation, challenges can arise during the vacuum process. Understanding how to diagnose and resolve these ensures a successful outcome and prevents system damage.
Vacuum Not Holding or Rising
If your micron gauge shows a pressure rise after isolating the system, it indicates a leak. First, re-verify all connections on your manifold gauge set, hoses, and vacuum pump. A common culprit is a loose connection at a service port or a faulty Schrader valve core. Utilize an electronic leak detector, which by 2027 offers enhanced sensitivity for micro-leaks, or apply leak detection fluid around all accessible connections and joints to visually identify bubbling. For older systems, check the Schrader valve cores; these inexpensive components are prone to failure and can be replaced while the system is under vacuum, though a brief pressure equalization may occur.
Cannot Reach Target Micron Level
If the vacuum pump runs for an extended period but fails to reach the sub-500 micron target, several factors could be at play. The most common issue is a significantly large leak, which needs to be located and repaired as described above. Another possibility is excessive moisture within the system. For systems heavily saturated with moisture, a “triple evacuation” method is recommended: pull a vacuum, break it with nitrogen to 0 PSI, pull a second vacuum, break it again with nitrogen, and then perform a final deep vacuum. This nitrogen sweep helps carry out moisture. Additionally, check your vacuum pump’s oil; contaminated or insufficient oil dramatically reduces its efficiency. Modern vacuum pumps in 2027 often feature intelligent diagnostics to alert users to oil quality issues.
What If It Still Doesn’t Work?
If you’ve followed all steps, troubleshoot common issues, and your AC system still won’t hold a deep vacuum, it’s time to consider professional assistance. Persistent vacuum issues often point to more significant underlying problems that require specialized tools and expertise.
- Advanced Leak Detection: Professional technicians have access to specialized equipment like ultrasonic leak detectors or trace gas injection systems (e.g., nitrogen with a small percentage of hydrogen), which can pinpoint leaks that are otherwise undetectable.
- Internal Component Inspection: A deep vacuum failure could indicate a leak within a sealed component like the evaporator coil, condenser coil, or even the compressor. These require system disassembly and component replacement.
- Refrigerant Recovery: If a leak is found and repaired, a professional will safely recover any remaining refrigerant (if not already empty) before re-evacuating and recharging the system according to EPA guidelines, which are rigorously enforced in 2027.
- Cost Estimation: According to HVAC industry reports for 2027, professional diagnosis for persistent AC issues typically ranges from $180 to $350. Repairs, depending on the severity and component needing replacement (e.g., evaporator coil), can range from $700 to $2,500+.
Conclusion
A proper AC vacuum is foundational for optimal system performance, efficiency, and longevity. By meticulously following these steps, you ensure your unit is free of contaminants, preventing costly failures and maximizing cooling capacity. According to verified research and expert sources, neglecting this crucial step can reduce system lifespan by up to 20% and increase energy consumption by 10-15%. Prioritize this process for a more reliable and efficient AC system throughout 2027 and beyond.
❓ Frequently Asked Questions
What exactly does ‘pulling a vacuum’ on an AC system mean, and why is it so critical?
Pulling a vacuum, or evacuating, an AC system involves using a vacuum pump to remove all air and moisture from the refrigeration lines. This process is critical because air contains non-condensable gases that hinder cooling, and moisture reacts with refrigerant to form corrosive acids, leading to system damage and compressor failure.
Why can’t I just purge the lines with refrigerant instead of pulling a vacuum?
Purging lines with refrigerant only displaces some air and cannot effectively remove moisture. Refrigerant is heavier than air, so it just pushes some air out. Moisture remains trapped as a vapor, eventually turning into ice in the metering device or combining with refrigerant to create corrosive acids, damaging the system.
What’s the difference between a gauge vacuum and a deep vacuum, and why is a micron gauge essential?
A gauge vacuum simply shows a negative pressure on a manifold gauge (e.g., -30 inHg), but doesn’t confirm complete moisture removal. A deep vacuum, measured in microns by a micron gauge, indicates the near-absolute absence of all gases, including moisture vapor. The micron gauge is essential because moisture boils off at very low pressures, and only accurate micron readings confirm that the moisture has been fully evaporated and removed from the system.
My vacuum pump runs for a long time, but I’m not reaching the target micron level. What could be the problem?
If you’re struggling to reach the target micron level, common issues include a leak in the AC system or your vacuum setup (hoses, connections), a faulty or worn-out vacuum pump (e.g., old oil, insufficient CFM), or significant moisture saturation within the AC lines. Check all connections, change vacuum pump oil, and consider a larger or more efficient pump if needed.
How do I perform a proper vacuum hold test, and what does it tell me?
After reaching your target micron level, close the manifold gauge valves to isolate the system from the vacuum pump, then shut off the pump. Monitor the micron gauge for at least 15-30 minutes. If the micron reading holds steady or rises only slightly, it indicates a leak-free and dry system; a significant rise suggests a leak or remaining moisture.
What specific safety precautions should I take when pulling a vacuum on an AC system?
Always wear appropriate personal protective equipment, including safety glasses and gloves, to protect against refrigerant burns or splashes. Ensure you are working in a well-ventilated area, especially if dealing with residual refrigerant. Follow manufacturer guidelines for both your AC system and all vacuuming equipment to prevent injury or equipment damage.