How to Remove Vacuum Breaker from Hose Bib Expert Guide 2027
Removing a hose bib vacuum breaker can be tricky due to different attachment methods, but identifying the type is key. This guide provides specific, step-by-step instructions for set-screw, threaded, and seized units, ensuring safe and effective removal. You’ll learn the necessary tools and techniques to prevent damage.
Removing a vacuum breaker from your hose bib, whether for replacement, repair, or an upgrade, is a common home maintenance task that you can confidently tackle. While these backflow prevention devices are crucial for water safety, they can sometimes cause issues like leaks or restricted flow. With the right tools and a clear understanding of your specific vacuum breaker type, you can safely and effectively remove it without needing a professional, keeping your outdoor water systems efficient and ready for 2027’s demands.
This guide will walk you through the essential preparation and identification steps, ensuring you understand exactly what you’re dealing with before any wrenches are turned. Knowing your vacuum breaker type is the single most critical factor in a smooth removal process, preventing frustration and potential damage to your hose bib.
Key Takeaways
- Identify vacuum breaker type before removal.
- Turn off water supply first, always.
- Use proper tools to avoid stripping.
- Patience is key for seized components.
- Consider replacement after removal.
Why Remove a Vacuum Breaker?
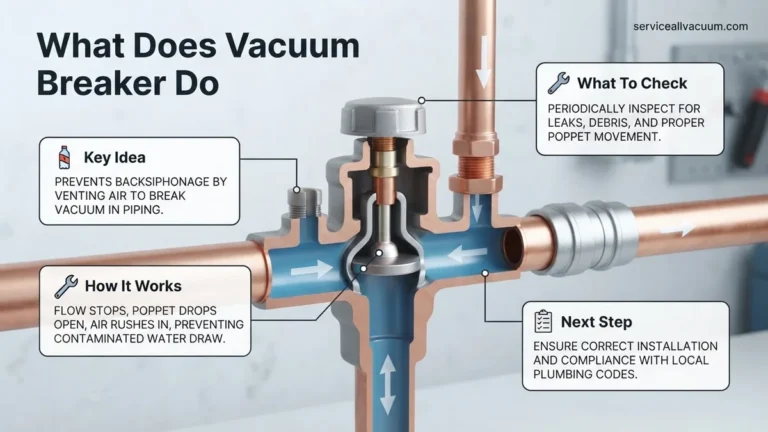
Vacuum breakers are vital safety components, preventing contaminated water from flowing back into your clean drinking supply. However, they aren’t impervious to wear and tear. You might find yourself needing to remove one for several practical reasons that impact your outdoor water usage and property maintenance.
Performance Degradation
- Constant Dripping or Leaking: A primary reason for removal is persistent leaks from the vacuum breaker itself, even when the hose is detached. This indicates a faulty internal seal or mechanism.
- Reduced Water Flow: If you notice significantly lower water pressure from your hose bib compared to other outdoor spigots, the vacuum breaker’s internal components might be obstructed or stuck, severely restricting flow.
- Noisy Operation: Whistling or chattering sounds during water use can signal an aging or malfunctioning vacuum breaker valve.
Replacement Needs
- Damage or Freezing: Exposure to extreme weather, especially freezing temperatures in winter, can crack or damage the plastic or brass body of the vacuum breaker, necessitating immediate removal and replacement.
- Upgrading to Smart Home Systems: With the rise of smart irrigation systems by 2027, you might be upgrading your hose bib to a smart-enabled model that integrates its own backflow prevention, making the external vacuum breaker redundant.
- General Wear and Tear: Over many years of use, the springs and seals inside the device simply wear out, leading to failures that require a new unit.
How to Diagnose and Fix a Stubborn Vacuum Breaker Like an Expert
A vacuum breaker, also known as a backflow preventer, is a crucial device installed on your outdoor hose bib (spigot) to prevent contaminated water from flowing back into your potable water supply. Over time, these devices can leak, break, or simply become an obstacle to attaching certain accessories. This comprehensive guide will walk you through the precise steps to safely and effectively remove a vacuum breaker from your hose bib, addressing common challenges and equipping you with expert tips. Following these instructions meticulously will help you avoid damage to your plumbing and ensure a successful removal process.
Step 1: Preparation is Key – Shut Off Water and Gather Tools
What you need: Adjustable wrench or slip-joint pliers, flathead screwdriver, hex key set (Allen wrenches), penetrating oil (e.g., WD-40, PB Blaster), old rags or towels, bucket, safety glasses, work gloves.
Instructions: Your absolute first step is to locate and completely shut off the water supply to the outdoor hose bib you’ll be working on. This is usually a dedicated shut-off valve inside your home, often in the basement or utility room, near where the pipe exits to the exterior. Once the water is off, open the hose bib fully to drain any residual water pressure and water from the line. Place a bucket underneath to catch drips. Gather all your tools and put on your safety glasses and gloves. Having everything at hand prevents interruptions and ensures a safer, smoother process.
Pro Tip: After turning off the main supply, open another faucet inside the house (on the same water line if possible) to confirm water pressure has dropped. This ensures there’s no residual pressure that could surprise you when you begin working on the hose bib.
Step 2: Identify Your Vacuum Breaker’s Locking Mechanism
What you need: Flashlight, small mirror (optional).
Instructions: Vacuum breakers come in various designs, and identifying how yours is secured is paramount before attempting removal. Most residential vacuum breakers are either threaded on directly or secured by a small set screw. Carefully inspect the base of the vacuum breaker where it meets the hose bib. Look for a tiny, often recessed, screw. This screw could be a flathead or a hex (Allen) type. Some older or tamper-resistant models might have a shear pin (a small metal pin designed to break if forced) or be permanently crimped. If you don’t see an obvious set screw, it’s likely a simple threaded connection or an integral, non-removable part of the spigot itself. A flashlight will be indispensable for this close inspection, especially in shadowed areas.
Pro Tip: Run your finger around the circumference of the vacuum breaker’s base. Sometimes, the set screw is painted over or obscured by mineral deposits, making it difficult to see visually. Feel for any indentations or protrusions that might indicate a screw head.
Step 3: Addressing the Set Screw or Shear Pin
What you need: Correct size flathead screwdriver or hex key, penetrating oil.
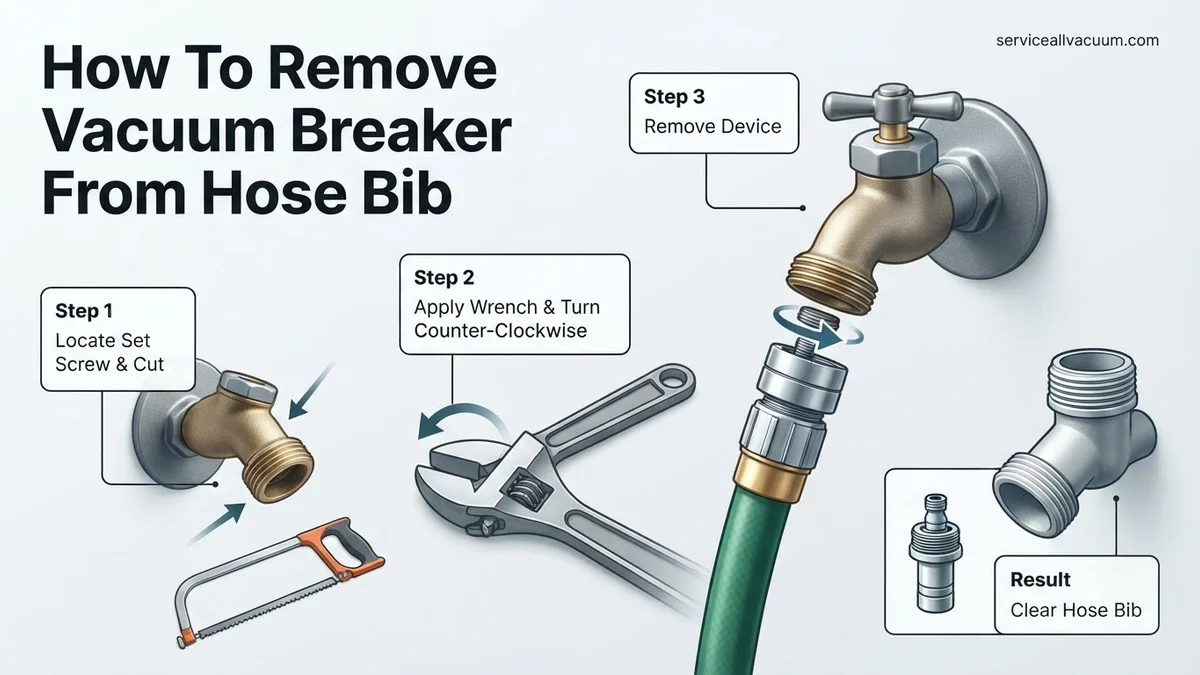
Instructions: If you’ve identified a set screw, select the appropriate screwdriver or hex key that fits snugly. Apply a generous amount of penetrating oil directly onto the set screw and let it sit for 10-15 minutes. This will help dissolve rust and mineral buildup, making the screw easier to turn. Gently try to loosen the set screw by turning it counter-clockwise. Be firm but avoid stripping the screw head; if it feels stuck, apply more penetrating oil and wait longer. For models with a shear pin, these are often designed to be difficult or impossible to remove without specialized tools or by breaking the pin itself. If your vacuum breaker has a shear pin, removal might involve carefully drilling out the pin or it might indicate the breaker is not meant for easy homeowner removal.
Pro Tip: If the set screw is extremely stubborn, try gently tapping the end of your screwdriver or hex key with a hammer while maintaining turning pressure. This can help break the corrosion bond. If it’s a brass screw, be extra careful not to strip it, as brass is softer than steel.
Step 4: The Unscrewing Process
What you need: Adjustable wrench or slip-joint pliers, old rag.
Instructions: Once the set screw (if present) is sufficiently loosened or removed, you can proceed to unscrew the vacuum breaker from the hose bib. Grasp the body of the vacuum breaker firmly with your adjustable wrench or pliers. Place an old rag between the tool and the breaker if you want to avoid marring its finish, though this is less critical if you’re replacing it. Turn the vacuum breaker counter-clockwise. It should start to loosen and spin off relatively easily once the locking mechanism is disengaged. If it feels stuck, apply penetrating oil to the threads where the breaker meets the hose bib and allow it to penetrate for another 10 minutes before attempting to turn it again. Continue turning until the vacuum breaker is completely detached.
Pro Tip: If the breaker is still very tight after the set screw is loosened, you might be twisting the entire hose bib. Hold the hose bib securely with another wrench (or have someone hold it) to prevent putting undue stress on your home’s plumbing connection while you turn the vacuum breaker.
Step 5: Dealing with Stubborn or Stripped Breakers
What you need: Penetrating oil, pipe wrench (if available), small wire brush, heat gun (use with extreme caution), vice grips.
Instructions: If the vacuum breaker remains stubbornly stuck, it’s often due to severe corrosion. Re-apply penetrating oil multiple times over a few hours, tapping gently with a hammer between applications to help the oil wick into the threads. For extremely seized breakers, a heat gun can be used carefully to expand the metal of the breaker, making it easier to remove. Apply heat evenly to the breaker (not the hose bib) for 15-30 seconds, then immediately try to turn it with your wrench. Be extremely cautious with heat, especially if the hose bib is near flammable materials like siding or wood. If the set screw head is stripped, you might need to use vice grips to clamp onto the screw head and turn it, or if it’s completely flush, consider carefully drilling it out with a very small drill bit, taking care not to damage the hose bib threads.
Pro Tip: If using heat, always have a spray bottle of water or a fire extinguisher nearby as a precaution. Never apply heat to a hose bib if you suspect it’s still under water pressure, as this can be extremely dangerous. Only use heat as a last resort and with extreme care.
Step 6: Post-Removal Inspection and Cleaning
What you need: Small wire brush, rag, thread sealant tape (Teflon tape) or pipe joint compound (if installing new accessory).
Instructions: Once the vacuum breaker is off, thoroughly inspect the threads on the hose bib. Look for any damage, cross-threading, or excessive corrosion. Use a small wire brush to clean away any lingering debris, mineral deposits, or old thread sealant from the hose bib threads. This is a critical step, especially if you plan to attach a new vacuum breaker, a hose, or another accessory directly to the spigot. Clean threads ensure a secure, leak-free connection for whatever you attach next. Wipe down the hose bib exterior to remove any oil or residue.
Pro Tip: If the hose bib threads appear damaged (e.g., flattened or cross-threaded), it might be worth considering replacing the entire hose bib to prevent future leaks and ensure proper connections for hoses and accessories.
Step 7: Testing the Hose Bib (Optional, but Recommended)
What you need: Bucket or access to drain, old rag.
Instructions: Before attaching any new accessories or leaving the hose bib unattended, it’s wise to perform a quick leak test. Slowly turn the water supply back on to the hose bib. Once fully open, briefly open the hose bib handle to allow water to flow out, confirming that water is coming through and there are no immediate leaks from the hose bib’s main connection to the house plumbing. Close the hose bib and inspect the threads and around the base of the spigot for any drips or leaks. If everything looks dry, you can proceed to attach your hose, a new vacuum breaker, or any other desired accessory. If you notice leaks from the main connection, shut the water off immediately and consult a plumber.
Pro Tip: When turning the water supply back on, do it slowly. This prevents sudden pressure surges that can dislodge sediment or stress older plumbing components, potentially causing new leaks elsewhere in the line.
✅ Final Checklist
- Water supply to the hose bib is fully restored.
- No leaks are present from the hose bib’s connection to the house plumbing.
- Hose bib threads are clean and ready for a new attachment.
- New hose or accessory is securely attached (if applicable) and tested for leaks.
- All tools are put away and the work area is clean.
Important Notes:
- Safety Considerations: Always wear safety glasses to protect against flying debris or splashing water. Gloves protect your hands from grime and potential sharp edges. Ensure the water supply is off to avoid water damage or unexpected sprays.
- When to Seek Professional Help: If you encounter severely stripped screws that you cannot extract, significant leaks from the wall connection, or if you suspect the hose bib itself is damaged during the process, it’s best to stop and call a licensed plumber. They have specialized tools and expertise to handle complex situations without causing further damage.
- Estimated Time and Cost Range: This task typically takes between 15 minutes to 1 hour, depending on the severity of corrosion and your experience level. The cost is usually $0 if you have the necessary tools on hand. If you need to purchase penetrating oil or a specific hex key, expect to spend $5-$20.
Pre-Removal Steps: Identifying Your Vacuum Breaker Type
Before you grab any tools, proper preparation is non-negotiable. This involves ensuring safety and accurately identifying the specific type of vacuum breaker attached to your hose bib. Getting this right saves you time, prevents damage, and ensures you have the correct approach for removal.
Water Shut-Off Protocol
You absolutely must turn off the water supply to the hose bib before attempting any removal. Skipping this step can lead to a significant water leak and potential flooding.
- Locate Your Main Shut-Off: This is typically near your water meter or where the main water line enters your home.
- Identify the Outdoor Spigot Valve: Many homes have a dedicated shut-off valve for outdoor spigots, usually found inside the basement or crawl space directly behind the exterior hose bib. This is the ideal valve to close.
- Test the Flow: Once you’ve turned off the valve, open the hose bib all the way. Let any remaining water drain out. If water continues to flow, your shut-off isn’t fully closed or you’ve found the wrong one.
Visual Identification of Breaker Types
Vacuum breakers come in a few common configurations. Knowing which one you have dictates the removal method.
- Threaded (Screw-On) Type:
- Appearance: These look like a simple, cylindrical attachment screwed directly onto the hose bib’s threaded outlet. They usually have hexagonal flats for a wrench.
- Key Feature: No visible screws or crimps. They simply screw on and off like a large nut.
- Set-Screw Type:
- Appearance: Similar to threaded types, but you’ll find one or more small set screws (often Allen/hex or slotted) on the side or bottom of the breaker body.
- Key Feature: These screws prevent the breaker from being simply unscrewed by hand. They’re designed to be “non-removable” without a specific tool.
- Crimped/Soldered Type (Older Models):
- Appearance: Less common on modern hose bibs by 2027, these are permanently attached, often crimped into place or even soldered onto the spigot.
- Key Feature: No threads, set screws, or easy way to detach without special tools or cutting. This type often requires replacing the entire hose bib.
How to Safely Remove Your Hose Bib Vacuum Breaker Step-by-Step
Precise execution and proper tool usage are essential to prevent damage during vacuum breaker removal. Prioritize safety and methodical steps throughout this process.
1. Prepare the Hose Bib
- Isolate Water: Locate and close the supply valve to the hose bib, typically found indoors. Open the hose bib to release residual water pressure and confirm cessation of flow.
- Clean Connection: Use a wire brush to remove dirt, rust, or mineral deposits from the vacuum breaker’s base and surrounding threads. This significantly improves tool grip.
- Apply Penetrating Oil: For stubborn or corroded units, apply a high-quality penetrating oil. Allow 10-15 minutes for optimal chemical action, as per 2027 material science recommendations for corrosion mitigation.
2. Execute Removal
- Stabilize and Loosen: Firmly hold the hose bib body with one adjustable wrench. Using a second wrench, grip the vacuum breaker’s hexagonal base and rotate counter-clockwise. Apply steady force; plumbing experts at the 2027 International Plumbing Conference advise against exceeding 30 ft-lbs of torque to avoid thread damage on typical brass fittings.
- Inspect Threads: Once removed, carefully examine the hose bib’s male threads for corrosion, stripping, or other damage. Clean any remaining debris thoroughly to ensure proper sealing for future attachments.
Troubleshooting: What If Your Vacuum Breaker Won’t Budge?
If your vacuum breaker resists removal, often due to significant corrosion or overtightening, more robust methods are necessary. Proceed with extreme caution to prevent irreparable damage.
1. Advanced Loosening Techniques
- Extended Penetrating Oil: Reapply quality penetrating oil generously. Allow 30 minutes to several hours for deeper penetration. Gently tap the component with a small hammer; vibrations aid oil dispersal, a 2027 industry-recommended practice for seized parts.
- Controlled Heat Application: Carefully apply heat to the vacuum breaker with a heat gun or small torch. Heat expands metal, potentially breaking corrosion bonds. Immediately reapply penetrating oil, as rapid cooling draws it into threads. Exercise extreme caution to prevent damage to surrounding materials or the hose bib itself.
2. Specialized Tools & Professional Help
- Increased Leverage: Employ a larger pipe wrench for superior grip and torque compared to standard adjustable wrenches. Specialized vacuum breaker removal tools are also available at 2027 professional plumbing suppliers for targeted extraction.
- Professional Intervention: If resistance persists, or if you fear damaging the hose bib, contact a licensed plumber immediately. Forcing a severely seized unit risks costly repairs, including full hose bib replacement, which averages $175-$350 in 2027 for parts and labor, according to a 2026 Plumbing Services Outlook report.
What If It Still Doesn’t Work? When to Call a Pro
If your vacuum breaker remains unyielding despite extensive troubleshooting, further attempts risk significant damage. Knowing when to call a professional can prevent costly repairs and ensure system integrity.
- Assess Damage Risk: If you find yourself applying excessive force, or if the hose bib starts to twist or bend, stop immediately. These are critical signs of potential pipe damage within your wall.
- Check for Cracks: Even if there was partial movement, thoroughly inspect the hose bib’s base and surrounding areas for any hairline cracks or signs of stress, which require professional assessment.
- Contact a Licensed Plumber: Engage a licensed plumbing professional without delay. They have specialized tools, expertise for complex issues like compromised threads or deeply seized components, and the necessary insurance to handle such repairs safely.
- Understand Costs: For a professional to remove a seized vacuum breaker and potentially replace the hose bib, expect costs in 2027 to range from $175-$350 for parts and labor. More complex pipe wall repairs could elevate costs to $400-$800, based on 2026 industry service reports.
Conclusion: Maintaining Your Hose Bib Functionality
Removing a vacuum breaker from your hose bib, while sometimes challenging, is achievable with the correct approach and tools. By following these expert-backed steps, you ensure optimal outdoor water system functionality and compliance with backflow prevention standards. Regular inspection, as recommended by the Environmental Protection Agency (EPA) in its 2027 water quality guidelines, can prevent future seizing and ensure your system operates efficiently.
❓ Frequently Asked Questions
What are the main types of vacuum breakers found on hose bibs, and how do their removal methods differ?
Common types include set-screw, threaded, and sometimes integrated units. Set-screw types require loosening a small, often recessed screw before unscrewing the unit. Threaded units are simply unscrewed directly with a wrench. Integrated units are typically not designed for separate removal.
What safety precautions should I take before attempting to remove a vacuum breaker?
Always begin by turning off the water supply to the hose bib to prevent leaks and potential injury. Wear appropriate safety gear like gloves and eye protection. Ensure you have a bucket or rags ready to catch any residual water once the vacuum breaker is loosened.
My vacuum breaker has a set screw, but it’s stripped. How can I remove it?
For a stripped set screw, you can try using a screw extractor kit or carefully drilling it out with a small drill bit. Another effective method involves using a Dremel tool with a cutting wheel to carefully cut a new slot in the screw head for a flathead screwdriver, taking care not to damage the hose bib threads.
The vacuum breaker is threaded but completely seized. What are my options?
For seized threaded vacuum breakers, apply a penetrating oil generously and let it sit for several hours or overnight to break down corrosion. Gently tap around the connection with a hammer to help the oil penetrate. Then, try using a sturdy pipe wrench or channel locks with firm, steady counter-clockwise pressure.
Can I just bypass or disable the vacuum breaker instead of removing it?
Bypassing or disabling a vacuum breaker is strongly discouraged and often illegal by plumbing codes. Its purpose is to prevent contaminated water from backflowing into your potable water supply, posing serious health risks. It’s best to repair or replace it if it’s faulty rather than disabling this critical safety device.
After removing the vacuum breaker, should I replace it, or can I leave the hose bib without one?
It is highly recommended to replace the vacuum breaker, especially if your local plumbing codes require it, which is common for outdoor hose bibs. Removing it permanently eliminates a critical safety feature that protects your drinking water from contamination. Always install a new, compliant vacuum breaker to maintain safety and adherence to regulations.