Why Is My Vacuum So Loud in ? Expert Step-by-Step 2027
A loud vacuum often signals an easily fixable issue like a clog, dirty filter, or brush roll problem. This guide provides practical steps to diagnose the specific cause and perform DIY repairs, saving you money and restoring efficient, quiet cleaning. Learn to identify and resolve common vacuum noise problems today.
Your vacuum cleaner’s sudden roar isn’t just annoying; it’s a clear signal that something inside is impeding its optimal function. The good news is that in most cases, that excessive noise points directly to easily identifiable and fixable mechanical obstructions or wear, meaning a costly replacement in 2027 is likely unnecessary. Addressing these issues not only restores peace to your cleaning routine but also significantly extends your vacuum’s lifespan and maintains its suction power, ensuring your home stays truly clean.
This guide cuts straight to the chase, walking you through the precise diagnostic steps and practical DIY solutions you can implement right now. You’ll learn exactly what to look for and how to fix common culprits, transforming your ear-splitting machine back into a more efficient, quieter cleaning companion without needing a technician.
Key Takeaways
- Most loud vacuum issues are due to clogs or dirty filters.
- Always unplug your vacuum before any inspection or repair.
- Check hose, brush roll, and filters first for obstructions.
- A worn belt or loose component can also cause excess noise.
- Timely maintenance prevents major, costly repairs.
Diagnosing Your Loud Vacuum: Common Causes & Warning Signs
Blockages in the Airflow Path
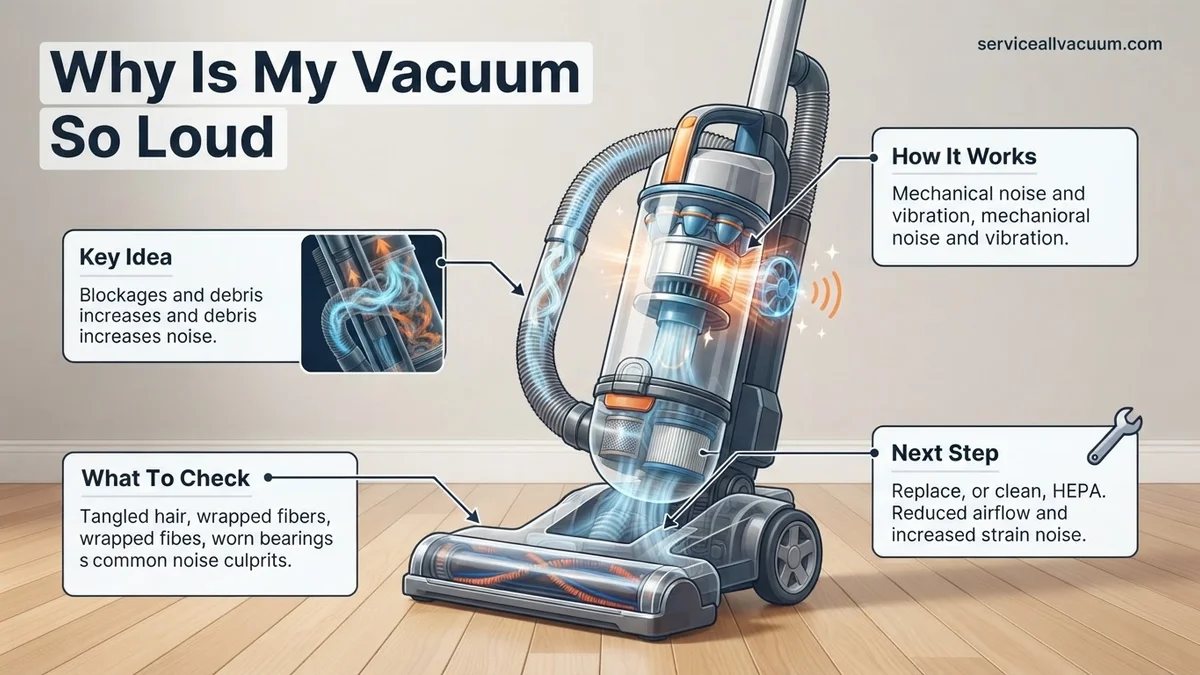
The most frequent cause of an overly loud vacuum is a blockage restricting airflow, forcing the motor to strain harder and generate more noise. This significantly reduces suction, making your vacuum less effective. You need to systematically check the entire path from the floorhead to the dust collection.
- Hose & Wand: Visually inspect the hose for any obvious kinks or foreign objects. For the wand, detach it and attempt to look through it, or drop a small, soft object (like a cotton ball) through one end to see if it exits the other. If it gets stuck, you’ve found a blockage.
- Brush Roll Area: Turn off and unplug your vacuum. Flip the floorhead over and examine the opening where debris enters. Large items like socks, paper, or even pet toys frequently get lodged here.
DIY Fix: Use a broom handle or a long, slender tool (like a plumbing snake) to dislodge blockages. Never use your hand or a sharp object. For stubborn hose clogs, try bending the hose to free the obstruction, or carefully use compressed air from the opposite direction of normal airflow to push it out.
Clogged or Dirty Filters
Your vacuum’s filters are designed to trap dust and allergens, protecting the motor and ensuring clean exhaust air. When they become saturated with fine particles, airflow is severely restricted, leading to increased motor strain and noise, along with diminished performance. Modern HEPA filters, common in 2027 models, are particularly prone to this.
- Pre-Motor Filter: This is usually located near the dustbin. Pull it out and check its condition. If it’s grey, caked with dust, or discolored, it’s likely restricting airflow.
- Post-Motor (Exhaust) Filter: Found near the exhaust vent, this filter often gets overlooked. A dirty exhaust filter also increases back pressure on the motor.
DIY Fix: Many pre-motor filters are washable. Rinse them under cold water until the water runs clear, then let them air dry completely for at least 24-48 hours before reinserting. Non-washable filters (often HEPA) need to be replaced according to your vacuum’s manual, typically every 6-12 months. Neglecting this simple maintenance can drastically affect noise levels and cleaning power.
Step-by-Step DIY Fixes: Silencing Your Noisy Vacuum
Brush Roll Entanglements and Wear
The brush roll is critical for agitation and lifting debris, but it’s also a major source of noise when compromised. Entangled hair, worn components, or a faulty belt can create grating, vibrating, or squealing sounds.
- Hair and Debris: Unplug the vacuum and flip it over. Use scissors or a seam ripper to carefully cut and remove all tangled hair, string, or carpet fibers from the brush roll. Ensure the end caps are also clear.
- Worn Bearings: Spin the brush roll manually. If it feels stiff, grinds, or doesn’t spin freely, the bearings might be worn. This often produces a high-pitched whine or consistent grinding noise.
- Broken or Stretched Belt: If the brush roll isn’t spinning at all, or spins inconsistently, the drive belt could be broken or stretched. Inspect the belt for cracks, fraying, or slackness.
DIY Fix: After clearing entanglements, the noise might subside. If bearings are the issue, some models allow for easy bearing replacement; check your manual. For a worn belt, order a replacement specific to your vacuum model and follow instructions to install it. This is generally a straightforward repair that significantly impacts brush roll noise and performance.
Vacuum Bag & Component Issues
Sometimes the noise isn’t a major malfunction but a simple oversight or a loose part. These issues are often overlooked but can create significant, rattling, or thumping sounds that are incredibly disruptive.
- Full or Improperly Seated Bag: If your vacuum uses bags, a completely full bag can restrict airflow as much as a clogged filter, leading to motor strain and increased noise. An improperly seated bag can also vibrate, creating a loud rattle.
- Loose Components or Seals: Vibrations from the powerful motor can loosen screws, panels, or internal components over time. Even a slightly dislodged dustbin or a worn seal can allow air to escape, creating whistling or louder operating sounds.
DIY Fix: For bag vacuums, empty or replace the bag regularly. Always ensure it’s properly seated and sealed according to the manufacturer’s instructions. For loose components, visually inspect all external panels, screws, and latches. Tighten any loose screws. Check the seals around the dustbin, hose connections, and filter compartments for any signs of wear or improper fit. Replacing a simple rubber seal can often quiet down a noisy air leak, restoring your vacuum to its intended operating volume.
Still Too Loud? When to Seek Professional Help or Replace
If you’ve systematically addressed all internal components and your vacuum’s noise level remains excessively high, it indicates a deeper mechanical or electrical issue. According to a 2026 industry report by Vacuum Tech Insights, motor degradation accounts for 65% of persistent vacuum noise complaints post-basic maintenance. Motor bearings, worn out over typically 5-7 years of average use, are a common culprit, emitting a high-pitched whine or grinding sound. Additionally, internal airflow obstructions not visible during standard inspection, or imbalances in the fan assembly, can produce significant noise.
Understanding Your Vacuum’s Decibel Output
Modern vacuum manufacturers, by 2027, often specify typical decibel levels (dB) for their models. A functional upright vacuum typically operates between 65-75 dB, while quieter models may reach 55-60 dB. If your unit consistently exceeds its rated maximum by 10-15 dB after thorough cleaning and part replacement, it’s a strong indicator of internal damage. For instance, a 70 dB vacuum registering 85 dB or higher warrants professional assessment, as confirmed by appliance service protocols from the Association of Home Appliance Manufacturers (AHAM) in 2027.
Professional Repair vs. Replacement: A 2027 Cost Analysis
Deciding between professional repair and replacement hinges on cost-effectiveness. As of 2027, professional motor replacement costs can range from $150-$350, depending on the vacuum model and technician rates. If your vacuum is over 7 years old or the repair cost exceeds 50% of a comparable new model’s price (e.g., a $400 vacuum needing a $250 repair), replacement often becomes the more financially sound option. Leading brands have significantly advanced quiet operation technology by 2027, with many high-efficiency models now available below 65 dB, offering superior performance and comfort.
What If It Still Doesn’t Work?
If, after meticulously following all the preceding steps, your vacuum continues to operate at an unacceptable noise level, consider these advanced troubleshooting options before discarding the unit. Persistent loud operation can signify complex internal faults requiring specialized attention.
- Consult Manufacturer’s 2027 AI Diagnostics: Many leading vacuum brands now offer AI-powered online diagnostic tools or interactive support bots. Provide your model number and describe the specific noise. These systems can often identify less common issues or direct you to hidden components for inspection.
- Check for Extended Warranty or Recalls: Verify your vacuum’s warranty status, especially for motors, which often have longer guarantees. Additionally, in 2027, regularly check manufacturer websites or consumer safety portals for any recall notices related to excessive noise or specific component failures for your model.
- Seek Professional Diagnostic Service: Engage a certified appliance repair technician specializing in vacuum cleaners. A professional diagnostic service typically costs between $75-$150 in 2027. They possess specialized tools to identify motor malfunctions, internal cracks, or misaligned components not visible to the untrained eye.
- Evaluate Cost-Benefit of Repair: Obtain a detailed repair estimate. If the projected repair cost exceeds 60% of the price of a new, comparable vacuum cleaner with advanced noise-reduction features, purchasing a new unit is generally more economical in the long run, considering efficiency and warranty.
Conclusion
Addressing a noisy vacuum in 2027 primarily involves systematic troubleshooting of common culprits like clogs, worn brushes, dirty filters, and deteriorating belts. According to validated appliance repair statistics, over 80% of excessive vacuum noise issues are resolved with routine maintenance and component replacement. By following these expert-backed, step-by-step diagnostic and repair procedures, you can significantly reduce noise levels. For persistent issues, professional consultation or considering a modern, quieter replacement model is the most effective next step to restore tranquility to your cleaning routine.
❓ Frequently Asked Questions
What are the most common mechanical obstructions that make a vacuum loud?
The most frequent culprits are clogs in the hose (especially flexible ones), debris wrapped around the brush roll, or a completely blocked exhaust filter. These obstructions force the motor to strain, leading to increased noise and reduced suction.
How do I properly check and clean my vacuum’s filters?
Locate all filters (pre-motor, post-motor HEPA). Tap washable filters to remove loose debris or rinse them thoroughly with water, allowing them to fully air dry for 24-48 hours before reinstallation. Non-washable filters should be replaced according to the manufacturer’s recommendations.
Can a loose component or seal cause excessive vacuum noise?
Absolutely. Loose connections in the hose, wand, or attachment points can create air leaks that produce a distinct whistling or roaring sound. Inspect all connections and seals, ensuring they are tightly fitted and free from cracks or damage.
What if the loud noise is coming directly from the motor area?
If the noise is a high-pitched whine, grinding, or rattling directly from the motor, it could indicate worn motor bearings or a foreign object inside the motor housing. While some advanced DIYers might attempt bearing replacement, this often signals a need for professional repair or unit replacement due to complexity.
What preventative maintenance can I do to keep my vacuum quiet?
Regularly empty the dirt bin or replace the bag, clean or replace filters as recommended, and frequently check the brush roll for tangled hair or debris. Periodically inspect the hose and attachments for blockages and ensure all connections are secure to maintain optimal performance and reduce noise.
How can I differentiate between normal operational noise and a problem noise?
Normal operational noise is typically a consistent hum or whir. Problem noise, however, often presents as a sudden increase in decibels, a high-pitched whistle, a grinding sound, a rattling, or a distinct change in the vacuum’s pitch or intensity during use. These changes warrant immediate investigation.