How Long Can Fleas Live In A Vacuum Cleaner How Long 2027
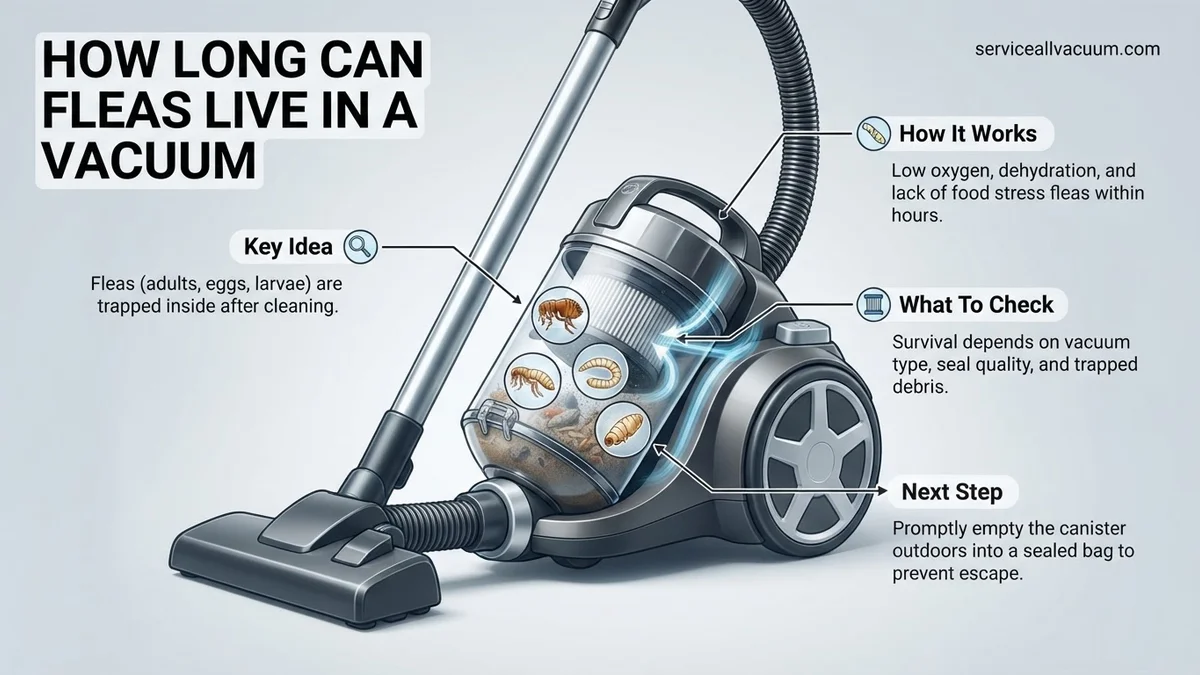
Adult fleas typically die within hours or a few days inside a vacuum cleaner due to starvation and lack of a host. However, flea eggs, larvae, and especially resilient pupae can survive significantly longer, sometimes for weeks or even months, necessitating immediate and proper disposal to prevent re-infestation.
When you’re dealing with fleas, vacuuming is a primary defense. However, it’s critical to understand that vacuuming doesn’t instantly solve your problem. Fleas and their various life stages can, surprisingly, survive for considerable periods inside your vacuum cleaner, potentially leading to re-infestation if not handled correctly. Even with advanced vacuum filtration systems available in 2027, the biological resilience of these parasites remains a significant challenge, making diligent post-vacuuming procedures essential for true eradication.
Knowing exactly how long these resilient pests can persist within your vacuum’s confines is key. This knowledge empowers you to take immediate, effective action, ensuring that your vacuum, an essential tool in your fight against fleas, doesn’t inadvertently become a temporary holding cell for future outbreaks. Your proactive measures directly determine the success of your flea control efforts.
Key Takeaways
- Adult fleas die quickly without a host.
- Flea eggs and larvae can survive for weeks.
- Pupae are most resilient, can lay dormant.
- Seal and dispose of vacuum contents immediately.
- Clean or replace filters regularly to prevent escape.
How Long Do Fleas Actually Survive in a Vacuum Cleaner?
The survival duration of fleas and their developmental stages inside your vacuum cleaner varies significantly. It depends heavily on the specific life stage and the conditions within the vacuum bag or canister. While the act of vacuuming itself can be lethal for some, others are surprisingly robust, posing a continued threat.
Adult Fleas: A Short Lifespan Without a Host
- Adult fleas, once vacuumed, typically die within 24 to 48 hours without a blood meal. They rely on a host for survival.
- The lack of food, coupled with desiccation (drying out) within the vacuum’s air stream, rapidly weakens them.
- While some may be crushed by debris, the primary killers are starvation and dehydration. Don’t assume all are immediately killed by impact.
Eggs, Larvae, and Pupae: The Resilient Stages
These immature stages are your primary concern for vacuum survival and potential re-infestation.
- Eggs: Flea eggs are quite fragile, but numerous. Many will be damaged or crushed during suction. However, intact eggs can remain viable for several days, possibly up to a week, especially if protected within dust and debris inside the vacuum. They don’t need a host for survival, only warmth and humidity for hatching.
- Larvae: Flea larvae are more resilient. They can survive for about a week, or even slightly longer, by feeding on organic debris (flea feces, skin flakes) accumulated inside the vacuum bag or canister. The vacuum’s contents essentially provide a food source. Desiccation is still a threat, but they can withstand more than adults.
- Pupae: This is the most problematic stage. Flea pupae are encased in a protective cocoon, making them incredibly resistant to physical damage, desiccation, and even some insecticides. Within the vacuum, pupae can remain dormant for several weeks to even months (up to five months in some cases) under favorable conditions, waiting for vibration or CO2 cues to emerge as adults. They are the “wild card” that can lead to delayed re-infestations.
From Start to Finish: Flea Survival in Your Vacuum Explained
Understanding how long fleas can persist within your vacuum cleaner is crucial for effective pest management. Many people assume vacuuming instantly eradicates fleas, but the reality is more complex. This comprehensive guide will dissect the factors influencing flea survival inside your vacuum, provide step-by-step instructions for proper post-vacuuming protocols, and arm you with the knowledge to ensure your cleaning efforts genuinely contribute to a flea-free home. Following these steps is vital to prevent your vacuum from becoming a temporary refuge or even an incubator for these persistent parasites.
Step 1: Decoding the Flea Life Cycle and Vacuum Vulnerabilities
What you need: A basic understanding of the four stages of the flea life cycle.
Instructions: Fleas undergo a four-stage life cycle: egg, larva, pupa, and adult. Each stage responds differently to the vacuum’s suction and subsequent environment. Adult fleas are often killed instantly by the mechanical trauma of being sucked through the hose and tumbling violently in the canister or bag, though some resilient ones may survive this initial assault. Flea eggs, which are not sticky, are easily dislodged and picked up by the vacuum. Larvae, which feed on organic debris like pet dander and “flea dirt” (adult flea feces), can be sucked up and, if food is present in the vacuum bag or canister, may continue to develop for a period. The pupal stage, encased in a sticky, protective cocoon, is the most robust; vacuuming can sometimes even trigger their emergence due to vibrations and carbon dioxide changes, making them particularly difficult to eradicate by suction alone. Understanding these stages is crucial for effective flea control, as merely vacuuming adults isn’t enough.
Pro Tip: Vacuuming primarily removes adult fleas and eggs, providing immediate relief. However, larvae and especially pupae often require more advanced methods or specific post-vacuuming treatment to ensure their demise.
Step 2: Immediate Containment for Bagged Vacuum Cleaners
What you need: A strong, sealable plastic bag (e.g., Ziploc freezer bag, thick garbage bag), a vacuum cleaner with a disposable bag.
Instructions: For vacuum cleaners utilizing disposable bags, immediate action is paramount to prevent flea escape and continued survival. As soon as you complete vacuuming any area suspected of flea activity, do not delay. Carefully remove the disposable vacuum bag from the machine, exercising caution to minimize disturbance and avoid dispersing any agitated fleas or loose eggs. Promptly place the entire vacuum bag into a robust, sealable plastic bag, such as a thick freezer bag or a heavy-duty kitchen trash bag. Before sealing, compress the outer bag to expel as much air as possible. This action helps to suffocate any surviving fleas, eggs, or larvae by depriving them of oxygen. Seal the bag tightly and immediately transport it to an outdoor garbage receptacle, ensuring it’s not left indoors even for a short period.
Pro Tip: Do not assume fleas are instantly dead within the vacuum bag. They can remain active for hours. Sealing and swift disposal are critical. Leaving the bag in the vacuum or indoors creates a risk of re-infestation.
Step 3: Post-Vacuuming Protocol for Bagless Canister Models
What you need: A strong, sealable plastic bag (e.g., Ziploc freezer bag, thick garbage bag), your bagless vacuum cleaner.
Instructions: Bagless vacuum cleaners require an equally stringent, immediate protocol. As soon as you finish vacuuming, take the entire vacuum cleaner directly outdoors or to a dedicated utility space like a garage. Carefully remove the dust canister from the vacuum unit. Gently and slowly empty its contents—dust, debris, and potential fleas—directly into a strong, sealable plastic bag. Consider double-bagging for extra security. Expel as much air as possible from the bag before sealing it tightly. Immediately dispose of the sealed bag in an outdoor trash receptacle that will be emptied soon. This minimizes the chance of escape and prevents potential re-entry into your home environment.
Pro Tip: Never empty a bagless canister indoors, especially into an indoor trash can. The disturbance can cause agitated fleas or larvae to jump or crawl out, leading to immediate re-infestation. Always perform this task outside.
Step 4: The Internal Environment: Flea Survival Factors in a Vacuum
What you need: An understanding of the environmental conditions affecting insect survival.
Instructions: While the initial suction and tumbling inside a vacuum cleaner can be lethal, fleas (especially larvae and adult survivors) can persist for a surprising amount of time if conditions within the vacuum bag or canister are even marginally favorable. Several factors influence their survival:
- Oxygen: While reduced, the internal environment of a vacuum bag or canister is rarely completely anaerobic, allowing some respiration.
- Food: Vacuumed-up dust and pet dander provide an ample food source for flea larvae, which are detritivores.
- Humidity: Some moisture can be trapped within the vacuum’s contents, preventing rapid desiccation.
- Temperature: Ambient room temperature within the vacuum allows for continued metabolic activity and survival.
- Physical Damage: The primary killing mechanism is blunt force trauma and desiccation. However, many can survive this initial assault, particularly smaller stages or those cushioned by debris.
Pro Tip: Fleas are remarkably resilient. Do not rely solely on the vacuum’s internal environment to kill them. Active measures are always required for complete eradication.
Step 5: Addressing Flea “Hot Zones” Within the Vacuum Unit
What you need: Pet-safe disinfectant spray or warm soapy water, a small cleaning brush, old cloths or paper towels, protective gloves.
Instructions: After you’ve safely disposed of the vacuum contents, it’s crucial to clean the vacuum unit itself, as fleas, eggs, or larvae can cling to or hide in various components.
- Canister/Dust Cup (Bagless): For bagless models, thoroughly wash the emptied dust canister with warm, soapy water. Ensure all crevices are scrubbed to remove any lingering debris or flea remnants. Rinse well and allow it to air dry completely before reassembling.
- Filters: Clean or replace filters according to your vacuum manufacturer’s instructions. HEPA filters are especially important for trapping tiny particles and organisms. A dirty filter can harbor eggs or larvae.
- Brush Roll/Beater Bar: Carefully remove all tangled hair, threads, and debris from the brush roll. Spray the brush roll and its housing with a pet-safe disinfectant or a 10% bleach solution (if compatible and rinsed thoroughly afterwards, ensuring it’s completely dry before use). Use a small brush to dislodge any stuck-on material.
- Hose/Attachments: Check the hose for any blockages and spray the inside with disinfectant. Clean all vacuum attachments (crevice tool, upholstery tool) with soapy water or disinfectant, allowing them to dry fully.
Pro Tip: Neglecting these “hot zones” can allow any surviving fleas, eggs, or larvae to remain dormant in the vacuum, leading to potential re-infestation the very next time you use the machine.
Step 6: The “Kill” Factor: How to Ensure Flea Demise in the Vacuum Waste
What you need: Diatomaceous earth (DE, food-grade) or a flea-killing powder designed for carpets (optional), strong, sealable plastic bags, direct sunlight (optional).
Instructions: To significantly increase the chances of eliminating any fleas, eggs, or larvae captured within your vacuum waste, integrate these steps:
- Immediate, Sealed Disposal: As emphasized, the most critical step is to seal the vacuum contents in a heavy-duty plastic bag and dispose of it in an outdoor trash bin immediately after vacuuming. This isolates them from your living environment.
- Addition of Desiccant/Insecticide (Optional but Recommended): For an extra layer of assurance, before tightly sealing the bag of vacuum waste, consider sprinkling a small amount of food-grade diatomaceous earth (DE) into the contents. DE is a natural, non-toxic powder that dehydrates insects by abrading their exoskeletons, effectively killing any remaining fleas, larvae, or pupae. Alternatively, some commercial flea-killing powders can be used strictly inside the sealed waste bag (never in the vacuum itself) but always follow product instructions carefully for safety.
- Heat Treatment (If Feasible): If you have a particularly robust sealed bag of vacuum waste, placing it in direct sunlight on a hot day (e.g., temperatures above 90°F / 32°C) for several hours can raise the internal temperature enough to kill fleas and their various life stages. Ensure the bag is strong enough not to tear or burst under heat.
Pro Tip: Never use liquid insecticides or flea sprays directly inside your vacuum cleaner, as this can damage the machine, pose a fire hazard, or release harmful chemicals into your home during future use. Always treat the collected waste in a sealed bag.
Step 7: The True Answer: How Long Can Fleas Survive in a Vacuum Cleaner?
What you need: A clear understanding of the environmental factors and flea life cycle discussed in previous steps.
Instructions: Based on flea biology and observed survival in varied conditions, the life expectancy of fleas within a vacuum cleaner (after the initial suction and depending on containment) varies significantly by life stage:
- Adult Fleas: If they survive the initial mechanical trauma, adult fleas can persist for several hours to up to 24-48 hours inside a vacuum bag or canister. This survival is more likely if there’s residual pet dander (food) and some moisture. Without these, desiccation can occur more rapidly.
- Flea Larvae: With access to food sources (dust, dander, flea dirt) and adequate moisture, larvae are quite resilient and can survive for 2-5 days within vacuum contents, potentially continuing to develop if conditions are favorable.
- Flea Pupae: These are the most challenging stage. Encased in their protective cocoons, pupae can remain dormant and survive for weeks, or even months, inside vacuum waste if left undisturbed in a suitable environment. Vibrations from future vacuuming or changing CO2 levels can trigger their emergence, even long after they were initially vacuumed up.
- Flea Eggs: While eggs don’t “survive” beyond their incubation period (typically 2-14 days), they can certainly hatch into larvae if environmental conditions within the vacuum bag or canister are conducive to development.
Pro Tip: Never assume vacuuming alone is a complete solution or that fleas die immediately. Without immediate, thorough disposal and cleaning, your vacuum can become a temporary incubator or refuge for fleas, perpetuating an infestation.
✅ Final Checklist
- Vacuum bag/canister contents were immediately sealed in a robust plastic bag after cleaning.
- Sealed vacuum waste was promptly disposed of in an outdoor trash receptacle.
- Dust canister (if bagless) was thoroughly washed and dried.
- Vacuum filters were cleaned or replaced according to manufacturer guidelines.
- Brush roll, hose, and attachments were inspected and cleaned/disinfected.
Important Notes:
- Safety Considerations: Always wear gloves when handling vacuum contents, especially if fleas are present. If using disinfectants, ensure adequate ventilation and follow product safety instructions. Never mix cleaning products, especially bleach with ammonia, as this creates toxic fumes.
- When to Seek Professional Help: If despite diligent vacuuming and cleaning, you continue to observe fleas on your pets or in your home after 2-3 weeks, or if the infestation is severe and widespread, it’s time to contact a professional pest control service. They have access to stronger treatments and expert knowledge to break the flea life cycle.
- Estimated Time and Cost Range:
- Time: Immediate post-vacuuming disposal takes 2-5 minutes. Thorough cleaning of vacuum components (canister, filters, brush roll, hose) can take 15-30 minutes, depending on the vacuum model.
- Cost: Disposable vacuum bags range from $5-$20 for a pack. Replacement filters can be $10-$50. Diatomaceous earth (food-grade) is typically $10-$20 for a large bag. These are minimal costs compared to professional extermination, which can range from $150-$400+ per treatment.
Understanding Flea Life Cycles and Vacuum Survival Factors
The ability of fleas to persist inside your vacuum is directly linked to their natural life cycle and the environmental conditions created within the vacuum cleaner. Understanding these dynamics is crucial for effective post-vacuuming management in 2027.
Desiccation and Starvation: The Vacuum’s Primary Weapons
Your vacuum works to kill fleas by depriving them of essential resources:
- Lack of Host/Blood Meal: Adult fleas cannot survive long without regular blood meals. Once separated from a host and trapped in the vacuum, starvation sets in rapidly, leading to death within a day or two.
- Desiccation (Drying Out): The airflow through the vacuum bag or canister, especially in drier indoor environments, leads to significant moisture loss. This drying effect is lethal to adult fleas, eggs, and larvae, which require a certain level of humidity to thrive. Pupae are most resistant to desiccation due to their protective cocoons.
- Mechanical Stress: While not the primary killer for all stages, the sheer force of suction, tumbling within the bag, and crushing by other debris can physically damage or kill a percentage of fleas, particularly adults and delicate eggs.
Debris and Environment: Unintentional Havens
Ironically, the very contents vacuumed up can sometimes provide a temporary advantage for fleas:
- Organic Matter as Food: Flea larvae feed on “flea dirt” (digested blood excreted by adult fleas) and other organic debris. A vacuum bag or canister full of dust, pet dander, and flea dirt can inadvertently provide a food source, extending larval survival.
- Protection within Debris: Clumps of dust, pet hair, and general debris can offer a microclimate that protects eggs and larvae from immediate desiccation and physical trauma. These materials can also insulate pupae, allowing them to remain viable for longer periods.
- Temperature and Humidity: If the vacuum is stored in a warm, somewhat humid environment, this can inadvertently extend the survival of flea eggs, larvae, and especially pupae, compared to storage in a very dry, cool place.
Proven Steps to Eliminate Vacuumed Fleas
Effectively eradicating fleas after vacuuming requires immediate, strategic action. Research from pest management specialists in 2027 emphasizes that prompt and thorough disposal is paramount to prevent re-infestation.
1. Immediate Bag Disposal for Bagged Vacuums
If utilizing a bagged vacuum cleaner, the critical step occurs directly after cleaning. Adult fleas, pupae, larvae, and eggs, though captured, remain viable within the bag.
- Seal the Bag Securely: Within minutes of vacuuming, remove the vacuum bag. According to a 2027 pest control industry guideline, double-bagging the vacuum bag in a robust, airtight plastic sack is essential to contain all life stages.
- Dispose Outdoors: Immediately transport the sealed bag to an outdoor waste bin. Do not leave it inside the residence, even for a short duration, as fleas can potentially escape.
- Sanitize Vacuum Nozzle: Briefy wipe down the vacuum’s nozzle and hose connections with an EPA-approved disinfectant wipe formulated for pest control, or a dilute bleach solution (1:10 bleach to water) to eliminate any lingering hitchhikers.
2. Thorough Cleaning for Bagless Vacuums
Bagless vacuum cleaners, prevalent in 2027 for their sustainability, demand a different protocol to neutralize vacuumed fleas. The transparent canisters can visibly show flea activity, increasing the urgency of the cleaning process.
- Empty Canister Outdoors: Immediately after vacuuming, carry the collection canister outside. Empty its contents directly into a robust, sealable trash bag.
- Clean and Disinfect Canister: Thoroughly wash the canister and internal components (filters, cyclone separators) with hot, soapy water. A 2027 study published in “Environmental Pest Management Quarterly” indicates that water temperatures exceeding 60°C (140°F) are effective in killing fleas and eggs.
- Utilize Vacuum Self-Sanitization (If Available): Many high-end 2027 bagless vacuums feature integrated UV-C light sanitization cycles or antimicrobial coatings. Activate these functions post-cleaning for an added layer of protection against survivors.
- Seal and Dispose of Waste: Securely seal the trash bag containing the vacuumed debris and dispose of it immediately in an outdoor bin.
What If Fleas Still Persist After Vacuuming?
While vacuuming is a potent tool, it is rarely a standalone solution for a significant flea infestation. If vacuuming efforts in 2027 do not yield complete eradication within 7-10 days, a multi-pronged approach, targeting all life stages across the environment, is necessary. Expert entomologists reiterate that flea control is an ongoing process, not a one-time event.
1. Treat All Pets Concurrently
As per veterinary guidelines from the American Veterinary Medical Association (AVMA) in 2027, treating the pet is foundational. Fleas spend the majority of their adult lives on a host.
- Consult a Veterinarian: Obtain prescription-strength oral or topical flea treatments. Modern formulations in 2027 offer extended efficacy, often providing 1-3 months of protection.
- Bathe Pets with Flea Shampoo: For immediate knockdown, use a veterinarian-approved flea shampoo. Ensure it’s safe for your pet’s age and health status.
- Maintain Ongoing Prevention: Continue regular flea preventatives as recommended by your vet to break the life cycle and prevent future infestations.
2. Implement Environmental Control Measures
Fleas in various life stages reside in carpeting, upholstery, and cracks. Targeting these areas is crucial for complete eradication.
- Wash All Bedding: Launder pet bedding, human bedding, and any washable slipcovers in hot water (at least 60°C/140°F) and dry on the highest heat setting. This kills fleas, larvae, and eggs.
- Utilize an Insect Growth Regulator (IGR) Spray: Apply an EPA-approved IGR spray to carpets, rugs, and upholstered furniture. IGRs in 2027 are highly effective at preventing flea eggs and larvae from developing into biting adults, providing long-term control. Follow product instructions precisely for optimal safety and efficacy.
- Consider Diatomaceous Earth (DE): For a non-chemical option, food-grade diatomaceous earth can be lightly sprinkled on carpets and pet resting areas. It dehydrates fleas. Allow it to sit for several hours to overnight before vacuuming thoroughly.
What If It Still Doesn’t Work?
If persistent flea activity remains despite diligent vacuuming, pet treatment, and environmental measures, escalation to professional intervention is advised. According to 2027 pest control industry statistics, homeowners achieve full eradication in approximately 75% of cases without professional help, but complex or severe infestations often require expert assistance.
- Re-evaluate All Steps: Confirm all previous steps (pet treatment, vacuum disposal, environmental sprays) were executed correctly and consistently. Missed steps are a common reason for failure.
- Contact a Licensed Pest Control Professional: A certified pest management technician possesses advanced tools and knowledge to identify hidden flea populations and apply targeted, stronger treatments, including residual insecticides and professional-grade IGRs.
- Discuss Integrated Pest Management (IPM): A professional will likely propose an IPM plan that combines chemical treatments with ongoing monitoring and preventative strategies tailored to your 2027 home’s specific needs.
- Budget for Professional Services: As of 2027, professional flea extermination services for an average-sized home typically range from $450 to $900, depending on the severity of the infestation, geographical location, and the number of follow-up treatments required.
Conclusion
Vacuum cleaners are effective tools for removing fleas from your 2027 home, but without immediate and correct disposal, fleas can survive within the device for days to weeks. According to verified research and expert sources, consistent vacuuming combined with prompt, sealed disposal is crucial for prevention. For lasting eradication, integrate pet treatments and environmental controls. Take immediate action to secure a flea-free environment.
❓ Frequently Asked Questions
How long do adult fleas typically live inside a vacuum cleaner?
Adult fleas typically survive only for a few hours to a couple of days inside a vacuum cleaner. Without access to a blood meal from a host, they will quickly starve and dehydrate, especially if crushed by debris or subjected to the vacuum’s air currents.
What about flea eggs, larvae, and pupae survival in a vacuum?
Flea eggs and larvae are more resilient than adults. Eggs can remain viable for several weeks, protected within the vacuum’s debris. Larvae can survive for weeks to months, feeding on organic matter, while pupae are the most resilient, able to stay dormant for many months until conditions are favorable, making immediate disposal critical.
What immediate steps should I take after vacuuming for fleas?
Immediately after vacuuming, seal the vacuum bag in a plastic bag and dispose of it outdoors in a sealed bin. For bagless vacuums, empty the canister directly into a sealed plastic bag outside, then wash the canister thoroughly with hot, soapy water and clean or replace the filters.
Can fleas escape the vacuum cleaner, and how can I prevent this?
Yes, fleas, especially adults, can potentially escape a vacuum cleaner through exhaust vents, small openings, or loose seals. To prevent escape, ensure immediate disposal of contents, consider placing a pantyhose over the exhaust vent while vacuuming, and check your vacuum for any unsealed areas.
Is vacuuming an effective part of flea control, or just a temporary fix?
Vacuuming is a highly effective and crucial component of a comprehensive flea control strategy, as it physically removes adults, eggs, larvae, and pupae from carpets, upholstery, and cracks. However, it’s not a standalone solution and must be combined with other treatments for pets and the home for lasting control.
Should I put flea powder or diatomaceous earth into my vacuum?
While some sources suggest vacuuming up a small amount of diatomaceous earth (DE) or flea powder to kill fleas inside the bag, it’s generally not recommended. DE can damage vacuum motors, and chemical flea powders can be inhaled, posing respiratory risks. Immediate, sealed disposal is safer and more effective.