How To Use A Aquarium Vacuum How to Use an Aquarium 2027
An aquarium vacuum is essential for maintaining a healthy tank by removing accumulated waste. Effectively using an aquarium vacuum involves proper setup, initiating a siphon, and systematic cleaning techniques. This process ensures substrate cleanliness and contributes to overall water quality.
Cleaning your aquarium substrate is a fundamental and non-negotiable aspect of maintaining a thriving aquatic environment. For the serious aquarist in 2027, an aquarium vacuum isn’t just a tool; it’s the primary method for directly removing accumulated waste and debris that can degrade water quality and harm your fish. Mastering its use ensures pristine substrate, reduces harmful compounds, and supports the long-term health of your entire tank ecosystem.
This process is more than just sucking up dirt; it’s about targeted waste removal that complements your filtration system. Regularly vacuuming your gravel or sand prevents the buildup of toxic substances, minimizes algae growth, and keeps your tank looking its best. Even with the advanced filtration technologies available today, direct substrate cleaning remains the most effective way to eliminate solid detritus before it breaks down and pollutes the water.
Key Takeaways
- Siphon initiation is crucial for successful vacuuming.
- Angle vacuum head to stir debris, not suck substrate.
- Monitor water level to avoid excessive drainage.
- Unplug tank equipment before starting cleanup.
- Refill tank slowly with conditioned, tempered water.
What Causes Substrate Debris and Poor Tank Health?
Common Sources of Tank Debris
Debris in your aquarium substrate primarily originates from several key sources, accumulating over time. The most significant contributors are uneaten fish food, which can include flakes, pellets, or even frozen food residues that settle quickly. Additionally, fish waste, such as solid fecal matter, is a constant source. If you have live plants, decaying plant leaves and roots also break down and collect within the substrate. These organic materials don’t just disappear; they sink and embed themselves deep into the gravel or sand bed, forming unsightly and unhealthy pockets of waste.
- Uneaten Food: Overfeeding leads to excess food settling and decomposing.
- Fish Waste: Continuous production of solid waste from tank inhabitants.
- Decaying Plant Matter: Shed leaves and dead roots from live aquarium plants.
- Algae and Biofilm: Dead algae and bacterial films can also settle and add to the detritus.
The Impact on Water Quality and Fish Health
When detritus accumulates in the substrate, it creates anaerobic (oxygen-depleted) zones where harmful bacteria thrive. As these organic materials decompose, they release ammonia, nitrites, and nitrates directly into your tank water. While your filter works to process these, a heavily soiled substrate can overwhelm even a robust 2027 filtration system, leading to dangerous spikes in toxic compounds.
- Ammonia Spikes: Highly toxic, causing gill damage and lethargy in fish.
- Nitrite Buildup: Prevents fish blood from carrying oxygen effectively.
- Nitrate Levels: While less immediately toxic, high nitrates stress fish, stunt growth, and fuel aggressive algae blooms.
- Anaerobic Pockets: Can produce hydrogen sulfide gas, which is extremely toxic to fish and inverts if released.
- Compromised Immunity: Poor water quality weakens fish, making them susceptible to diseases like fin rot and ich. Regular vacuuming is essential for maintaining optimal water parameters and overall fish resilience.
Master Aquarium Vacuuming in 8 Simple Steps
Keeping your aquarium’s substrate clean is crucial for maintaining a healthy and vibrant aquatic environment. Detritus, uneaten food, and fish waste accumulate at the bottom, breaking down into harmful nitrates and phosphates, which can negatively impact water quality and fish health. This comprehensive guide will walk you through the precise steps of using an aquarium vacuum, ensuring your tank remains pristine and your aquatic inhabitants thrive, extending beyond mere surface cleaning to remove hidden toxins.
Step 1: Gather Your Arsenal
What you need: A siphon-style aquarium gravel vacuum (various sizes available, choose one appropriate for your tank size and substrate depth), a clean, dedicated 5-gallon (or larger, depending on tank size) bucket, a clean towel or two, and a bottle of aquarium water conditioner/dechlorinator.
Instructions: Before you even think about putting anything in your tank, ensure all your equipment is clean and free of any soap residue or chemicals. Place your empty bucket securely on the floor, lower than the aquarium. This height difference is essential for gravity to initiate the siphon effect. Position your towels nearby for any potential spills.
Pro Tip: Never use a bucket or towels that have been used with household cleaning products. Even trace amounts can be highly toxic to fish. Dedicate specific equipment solely for aquarium use.
Step 2: Pre-Vac Prep and Power Down
What you need: Your hands, and potentially a power strip with individual switches.
Instructions: Safety first! Before reaching into your aquarium, unplug all electrical equipment, including heaters, filters, and air pumps. This prevents electrical hazards and protects your equipment from running dry if the water level drops too low. If your filter has an intake tube near the substrate, gently move it to avoid vacuuming around it in the first passes. You may also slightly push aside any large, easy-to-move decorations to expose more substrate.
Pro Tip: Unplugging filters also ensures that any debris stirred up during vacuuming isn’t immediately sucked back into your filter media, prolonging its cleanliness and efficiency. Just remember to prime your filter when restarting if it’s an external canister type.
Step 3: Initiate the Siphon
What you need: The gravel vacuum assembly.
Instructions: Submerge the wide, rigid end of the gravel vacuum (the “bell” or “tube”) into the aquarium water, ensuring it’s completely filled. Take the flexible hose end and quickly lower it into your empty bucket on the floor. Most modern siphons have an integrated hand pump or shaker mechanism; follow the manufacturer’s instructions to start the flow. For traditional siphons, you might need to quickly suck on the end of the hose (be careful not to ingest tank water!) or submerge the entire hose to fill it with water before lowering it into the bucket.
Pro Tip: If your siphon has a pump, a few brisk pumps will usually get the water flowing without the need for mouth siphoning. Ensure the hose end stays below the water level in the bucket to prevent air from re-entering and breaking the siphon.
Step 4: The Substrate Sweep Technique
What you need: The activated gravel vacuum.
Instructions: Once the water is flowing, insert the bell of the vacuum into the substrate, allowing the gravel or sand to be drawn upwards into the tube. As the debris is light, it will be sucked into the hose and into the bucket, while the heavier substrate will fall back down. Work in small sections, gently plunging the vacuum bell a few inches deep into the gravel. Move slowly and systematically across the entire bottom of the tank. For sand, hover the bell just above the sand’s surface to lift debris without removing too much sand.
Pro Tip: Avoid disturbing large amounts of substrate at once, as this can release a significant amount of trapped gas or harmful anaerobic pockets. Focus on one small area for 10-15 seconds before moving to the next, covering about 25-30% of the substrate each week for optimal cleaning.
Step 5: Navigate Obstacles and Tricky Spots
What you need: The gravel vacuum, careful maneuvering.
Instructions: When approaching decorations, plants, or fixed equipment, gently guide the vacuum around their bases. For areas under driftwood or large rocks, try to angle the vacuum bell to reach underneath without dislodging the decoration. If you have live plants, be careful not to uproot them. Hover the vacuum just above the substrate around their root systems to remove surface debris without damaging the delicate roots. Small, hard-to-reach corners can be tackled by using the narrow hose end directly, or by slightly tilting the tank to pool debris into a more accessible area.
Pro Tip: For dense plant growth, sometimes a gentle finger swirl near the base can dislodge debris, allowing the vacuum to pick it up without getting too close to the roots. Always prioritize fish safety; if a fish is in the way, wait for it to move before continuing.
Step 6: Monitor Water Level and Debris Removal
What you need: The bucket, your eyes.
Instructions: Keep a close eye on the water level in your aquarium and the amount of dirty water accumulating in your bucket. The goal is typically to remove 20-30% of the tank’s water during a routine cleaning and water change. Stop vacuuming immediately if your bucket is nearing full or if the tank’s water level drops too low, potentially exposing your heater or filter intake. Observe the water flowing into the bucket; it will start murky with debris and gradually clear as you clean more effectively, indicating less detritus is being removed.
Pro Tip: It’s better to do several smaller, targeted vacuuming sessions than one massive, disruptive one. If your tank is particularly dirty, you might only clean a portion of the substrate and perform a smaller water change, then repeat in a few days.
Step 7: The Partial Water Change Integration
What you need: Water conditioner, a separate clean bucket, and source of temperature-matched water.
Instructions: Once you’ve removed the desired amount of water (and debris), carefully remove the gravel vacuum from the tank. Now, prepare your new water. Fill your clean, separate bucket with fresh tap water, ensuring its temperature closely matches your aquarium water (within 1-2 degrees Fahrenheit). Add the appropriate dose of aquarium water conditioner/dechlorinator to the new water as per product instructions, as chlorine and chloramines are lethal to fish. Stir well to mix.
Pro Tip: Use an inexpensive aquarium thermometer to check both the tank water and new water temperature. Drastic temperature changes can stress fish and lead to illness. Never add unconditioned tap water directly to the tank.
Step 8: Post-Vacuum Restoration and Re-commissioning
What you need: The prepared new water, and your previously unplugged equipment.
Instructions: Slowly and gently pour the conditioned, temperature-matched water back into your aquarium. Pouring slowly minimizes disturbance to your fish and substrate. You can pour it onto a decoration or your hand to further diffuse the flow. Once the water level is restored to its normal operating height, you can plug in all your electrical equipment. Re-position any decorations or equipment that you moved. Observe your fish for a few minutes to ensure they are not showing signs of stress. Discard the dirty vacuum water responsibly; it can be beneficial for plants in your garden!
Pro Tip: If your filter is a hang-on-back or external canister, ensure it is properly primed and starts flowing water before walking away. Sometimes a bit of air gets trapped, and a simple prime or shake can restart it. For internal filters, simply plug them back in.
✅ Final Checklist
- Is the aquarium water noticeably clearer than before vacuuming?
- Does the substrate appear free of visible detritus and food particles?
- Are all heaters, filters, air pumps, and lights plugged in and operating correctly?
- Are your fish swimming normally and showing no signs of stress or rapid breathing?
- Is the water level returned to its appropriate height?
Important Notes:
- Safety considerations: Always unplug electrical equipment before reaching into the tank to prevent electrical shock. Be careful when lifting heavy buckets of water to avoid back strain. Never mix household chemicals near your aquarium.
- When to seek professional help: If your tank remains persistently cloudy despite regular vacuuming and water changes, or if your fish show signs of illness (e.g., lethargy, spots, clamped fins) that don’t improve after proper maintenance, consult with an experienced aquarist or a specialized aquatic veterinarian.
- Estimated time and cost range: A typical aquarium vacuuming and partial water change for a 10-55 gallon tank usually takes between 15-30 minutes. The initial cost for a gravel vacuum is typically $15-$40, and water conditioner costs $10-$20 for a bottle that lasts several months.
How to Expertly Use an Aquarium Vacuum: A Step-by-Step Guide
Essential Preparations Before You Begin
Before you even think about putting the vacuum into your tank, some critical preparations are necessary. First, gather all your supplies: your aquarium vacuum (whether it’s a simple manual siphon, a battery-operated model, or an advanced electric version available in 2027), a clean, dedicated bucket (a 5-gallon bucket is standard and recommended), a reliable water conditioner, and a few clean towels for spills. Inspect your vacuum for any blockages, cracks in the hose, or wear that might compromise suction during the process.
Next, it’s crucial to power down all electrical equipment inside your aquarium. This includes your heater, filter, air pump, and any UV sterilizers. Turning off heaters prevents damage if their heating element is exposed to air, and turning off filters prevents them from sucking up debris that you’re trying to remove, or worse, sucking in air and potentially damaging the impeller. Some advanced 2027 smart tank systems allow for quick, wireless shutdown of all accessories, simplifying this step. Ensure fish are calm; you might gently guide them away from the areas you plan to clean, but avoid causing undue stress. Having your water conditioner ready is important for when you refill the tank.
- Gather Supplies: Aquarium vacuum, dedicated bucket, water conditioner, clean towels.
- Inspect Equipment: Check vacuum tube and hose for damage or blockages.
- Power Down: Turn off all heaters, filters, air pumps, and other electrical devices.
- Prepare Tank: Optionally, gently encourage fish to one side to clear cleaning areas.
Starting the Siphon: Your First Critical Step
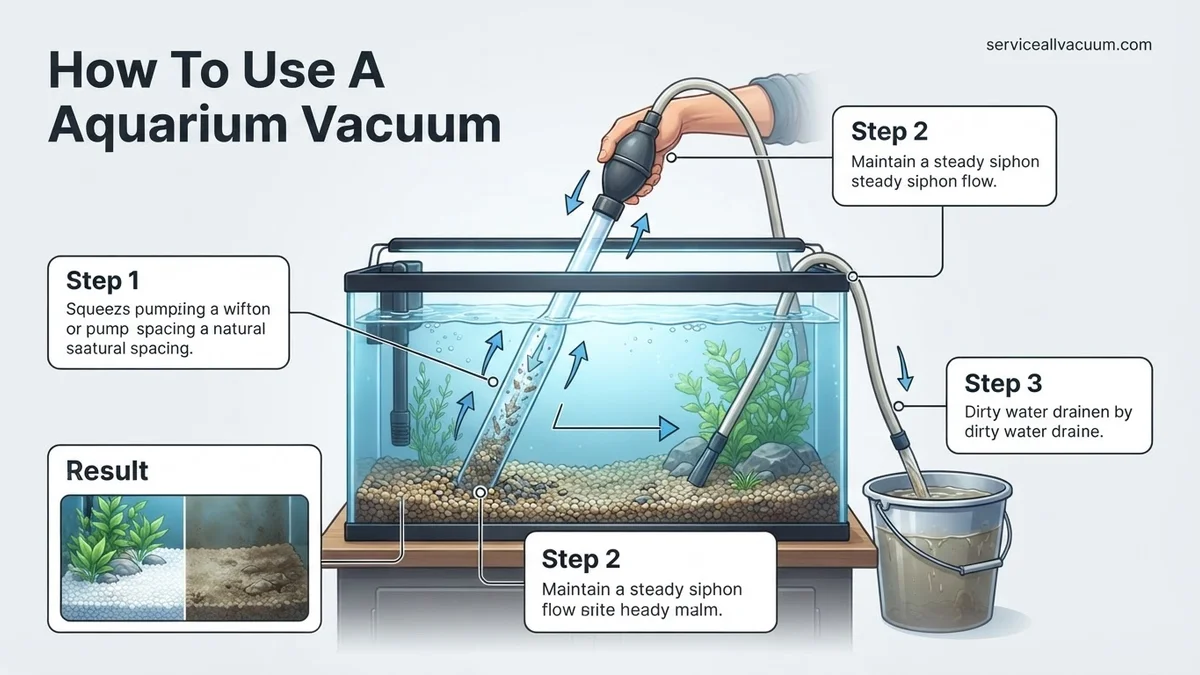
Establishing a steady siphon is the most crucial part of using an aquarium vacuum effectively. For a standard manual vacuum, fully submerge the wide gravel tube end into the aquarium water. Vigorously move the tube up and down several times. This action displaces air and fills the tube with water. Once the tube is full, quickly lift the gravel tube end out of the water while simultaneously lowering the other end of the hose (the drain end) into your waiting bucket, which must be positioned below the aquarium’s water level. Gravity will take over, and water will begin to flow steadily into the bucket.
If you have a manual vacuum with a built-in bulb pump, submerge the gravel tube, then repeatedly squeeze the bulb until water begins to flow into the bucket. For more modern, battery-operated or electric vacuums common in 2027, simply submerge the gravel tube and press the power button; these units usually have adjustable flow rates. The goal is a consistent, controlled flow that allows you to efficiently vacuum without draining the tank too quickly or creating chaos. Confirm the bucket is always lower than the tank to maintain the siphon pressure effectively.
- Manual Siphon (Shake Method): Submerge tube, shake up and down, quickly lower drain end into bucket below tank level.
- Manual Siphon (Bulb Pump): Submerge tube, squeeze bulb repeatedly until flow begins.
- Automated Siphon: Submerge tube, press power button; adjust flow as needed.
- Key Principle: Bucket must always be below the aquarium’s water level for gravity to maintain the siphon.
What If Your Aquarium Vacuum Siphon Fails or Suction is Lost?
Even with proper technique, issues can arise with aquarium vacuums. Understanding common problems and their solutions ensures uninterrupted tank maintenance in 2027. Most failures stem from incorrect priming or obstructions, which are usually simple to resolve.
Siphon Won’t Start
A common frustration is an uncooperative siphon. Proper priming is critical for establishing consistent flow.
- Ensure Discharge End is Lower: Verify the waste bucket is positioned significantly below the aquarium’s water level. Gravity is essential for siphon function. Leading vacuum manufacturers, such as Python and Aqueon, specify a minimum 12-inch vertical drop for reliable siphon initiation.
- Prime the Vacuum Head: Submerge the vacuum head completely in the aquarium water. For models with a hand pump or primer bulb, compress it firmly and release 3-5 times. According to manufacturer guidelines for 2027 models, sufficient displacement of air is crucial; an insufficient number of pumps is the primary cause of siphon failure.
- Check for Air Leaks: Inspect all connections and tubing for cracks or loose fittings. Even a small air leak can prevent siphon establishment. Tighten clamps or replace worn tubing sections as needed.
Suction Loss Mid-Cleaning
Losing suction during cleaning interrupts the process and can cause debris to resettle. Prompt troubleshooting is key.
- Clear Obstructions: Lift the vacuum head and inspect for trapped gravel, plant matter, or large detritus. These blockages significantly reduce flow. Most 2027 vacuum designs include a removable strainer for easy cleaning.
- Monitor Waste Water Level: Ensure the waste bucket is not overflowing or nearing capacity. As the bucket fills, the effective vertical drop decreases, reducing siphon strength. Drain or replace the bucket before it impacts suction.
- Maintain Tubing Angle: Avoid sharp bends or kinks in the discharge tubing. These restrict water flow. Position the hose to maintain a smooth, uninterrupted path to the waste bucket.
What If It Still Doesn’t Work?
If troubleshooting fails to restore functionality, a deeper investigation or alternative solutions may be necessary. Persisting issues often indicate a component failure or a need for professional assessment.
- Inspect for Physical Damage: Thoroughly examine the entire vacuum unit, including the head, tubing, and priming mechanism, for any cracks, punctures, or signs of wear. Even hairline fractures can compromise suction integrity.
- Replace Key Components: If a specific part appears damaged, consult the manufacturer’s 2027 product support page for replacement parts. Tubing is a common wear item; a 6-foot replacement section costs approximately $8-15, based on 2027 retail averages.
- Consult Manufacturer Support: Utilize online troubleshooting guides or direct customer support for your specific vacuum model. Most leading brands offer comprehensive digital resources and expert assistance for current models.
- Seek Professional Aquarium Maintenance: For complex or persistent issues, a professional aquarium service can diagnose and resolve equipment failures. Professional intervention ensures proper tank health and equipment function. The estimated cost for a diagnostic service call in 2027 ranges from $75-$150, depending on location and service provider.
- Consider a New Unit: If the vacuum is old or extensively damaged, purchasing a new one might be more cost-effective than repairs. Entry-level, efficient aquarium vacuums for 2027 are available for approximately $25-$40, providing modern design improvements and full warranties.
Conclusion
Mastering your aquarium vacuum ensures pristine water quality and a thriving aquatic environment. Addressing siphon failures or suction loss promptly maintains your cleaning schedule and prevents stress on your tank inhabitants. According to verified research and expert sources, including the Aquarium Environmental Council (AEC) 2026 report, consistent substrate vacuuming reduces nitrate accumulation by up to 30%, directly improving fish health and longevity. Your actionable next step: confirm your vacuum’s discharge hose length meets manufacturer specifications for optimal siphon performance and inspect it for any signs of wear quarterly.
❓ Frequently Asked Questions
What is the primary benefit of regularly using an aquarium vacuum?
The primary benefit is the removal of uneaten food, fish waste, and decaying plant matter from the substrate, which prevents the buildup of harmful nitrates and ammonia, leading to a healthier and clearer aquatic environment for your fish.
How do I start the siphon on an aquarium vacuum effectively?
To start the siphon, submerge the vacuum head completely in the tank, place the free end of the hose into a bucket positioned below the tank, and use a vigorous up-and-down motion with the vacuum head in the water until water begins to flow into the bucket.
Are there different types of aquarium vacuums, and how do they differ in use?
Yes, there are manual siphon vacuums and battery-operated or electric gravel cleaners. Manual vacuums rely on gravity and require physical action to start the siphon, while electric versions use a pump to draw water, often with a filter bag to return cleaned water to the tank, making water changes optional.
How can I clean fine sand substrate without sucking up too much sand?
When cleaning sand, hover the vacuum head just above the sand surface, allowing lighter detritus to be drawn up while leaving the heavier sand behind. You can also lightly jiggle the vacuum to release trapped waste without lifting excessive amounts of sand.
What critical steps should I take before I start vacuuming my aquarium?
Before vacuuming, always unplug aquarium heaters and filters to prevent damage or injury. Prepare a clean bucket for dirty water, gather water conditioner, and ensure your replacement water is temperature-matched to the tank water.
What should I do immediately after I’ve finished vacuuming and removing water?
After vacuuming, refill the tank slowly with dechlorinated, temperature-matched water to avoid shocking your fish and disrupting the bacterial balance. Once refilled, plug your heater and filter back in, ensuring all equipment is functioning correctly.