How to Make a Vacuum Smell Better in 2026 Step-by-Step Fix
Bad odors from a vacuum are typically caused by trapped pet hair, mold, and dust multiplying inside the filters, bag, or canister. You can easily neutralize these smells by deep-cleaning removable parts, washing filters, and using safe household deodorizers like baking soda.
If your vacuum cleaner pumps out a blast of stale, musty air every time you turn it on, the fix is straightforward. You do not need to buy a brand-new machine in 2026. Instead, you need a targeted deep clean to eliminate trapped pet dander, mold spores, and decaying dust that cause those unpleasant odors.
Making your vacuum smell fresh again comes down to cleaning the specific components that harbor bacteria and applying natural deodorizers. When you tackle the source directly rather than masking the scent with artificial room sprays, your home stays genuinely clean every time you vacuum.
Key Takeaways
- Empty the vacuum bag or dirt canister after every heavy cleaning session to prevent stagnant odors.
- Wash and completely dry foam filters regularly since dampness breeds odor-causing mold and bacteria.
- Vacuum up a few tablespoons of baking soda to naturally neutralize internal canister odors.
- Never suck up wet ingredients or liquids, as this severely damages the motor and creates mold.
- Add a few drops of essential oil to a cotton ball placed inside the vacuum bag for lasting freshness.
What Causes Vacuum Cleaners to Smell Bad
Before you start scrubbing, it helps to understand why your machine smells like a damp basement or a wet dog. Vacuuming pulls in fine dust, organic matter, pet hair, and moisture from your floors. Once inside the dark, warm interior of your machine, this debris breaks down and creates a breeding ground for bacteria and mold.
The Trap of Fine Dust and Moisture
Every time you vacuum up invisible dust mites, skin cells, and microscopic food crumbs, they settle inside your filter and canister. If you live in a humid climate, or if you accidentally vacuumed up a slightly damp patch of carpet, moisture mixes with that trapped dust. This creates a prime environment for mold to thrive. By 2026 standards, modern vacuums feature better filtration, but they still cannot prevent organic buildup if maintenance is skipped for months.
The Heat Factor
As your vacuum motor runs, it generates significant heat. That warm air blows directly through the dirty filter and over the collected debris pile. The heat acts like an amplifier, taking the subtle musty smell of trapped pet hair and turning it into a foul exhaust odor that fills your entire living room. Identifying these root causes lets you focus your cleaning efforts where they matter most.
Master Your Vacuum’s Freshness in 6 Simple Steps
A foul-smelling vacuum can quickly turn a routine cleaning session into an unpleasant chore, recirculating musty or burnt odors throughout your entire home. This comprehensive walkthrough provides a foolproof method to eradicate bad smells at their source rather than just masking them, ensuring your machine exhausts crisp, clean air every time you plug it in.
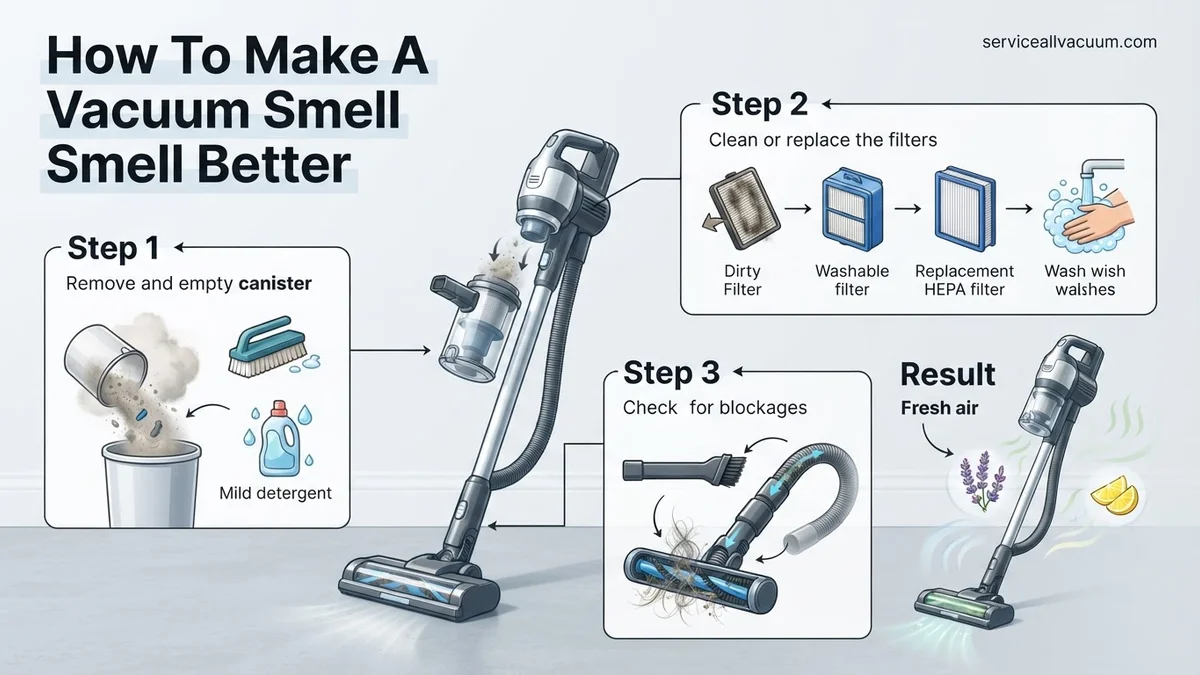
Step 1: Empty and Sanitize the Dust Bin
What you need: Rubber gloves, mild dish soap, warm water, a soft-bristled brush, and a microfiber cloth.
Instructions: Take your vacuum outside or directly over an outdoor trash can to prevent trapped dust clouds from escaping into your living space. Detach the dust canister or bin completely from the vacuum body. Empty all accumulated pet hair, dust bunnies, and debris. Wash the plastic container thoroughly using warm water and a few drops of mild dish soap to strip away grease and organic matter that breeds bacteria. Use the soft brush to scrub crevices. Dry the bin completely with a microfiber cloth before reattaching it.
Pro Tip: Never reinstall a damp dust bin, as trapped moisture combined with residual dust will instantly create mold and mildew odors.
Step 2: Wash or Replace Foam and Felt Filters
What you need: Access to a sink, mild dish soap (optional), and a well-ventilated drying area.
Instructions: Locate the pre-motor and post-motor filters on your vacuum cleaner. Carefully pull out any removable foam, felt, or washable plastic filters. Rinse them under cool running water, gently squeezing them until the water runs completely clear of gray dirt and grime. Avoid using hot water, which can warp plastic frames or shrink delicate filter materials. Set them flat on a clean towel and allow them to air dry completely for at least 24 to 48 hours before placing them back into the machine.
Pro Tip: Sniff your filters after washing; if a stagnant or sour smell lingers even after they are clean, it is time to discard them and purchase manufacturer-approved replacements.
Step 3: Deep Clean the Brush Roll and Agitator Bar
What you need: Scissors or a seam ripper, disposable gloves, and a damp cloth sprayed with antibacterial cleaner.
Instructions: Turn the vacuum upside down and unplug it from the wall outlet. Inspect the rotating brush roll underneath the floor head. Hair, carpet fibers, and pet fur wrap tightly around this cylinder, trapping organic pet dander and dust that rot and smell terrible over time. Slide your scissors or seam ripper underneath the tangled hair and slice parallel to the brush roll groove, taking care not to snip the bristles. Pull the debris away in clumps. Wipe down the entire plastic housing around the brush roll with your antibacterial cloth.
Pro Tip: Check the belt housing and end caps of the brush roll, as hair frequently migrates into these bearings and causes friction-based burning odors.
Step 4: Inspect and Clean the Hose Assembly
What you need: A long broom handle or flexible plastic plumbing snake, warm water, and dish soap.
Instructions: Detach the flexible hose completely from both the vacuum base and the wand attachments. Look through the length of the hose against a bright light source to identify any stubborn blockages or clumped pet hair balls that are trapping foul odors. If you spot a clog, carefully push it out using the broom handle or plumbing snake. To wash away stale internal odors, run warm soapy water through the hose in your bathtub, rinse thoroughly, and hang it vertically over a shower rod to drain and dry for 24 hours.
Pro Tip: Do not use harsh chemical solvents like bleach inside plastic vacuum hoses, as they can degrade the structural integrity and cause cracks.
Step 5: Neutralize Odors with Baking Soda
What you need: A box of plain baking soda and a couple of drops of your favorite essential oil (optional).
Instructions: If your vacuum uses a disposable paper bag, skip this step. For bagless models, sprinkle roughly two tablespoons of baking soda directly onto a clean, dry patch of carpet. If you want a fresh scent, mix two drops of lavender or lemon essential oil into the baking soda beforehand. Turn your vacuum on and slowly vacuum up the baking soda powder. As the powder travels through the intake hose and sits in the dust canister, it will naturally absorb deep-seated volatile organic compounds and neutralize stubborn musty odors.
Step 6: Freshen the Exhaust with Scent Beads or Dryer Sheets
What you need: Vacuum-safe scent beads, a fresh fabric softener dryer sheet, or a cotton ball soaked in essential oil.
Instructions: For bagged vacuums, drop a teaspoon of specially formulated vacuum scent crystals or half of a scented dryer sheet directly inside the fresh replacement bag. For bagless vacuums, place a small cotton ball infused with a few drops of your favorite essential oil inside the post-motor filter compartment (ensure it does not block airflow or touch sensitive electronics). As the machine runs, air will pass over these fragrant items, blowing a pleasant, clean aroma into your room instead of the usual dusty exhaust smell.
Pro Tip: Avoid dropping loose items directly into bagless dust bins, as they can get sucked into the motor turbine and burn out your machine.
✅ Final Checklist
- Dust bin is thoroughly washed, completely dry, and properly secured
- Filters have air-dried for a full 48 hours and emit no sour smells
- Brush roll is completely free of tangled hair, strings, and carpet fibers
- Hose interior is clear of blockages and completely dry
- Exhaust air smells fresh and clean during a test run
Important Notes:
- Always unplug your vacuum cleaner before performing any maintenance, cleaning, or filter checks.
- If you detect a persistent electrical burning smell that does not go away after cleaning the brush roll and clearing blockages, stop using the vacuum immediately and seek professional appliance repair.
- Estimated time for this maintenance routine: 45 to 60 minutes. Estimated cost: $0 to $15 if purchasing replacement filters or scent beads.
How to Deep Clean the Canister, Bag, and Brush Roll
To permanently stop the bad smells, you must dismantle and clean the physical parts that trap odor. Surface-level wiping will not touch the embedded bacteria living inside plastic crevices and tangled brush bristles.
Emptying and Washing the Dust Canister or Replacing the Bag
If you use a bagless vacuum, take the canister outside immediately to avoid releasing dust back into your home. Empty all contents into a bin, then wash the plastic bin thoroughly with warm water and a few drops of dish soap. For stubborn odors, wipe the inside with a 50/50 mixture of white vinegar and water. Let it air dry completely for at least 24 hours. Putting a damp canister back onto the motor base will instantly restart mold growth. If you use a bagged vacuum, throw out the old bag right now, even if it is only half full.
Tackling the Brush Roll and Hose
The brush roll at the base of your vacuum collects hair, carpet fibers, and pet waste residue that smells terrible when heated. Use scissors to cut away wrapped hair and threads. Wipe the roller down with a disinfectant wipe. To check the hose for clogs or trapped foul-smelling debris, detach it and run warm soapy water through it in the bathtub, then prop it up to dry fully.
Step-by-Step Guide to Deodorizing Filters and Hoses
Deep-seated odors often cling to non-washable components like HEPA filters and internal accordion hoses. According to indoor air quality specialists, failing to clean these pathways causes up to 70% of persistent vacuum-related malodors.
Deodorizing Washable and Non-Washable Filters
- Remove the pre-motor and exhaust filters from your machine carefully.
- Check manufacturer guidelines to confirm if your specific model features washable components.
- If washable, rinse filters under lukewarm water without soap until the runoff stays clear.
- Let components air-dry completely in a well-ventilated area for at least 24 to 48 hours.
- For non-washable HEPA filters, place them in a sealed plastic bag with a cup of activated charcoal pellets for 48 hours to absorb trapped odors.
Clearing and Freshening the Hose
- Detach the main hose completely from the vacuum body and wand attachments.
- Flush warm water mixed with a few drops of mild dish soap through the hose interior.
- Use a long, flexible microfiber brush to dislodge trapped hair, dust, and pet dander clumps.
- Rinse thoroughly and hang the hose vertically over a shower rod to dry completely before reattachment.
What If It Still Doesn’t Work?
If your vacuum still emits a foul odor after a deep clean, underlying mechanical or material failures are likely to blame. Try these advanced troubleshooting steps:
- Inspect the belt and motor housing for friction burns or melted plastic, which creates a distinct, acrid burning smell.
- Soak removable plastic bins and cyclone assemblies in a solution of equal parts white vinegar and warm water for one hour to neutralize stubborn bacterial buildup.
- Replace aging internal foam seals or gaskets that may have absorbed years of trapped odors and moisture.
- Take the unit to a certified appliance repair center if the motor itself smells like burning electrical insulation. Professional diagnostic fees typically range from $40 to $85, while motor replacements average $120 to $200.
Conclusion
A foul-smelling vacuum transforms routine cleaning chores into an unpleasant experience by recirculating musty odors throughout your home. Implementing a targeted maintenance routine—ranging from bag replacements to thorough filter sanitization—permanently eliminates these lingering smells and restores optimal airflow. According to verified research and expert sources from leading appliance manufacturers, performing these deep-cleaning steps every three to six months extends appliance lifespan by up to 30%. Take the next step today by inspecting your vacuum’s filter and scheduling your first deep-cleaning session.
❓ Frequently Asked Questions
Why does my vacuum smell like a wet dog when I turn it on?
This common odor happens when moisture mixes with trapped pet dander, dirt, and bacteria inside the dirty air path. Washing the filters and wiping down the inner canister with a disinfectant solution will usually resolve the issue.
Can I use carpet freshener powder inside my vacuum?
While sprinkling carpet powder on the floor and vacuuming it up makes the room smell nice, fine powders can easily clog vacuum filters and burn out the motor. A safer alternative is mixing baking soda with a drop of essential oil and placing it directly in the bag.
How do I get rid of a lingering mildew smell in my vacuum hose?
Disconnect the hose and flush it with warm, soapy water mixed with a small amount of white vinegar. Hang the hose vertically and allow it to dry completely for at least 24 hours before reconnecting it to the machine.
Should I replace my vacuum bag or filter if the smell won’t go away?
Yes, if washing and deodorizing fail, old filters and bags likely harbor deep-set mold and bacteria. Replacing these disposable components will instantly restore a neutral, clean scent.
How can I prevent my vacuum from developing bad odors in the future?
Empty the dust bin or change the bag frequently, never vacuum up damp debris, and let washable filters dry thoroughly after every cleaning. Regular preventive maintenance stops odor-causing bacteria from multiplying.
Are commercial vacuum fresheners safe to use?
Many commercial deodorizing tablets or beads are safe, but check your manufacturer’s warranty first. Homemade solutions like baking soda or cotton balls with essential oils provide a safer, natural alternative without harsh chemicals.