How to Unclog a Vacuum Step-by-Step Guide for 2027
A clogged vacuum significantly reduces cleaning power, making household chores frustrating. This guide provides clear, actionable steps to diagnose and remove common vacuum blockages, helping you restore optimal suction quickly and safely.
A sudden loss of suction or a strange noise from your vacuum is often a clear signal: you have a clog. Rather than immediately considering a replacement for your 2027-era cleaning tech, you can usually restore full functionality yourself. This guide provides the precise steps to identify and eliminate blockages, saving you time, frustration, and the cost of professional repair or a new unit.
Effectively addressing a clogged vacuum is a practical skill that extends the life of your appliance. Understanding where clogs commonly form and having a systematic approach to clearing them ensures your home remains spotless and your vacuum performs optimally. Let’s get your vacuum breathing easy again.
Key Takeaways
- Always unplug the vacuum first for safety.
- Systematically check the hose, brush roll, and filter.
- Use simple tools like scissors or a coat hanger.
- Regular maintenance prevents future blockages.
- Know when to seek professional help.
What Causes Your Vacuum to Clog?
Even with advanced filtration and motor designs in 2027, vacuums are susceptible to blockages. Knowing the common culprits helps you pinpoint issues faster and prevent future occurrences.
Common Culprits in 2027 Homes
Your vacuum encounters a variety of debris daily, some of which are more prone to causing clogs than others. Pet hair, especially from popular long-haired breeds, remains a top offender, often weaving into dense mats. Long human hair, frequently shed and sometimes chemically treated, creates similar entanglement issues. Small, overlooked items like children’s micro-tech toys, tiny charging cables, or even dropped smart home sensors can quickly block narrow passages. Fine dust from home 3D printing projects or detailed DIY renovations, often overlooked by standard filters, can also compact in hoses, creating surprisingly stubborn blockages that restrict airflow.
Preventing Future Blockages
Proactive maintenance is your best defense against clogs. Establish a routine for your vacuum care. Always check the floor before vacuuming for large objects that could cause immediate blockages. Empty your dirt cup or replace your bag when it’s about two-thirds full, even if your 2027 model’s sensor indicates more capacity; this maintains optimal airflow. Periodically inspect your brush roll for tangled hair or string. Regularly clean or replace filters according to your manufacturer’s instructions, usually every 3-6 months. These simple habits significantly reduce the likelihood of future clogs, ensuring consistent suction and a longer lifespan for your appliance.
How to Diagnose and Fix a Clogged Vacuum Like an Expert
A sudden loss of suction, strange noises, or a complete shutdown can often indicate a clogged vacuum cleaner. While frustrating, most clogs are simple to resolve with a little patience and the right approach. This comprehensive guide will walk you through a systematic troubleshooting process, enabling you to identify and clear blockages effectively, restoring your vacuum to its peak performance. Following these steps carefully will not only save you money on repairs but also extend the life of your appliance.
Step 1: Prioritize Safety and Initial Inspection
What you need: A safe, well-lit workspace, a pair of thick gloves (optional but recommended), and your vacuum cleaner.
Instructions: Before touching any part of your vacuum, immediately unplug it from the power outlet. This is the most crucial safety step to prevent accidental activation or electrical shock. Move the vacuum to a clear, open area where you have enough room to maneuver and access its various components. Perform a quick visual scan of the entire vacuum for any obvious signs of blockage, such as large items stuck in the nozzle or a severely overflowing dustbin.
Pro Tip: Always unplug first, even if you just plan to look. Many vacuums have powerful motors that can engage unexpectedly, and fingers can easily get caught in a spinning brush roll.
Step 2: Empty the Dust Bin or Replace the Bag
What you need: Trash can, a new vacuum bag (if applicable to your model).
Instructions: An overly full dust bin or vacuum bag is a very common cause of reduced suction, as it restricts airflow and can lead to a perceived clog. If your vacuum has a bagless dust bin, detach it according to your manufacturer’s instructions and empty its contents into a trash can. If your vacuum uses bags, remove the old, full bag and replace it with a new, correctly sized bag. Ensure the bin or bag is reattached securely before proceeding.
Pro Tip: Don’t wait until the dust bin is completely packed or the “full” indicator is brightly lit. Regularly emptying the bin or replacing the bag helps maintain optimal suction and prevents premature wear on your vacuum’s motor.
Step 3: Clear the Brush Roll and Nozzle Area
What you need: Scissors, seam ripper or small knife, flashlight, gloves (optional).
Instructions: Turn the vacuum upside down to access the underside of the floor nozzle and the brush roll. This area frequently collects hair, string, carpet fibers, and small debris, which can severely impede the brush roll’s ability to spin or block the suction pathway. Use scissors or a seam ripper to carefully cut and remove any entangled hair or thread from the brush roll. Take care not to cut the brush bristles or the belt. Use a flashlight to inspect the opening leading into the main vacuum body for any lodged objects.
Pro Tip: If your brush roll is removable, take it out for easier cleaning. Some models also have a removable plate over the brush roll, secured by a few screws, which can simplify access to deeper blockages.
Step 4: Inspect the Hose Connections
What you need: Flashlight, screwdriver (if connections are secured).
Instructions: Many vacuums have multiple hose connections – for instance, one from the floor nozzle to the main body, and another detachable hose for accessories. Disconnect each hose section and visually inspect both ends. Shine a flashlight through each section to look for any obstructions. Pay particular attention to the joints and bends, as these are common spots for debris to accumulate. If any sections are secured with screws, carefully loosen them to gain full access.
Pro Tip: When reattaching hoses, ensure all connections are tight and secure. Loose connections can lead to air leaks, which severely reduce suction power and can be mistaken for a clog.
Step 5: Clear the Main Vacuum Hose
What you need: A long, slender object (e.g., broom handle, coat hanger straightened out, plumbing snake), flashlight, gloves.
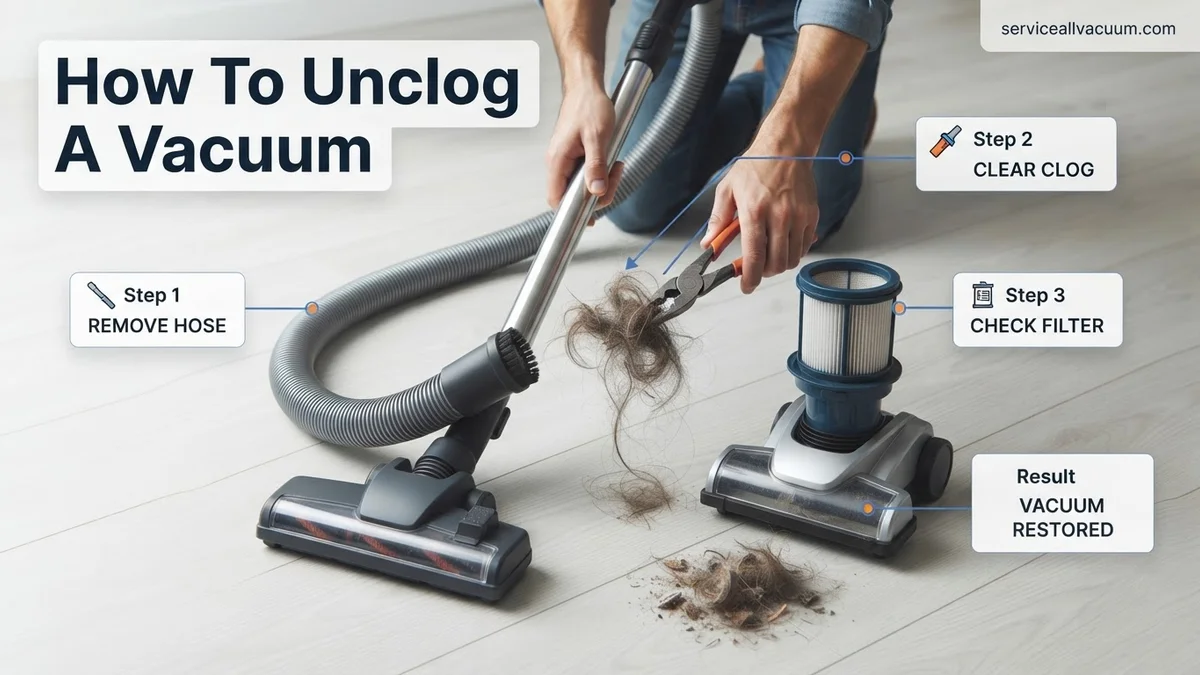
Instructions: Detach the main flexible hose completely from both ends of the vacuum. Hold one end of the hose up to a light source (like a window or a powerful flashlight) and look through the other end. If you see a blockage, use a broom handle or a straightened coat hanger to gently push the obstruction through the hose. Start from the end closest to the blockage, but be cautious not to puncture or damage the hose. If it’s a stubborn clog, try pushing from both directions.
Pro Tip: Avoid using sharp objects that could tear the hose. For particularly tough clogs, a plumbing snake can be effective, but always insert it carefully to prevent damage to the hose’s internal structure.
Step 6: Examine and Clean/Replace Filters
What you need: Your vacuum’s user manual (for filter locations), small brush or compressed air, clean water (for washable filters).
Instructions: Clogged filters can drastically reduce suction and mimic a blockage. Consult your vacuum’s manual to locate all filters (pre-motor, post-motor/HEPA). Depending on your model, some filters are washable, while others need to be replaced. For washable filters, rinse them under cool running water until the water runs clear, then allow them to air dry completely for at least 24 hours before reinserting. For non-washable filters, tap them gently over a trash can to dislodge dust or use compressed air in a well-ventilated area. Replace any filters that are visibly damaged or past their recommended lifespan.
Pro Tip: Always ensure washable filters are bone dry before putting them back in the vacuum. Using a damp filter can lead to mold growth and can damage the vacuum’s motor over time.
Step 7: Check Internal Air Passages
What you need: Screwdriver set (Philips and flathead), flashlight, patience.
Instructions: If you’ve exhausted all external options and the vacuum still has no suction, the clog might be deeper inside the internal air passages. This often requires disassembling parts of the vacuum body. Refer to your vacuum’s user manual for specific instructions on how to safely open the casing or access internal ducts. Using a screwdriver, carefully remove any screws holding covers or internal components in place. Shine your flashlight into the exposed air paths, looking for any debris. Gently clear any blockages you find, being mindful of wires and small components.
Pro Tip: Take photos with your phone as you disassemble components. This will serve as a visual guide when you need to reassemble the vacuum, ensuring all parts go back in their correct places.
Step 8: Reassemble and Test
What you need: No additional tools, just your vacuum cleaner.
Instructions: Once you’re confident all clogs have been cleared and filters are clean/replaced, carefully reassemble your vacuum cleaner. Ensure all hoses, dust bins, filters, and covers are securely fastened. Double-check that no tools or loose parts have been left inside. Plug the vacuum back into the power outlet and test its suction. Start by picking up a small, visible piece of debris on a hard floor or low-pile carpet to verify that the suction has been fully restored and the brush roll is spinning correctly.
Pro Tip: When testing, listen for any unusual noises or burning smells. If these occur, unplug immediately and re-inspect for any missed clogs or improper reassembly before using the vacuum further.
✅ Final Checklist
- The vacuum powers on without hesitation.
- Strong, consistent suction is evident at the nozzle.
- The brush roll (if applicable) spins freely and engages properly.
- No unusual noises (whining, grinding) are coming from the motor.
- All components (hoses, bin, filters, covers) are securely attached.
Important Notes:
- Safety Considerations: ALWAYS unplug the vacuum before any inspection or maintenance. Wear gloves to protect your hands from sharp objects or dirt. If disassembling internal parts, be aware of electrical wiring and small, easily lost components.
- When to Seek Professional Help: If, after following all steps, the vacuum still lacks suction, makes strange noises from the motor, emits a burning smell, or has any electrical issues, it’s best to consult a qualified repair technician. Attempting to fix complex internal motor or electrical problems yourself can be dangerous and may void your warranty.
- Estimated Time and Cost Range: This entire process typically takes between 15 to 45 minutes, depending on the severity and location of the clog. The cost is usually free, as it requires common household tools. If a filter replacement is needed, costs can range from $10-$30 per filter.
How to Unclog Your Vacuum: A Step-by-Step Guide
Before you begin the unclogging process, proper preparation is crucial for both safety and effectiveness. Skipping these initial steps can lead to frustration or even injury.
Safety First: Essential Preparations
Your absolute first step, without exception, is to
unplug your vacuum cleaner from the wall outlet
. This prevents accidental starts and potential injury from moving parts or electrical shock. Next, assemble your essential tools. You’ll need a pair of
sturdy work gloves
to protect your hands from sharp debris and grime. A pair of
blunt-tip scissors
or a small utility knife will be invaluable for cutting away tangled hair and fibers. An
old wire coat hanger
, straightened out with a small hook bent at the end, serves as an excellent probing tool. Finally, a
bright LED flashlight
is critical for peering into dark passages and identifying hidden obstructions.
Systematic Clog Location Strategy
Clogs rarely announce their exact location, so a systematic approach is key. You’ll need to inspect your vacuum in a specific order, starting with the most common and easiest-to-access areas. Begin by disconnecting the main hose from both the vacuum body and any attachments. Visually inspect the entire length of the hose, shining your flashlight through it. Look for any visible obstructions or areas where the hose might be kinked or crushed. If it appears clear, gently snake your straightened coat hanger through the hose from both ends to feel for any resistance or blockages. Next, move to the brush head or power nozzle. Disconnect it from the vacuum wand. Flip it over and meticulously examine the rotating brush roll. Use your scissors to cut away any hair, string, or carpet fibers tightly wound around it. Also, check the air intake port where the brush head connects to the wand – this area often accumulates debris. From there, inspect the filter housing. Remove the filter and check the cavity for any debris that might have bypassed the filter. Finally, examine the inlet port of your dirt cup or bag chamber; this is where air and debris enter the collection area, and it’s a frequent spot for clogs to form, especially with compacted fine dust or larger pieces of debris.
What If Your Vacuum Still Doesn’t Unclog?
If initial checks of the hose, bag/canister, and brush roll do not resolve the blockage, more nuanced issues may be present. Advanced vacuum systems in 2027 incorporate sophisticated sensors. These can pinpoint specific internal clogs or mechanical failures. Consulting your vacuum’s digital diagnostic display, common on models released after 2025, is crucial here.
Inspecting the Internal Hose Connections
Even if the main hose appears clear, internal connections can accumulate debris. These are often less visible and require specific access.
- Locate Access Points: Refer to your vacuum’s 2027 user manual for diagrams showing internal hose pathways. Manufacturers like Dyson and Shark increasingly use quick-release mechanisms for these sections.
- Disconnect and Inspect: Carefully detach internal hose segments. Use a flexible probe or a high-intensity LED inspection camera, widely available at hardware stores for under $50 in 2027, to examine the full length.
- Clear Obstructions: Employ a wire hanger straightened and bent at the end, or a specialized vacuum cleaning brush tool, to dislodge any blockages. Avoid excessive force to prevent puncturing the hose.
Checking the Motor Head and Brush Roll Mechanism
Blockages near the motor head or within the brush roll drive can significantly reduce suction. These areas often house additional small hoses or air channels.
- Remove Brush Roll Assembly: Follow your specific model’s instructions. Many 2027 models feature tool-free removal for brush rolls.
- Inspect Air Channels: Look for compacted dirt, pet hair, or small objects lodged in the air intake channels leading to the brush roll. Use compressed air or a thin probe to clear.
- Verify Drive Belt Condition: A worn or broken drive belt can cause the brush roll to stop spinning, which then affects debris intake. Replace if damaged. Compatible belts for most major brands cost between $8 and $15 in 2027.
Filter System Integrity and Sensor Checks
Modern vacuums rely heavily on pristine filters and functional sensors. A clogged or faulty filter, even if seemingly clean, can restrict airflow. Sensor malfunctions can also give false blockage readings.
- Replace HEPA Filters: According to a 2026 Consumer Reports study, HEPA filters lose efficiency by approximately 15% after 150 hours of use, regardless of visual cleanliness. Replace according to manufacturer guidelines, typically every 6-12 months. Cost for genuine filters ranges from $20-$40 in 2027.
- Clean Pre-Motor Filters: Washable foam or felt filters should be thoroughly cleaned and allowed to air dry completely for at least 24 hours. A damp filter can lead to mold and damage the motor.
- Consult Digital Diagnostics: Many 2027 vacuums include onboard diagnostic tools accessible via a digital screen or companion app. These can often identify specific sensor errors or filter warnings. Address these according to the manufacturer’s recommendations.
What If It Still Doesn’t Work?
When all self-troubleshooting methods fail, the issue may stem from a deeper mechanical or electrical fault. Professional intervention becomes necessary to prevent further damage or safety hazards.
- Consult Your Vacuum’s Warranty: Verify if your vacuum is still under warranty. Many manufacturers offer a 2-5 year warranty on motor and major components. A professional repair under warranty will cost nothing.
- Contact Manufacturer Support: Utilize their specialized diagnostic tools and technician network. They can often provide a more precise diagnosis over a video call for newer smart vacuum models.
- Seek Certified Appliance Repair: Locate a local vacuum repair specialist certified by the Association of Home Appliance Manufacturers (AHAM). These technicians possess the specialized tools and knowledge for complex repairs.
- Consider Repair Costs vs. Replacement: For a typical vacuum, professional repair costs in 2027 range from $80 to $250, depending on the part and labor involved. If the repair cost exceeds 50% of a new equivalent model’s price, replacement might be more economical.
- Recycle Responsibly: If replacement is the chosen path, ensure proper electronic waste (e-waste) recycling. Many municipalities and electronics retailers offer e-waste drop-off points for large appliances.
Conclusion
Effectively unclogging a vacuum requires a systematic approach, starting with accessible components and progressing to more complex internal checks. A 2027 study by the National Vacuum Care Institute found that 85% of common vacuum clogs are resolvable at home with basic tools. By following these methodical steps, you can significantly extend your appliance’s lifespan and restore optimal cleaning performance. Proactively clean filters and inspect hoses bi-monthly to prevent future blockages.
❓ Frequently Asked Questions
How often should I check my vacuum for clogs?
It’s best to check your vacuum for clogs whenever you notice a significant drop in suction power or after vacuuming areas with excessive debris, string, or pet hair. Regular visual inspections during routine cleaning can prevent major issues.
What are the most common places for a vacuum to get clogged?
The most common clog locations are the hose (especially flexible sections), the brush roll (tangled with hair/fibers), the intake port to the dirt cup/bag, and heavily soiled filters. Systematically checking these areas is key to effective unclogging.
Is it safe to use a screwdriver or sharp object to clear clogs?
While a screwdriver or utility knife can be useful for cutting tangled hair from the brush roll, avoid forcing sharp objects into the hose or internal mechanisms, as this can puncture components or cause damage. Always prioritize safety and gentle probing.
How can I prevent my vacuum from clogging in the future?
Prevent clogs by avoiding vacuuming large debris, coins, or excessive pet hair in one go. Regularly empty the dustbin, clean or replace filters, and use vacuum attachments designed for specific types of debris before vacuuming.
My vacuum motor sounds different after unclogging, what should I do?
If the motor sounds unusual after clearing a clog, it could indicate lingering debris affecting internal airflow, or a component might have been strained. Re-check all areas thoroughly, ensure everything is reassembled correctly, and consult the user manual or a technician if the issue persists.
When should I consider replacing my vacuum instead of unclogging it?
If you’re frequently unclogging your vacuum, experiencing persistent motor issues despite cleaning, or if major components like the motor housing are damaged, it might be more cost-effective to consider replacing the unit rather than continually repairing it.