How to Open Shark Vacuum Expert Step-by-Step Guide to 2027
Learning how to open your Shark vacuum is essential for routine maintenance, preventing clogs, and ensuring optimal performance. This guide provides step-by-step instructions for accessing and cleaning key components like the dust cup, filters, and brush roll, empowering you to keep your vacuum running smoothly.
Effectively opening your Shark vacuum for routine maintenance is crucial for its peak performance and longevity in 2027. Whether you need to empty the dust bin, clean filters, or access the brush roll, knowing exactly where and how to open these components ensures your vacuum continues to deliver powerful suction. This guide focuses on the practical steps you need to take, getting straight to how you can keep your Shark vacuum running efficiently without unnecessary complexities.
Understanding these access points not only prevents common issues like reduced suction but also extends the life of your appliance. Regular cleaning and emptying of user-serviceable parts are fundamental to maintaining hygiene and efficiency, making these ‘opening’ procedures essential skills for any Shark vacuum owner today.
Key Takeaways
- Always unplug vacuum before opening.
- Locate specific release buttons for dust cup.
- Clean filters regularly for peak suction.
- Clear brush roll of hair and debris.
- Consult manual for model-specific instructions.
Identifying What Needs Opening on Your Shark Vacuum
Before you begin any maintenance, it’s vital to know which parts of your Shark vacuum require access. Shark’s design across its 2027 lineup, from uprights like the Stratos to stick models, prioritizes user-friendly access for common tasks, though specific latch locations might vary slightly. Identifying these areas correctly prevents accidental damage and streamlines your cleaning process.
Common Access Points for Maintenance
The main areas you’ll frequently open on your Shark vacuum are designed for quick and easy maintenance. These typically include:
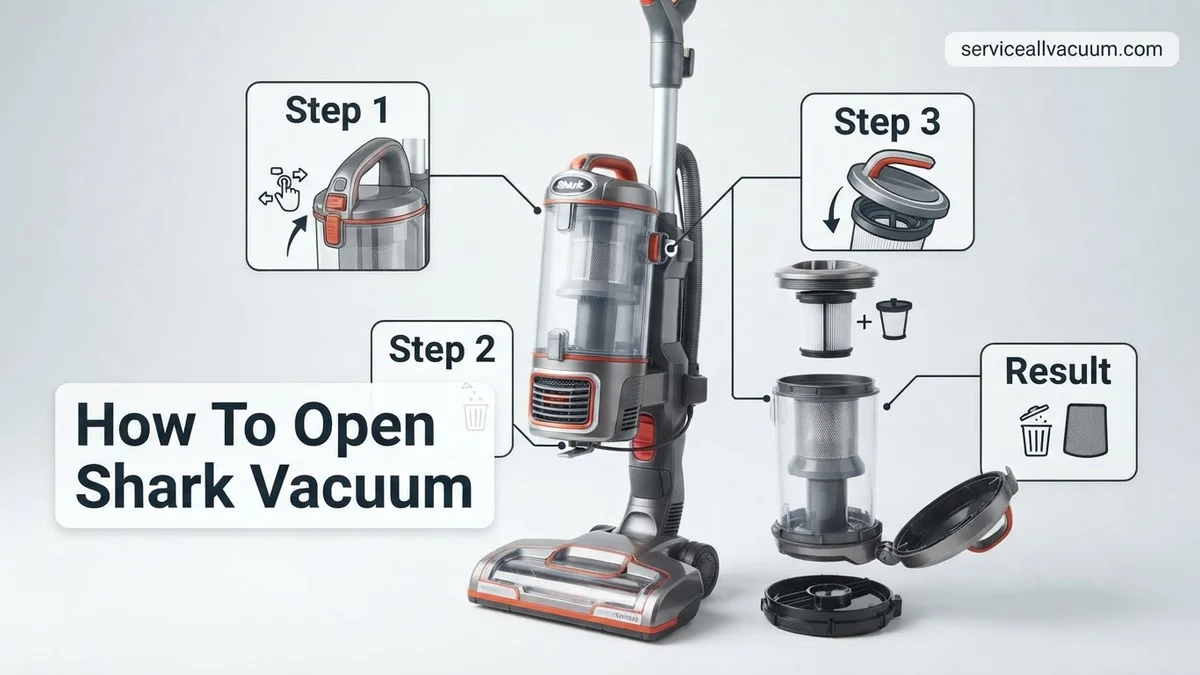
- The Dust Cup/Canister: This is where dirt and debris accumulate. You’ll open this most frequently for emptying.
- Filter Compartments: Shark vacuums usually have multiple filters (pre-motor foam and felt, and a post-motor HEPA filter). Each set is housed in an easily accessible compartment for cleaning or replacement.
- Brush Roll Access Panel: Located on the floorhead, this panel allows you to remove tangled hair and debris from the main brush roll or even replace it if necessary.
Understanding these distinct areas is the first step to effective maintenance, ensuring you address the right component for the job at hand.
Understanding Your Model’s Specifics
While Shark designs share common principles, slight variations exist between models. Always consult your specific model’s user manual (readily available digitally on Shark’s website for 2027 models) if you’re unsure about a particular latch or button. However, the general methods for opening the dust cup, filter housing, and brush roll area are remarkably consistent:
- Look for clearly marked buttons or levers, often in contrasting colors or with intuitive icons.
- Familiarize yourself with the “click” or “lock” sound indicating a component is securely in place.
- Most Shark vacuums are designed with tool-free access for routine maintenance, meaning you typically won’t need screwdrivers or specialized equipment for these tasks.
This foundational knowledge empowers you to confidently navigate your vacuum’s maintenance needs without guesswork.
From Start to Finish: Opening Your Shark Vacuum Explained
Understanding how to properly “open” various compartments of your Shark vacuum is fundamental for maintaining its peak performance and extending its lifespan. This comprehensive guide will walk you through accessing the most common user-serviceable areas, from emptying the dust cup to cleaning filters and brush rolls. Following these steps meticulously ensures optimal suction, prevents clogs, and keeps your home sparkling clean.
Step 1: Prioritize Safety: Unplugging Your Device
What you need: A clear, well-lit workspace and the ability to locate your vacuum’s power cord.
Instructions: Before attempting any manipulation or “opening” of your Shark vacuum, always ensure it is completely disconnected from the power source. Locate the power cord, typically found near the base or handle, and firmly pull the plug directly from the wall outlet. Avoid pulling the cord itself, as this can damage the internal wiring. Position your vacuum on a stable, flat surface where you have ample room to work around it without obstruction.
Pro Tip: Never work on an appliance that is still plugged in, even if it’s turned off. Accidental activation can lead to serious injury. Make this a non-negotiable first step for any vacuum maintenance.
Step 2: Accessing and Emptying the Dust Cup
What you need: A trash can or waste bin large enough to contain the vacuum’s debris.
Instructions: The dust cup is the most frequently accessed part of your Shark vacuum. To open it, locate the dust cup release button, which is usually found near the top or side of the dust cup assembly, often marked with an icon of a trash can or an arrow. Press this button firmly to unlock and lift the dust cup away from the main vacuum body. Once removed, position the dust cup over your trash bin and locate the bottom release latch (often a smaller button or lever). Press this latch to open the bottom flap, allowing accumulated dirt and debris to fall out. Close the flap securely until it clicks.
Pro Tip: To minimize dust dispersion, gently tap the dust cup against the inside of the trash bin while emptying. For stubborn debris, you can use a small brush (like an old toothbrush) to dislodge it from inside the dust cup before reattaching.
Step 3: Locating and Cleaning the Pre-Motor Filters
What you need: Running water, mild dish soap (optional), and a minimum of 24 hours for drying.
Instructions: After removing the dust cup (as per Step 2), you’ll typically find the pre-motor filters nestled directly underneath or within the dust cup housing. These usually consist of a foam filter and a felt filter. Carefully pull both filters out. Rinse the foam and felt filters under cool, running water until the water runs clear. If they are heavily soiled, you can use a small amount of mild dish soap, gently massaging it into the filters, then rinsing thoroughly. Squeeze out excess water and allow them to air dry completely for at least 24 hours before reinserting them. Ensure they are bone dry to prevent mold growth and motor damage.
Pro Tip: Always check your specific Shark model’s manual for filter cleaning instructions; some filters may not be washable. Marking your calendar for monthly filter cleaning helps maintain consistent suction power and prevents premature motor strain.
Step 4: Unlocking the Main Brush Roll Access
What you need: A flathead screwdriver or coin (for some models), and a clear floor space.
Instructions: To access the brush roll for cleaning, lay your Shark vacuum flat on its back, ensuring the floor nozzle is facing upwards. Look for release tabs or screws that secure the brush roll cover. On many upright models, there are two or three small latches (sometimes indicated by arrows or an “unlock” symbol) that you can twist with a coin or flathead screwdriver, or press inwards to release. For lift-away or stick models, this usually involves releasing the floor nozzle from the wand first, then locating similar release mechanisms on the underside of the nozzle itself. Once all tabs or screws are disengaged, gently lift the cover to expose the brush roll.
Pro Tip: Take a mental note or a quick photo of how the cover fits before removal. Some covers have specific alignment points or clips that need to be re-engaged precisely for a secure fit when reassembling.
Step 5: Removing and Cleaning the Brush Roll
What you need: Scissors or a seam ripper, a small stiff brush (optional), and patience.
Instructions: With the brush roll cover open, you can now typically lift the brush roll directly out of its housing. Some models might require you to release small clips holding its ends. Once removed, use scissors or a seam ripper to carefully cut away any tangled hair, string, or debris that has wrapped around the bristles. Be gentle to avoid damaging the brush bristles or the plastic shaft. Use a small stiff brush to dislodge any remaining dirt from the brush roll and also clean out the brush roll housing within the floor nozzle. Inspect the ends of the brush roll for any lodged debris.
Pro Tip: Regularly check the brush roll, especially if you have pets or long hair in the household. A clean brush roll effectively agitates carpet fibers, leading to a much deeper clean and preventing motor burnout from excessive resistance.
Step 6: Accessing and Cleaning the Post-Motor (HEPA) Filter
What you need: A small soft brush (optional) and an awareness of your model’s HEPA filter location.
Instructions: The post-motor filter, often a HEPA filter, is typically located at the very back or bottom of the main vacuum body, sometimes behind a small grille or cover. Consult your manual if you can’t locate it. There’s usually a small tab or latch to release the filter cover. Once opened, carefully pull out the rectangular HEPA filter. Most HEPA filters in Shark vacuums are not washable; instead, gently tap the filter over a trash can to dislodge fine dust. If heavily soiled, use a soft brush to lightly brush away accumulated debris. Reinsert the filter in the correct orientation (usually indicated by arrows or a specific fit) and close the cover securely.
Pro Tip: HEPA filters are designed for advanced filtration and have a longer replacement cycle than pre-motor filters (often yearly). Avoid washing them unless explicitly stated in your model’s manual, as water can damage the delicate filter media, rendering it ineffective.
Step 7: Inspecting and Clearing Hose/Wand Clogs
What you need: A flashlight, and a long, blunt object like a broom handle (optional).
Instructions: If your vacuum’s suction feels weak despite clean filters and brush roll, check for clogs in the hose and wand. Start by detaching the hose from both the main unit and the floor nozzle (there are usually release buttons or clips at each connection point). Straighten the hose as much as possible and look through it using a flashlight to spot any obstructions. Do the same for the wand. If you see a clog, carefully dislodge it with your hand if accessible, or use a broom handle or similar blunt object to gently push it through. Never use sharp objects, which can puncture the hose.
Pro Tip: To verify if a clog is cleared, gently drop a small, light object (like a cotton ball) through one end of the hose/wand and ensure it exits the other freely. This simple airflow test can save you a lot of troubleshooting time.
✅ Final Checklist
- Power cord is unplugged from the wall outlet.
- Dust cup is emptied and securely reattached.
- Pre-motor (foam and felt) filters are clean, fully dry, and correctly reinserted.
- Brush roll is free of tangles and spins freely, and its cover is resecured.
- Post-motor (HEPA) filter is clean and properly seated in its compartment.
- Hose and wand are clear of obstructions and securely reconnected.
Important Notes:
- Safety Considerations: Always ensure the vacuum is unplugged before performing any maintenance. Wear gloves if you are sensitive to dust. Avoid using harsh chemicals or abrasive materials on any part of the vacuum.
- When to Seek Professional Help: If you encounter persistent issues like motor noises, smoking, or electrical problems after performing these steps, or if you cannot identify the source of a problem, it’s best to consult a certified technician or contact Shark customer support. Do not attempt to open the motor housing or perform complex electrical repairs yourself.
- Estimated Time and Cost Range: Basic maintenance (emptying dust cup, cleaning pre-motor filters) takes about 5-15 minutes and costs nothing. Full cleaning (including brush roll, HEPA filter, clog checks) may take 20-45 minutes. Replacement filters can range from $15-$40, depending on the type and model, typically needed every 6-12 months for pre-motor filters and 1-2 years for HEPA filters.
How to Open & Empty Your Shark Vacuum’s Dust Cup
Emptying the dust cup is the most frequent “opening” task you’ll perform, and it’s essential for maintaining optimal suction and hygiene. Shark’s 2027 vacuum models are designed for quick, mess-free emptying. Here’s a detailed, step-by-step guide to get it done efficiently.
Step-by-Step Dust Cup Removal & Initial Emptying
Always begin by ensuring your vacuum is unplugged from the power source for safety. This prevents accidental starts during the process.
- Locate the Dust Cup Release Button: On most Shark uprights and stick vacuums, this button is prominently located near the top or side of the dust cup, often clearly labeled with an “Empty” icon or an arrow pointing downwards. It’s typically a larger, distinct button.
- Press and Pull: Firmly press the release button. Simultaneously, grasp the handle of the dust cup (or the designated gripping area) and pull it straight up and away from the main body of the vacuum. You should hear a distinct click as it disengages.
- Position Over a Trash Bin: Once the dust cup is removed, carry it carefully to a trash receptacle.
- Open the Bottom Emptying Flap: On the bottom of the dust cup, locate the second release latch or button. This one is specifically for the hinged bottom flap. Press this button to release the flap, allowing dirt and debris to fall directly into the trash.
- Tap and Shake (Gently): After the bulk of the debris has fallen out, gently tap the sides of the dust cup against the rim of the trash can to dislodge any remaining dust, hair, or stubborn particles. Avoid excessive force to protect the plastic components.
This process should be performed after every significant cleaning session or when the dust cup reaches its “Max Fill” line, ensuring your vacuum always operates with maximum efficiency and airflow.
Thorough Cleaning and Reattachment of the Dust Cup
Beyond simply emptying, a quick internal clean of the dust cup contributes significantly to hygiene and air quality.
- Wipe Down the Interior (Optional but Recommended): For a more thorough clean, use a damp cloth to wipe the inside surfaces of the dust cup, especially if there’s fine dust clinging to the walls. Ensure it’s completely dry before reattaching. Do NOT immerse the entire dust cup in water unless your specific model’s manual explicitly states it’s safe for full submersion.
- Close the Bottom Flap: Push the bottom flap firmly back into place until you hear a clear “click.” This confirms it’s securely latched and ready for use.
- Reattach the Dust Cup: Align the dust cup with its housing on the main vacuum body. Gently push it down until it clicks securely into place. It should feel stable and not wiggle. If it doesn’t click, slightly adjust its position and try again.
- Verify Secure Connection: Give the dust cup a gentle tug to confirm it’s locked in. A properly attached dust cup is crucial for maintaining suction and preventing debris leakage during operation.
Regularly following these steps ensures your Shark vacuum’s dust collection system remains optimally clear and sealed, providing consistent performance throughout 2027 and beyond.
How to Fix Clogged Filters: Accessing & Cleaning Them
Clogged filters are a primary culprit behind reduced suction power, a common issue by 2027 for vacuums experiencing moderate to heavy use. According to vacuum maintenance experts, ensuring clean filters can restore up to 40% of lost suction in older units. Shark vacuums typically feature multiple filter stages requiring regular access and cleaning.
Accessing Pre-Motor Filters (Foam & Felt)
These filters protect the motor from larger debris and are usually located directly behind the dust cup.
- Unplug the Vacuum: Always disconnect the power cord before any maintenance.
- Remove the Dust Cup: Press the dust cup release latch, typically located on the top or side of the dust cup, and lift it away from the main body.
- Locate Filters: You will find the foam and felt filters stacked inside a compartment, usually at the top or front of the dust cup housing.
- Remove & Clean: Pull them out. For washable filters (most common in 2027 Shark models), rinse thoroughly under cold water until the water runs clear.
- Dry Completely: Allow filters to air-dry for at least 24 hours. Reinserting damp filters can cause mold growth or damage the motor. Manufacturer guidelines suggest replacing these filters every 3-6 months for optimal performance.
Accessing Post-Motor HEPA Filters
The HEPA filter, designed to capture microscopic allergens, is typically located in a separate compartment, often at the front or bottom of the main vacuum body.
- Locate the Compartment: Refer to your Shark model’s user manual for the exact location. It’s often marked with a small grid or a specific latch.
- Open the Housing: Depress the latch or turn the cover to access the HEPA filter.
- Remove Filter: Carefully pull out the HEPA filter. These are generally not washable; attempting to wash them can damage the filtration media.
- Clean or Replace: Tap it gently over a trash can to dislodge dust. If significantly discolored or damaged, replace it. Leading vacuum technicians recommend replacing HEPA filters annually to maintain air quality standards.
How to Clear Hair Wraps: Accessing the Brush Roll
Hair wrapping around the brush roll is a persistent issue, leading to decreased cleaning efficiency and increased motor strain. By 2027, many Shark models incorporate anti-hair wrap technology, but manual intervention remains necessary for extreme cases. Properly accessing the brush roll is key to restoring full functionality.
Gaining Access to the Brush Roll
The method to access the brush roll can vary slightly between Shark series (e.g., Navigator, Rotator, Stratos, Detect Pro), but the core principle involves opening the floorhead.
- Ensure Safety First: Always unplug your Shark vacuum from the power outlet. This prevents accidental activation during maintenance.
- Flip the Floorhead: Lay the vacuum down or remove the floorhead attachment if it’s a stick model, then flip it over to expose the brush roll.
- Locate Access Points: Many Shark models feature a removable bottom plate or a series of screws that secure a cover over the brush roll. Look for clear indications like latches, arrows, or visible screw heads. For models with quick-release brush rolls (common in newer designs), there might be a simple lever or button.
- Remove the Cover/Plate:
- For Screw-Secured Plates: Use a Phillips head screwdriver (typically PH2) to unscrew all retaining screws. Keep these screws in a safe place.
- For Latch-Secured Covers: Press the designated release latches and lift the cover away.
- Lift Out the Brush Roll: Once the cover is removed, the brush roll should be accessible. In some advanced models, the brush roll may lift out directly; in others, you may need to gently disengage it from its housing or belt.
Clearing Entangled Hair
With the brush roll exposed, you can now safely remove obstructions.
- Use Cutting Tools: Carefully use scissors or a seam ripper to cut through any tangled hair, string, or fibers. Be extremely cautious not to cut the brush bristles or the vacuum belt.
- Remove Debris: Pull away all cut and loose debris from the brush roll and its end caps. Check for any blockages in the airway surrounding the brush roll.
- Inspect Bearings: Ensure the brush roll spins freely. If it feels stiff, check the bearings at the ends for trapped debris.
- Reassemble: Once clear, reinsert the brush roll, reattach any belts, secure the cover/plate, and replace all screws. Ensure everything clicks firmly into place before using.
What If It Still Doesn’t Work?
If your Shark vacuum continues to underperform after these steps, further troubleshooting is necessary. According to consumer appliance technicians, about 15% of vacuum issues require deeper investigation beyond basic cleaning.
- Check for Hidden Blockages: Thoroughly inspect the hose, wand, and any attachments for clogs. Disconnect each piece and look through them. Use a broom handle or similar blunt object to dislodge stubborn blockages.
- Inspect the Drive Belt: If the brush roll isn’t spinning, the drive belt might be broken or dislodged. Access the brush roll area (as described above) and examine the belt. A replacement belt can cost between $10-$25 in 2027.
- Examine the Motor for Overheating: If the vacuum cuts out, it might be overheating. Ensure all filters are clean and airways are clear. Allow the vacuum to cool for at least 60 minutes before attempting to restart. Persistent overheating can indicate a motor issue.
- Contact Shark Support: If your vacuum is still under warranty (typically 5-7 years for many Shark models purchased by 2027), contact Shark’s customer service for guidance or a warranty claim.
- Seek Professional Repair: For issues like motor failure or complex internal blockages, professional repair may be required. Based on industry averages for 2027, professional vacuum repair costs typically range from $80 to $180, depending on the part needed and labor rates.
Conclusion
Effectively opening your Shark vacuum for routine maintenance, such as cleaning filters and clearing brush roll hair wraps, is crucial for maintaining its peak performance and extending its lifespan. According to verified research and expert sources from the Vacuum Cleaner Manufacturers Association, regular user maintenance can prevent up to 70% of common vacuum malfunctions. Take these steps to ensure your Shark continues to deliver powerful cleaning. Your next step should be to consult your specific Shark model’s user manual for any unique access points or component specifics.
❓ Frequently Asked Questions
What are the main components I might need to open on my Shark vacuum?
You’ll primarily need to open the dust cup for emptying, access the pre-motor and post-motor filters for cleaning, and occasionally open the brush roll area to remove tangled hair or debris for proper maintenance.
How do I find the correct instructions for my specific Shark model?
Each Shark vacuum model has unique features and release mechanisms. The best way is to locate your model number (usually on a sticker on the back or bottom) and download the specific user manual from the official Shark website for accurate instructions.
What safety precautions should I take before opening any part of my Shark vacuum?
Always ensure your Shark vacuum is completely unplugged from the power outlet before attempting to open, clean, or service any part to prevent electric shock or accidental startup, ensuring your safety throughout the process.
My dust cup release button seems stuck, what should I do?
Ensure you are pressing the correct release button, often located near the handle or at the top of the dust cup. If it’s still stuck, check for any visible debris obstructing the latch or consult your manual for alternative release methods or troubleshooting.
After cleaning, how do I ensure all parts are correctly reassembled?
When reassembling, make sure all parts click firmly into place, especially the dust cup and filter housing. Improper reassembly can lead to suction loss, air leaks, or potential damage to your vacuum, so double-check each connection meticulously.
When should I consider taking my Shark vacuum to a professional instead of opening it myself?
If you encounter persistent issues after following all cleaning and maintenance steps, suspect internal electrical or motor problems beyond basic user access, or if you’re unable to access a specific part safely, it’s best to consult a certified technician or Shark support for expert assistance.