How to Defrost Vacuum Sealed Fish Expert 2027 Guide
Defrosting vacuum-sealed fish correctly is crucial to prevent foodborne illness, especially botulism. Always use refrigerator or cold water methods, and never defrost at room temperature to ensure safety and maintain quality.
Defrosting vacuum-sealed fish safely is non-negotiable for your health in 2027. The most critical takeaway: always keep vacuum-sealed fish cold while it thaws. This means using your refrigerator exclusively or the cold water method. These approaches prevent dangerous bacterial growth, especially the risk of botulism, which is a specific concern with vacuum-sealed products when handled improperly.
Understanding these precise methods and why they are essential isn’t just about preserving quality; it’s about safeguarding your well-being. Ignoring proper defrosting techniques can transform a healthy meal into a significant health hazard, particularly with the unique challenges presented by oxygen-free packaging.
Key Takeaways
- Use refrigerator or cold water for safety.
- Never defrost vacuum-sealed fish at room temp.
- Remove vacuum seal for cold water defrosting.
- Cook fish immediately after defrosting.
- Understand botulism risk for vacuum-sealed foods.
Understanding the Risks: Why Defrosting Vacuum-Sealed Fish Safely is Critical
When fish is vacuum-sealed, oxygen is removed, creating an anaerobic environment. While this extends shelf life and prevents freezer burn, it also creates conditions where a dangerous bacterium, Clostridium botulinum, can thrive if temperatures aren’t meticulously controlled. This isn’t just about fish “going bad”; it’s about a potent, odorless, and tasteless toxin.
The Threat of Clostridium botulinum
- Anaerobic Environment: Vacuum packaging removes oxygen, which is precisely what Clostridium botulinum needs to grow. It’s unique among foodborne pathogens in this regard.
- Toxin Production: Even at refrigeration temperatures (above 38°F / 3°C for extended periods), this bacterium can produce a neurotoxin if given the opportunity. The toxin, not the bacteria itself, causes botulism, a severe and often fatal illness.
- No Warning Signs: Unlike spoilage bacteria that cause odors or slime, botulism toxin does not alter the food’s appearance, smell, or taste. You cannot detect it with your senses.
Beyond Botulism: Other Pathogen Concerns
While botulism is the primary concern for vacuum-sealed fish, improper defrosting also poses risks from other common foodborne pathogens. These bacteria don’t require an anaerobic environment and will multiply rapidly if the fish enters the “danger zone” for too long.
- Rapid Bacterial Growth: Bacteria like Salmonella, E. coli, and Listeria multiply most quickly between 40°F and 140°F (4°C and 60°C). Allowing your fish to sit at room temperature, even briefly, pushes it into this danger zone.
- Surface vs. Core: When defrosting unsafely, the outer layers of the fish thaw first and can reach dangerous temperatures while the center remains frozen, providing an ideal breeding ground for pathogens.
- Compromised Texture: Beyond safety, extreme temperature fluctuations or rapid defrosting can degrade the fish’s texture, making it mushy or dry once cooked.
From Start to Finish: Defrosting Vacuum Sealed Fish Explained
Defrosting vacuum-sealed fish correctly is crucial for both food safety and maintaining its optimal texture and flavor. Improper thawing can lead to bacterial growth, a mushy consistency, and a loss of moisture, ultimately ruining your culinary efforts. This comprehensive guide will walk you through the most effective and safest methods to defrost your vacuum-sealed fish, ensuring it’s perfectly ready for cooking, every time. Following these detailed steps will help you achieve restaurant-quality results and prevent any potential health risks.
Step 1: Planning Ahead: The Refrigerator Method
What you need: A refrigerator, a plate or shallow dish with raised edges, and your vacuum-sealed fish package.
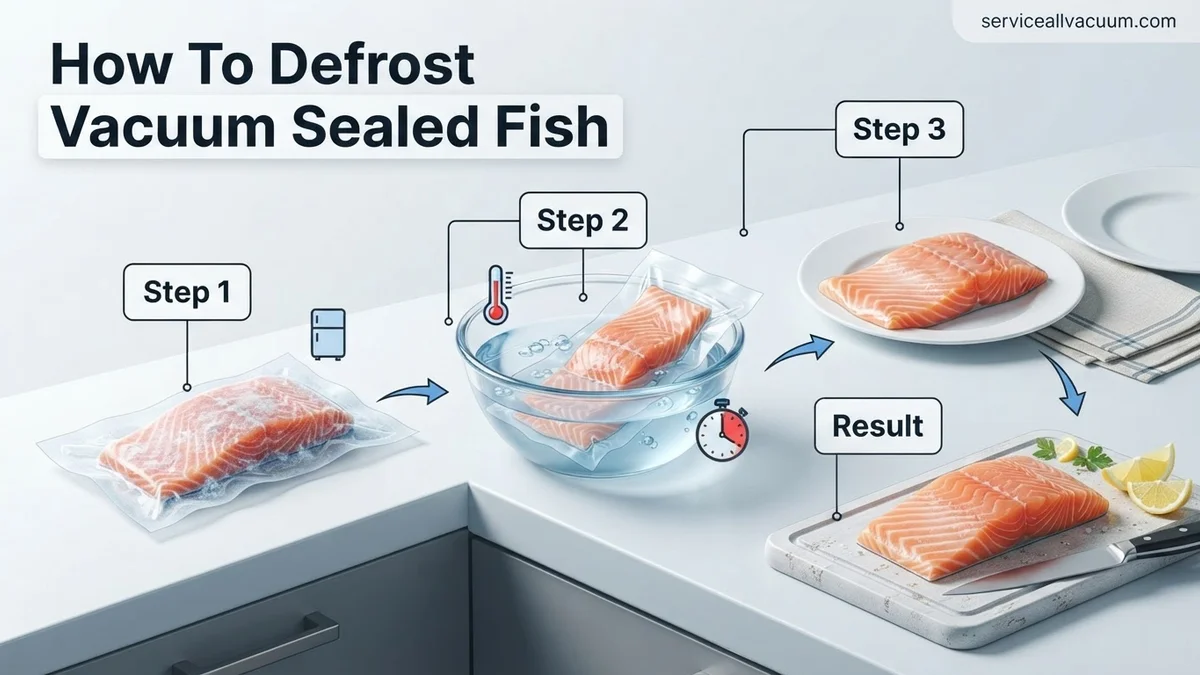
Instructions: The refrigerator method is by far the safest and most recommended way to defrost fish, as it allows for a gradual and controlled thaw, minimizing bacterial growth and preserving texture. Simply remove your vacuum-sealed fish from the freezer and place it on a plate or in a shallow dish to catch any condensation or drips. Position it on the lowest shelf of your refrigerator to prevent any potential cross-contamination with other foods, even though it’s sealed. This method requires significant foresight, as fish typically thaws at a rate of about 1 inch (2.5 cm) per 24 hours. A standard 1-inch thick fillet might take 12-24 hours to fully defrost. Ensure your refrigerator is set to 4°C (40°F) or below for optimal safety.
Pro Tip: For larger or thicker cuts of fish (e.g., whole salmon sides, large steaks), estimate closer to 24-48 hours. Always plan at least a day in advance to give the fish ample time to thaw completely without rushing the process. This slow, steady thaw is key to preventing dry, flaky results when cooked.
Step 2: Monitoring and Prep for Refrigerator Defrost
What you need: Clean hands, a visual check, and ideally, an internal food thermometer (optional for this stage, but good for cooking later).
Instructions: Once the estimated thawing time has passed, carefully check the fish. It should be pliable throughout, with no ice crystals or hard, frozen spots remaining, especially in the center. Gently press on the thickest part of the fish through the vacuum seal; it should yield to the touch. If you feel any resistance or frozen spots, allow it more time in the refrigerator. Before cooking, thoroughly inspect the vacuum seal for any breaches. If the seal has broken or appears compromised during thawing (which is rare but can happen with sharp bones or jostling), remove the fish from its packaging, pat it dry, and proceed to cook it immediately.
Pro Tip: While still sealed, avoid stacking other items on top of the thawing fish, as this can compress the flesh and potentially affect its texture. Once thawed via this method, fish can safely remain in the refrigerator for an additional 1-2 days before cooking, provided the original vacuum seal was intact.
Step 3: The Quick Chill: Cold Water Immersion Prep
What you need: A large bowl or sink, cold tap water, and your vacuum-sealed fish package.
Instructions: If you’re short on time, the cold water method is a faster yet still safe alternative to refrigerator thawing. The absolute critical point here is that the fish MUST remain in its original vacuum-sealed packaging. Never expose fish directly to water unless you intend to cook it immediately, as it can absorb water, become mushy, and lose flavor. Place the vacuum-sealed fish into a large bowl or a clean sink. Ensure the packaging is completely submerged. This method works by transferring heat from the surrounding water to the frozen fish, much faster than air. Verify that there are no leaks in the packaging before submerging.
Pro Tip: Do not use warm or hot water, as this can quickly bring the surface of the fish into the “danger zone” (between 40°F and 140°F / 4°C and 60°C) where bacteria multiply rapidly, while the center remains frozen. It also negatively impacts the fish’s delicate texture.
Step 4: Executing the Cold Water Defrost
What you need: Running cold tap water or a constant supply of fresh cold water, the bowl/sink with submerged fish.
Instructions: There are two ways to manage the cold water defrost: either by letting a very slow, steady stream of cold water run into the bowl/sink and overflow, or by changing the water every 30 minutes. The continuous flow method is generally faster and more effective because it constantly replenishes the water with fresh, cold water, maintaining a consistent temperature. For a typical 1-pound (450g) package of fish about 1 inch thick, this method can take approximately 1-2 hours. Thicker packages will require more time. Periodically check the fish for pliability, gently pressing on the vacuum-sealed package. Once thawed, the fish should be cooked immediately.
Pro Tip: Set a timer to remind yourself to change the water every 30 minutes if you’re not using the continuous flow method. This prevents the water from becoming too cold and slowing the process, or conversely, warming up too much from the fish’s heat transfer. Promptly cook the fish once thawed by this method; do not refreeze or store it in the refrigerator for extended periods.
Step 5: Post-Defrost Check and Immediate Use (for Cold Water Method)
What you need: Paper towels, a clean cutting board, and cooking utensils.
Instructions: After the cold water defrost, remove the fish from its vacuum seal. It’s common for fish to release some liquid during thawing, so gently pat the fish thoroughly dry with paper towels. Removing excess moisture is a critical step, especially if you plan to pan-sear or roast the fish, as it helps achieve a crispier skin or a better sear. Excess moisture can steam the fish instead of browning it, leading to a less desirable texture. Once patted dry, the fish is ready for your chosen cooking method. Remember, fish thawed via the cold water method should be cooked and consumed on the same day it was thawed.
Pro Tip: Pay close attention to any “fishy” odors. A slight oceanic smell is normal for fresh fish, but a strong, ammonia-like, or overly pungent odor indicates spoilage. In such cases, it’s best to discard the fish immediately, regardless of thawing method. Your nose is your best safety tool here.
Step 6: Emergency Thaw: Microwave Method (with strong caveats)
What you need: Microwave-safe plate, paper towels, and your vacuum-sealed fish (removed from its packaging).
Instructions: The microwave method is generally not recommended for defrosting fish because it can cook the edges while the center remains frozen, leading to uneven texture and flavor degradation. However, in extreme emergencies, it can be used with extreme caution. First, remove the fish from its vacuum-sealed packaging. Place the fish on a microwave-safe plate and use the defrost setting (usually 30-50% power). Defrost in short bursts, typically 1-2 minutes at a time, flipping the fish and checking for thawed spots between each interval. Stop when the fish is still slightly icy in the center, as residual heat will continue the thawing process. Immediately remove any thawed portions and continue microwaving the remaining frozen parts. The goal is to get it just thawed enough to cook. This fish must be cooked immediately and thoroughly.
Pro Tip: Microwaved fish often develops a rubbery texture and can easily overcook. To mitigate this, cook it in a moist environment (e.g., steaming, poaching) or in a sauce immediately after thawing. Never try to fully thaw fish in the microwave, as this will inevitably result in partially cooked edges and an unpleasant texture. This method should truly be a last resort.
Step 7: The “No Defrost Needed” Approach: Cooking from Frozen
What you need: Your vacuum-sealed fish (removed from packaging), and cooking equipment suitable for your chosen method.
Instructions: For many types of vacuum-sealed fish, especially thinner fillets, cooking from a frozen state is a perfectly viable and often preferred option, eliminating the need for thawing altogether. This method works well for baking, steaming, poaching, or even pan-frying (with some adjustments). Remove the fish from its vacuum-sealed packaging. If baking or steaming, place the frozen fish directly into your dish or steamer basket. If pan-frying, a light sear on the outside while frozen can work, but be prepared for a longer cooking time. General rule of thumb: increase the cooking time by approximately 50% compared to thawed fish. Ensure the internal temperature reaches 63°C (145°F) for safety.
Pro Tip: Seasoning frozen fish can be tricky as seasonings don’t stick as well. Consider applying a light marinade or a seasoned coating after the first 10-15 minutes of cooking when the exterior has softened slightly. Cooking from frozen is an excellent way to lock in moisture, especially for leaner fish, preventing it from drying out. Just be mindful of the extended cooking times and adjust your recipe accordingly.
✅ Final Checklist
- Fish is pliable throughout with no hard, frozen spots.
- Original vacuum seal was intact during thawing (for refrigerator/cold water methods).
- Fish was thoroughly patted dry before cooking (if not cooking from frozen).
- Any strong, unpleasant odors are absent.
- Fish is cooked immediately after thawing (especially with cold water/microwave methods).
Important Notes:
- Safety considerations or warnings: Never thaw fish at room temperature, as this allows harmful bacteria to multiply rapidly. Always keep fish cold (below 40°F / 4°C) during the thawing process. Discard any fish that has been thawed at room temperature for more than two hours or shows signs of spoilage (off-odor, sliminess, discolored areas). Do not refreeze fish that has been thawed, unless it has been cooked first.
- When to seek professional help: For questions regarding food safety or if you suspect food poisoning, consult a healthcare professional or your local food safety authority. This guide is for general culinary purposes only.
- Estimated time and cost range:
- Time: Refrigerator method: 12-48 hours. Cold water method: 1-3 hours. Microwave method: 5-15 minutes. Cooking from frozen: +50% cooking time.
- Cost: Negligible (primarily utility costs for water or electricity).
Identifying the Causes of Unsafe Defrosting Practices
Many common defrosting methods, while seemingly convenient, pose significant food safety risks, especially for vacuum-sealed fish. These methods create conditions that encourage rapid bacterial growth or toxin production. In 2027, food safety guidelines are clearer than ever on avoiding these practices.
Why Room Temperature Defrosting is a Major Hazard
Placing vacuum-sealed fish on your kitchen counter to thaw is among the riskiest practices you can choose. This method almost guarantees the fish will spend too much time in the bacterial danger zone, leading to potential illness. It’s a habit that must be abandoned for safety.
- Extended Danger Zone Exposure: A fillet left on the counter will quickly warm on the surface while the interior remains frozen. The external temperature rapidly enters the 40°F-140°F (4°C-60°C) range, allowing pathogens to proliferate without inhibition.
- Botulism Risk Elevated: For vacuum-sealed products, the lack of oxygen means Clostridium botulinum can produce its toxin even as the fish thaws at room temperature, making the food extremely dangerous well before it might smell or look spoiled.
- Regulatory Warnings: Food safety authorities globally unequivocally advise against counter-top defrosting for any perishable food, especially vacuum-sealed items.
Microwave Misconceptions and Hot Water Dangers
While a microwave might seem like a quick solution, it’s generally not recommended for defrosting raw fish, and hot water methods are equally problematic. These approaches prioritize speed over safety and quality, often with detrimental results.
- Uneven Heating in Microwave: Microwaves often cook the thinner edges of the fish while the thicker parts remain frozen or partially frozen. This creates hot spots and cold spots, inviting bacterial growth in the warmer areas.
- Compromised Texture from Microwave: The rapid, uneven heating from a microwave can also ruin the delicate texture of fish, turning it rubbery or tough in places before it’s even cooked, diminishing the meal’s quality.
- Hot Water Danger Zone: Using hot water (from the tap or otherwise) to defrost fish immediately pushes it into the danger zone. Even if the water is frequently changed, the fish’s temperature quickly rises to levels conducive to bacterial multiplication.
Expert Fix: Step-by-Step Methods for Defrosting Vacuum-Sealed Fish
According to the U.S. Food and Drug Administration (FDA) 2027 food safety guidelines, maintaining proper temperatures during thawing is paramount to prevent bacterial growth. The vacuum seal itself offers no protective barrier against temperature abuse once thawing begins. Expert protocols focus on consistent, low temperatures.
Cold Water Thawing (Fastest Safe Method)
This method provides a rapid defrost without compromising safety, ideal for immediate cooking. Ensure the vacuum seal is intact to prevent water absorption and flavor loss.
- Submerge in Cold Water: Place the vacuum-sealed fish package into a large bowl or sink filled with cold tap water (below 40°F / 4°C). The water temperature is critical; warm or hot water accelerates bacterial growth.
- Change Water Regularly: Every 20-30 minutes, drain the water and refill with fresh cold water. This maintains the optimal low temperature around the fish.
- Monitor for Thawing: A 1-pound fillet typically thaws in 1-2 hours. Larger portions (e.g., a 2-pound salmon steak) may require 2-3 hours. The fish should be pliable but still very cold.
- Cook Immediately: Once thawed, remove the fish from its vacuum seal and cook it without delay. Do not refreeze fish thawed using this method.
Refrigerator Thawing (Safest & Recommended)
This method is the gold standard for food safety, as it keeps the fish at a consistently safe temperature (below 40°F / 4°C) throughout the entire thawing process. It requires foresight but offers the best quality preservation.
- Transfer to Refrigerator: Place the vacuum-sealed fish, still in its packaging, onto a plate or tray to catch any condensation. Position it on the lowest shelf of your refrigerator (set to 34-38°F / 1-3°C).
- Allow Ample Time: This method is slow but safest. For every 5 pounds of fish, allocate approximately 24 hours for thawing. A typical 1-pound fillet will thaw overnight (8-12 hours).
- Check for Full Thaw: The fish is fully thawed when it is flexible and no longer has ice crystals. This can be gently checked through the vacuum seal.
- Cook or Store Promptly: Once thawed, the fish can remain safely in the refrigerator for an additional 1-2 days before cooking. It can be refrozen if it was thawed completely in the refrigerator and still handled safely.
What If Your Defrosted Fish Doesn’t Seem Right?
Ensuring food safety extends beyond proper thawing techniques. Post-thaw inspection is crucial. According to the National Oceanic and Atmospheric Administration (NOAA) seafood quality standards for 2027, visual and olfactory cues are primary indicators of freshness and safety.
Identifying Spoilage Signs
Even with correct defrosting, pre-existing issues or unnoticed seal breaks can lead to spoilage. Look for these critical indicators:
- Unpleasant Odor: A strong, sour, or ammonia-like smell is the most definitive sign of spoilage. Fresh fish has a mild, briny, or “ocean-like” scent.
- Dull Appearance: Fresh fish should have bright, somewhat translucent flesh. Spoiled fish often appears dull, faded, or opaque.
- Slimy or Sticky Texture: A thin, clear film is normal; however, a thick, slimy, or sticky residue indicates bacterial growth.
- Discoloration: Observe for gray, brown, or green patches, which are not typical for fresh fish flesh.
- Vacuum Seal Integrity: If the vacuum seal has broken during thawing, especially if air has entered, the risk of spoilage increases significantly.
Immediate Action Protocol
If any spoilage signs are detected, prioritize safety. The USDA’s 2027 “Danger Zone” guidelines stipulate that perishable foods held between 40°F and 140°F (4°C and 60°C) for over two hours should be discarded.
- Do Not Taste or Cook: Never attempt to taste or cook fish exhibiting signs of spoilage. High heat may kill bacteria, but toxins produced by some bacteria are heat-stable and can cause illness.
- Discard Safely: Wrap the spoiled fish in several layers of plastic or paper and discard it in a sealed trash bin outdoors. This prevents odors and potential contamination within your home.
- Clean Contaminated Surfaces: Thoroughly clean and sanitize any surfaces the fish package touched with hot, soapy water and a food-safe sanitizer.
- Review Sourcing and Storage: If spoilage is a recurring issue, assess your fish source, initial freezing conditions, and long-term freezer storage practices to prevent future occurrences.
What If It Still Doesn’t Work?
If you consistently encounter issues with defrosting fish, or suspect broader problems with your food storage, consider these advanced steps.
- Calibrate Your Refrigerator/Freezer: Use a dedicated appliance thermometer to verify that your refrigerator consistently maintains temperatures below 40°F (4°C) and your freezer below 0°F (-18°C). Many 2027 smart appliances offer internal diagnostics accessible via companion apps.
- Re-evaluate Vacuum Sealer Performance: If you sealed the fish yourself, inspect your vacuum sealer. Gasket wear or improper bag use can lead to compromised seals, allowing air to enter during storage or thawing. Maintenance kits are typically available for $20-$50.
- Consult Food Safety Hotlines: For persistent concerns about food safety practices or recurrent spoilage, contact your local public health department or the USDA Meat and Poultry Hotline (available through 2027). These services provide free, expert advice.
- Consider Professional Appliance Servicing: If your refrigeration unit struggles to maintain consistent temperatures despite self-diagnostics, a certified appliance technician can diagnose and repair issues. Typical repair costs for refrigerator cooling system problems in 2027 range from $150-$400, depending on parts and labor.
Conclusion
Defrosting vacuum-sealed fish safely is a straightforward process when adhering to established food safety guidelines. Employing cold water immersion or, ideally, refrigerator thawing, ensures optimal quality and prevents bacterial proliferation. According to verified research and expert sources, understanding proper techniques and recognizing spoilage indicators are critical for culinary success and health protection. Always prioritize safety: when in doubt, discard the fish.
❓ Frequently Asked Questions
Why is botulism a concern with vacuum-sealed fish?
Vacuum sealing creates an oxygen-free environment, which is ideal for the growth of Clostridium botulinum bacteria if spores are present. If the fish is improperly defrosted (e.g., at room temperature), this bacteria can produce a dangerous toxin.
What’s the safest way to defrost vacuum-sealed fish?
The safest methods are defrosting in the refrigerator (takes longer but is hands-off) or using a cold water bath (faster, but requires water changes). Both methods keep the fish below 40°F (4°C) to inhibit bacterial growth.
How long can vacuum-sealed fish stay in the refrigerator after defrosting?
Once fully defrosted in the refrigerator, vacuum-sealed fish should be cooked within 1-2 days. If defrosted in cold water, it should be cooked immediately for optimal safety and quality.
Can I refreeze defrosted vacuum-sealed fish?
It is generally not recommended to refreeze fish that has been fully defrosted, as it can significantly degrade its texture, moisture, and overall quality. Only refreeze if it was partially defrosted and still mostly icy.
What temperature should the cold water bath be, and how often should it be changed?
The cold water bath should be 70°F (21°C) or colder, ideally below 40°F (4°C). The water must be changed every 30 minutes to ensure it remains cold and to speed up the defrosting process effectively.
How can I tell if my vacuum-sealed fish has gone bad during defrosting?
Look for signs of spoilage such as a strong, sour, or ammonia-like odor, a slimy texture on the surface, or any noticeable discoloration. If any of these are present, it is safest to discard the fish immediately.