How To Take Bissell Vacuum Apart To Clean: Simple DIY Guide
Unplug the vacuum, remove bin and filters, detach brush roll and hose, then wash parts.
If you’ve wondered how to take bissell vacuum apart to clean without breaking anything, you’re in the right place. I’ve maintained hundreds of vacuums, and Bissell models are some of the easiest to service once you know the steps. This guide walks you through clear, model-aware instructions, pro tips, and mistakes to avoid so you can restore strong suction fast and extend your machine’s life.

Safety and prep you should never skip
Before you start learning how to take bissell vacuum apart to clean, set yourself up for success. Unplug the vacuum. Clear a bright workspace. Lay a towel down to catch dust.
- Take a quick photo before each step. It helps during reassembly.
- Keep small parts in a bowl so nothing gets lost.
- If your machine was used on wet messes, let it dry first to avoid mildew.

Know your Bissell model and what changes
The core steps are similar, but small details vary. This matters when you plan how to take bissell vacuum apart to clean without damaging clips or seals.
Common types you’ll see:
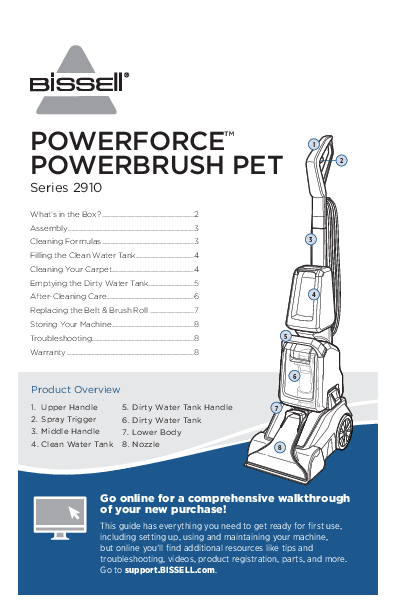
- Upright (CleanView, PowerForce, Pet Hair Eraser). Great suction, larger floorheads.
- Stick/Cordless (ICONpet, Adapt). Compact, more clip-in parts.
- Canister (Zing, Hard Floor Expert). Hose-centric, separate powerhead.
- Multi-surface wet/dry (CrossWave). Has water tanks; follow wet-care rules only if your model supports it.
Tip: Check the model label under the dust bin or on the back of the unit. Grab the user manual PDF online if you need torque specs or part names.

Tools and supplies that make it easy
A short list speeds up how to take bissell vacuum apart to clean and reduces risk.
- Phillips screwdriver and, for some models, Torx T10 or T15
- Scissors or seam ripper for hair on the brush roll
- Soft brush and an old toothbrush
- Microfiber cloths and cotton swabs
- Mild dish soap, warm water, and optional white vinegar
- Compressed air (optional) for tight crevices
Avoid harsh cleaners or hot water on plastic parts.

Step-by-step: Upright Bissell vacuums (CleanView, PowerForce, Pet series)
If you want a simple path for how to take bissell vacuum apart to clean, start with the uprights. They have the most predictable layout.
- Unplug and remove the dust bin. Press the release button, take it off, and empty it.
- Remove filters. Pull out the pre-motor foam filter and HEPA/exhaust filter if accessible. Note orientation.
- Open the brush roll compartment. Flip the vacuum. Remove the bottom plate screws and cover.
- Take out the brush roll and belt. Lift the roll straight up. Slide off the belt. Check for cracks or glazing.
- Detach the hose and wand. Twist off the hose ends. Pop out the wand. Look for clogs at both ends.
- Access the cyclone assembly (bin top). On many Bissell uprights, the bin top twists off. Tap out dust and rinse if allowed by your manual.
- Check air paths. Wipe the intake channel, elbows, and seals. Use a swab for corners.
- Clean the wheels and base. Hair tends to wrap around wheel axles. Pry off gently if needed.
- Wipe the motor intake screen. Do not get the motor wet. Only dry wipe.
Personal tip: On a recent CleanView 2252, I found a hairpin stuck deep in the hose elbow. Compressed air from the opposite end popped it out and suction jumped back to normal.

Step-by-step: Stick and cordless Bissell vacuums (ICONpet, Adapt)
This is where many wonder how to take bissell vacuum apart to clean with all the quick-release parts. The good news: most of it is tool-free.
- Remove the handheld unit from the wand.
- Eject the dust cup. Press the bin release and empty it.
- Pull the filter stack. Many sticks have a cylinder filter and a foam layer.
- Open the floorhead. Some have a side access door or a coin-lock to release the brush roll.
- Slide out the brush roll. Cut hair along grooves. Avoid cutting bristles.
- Detach the wand and hose. Look down the tube with a flashlight for clogs.
- Wipe sensors and charging contacts gently with a dry cloth.
Battery note: Never wash parts attached to electronics. Remove the bin and filter before washing. Keep all electrical sections dry.

Step-by-step: Canister Bissell vacuums (Zing, Hard Floor Expert)
Canister owners often ask how to take bissell vacuum apart to clean since the hose is longer and clogs hide well.
- Separate the canister from the hose and wand.
- Empty the bin or replace the bag (bagged models).
- Remove and inspect filters. Clean or replace as labeled.
- Check the hose. Drop a small coin through to confirm a clear path. If stuck, reverse-blow with gentle air.
- Inspect the floor tool. Open the plate (screws or clips), remove the brush roll if present, and cut away hair.
- Clean the telescoping wand. Wipe inside with a dry cloth and check the locking buttons.

Deep-clean key parts the right way
At this point, you know how to take bissell vacuum apart to clean. Now make it last with safe washing methods.
- Dust bin and cyclone: Rinse with warm water only. No soap inside the cyclone unless the manual says it’s okay. Shake out water and air-dry 24 hours.
- Foam and felt filters: Wash with warm water and a drop of dish soap. Rinse until clear. Squeeze gently. Air-dry fully.
- HEPA filters: Many are not washable. If yours is reusable, rinse only. If not, tap out light dust or replace per the manual.
- Brush roll: Wipe with a damp cloth. Keep bearings dry. If end caps pop off, remove wrapped hair and re-seat.
- Hoses and wands: Rinse with warm water, then hang to dry so water drains out.
Never reassemble damp parts. Moisture leads to odors, mold, and poor suction.

Reassembly checklist and power test
You learned how to take bissell vacuum apart to clean. Now ensure you put it back together correctly and test suction.
- Filters fully dry and oriented correctly
- Cyclone and bin locked with seals seated
- Belt routed correctly over motor shaft and brush roll
- Bottom plate clicked or screwed snug, not overtightened
- Hose ends firmly twisted on with no gaps
Power test:
- Turn it on for 15 seconds. Listen for smooth tone, no whistling leaks.
- Test suction at the hose end with your palm. It should pull hard and steady.
- Run on carpet. The brush should spin without squeal.

Maintenance schedule and pro tips
To make how to take bissell vacuum apart to clean easier next time, follow a simple schedule.
- After every use: Empty the bin.
- Every 2–4 weeks: Wash foam filters and wipe the bin (more often with pets).
- Every 1–3 months: Remove brush roll hair and check the hose.
- Every 6–12 months: Replace HEPA or post-motor filter if non-washable.
- Annually: Replace the belt or sooner if it smells burnt or looks glossy.
Pro tips from the bench:
- Sprinkle a teaspoon of baking soda in the bin after it’s dry to cut odor.
- Label your filter dry date on a sticky note so you don’t rush reassembly.
- Keep a spare filter set on hand so you never run the vacuum with damp filters.
Troubleshooting after a clean
If, after learning how to take bissell vacuum apart to clean, the vacuum still underperforms, run these checks.
- Weak suction: Check for a loose bin seal or a missed clog at an elbow.
- Brush not spinning: Belt twisted, wrong size, or not fully seated on the motor shaft.
- High-pitched whistle: Air leak at the hose cuff or bin gasket out of place.
- Dust blowback: Exhaust filter missing, soaked, or installed backward.
If the motor sounds rough or smells burnt, stop and consult service. Continuing can cause damage.
Common mistakes to avoid
These errors can turn how to take bissell vacuum apart to clean into a hassle.
- Washing non-washable HEPA filters and then losing filtration
- Reassembling while parts are damp
- Over-tightening screws and cracking plastic posts
- Pulling on wires inside the floorhead when removing the brush roll
- Forgetting the belt path and forcing the cover closed
Take photos. Move slow. It pays off.
Frequently Asked Questions of how to take bissell vacuum apart to clean
How often should I take my Bissell apart for cleaning?
For most homes, do a light clean monthly and a deeper teardown every 3 months. With pets or heavy use, shorten those intervals.
Can I wash all Bissell filters?
Foam and felt filters are usually washable. HEPA or post-motor filters are often not; check your manual and replace when clogged.
What if my brush roll is stuck after reassembly?
Remove the bottom plate, reseat the belt, and confirm the brush caps are fully clicked in. Spin it by hand before powering up.
Is vinegar safe for cleaning parts?
A mild vinegar solution can deodorize bins and hoses. Do not use it on metal bearings or HEPA media; rinse well and dry fully.
How do I know if the hose has a clog?
Drop a small coin through the hose or shine a light from one end. If it stops or the light is blocked, reverse-blow with air and check elbows.
Should I lubricate the brush roll bearings?
No lubrication is needed. Keep them dry and hair-free; oil can attract dust and cause binding.
What’s the best way to remember screw locations?
Place screws in labeled cups or take a photo at each step. Match lengths during reassembly to avoid cracking plastic.
Conclusion
You now know exactly how to take bissell vacuum apart to clean, from safe prep to reassembly and testing. With a simple routine, you’ll keep suction strong, control odors, and make your machine last longer. Set a reminder for your next filter wash, and try today’s steps on your vacuum now.
Want more guides like this? Subscribe, share your results, or drop a question below so we can help you fix your next cleaning challenge.