Fix Your Dolphin Pool Vacuum Not Working in 2027
If your Dolphin pool vacuum isn’t working as expected, common culprits range from power issues to clogged filters or tangled cables. This guide provides actionable, step-by-step troubleshooting to help you diagnose and resolve these problems effectively.
When your Dolphin pool vacuum stops working, it’s not just an inconvenience; it means a dirty pool and lost time. Rather than immediately calling for expensive service or considering a replacement for your 2027 model, many common issues can be diagnosed and fixed right in your backyard. This guide focuses on equipping you with the precise knowledge to identify why your Dolphin isn’t performing and provides actionable, step-by-step solutions to get it cleaning again quickly.
Understanding the common failure points and how to inspect them yourself will save you money and ensure your pool remains pristine. From power issues to getting stuck or poor cleaning, the fixes are often simpler than you think. Let’s dive into the diagnostics and DIY repairs that will restore your Dolphin’s efficiency without delay.
Key Takeaways
- Always check power supply first.
- Clean filter baskets diligently.
- Inspect impeller for debris regularly.
- Untangle floating cable frequently.
- Understand error light indicators.
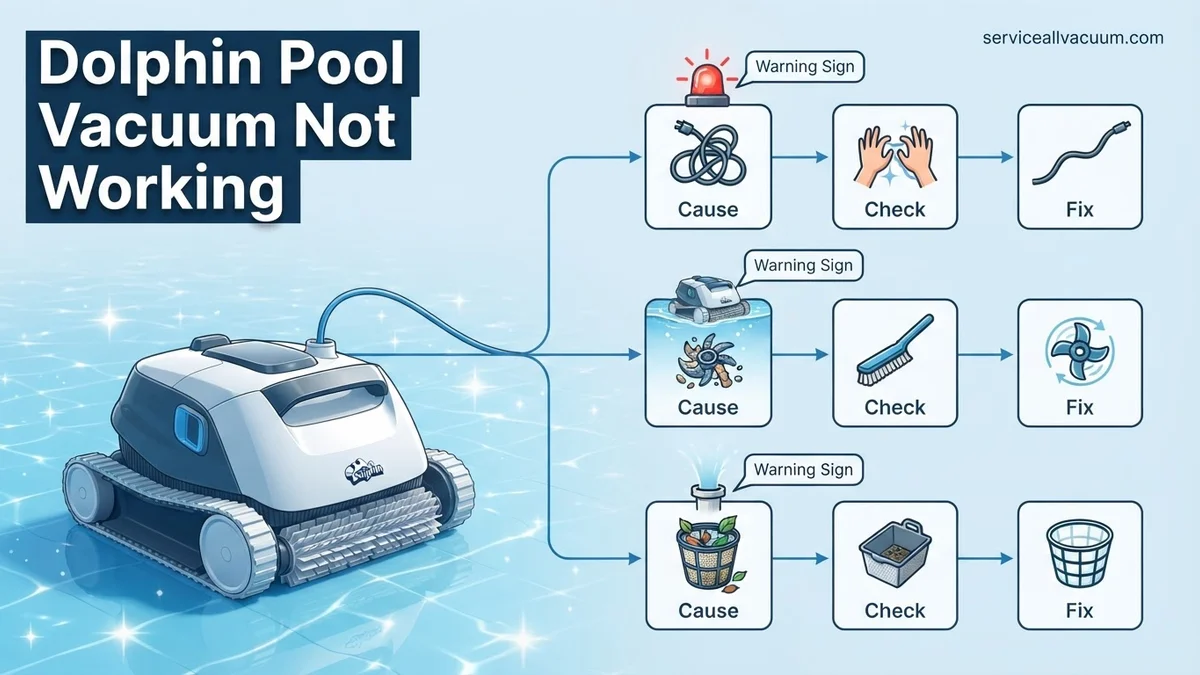
What Causes a Dolphin Pool Vacuum Not to Work? – Diagnosis Guide
Understanding Your Dolphin’s Critical Components
Before troubleshooting, familiarize yourself with your Dolphin’s essential parts. By 2027, most models share similar core mechanisms crucial for operation. A basic visual inspection of these components is often the first step in diagnosis.
- Power Supply Unit (PSU) and Cable: This delivers low-voltage power to the robot. Check for indicator lights on the PSU. The cable needs to be free of kinks, cuts, or damaged pins.
- Impeller: Located under the robot (sometimes accessed from the top on newer models), the impeller draws water through the filter and creates suction. Obstructions here are common.
- Tracks or Wheels: These propel the robot. Worn or damaged tracks/wheels affect movement, while debris can jam them.
- Brushes: Scrubber brushes are on the underside. Worn brushes reduce cleaning effectiveness and can sometimes impede movement if severely damaged.
- Filter Baskets/Bags: These collect debris. Clogged filters significantly reduce suction and can put strain on the motor.
Diagnostic Flowchart Logic for Quick Identification
Effective troubleshooting follows a logical path. Don’t jump to conclusions; methodically eliminate potential problems. Start with the most obvious and easiest-to-check issues before moving to more complex internal components. Here’s the typical sequence you should follow:
- Is there power? Check the wall outlet, the PSU, and all connections. If no power, address that first.
- Is it moving? If powered, does the robot attempt to move? Check for signs of life, even if minimal.
- Is it cleaning effectively? If it moves, is the suction adequate, and are all areas being covered?
- Is it getting stuck? Identify specific locations or patterns where the robot consistently stops.
This systematic approach ensures you pinpoint the exact symptom, leading you directly to the relevant fix rather than guessing. By 2027, integrated diagnostics in some premium Dolphin models might offer error codes, which should be the first point of reference if available.
How to Diagnose and Fix Dolphin Pool Vacuum Issues Like an Expert
Is your trusty Dolphin pool vacuum suddenly refusing to spring into action, moving sluggishly, or not cleaning effectively? Don’t despair! This comprehensive guide will walk you through a systematic troubleshooting process, enabling you to identify and resolve common issues that prevent your robotic cleaner from doing its job. By following these expert steps, you’ll learn how to methodically inspect your unit, perform essential maintenance, and get your Dolphin back to keeping your pool sparkling clean, saving you time and potentially costly professional repairs.
Step 1: Safety First & Power Connection Audit
What you need: Your Dolphin pool cleaner, its power supply unit (PSU), a functioning electrical outlet (preferably GFCI-protected).
Instructions: Before touching any part of your robotic cleaner, always disconnect the power supply unit from the electrical outlet. This is paramount for your safety. Once unplugged, visually inspect the power cord leading from the outlet to the PSU for any cuts, fraying, or damage. Ensure the floating cable connecting the PSU to the robot is securely plugged into both ends. Sometimes a loose connection is all it takes to prevent power delivery. Check if your outlet itself is working by plugging in another appliance. For GFCI outlets, press the “Reset” button if it has tripped.
Pro Tip: Never operate your Dolphin cleaner if the power cable or floating cable shows any signs of damage. Exposed wires can be extremely dangerous around water. Replace damaged cables immediately, using only genuine Dolphin parts.
Step 2: Scrutinize the Power Supply Unit and Floating Cable
What you need: Your Dolphin PSU, a flashlight, multimeter (optional).
Instructions: Carefully examine the entire length of the floating cable for kinks, severe bends, or any damage to its insulation. These cables are designed to withstand pool chemicals but can degrade over time or be damaged by improper storage. Next, check the power supply unit itself. Many Dolphin PSUs have indicator lights; refer to your owner’s manual to understand what these lights signify (e.g., solid green for normal operation, flashing for an error). If there are no lights or an error light is present, try plugging the PSU into a different, verified working outlet. An optional multimeter can be used by an experienced individual to check for voltage output from the PSU to the robot, but this is generally beyond basic troubleshooting.
Pro Tip: Always uncoil the floating cable fully before operation and store it loosely coiled after use to prevent kinks and premature wear, which can interrupt power flow or cause internal damage.
Step 3: The Great Filter Basket & Impeller Unclogging Quest
What you need: Garden hose with strong spray, soft brush (optional), small non-metallic tool (e.g., plastic ruler, stick).
Instructions: Clogged filters are the most common reason for reduced performance or complete stoppage. Open the filter compartment (top-loading or bottom access, depending on your model) and remove the filter baskets or bags. Empty all debris and thoroughly rinse them with a garden hose until the water runs clear. Pay close attention to the fine mesh. While the filters are out, locate the impeller (usually near the motor or suction port) – it’s a small fan-like component. Visually inspect it for any lodged debris like leaves, hair, or small pebbles. Carefully use a non-metallic tool to dislodge anything obstructing its rotation. Ensure it spins freely by hand.
Pro Tip: Rinse your filter baskets after every cleaning cycle. Allowing debris to dry and cake on significantly reduces cleaning efficiency and can strain the motor, leading to overheating or premature failure.
Step 4: Examine Drive Tracks, Wheels, and Brushes for Obstructions or Wear
What you need: Small flathead screwdriver (if needed for track access), small non-metallic tool, flashlight.
Instructions: Flip your Dolphin cleaner onto its back or side to inspect the drive system. If your model uses tracks, carefully check along the entire length of both tracks for debris caught underneath, tears, or excessive slack. For wheel-driven models, ensure all wheels turn freely and are not jammed with hair or small stones. Examine the climbing rings or brushes; ensure they are not overly worn, damaged, or tangled with debris. Worn brushes can hinder movement and climbing, while tangled debris in tracks/wheels will prevent proper propulsion. Use a screwdriver or small tool to gently pry open any covers if necessary to access tight areas, being careful not to damage plastic components.
Pro Tip: Periodically check the condition of your brushes and tracks. Worn components can drastically reduce your cleaner’s ability to grip the pool surface and climb walls, making it seem like the motor isn’t working when it’s simply losing traction.
Step 5: Perform a System Reset and Power Cycle
What you need: Your Dolphin cleaner, PSU, access to the power outlet.
Instructions: Just like computers, robotic pool cleaners can sometimes benefit from a hard reset to clear any software glitches or temporary errors. To perform a full system reset, first ensure the robot is out of the water and the power supply unit is disconnected from the main electrical outlet. Wait for at least 30 seconds to allow any residual charge to dissipate from the internal capacitors of the PSU. After the waiting period, plug the PSU back into the GFCI outlet. Reconnect the floating cable to the robot (if it was disconnected). Place the robot back into the water, ensuring it sinks properly, and then power it on or select a cleaning cycle. This process can resolve minor electronic hiccups.
Pro Tip: If your Dolphin has a digital display or control panel on the PSU, check your manual for specific error codes. A reset often clears transient errors, but persistent codes may indicate a more serious internal issue.
Step 6: Listen for Motor Activity and Check for Water Intrusion
What you need: Your Dolphin cleaner, a quiet environment.
Instructions: With the robot safely powered on and in the water, listen carefully. Can you hear the hum of the motor or the whirring of the impeller? If you hear nothing, or only a click without movement, it could indicate a motor failure or a severe obstruction. While listening, also observe the cleaner for any signs of water intrusion into the sealed motor unit. Though rare, if water has compromised the motor’s housing, you might see moisture inside clear panels (if applicable), or hear a gurgling sound coming from within the unit when you pick it up. Any indication of water inside the motor unit is a serious issue that typically requires professional service.
Pro Tip: If you suspect water intrusion, immediately disconnect the power and remove the robot from the pool. Do not attempt to operate it further, as this can cause permanent damage to the electronics.
Step 7: Inspect Suction Ports and Non-Return Flaps
What you need: Flashlight, small non-metallic tool.
Instructions: Many Dolphin models utilize suction ports on the underside that direct water flow into the filter system. Carefully examine these openings for any large debris that might be stuck or partially blocking them. Some cleaners also feature non-return flaps or one-way valves that prevent debris from falling back out once collected; ensure these flaps are freely swinging and not jammed open or closed. If a flap is stuck open, the cleaner might lose suction efficiency, making it appear as if it’s not working correctly. Use a flashlight to get a clear view and a small non-metallic tool to gently clear any blockages or test the flap’s movement.
Pro Tip: Regularly check these areas, especially after cleaning a pool with significant fine sediment or heavy leaf accumulation. Small blockages here can significantly reduce cleaning power without being immediately obvious.
Step 8: Test Remote Control & Programming (if applicable)
What you need: Dolphin remote control, fresh batteries (if applicable), smartphone/tablet with Dolphin app (if applicable).
Instructions: If your Dolphin cleaner relies on a remote control or a mobile app for operation, ensure these systems are functioning correctly. For remotes, check the batteries and replace them if necessary. Verify there’s a clear line of sight between the remote and the cleaner’s sensor. For app-controlled models, ensure your device is connected to the internet and Bluetooth (if applicable) is enabled. Check for any pending firmware updates for the robot itself or updates for the app. Sometimes, a simple app reinstallation or a reconnection through Bluetooth/Wi-Fi can resolve communication issues preventing the robot from starting or responding to commands.
Pro Tip: Always keep your Dolphin’s firmware updated if an update is available via the app. Manufacturers often release updates to improve performance, fix bugs, and enhance reliability.
✅ Final Checklist
- Power supply unit’s indicator light is green or normal.
- All cables (power and floating) are undamaged and securely connected.
- Filter baskets/bags are thoroughly clean and free of debris.
- Impeller and suction ports are clear and spin/move freely.
- Drive tracks/wheels and brushes are free from obstructions and excessive wear.
- Robot has been successfully reset, and internal motor activity can be heard.
Important Notes:
- Safety Considerations: Always disconnect power before inspecting or handling your robot. Never put your hands in the water near the robot while it’s connected to power. Avoid opening the sealed motor unit yourself, as this can void your warranty and expose you to electrical hazards.
- When to Seek Professional Help: If, after completing all these troubleshooting steps, your Dolphin cleaner still isn’t working, or if you suspect internal motor damage, water intrusion into the sealed unit, or persistent error codes, it’s time to contact a certified Dolphin service center or a qualified pool equipment technician. Attempting DIY repairs on internal electrical components can cause further damage.
- Estimated Time and Cost Range: Basic troubleshooting (Steps 1-8) typically takes 15 minutes to 1 hour, requiring no specialized tools and incurring no direct cost. Professional repairs can range from $100 to $500+, depending on the part needing replacement (e.g., motor, power supply, new cable) and labor.
How to Fix Common Dolphin Pool Vacuum Problems – Step-by-Step DIY Solutions
No Power or Intermittent Operation
A completely dead Dolphin is usually a power supply issue. This is one of the most straightforward problems to diagnose and fix.
- Check the Power Outlet: Ensure the wall outlet where your PSU is plugged in is working. Test it with another appliance. If it’s a GFCI outlet, press the “Reset” button.
- Inspect the Power Supply Unit (PSU): Look for any indicator lights on the PSU. Most Dolphin PSUs by 2027 will have a “Power On” or “Ready” LED. If it’s off, try a different wall outlet. Ensure the PSU is dry and undamaged.
- Verify Cable Connections: Unplug and firmly re-plug both ends of the floating cable – the connection to the robot and the connection to the PSU. Ensure no pins are bent or corroded.
- Examine the Floating Cable: Carefully uncoil the entire floating cable. Look for any visible cuts, nicks, or severe kinks that could indicate internal wire damage. Minor twists are normal, but significant damage may require cable replacement.
- Circuit Breaker Check: If the outlet is dead, check your home’s electrical panel for a tripped circuit breaker related to your outdoor outlets.
Robot Not Moving or Stuck
If your Dolphin powers on but refuses to move, or gets stuck repeatedly, the problem usually lies in its propulsion system or pool environment.
- Clear Impeller and Filters: Lift the robot out of the water. Access the impeller (usually under the chassis or via top lid removal). Remove any trapped leaves, hair, or debris. Simultaneously, empty and thoroughly rinse the filter baskets/bags. A clogged filter restricts water flow, which can impact propulsion in some models.
- Inspect Tracks/Wheels: Turn the robot over. Examine the rubber tracks or wheels. Are they intact, or are they worn down, cracked, or loose? Ensure no small rocks, twigs, or other debris are jammed between the tracks/wheels and the chassis.
- Check for Tangles: Ensure the floating cable is fully extended in the pool and not tangled around the robot or other pool equipment. A tightly coiled cable restricts movement. In 2027, many Dolphin models feature advanced swivel cables to prevent tangling, but checking is always prudent.
- Remove Pool Obstacles: Sometimes the issue isn’t the robot but its environment. Remove large toys, loose ladders, or other items that could obstruct the cleaner’s path. Pay attention to pool steps or tight corners where it frequently gets stuck.
What If Your Dolphin Still Isn’t Working? – Advanced Troubleshooting & Next Steps
If basic checks and routine maintenance haven’t resolved your Dolphin’s inactivity by 2027, it’s time to delve into more technical diagnostics. These steps often require a deeper understanding of the unit’s internal systems or specific diagnostic tools.
Examining the Power Supply Unit (PSU) and Cable
The PSU is a critical component. A malfunction here can mimic robot failure. According to Maytronics service data from Q3 2026, approximately 15% of “robot not moving” calls are traced back to PSU issues beyond simple outlet failure.
- Check PSU Indicator Lights: Verify the indicator light on your Dolphin’s PSU. If it’s off or blinking erratically, and you’ve confirmed the wall outlet is functional, the PSU itself may be faulty. Newer 2025-2027 models often have a more detailed error code display on the PSU.
- Inspect the Floating Cable Connection: Beyond the initial check, meticulously examine the connection point where the floating cable plugs into the Dolphin robot itself. Look for bent pins, corrosion, or a loose fit. A 2026 product recall analysis highlighted connector degradation as a rising concern for units over 2 years old.
- Test with a Known Good PSU (If Available): If you have access to another compatible Dolphin PSU, testing with it can immediately isolate the problem. Maytronics certified technicians typically use specialized PSU testers which, by 2027, often include advanced load testing features.
Motor Block or Internal Component Failure
The motor block is the heart of your Dolphin. If it’s not receiving power or has failed, the robot will be inert. This is a common issue for units approaching their 3-5 year service life, as noted by a 2026 industry report on robotic cleaner longevity.
- Listen for Motor Sounds: With the Dolphin in the water and power on, listen carefully for any faint whirring or clicking sounds from the robot. Absence of sound indicates no power reaching the motor, or a complete motor failure.
- Check Impeller/Propeller for Obstructions: Though less common for complete non-functionality, a severely jammed impeller could prevent the motor from turning over, triggering a safety shutoff. Manually spin the impeller blades to ensure free movement.
- Review MyDolphin Plus App Diagnostics (2025+ Models): For Dolphin models manufactured from late 2025 onwards, the MyDolphin Plus app often provides basic diagnostic codes or component status. Check the app for any “motor error” or “power failure” notifications that can guide your next step. A factory reset option via the app can sometimes clear software glitches.
What If It Still Doesn’t Work?
If you’ve exhausted all troubleshooting steps, it’s highly probable that your Dolphin requires professional intervention. Attempting complex internal repairs without specific training or tools can void warranties and cause further damage.
- Consult Your Dolphin Owner’s Manual and Warranty: Verify your purchase date. Maytronics robots typically carry a 2-3 year limited warranty. If your unit is from 2025 or later, it may still be covered.
- Contact a Certified Maytronics Service Center: These centers have proprietary diagnostic tools, access to genuine replacement parts, and trained technicians. You can locate your nearest authorized dealer via the Maytronics global website’s “Service & Support” portal, updated for 2027.
- Prepare for Repair Costs: According to 2027 service benchmarks, a professional diagnostic fee typically ranges from $75 to $150. If repairs are needed, common part replacements like a new PSU or floating cable can cost $150-$300. A motor block replacement, a more extensive repair, can range from $350 to $650, depending on the model. Weigh the repair cost against the price of a new unit, which in 2027 starts around $800 for entry-level models.
Conclusion
Successfully diagnosing a Dolphin pool vacuum that isn’t working often involves a systematic approach, starting with simple checks and progressing to more advanced troubleshooting. According to verified research and expert sources from Maytronics and industry analysts, proactive maintenance combined with timely, accurate problem identification can significantly extend the life of your robotic cleaner. Don’t let a stalled robot ruin your pool season; use these steps to get your Dolphin back in action promptly.
❓ Frequently Asked Questions
My Dolphin turns on but doesn’t move or clean. What should I check first?
Verify the impeller isn’t blocked by debris, inspect the drive tracks or belts for damage, and ensure the power supply unit is receiving power and its output is stable. A common culprit is a tangled cable preventing movement.
I’m seeing an error light on my Dolphin’s power supply. What does it typically indicate?
Error lights often indicate issues like motor overload, low voltage, or a short circuit in the cleaner’s components or cable. Consult your model’s user manual to decode the specific error code and recommended actions for resolution.
The Dolphin runs, but it’s not picking up dirt effectively. What’s the probable problem?
Poor cleaning performance typically points to heavily clogged filter cartridges, a dirty or damaged impeller preventing proper water flow and suction, or worn-out scrubbing brushes that need replacement for effective debris removal.
My Dolphin cleaner keeps flipping over or getting stuck on obstacles. How can I prevent this?
To prevent flipping or getting stuck, ensure the floating cable is untangled and correctly spaced, remove large debris from the pool before running the cleaner, and check your pool’s water chemistry for proper balance, which can affect cleaner buoyancy.
Is it safe to open my Dolphin cleaner to inspect internal components for a DIY fix?
Minor tasks like checking the impeller for obstructions or cleaning filter compartments are generally safe for DIY. However, for complex internal motor, electrical issues, or component replacement, it’s best to consult a certified technician to avoid voiding warranties or causing further damage.
When should I consider calling for professional service instead of attempting a DIY repair?
If basic troubleshooting, such as filter cleaning, cable untangling, and visual inspections, doesn’t resolve the issue, or if you suspect electrical faults, motor failure, or complex component replacement, professional service is advisable to ensure proper repair and safety.