
How to Pull a Vacuum on an AC System Expert 2027
Properly pulling a vacuum on an AC system is crucial for its efficiency and longevity, removing damaging moisture and non-condensable gases. This guide provides a step-by-step process, detailing the necessary tools and techniques to achieve the ideal vacuum level before refrigerant charging.
Pulling a deep vacuum on your AC system is not just a best practice; it’s a non-negotiable step for optimal performance and longevity. This crucial procedure removes all moisture and non-condensable gases, such as air, from the refrigeration lines. Failing to achieve a proper vacuum leads to inefficiency, premature component failure, and costly repairs, especially with the intricate systems and advanced refrigerants mandated by 2027 standards.
The goal is to create an environment where refrigerant can flow and cool effectively without harmful contaminants. You’re effectively preparing a sterile, moisture-free pathway for the refrigerant. Mastering this process ensures your AC operates at peak cooling capacity and protects its expensive components from corrosive damage caused by residual moisture.
Key Takeaways
- Always use a micron gauge for accurate vacuum readings.
- Target 500 microns or lower for effective dehydration.
- Perform a decay test to confirm system integrity.
- Core removal tools speed up the vacuum process significantly.
- Wear proper safety gear when handling AC refrigerants.
What Causes the Need to Vacuum Your AC System?
Any time your AC system’s hermetically sealed environment is opened, it becomes contaminated. This exposure introduces both atmospheric air and moisture into the lines. Whether you’re replacing a compressor, repairing a leak, or installing a brand-new system, the internal components are instantly exposed to the ambient environment.
The Silent Threat: Air and Moisture Contamination
- Air (Non-Condensable Gases): Air trapped in the system occupies space that refrigerant should use. This increases head pressure, forces the compressor to work harder, and significantly reduces cooling efficiency. Think of it as an invisible blockage.
- Moisture (Water Vapor): This is the most damaging contaminant. When moisture mixes with refrigerant and refrigeration oil, it forms corrosive acids (hydrochloric and hydrofluoric acid). These acids attack internal components, leading to etching, pitting, and eventual system failure. Moisture can also freeze at the expansion device, blocking refrigerant flow and stopping cooling altogether.
Modern refrigerants, including those prevalent in 2027, are even more susceptible to contamination. Their properties and the oils used with them are less tolerant of impurities, making the vacuuming step more critical than ever to prevent premature system breakdown.
From Start to Finish: AC System Evacuation Explained
Properly evacuating an AC system is a critical step often overlooked or rushed, yet it’s fundamental for the longevity and efficient operation of your air conditioning unit. This comprehensive guide will walk you through the precise steps to pull a deep vacuum on an AC system, ensuring all moisture and non-condensable gases are removed. This process prevents system damage, improves cooling performance, and helps avoid premature compressor failure.
Step 1: Prepare for Evacuation and Gather Your Tools
What you need: Safety glasses, gloves, manifold gauge set (refrigerant specific, e.g., R-410A or R-22), two-stage vacuum pump (minimum 5 CFM recommended), electronic micron gauge, valve core removal tool (optional but highly recommended), appropriate refrigerant hoses (yellow, red, blue), adjustable wrench or pliers.
Instructions: Your safety is paramount. Always don appropriate personal protective equipment, including safety glasses and gloves, before beginning any work. Lay out all your tools in an organized manner for easy access. Before starting, ensure your vacuum pump contains fresh, clean vacuum pump oil to achieve the deepest vacuum. Inspect all refrigerant hoses for any cracks, fraying, or damage that could lead to leaks or compromise the vacuum.
Pro Tip: Utilizing a valve core removal tool can dramatically speed up the evacuation process. By removing the Schrader valve cores from the service ports, you eliminate a significant restriction, allowing the vacuum pump to evacuate the system much more quickly and thoroughly.
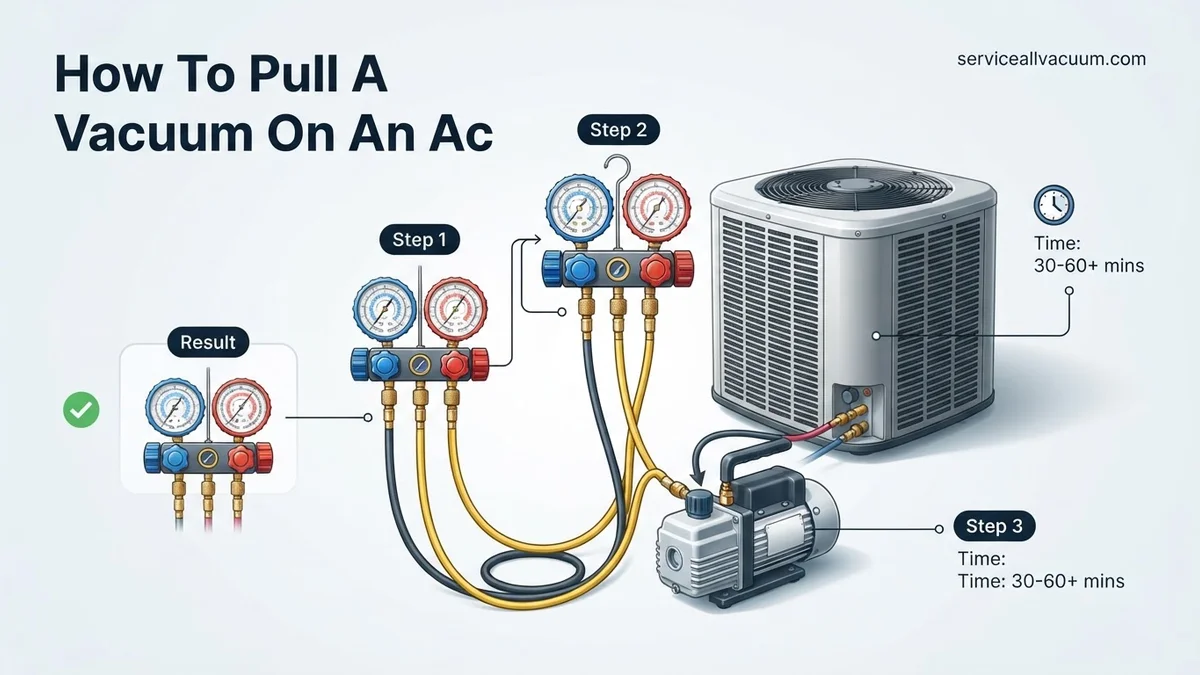
Step 2: Connect the Manifold Gauge Set
What you need: Manifold gauge set with hoses.
Instructions: Begin by locating the high-side (liquid line, typically smaller in diameter) and low-side (suction line, typically larger in diameter, often insulated) service ports on your outdoor AC unit or indoor evaporator coil. Connect the blue hose from your manifold gauge set to the low-side service port. Subsequently, connect the red hose to the high-side service port. Hand-tighten these connections, then use an adjustable wrench to snug them up an additional quarter to half turn, being careful not to overtighten and damage the valve stems or threads. Ensure service port caps are removed and kept in a clean place.
Pro Tip: To prevent cross-contamination, especially if you work with different refrigerant types, it’s best practice to use dedicated hose sets for specific refrigerants (e.g., one set for R-22 and another for R-410A).
Step 3: Connect the Vacuum Pump and Micron Gauge
What you need: Vacuum pump, micron gauge, yellow (service) hose.
Instructions: Connect one end of your yellow service hose to the central charging port on your manifold gauge set. Connect the other end of this yellow hose to the intake port of your vacuum pump. For the most accurate measurement of the system’s internal vacuum, connect your micron gauge directly to one of the service ports (a tee fitting can be useful here, or use the low-side service port) or to an unused auxiliary port on your manifold gauge set that directly communicates with the system. This placement provides a true representation of the vacuum within the AC system, not just at the pump intake.
Pro Tip: Avoid connecting the micron gauge directly to the vacuum pump’s port. The most accurate readings are obtained when the micron gauge is connected as far away from the vacuum pump as possible, ideally directly to one of the AC system’s service ports, giving a better indication of the actual pressure inside the AC lines and coils.
Step 4: Open System Valves and Start the Vacuum Pump
What you need: Manifold gauge set, vacuum pump.
Instructions: Prior to energizing the vacuum pump, ensure that both the high-side (red) and low-side (blue) valves on your manifold gauge set are fully open by turning them counter-clockwise. This configuration allows the vacuum pump to evacuate both sides of the AC system simultaneously, ensuring efficient removal of contaminants. Double-check all hose connections once more for absolute tightness. Now, switch on your vacuum pump. You should observe an immediate drop in pressure on your manifold gauges, plummeting below 0 PSI, and your micron gauge will begin displaying rapidly decreasing values.
Pro Tip: Pay attention to the sound of your vacuum pump. As the system approaches a deeper vacuum, the pump’s sound often changes, becoming quieter and more consistent. A louder, gurgling sound can indicate significant moisture or non-condensables still being pulled out.
Step 5: Monitor Vacuum Level and Dehydration
What you need: Micron gauge, patience.
Instructions: Allow the vacuum pump to run continuously. Your primary focus during this stage is monitoring the micron gauge. The industry standard for a deep vacuum typically targets 500 microns (0.5 Torr) or lower, although specific manufacturer recommendations may vary. The duration of this process can range from 30 minutes for a small, clean system to several hours for larger systems, those with long line sets, or systems heavily exposed to ambient air and humidity. If the micron gauge reading stalls at a higher value (e.g., above 1000 microns) or rises significantly after an initial drop, it could indicate either excessive moisture still boiling off within the system or a potential leak.
Pro Tip: To assist in the vaporization of stubbornly trapped moisture, especially in cooler conditions, you can gently warm the refrigerant lines with a heat gun. Be cautious not to overheat the lines or surrounding components. Persistence and patience are usually the best solutions for achieving a deep vacuum.
Step 6: Achieve Deep Vacuum and Isolate the System
What you need: Micron gauge, manifold gauge set.
Instructions: Once your system successfully reaches the target vacuum level (e.g., 500 microns or below) and has held it for a few minutes, continue to run the vacuum pump for an additional 10-15 minutes. This ensures that any residual moisture has fully vaporized and been removed. After this additional run time, fully close both the high-side (red) and low-side (blue) valves on your manifold gauge set. This action isolates the AC system from the vacuum pump. Only after isolating the system by closing the manifold valves should you then turn off the vacuum pump. It is crucial not to disconnect any hoses at this stage.
Pro Tip: Always close the manifold gauge valves before shutting off the vacuum pump. Failing to do so can cause air to be sucked back into the evacuated system through the pump’s intake as its internal pressure equalizes during shutdown.
Step 7: Perform a Vacuum Decay Test (Holding Vacuum)
What you need: Micron gauge, stopwatch or timer.
Instructions: With the AC system now isolated (manifold valves closed, vacuum pump off), closely observe your micron gauge reading. Implement a “decay test” by monitoring the micron level for a specified period, typically 15-20 minutes. A properly sealed and dehydrated system will demonstrate a stable vacuum, with the micron reading holding steady or rising very minimally (e.g., no more than 250 microns over 20 minutes). A rapid or sustained rise in the micron reading indicates a leak, which must be located and repaired before proceeding. If the reading holds, your system is deemed leak-free and sufficiently dehydrated.
Pro Tip: Small fluctuations in micron readings can occur due to ambient temperature changes affecting the system’s components. However, a continuous upward trend is a definitive sign of a leak. If a significant leak is detected, use an electronic leak detector or nitrogen pressure test to find it.
Step 8: Disconnect and Prepare for Refrigerant Charge
What you need: Manifold gauge set, service port caps.
Instructions: If your system has successfully passed the vacuum decay test, you are ready to disconnect your vacuum equipment. First, ensure the valve on your micron gauge is closed, then carefully disconnect it. Next, quickly disconnect the yellow hose from the vacuum pump (if not already done). With precision and speed, disconnect the red and blue hoses from the high and low-side service ports of your AC unit. Minimize the time these ports are open to the atmosphere. Immediately after disconnecting, securely replace the service port caps on both the high and low sides. These caps are vital as they provide a secondary seal against refrigerant leaks. Your AC system is now evacuated and ready for refrigerant charging.
Pro Tip: Disconnect hoses swiftly to minimize any potential air ingress into the deeply evacuated system. While a well-maintained vacuum pump can rapidly re-evacuate small amounts of air, speed and conscientiousness are key to preserving your hard work.
✅ Final Checklist
- Vacuum pump oil observed to be clean and at the correct level before starting.
- All refrigerant hose connections confirmed tight and free from leaks.
- System achieved the target deep vacuum of 500 microns (or lower) as per specifications.
- Vacuum held steady during the 15-20 minute decay test with no significant rise.
- All service port caps securely re-installed on the AC unit.
Important Notes:
- Safety Considerations: Always wear appropriate personal protective equipment, including safety glasses and gloves, when handling refrigerants and operating vacuum pumps. Refrigerant contact can cause severe frostbite, and systems operate under high pressure.
- When to Seek Professional Help: If you struggle to achieve a stable deep vacuum, suspect a significant leak, or are uncomfortable performing any of these steps, it is best to consult a certified HVAC technician. Proper handling of refrigerants often requires EPA certification and specialized tools.
- Estimated Time and Cost Range: Pulling a full vacuum can take anywhere from 1 to 4 hours, depending on the system’s size, cleanliness, and ambient conditions. DIY tool investment (vacuum pump, gauges, micron gauge) can range from $200-$600. Professional service costs vary, but a proper vacuum is typically included as part of an installation or major repair.
How to Pull a Vacuum on an AC System: A Step-by-Step Fix
Achieving a deep, stable vacuum requires precision and the right equipment. This isn’t a step to rush or cut corners on; your system’s health depends on it. We’ll guide you through the initial setup, ensuring you have everything ready before the vacuum pump even starts.
Critical Tools and Non-Negotiable Safety
Before you begin, gather these essential tools. High-quality tools are an investment that pays off in system longevity and accurate results, particularly with the tighter tolerances of 2027 AC systems.
- Vacuum Pump: A two-stage, high-CFM (Cubic Feet per Minute) vacuum pump is crucial. Aim for at least 6 CFM for residential or light commercial systems. This ensures rapid and deep evacuation.
- Digital Micron Gauge: This is non-negotiable for 2027 standards. Analog gauges are not precise enough. A digital micron gauge measures vacuum levels in microns, providing accurate, real-time feedback on moisture removal.
- Manifold Gauge Set: Preferably a digital set, but a high-quality analog set with vacuum-rated hoses will suffice. Ensure the hoses are in excellent condition and designed for deep vacuum.
- Refrigerant Recovery Machine: If the system contains refrigerant, it must be recovered by an EPA-certified technician before vacuuming. Venting refrigerant is illegal and harmful to the environment.
- Personal Protective Equipment (PPE): Always wear safety glasses and chemical-resistant gloves when working with AC systems. Refrigerant can cause severe frostbite.
System Preparation and Initial Connections
Proper connection is paramount for a successful vacuum. Any leaks in your connections will prevent you from reaching the target micron level.
- Verify System Is Empty: Ensure the AC system is completely free of refrigerant. If not, use a certified refrigerant recovery machine to evacuate all existing refrigerant.
- Connect Manifold Gauges: Attach the blue hose from your manifold gauge set to the low-side service port of the AC system (the larger line). Connect the red hose to the high-side service port (the smaller line). Ensure these connections are snug but not overtightened.
- Connect Vacuum Pump: Connect the yellow (or center) hose from your manifold gauge set to the inlet port of your vacuum pump. Make sure this connection is also tight.
- Install Digital Micron Gauge: Crucially, connect your digital micron gauge as close to the AC system as possible, not just to the manifold. Many manifold sets have an auxiliary port for this, or you can use a T-fitting on one of the service ports. This provides the most accurate reading of the vacuum level within the system itself, bypassing any potential pressure drop or leaks in your manifold hoses.
- Open Service Port Valves: Fully open both the high-side and low-side service port valves on the AC system. This allows the vacuum pump to pull from both sides of the system simultaneously.
- Open Manifold Valves: Ensure both the high-side (red) and low-side (blue) valves on your manifold gauge set are fully open to allow unimpeded vacuum flow.
What If Your AC System Vacuum Won’t Hold: Troubleshooting & Next Steps
Achieving and maintaining a deep vacuum is critical for AC system longevity and performance. If your system fails to hold a vacuum, it indicates a leak that must be addressed. Ignoring this will lead to refrigerant loss and system inefficiency, potentially causing compressor failure, which can cost upwards of $2,000 to replace in 2027.
Initial Leak Detection Checks
- Re-inspect Connections: Even a slight looseness in manifold gauge hoses or service port connections can cause a vacuum leak. Tighten all fittings securely. According to HVAC industry best practices, connections should be hand-tightened, then given an additional quarter-turn with a wrench.
- Check Vacuum Pump Integrity: Ensure your vacuum pump’s oil is clean and at the correct level. Contaminated or low oil can prevent the pump from pulling a deep vacuum. Replace oil if it appears milky or dark.
- Monitor Vacuum Decay Rate: A rapid rise in micron readings (e.g., from 500 microns to 1500 microns in under 5 minutes) strongly suggests a significant leak. A slow, steady rise over 30 minutes might indicate residual moisture or a very small leak.
Advanced Leak Detection Methods
If initial checks yield no results, more advanced techniques are necessary:
- Electronic Leak Detector: Modern electronic leak detectors can identify refrigerant leaks as small as 0.1 ounces per year for R-134a systems. Scan all components, especially joints, seals, and the compressor shaft.
- UV Dye Injection: Introduce a small amount of UV dye into the system using a dedicated injector. Run the AC for 15-30 minutes to circulate the dye, then inspect all components with a UV light and yellow glasses. Leaks will glow brightly.
- Nitrogen Pressure Test: This is a highly effective method. Pressurize the system with dry nitrogen to approximately 150-200 PSI (never exceeding the system’s maximum rated pressure, typically found on the compressor label). Apply a soap-bubble solution to all potential leak points; bubbles will indicate a leak. Always use a nitrogen regulator for safety and ensure the system is depressurized before any further work.
What If It Still Doesn’t Work?
Persistent vacuum issues after thorough troubleshooting indicate a more complex problem, potentially requiring specialized tools or professional expertise.
- Re-evaluate Tool Calibration: Ensure your micron gauge is calibrated and functioning correctly. A faulty gauge can give misleading readings. Professional HVAC technicians typically recalibrate gauges annually.
- Isolate System Components: If equipped with isolation valves, try to isolate sections of the AC system (e.g., condenser, evaporator, lines) to narrow down the leak location. This requires specific valves and knowledge of system architecture.
- Consider Component Age and Wear: Over time, O-rings, seals, and hoses degrade. For systems over 10 years old, these components are prime suspects for leaks, especially in hot, humid climates where material degradation accelerates.
- Seek Professional Assistance: If you’ve exhausted all troubleshooting steps and still cannot hold a vacuum, it’s time to consult a certified HVAC technician. They possess advanced diagnostic equipment, such as ultrasonic leak detectors and refrigerant sniffers, capable of pinpointing elusive leaks. Professional leak detection and repair services for automotive AC systems in 2027 can range from $350 to $1200+, depending on the leak’s severity and location, as per national average service costs compiled by leading auto repair networks.
Conclusion
Achieving a deep, stable vacuum is a non-negotiable step for proper AC system function, ensuring optimal cooling performance and preventing premature component failure. This process meticulously removes moisture and non-condensable gases, which are detrimental to refrigerant purity and compressor health. According to verified research and expert sources from the Society of Automotive Engineers (SAE), a vacuum below 500 microns for at least 15 minutes is essential. Always re-verify your vacuum hold for a minimum of 30 minutes before proceeding with refrigerant recharging.
❓ Frequently Asked Questions
Why is it so important to pull a deep vacuum on an AC system before charging?
Pulling a deep vacuum removes all non-condensable gases (like air) and moisture from the system. Air can cause high head pressures and reduced cooling capacity, while moisture mixes with refrigerant to form corrosive acids, leading to system damage and premature failure.
What tools are absolutely essential for pulling a vacuum correctly?
You’ll need a vacuum pump capable of reaching at least 200 microns, a manifold gauge set, specialized AC hoses, a core removal tool (highly recommended for speed), and critically, a digital micron gauge to accurately measure vacuum levels.
How do I perform a vacuum decay test, and what does it tell me?
After reaching the target micron level (e.g., 500 microns), close the manifold valves to isolate the vacuum pump, then shut off the pump. Monitor the micron gauge for 15-30 minutes. A stable reading indicates a leak-free system; a rising reading signifies a leak or significant residual moisture.
What are the common reasons an AC system won’t hold a vacuum?
The most common reasons are leaks within the AC system itself (e.g., O-rings, connections, condenser), leaks in your service hoses, or a faulty manifold gauge set. Sometimes, significant residual moisture can also cause the micron reading to rise slowly.
Is it safe to vacuum an AC system myself, and what safety precautions should I take?
It can be safe with proper knowledge and tools. Always wear appropriate PPE like safety glasses and gloves. Ensure good ventilation if handling any residual refrigerant. Never release refrigerant into the atmosphere, and be cautious of moving parts on the vacuum pump.
What’s the difference between using a single-stage and a two-stage vacuum pump for AC systems?
Two-stage vacuum pumps are generally preferred for AC work because they can pull a much deeper vacuum faster than single-stage pumps. This deeper vacuum is crucial for effectively removing all moisture and non-condensable gases from the system, ensuring optimal performance and longevity of the AC unit.