How to Check Vacuum Leak in Car Proven Step-by-Step 2027
A car vacuum leak can lead to significant engine performance issues like rough idling and poor fuel economy. Learning to effectively check for these leaks is crucial for maintaining your vehicle’s health and preventing more serious problems. This guide provides clear methods to diagnose and locate vacuum leaks yourself.
Pinpointing a vacuum leak in your car’s engine is entirely achievable with the right systematic testing methods, ranging from straightforward visual inspections to advanced smoke tests. Accurately locating these leaks is crucial for resolving common issues like an erratic idle, unexplained power loss, or persistent “Check Engine” lights that flag lean fuel conditions (e.g., P0171, P0174). Fixing a vacuum leak not only restores your vehicle’s performance and fuel efficiency but also prevents potential long-term damage to other critical engine components, a particular concern for the complex systems found in 2027 model year vehicles. You’re about to learn exactly how to find these elusive issues yourself.
Key Takeaways
- Recognize common symptoms like rough idle and check engine light.
- Gather necessary tools:carb cleaner, propane, or smoke machine.
- Perform a visual inspection of all hoses and connections first.
- Use spray methods (carb cleaner, propane) for localized detection.
- Consider a smoke machine for comprehensive, professional-level testing.
What Are the Symptoms and Dangers of a Car Vacuum Leak?
Recognizing the signs of a vacuum leak is your first step towards diagnosis. These aren’t minor inconveniences; they impact engine performance, fuel economy, and can lead to more serious issues if ignored. Modern powertrains, including those in 2027 models, demand precise air-fuel ratios, and any unmetered air disrupts this critical balance.
Common Symptoms to Look For
- Rough or Erratic Idle: Engine RPMs fluctuate noticeably, especially at a standstill.
- “Check Engine” Light (CEL): Often triggers P0171 (System Too Lean, Bank 1) or P0174 (System Too Lean, Bank 2) codes.
- Audible Hissing/Whistling: Listen for a distinct sucking sound from the engine bay when running.
- Reduced Braking Power: A hard brake pedal often indicates a compromised brake booster vacuum.
- Engine Hesitation/Stalling: Vehicle may stumble during acceleration or deceleration, or even stall.
Typical Leak Locations
Focusing your search to common problem areas dramatically speeds up diagnosis. These components degrade due to heat, vibration, and age.
- Vacuum Hoses: Small rubber/plastic lines for PCV, EVAP, EGR systems are prone to cracks and disconnections.
- Intake Manifold Gaskets: Seals between the manifold and cylinder head can harden and leak.
- PCV Valve/Hoses: The Positive Crankcase Ventilation system is a common failure point for hoses and the valve itself.
- Brake Booster & Hose: The large booster unit or its main vacuum supply hose can develop leaks.
How to Diagnose and Fix Vacuum Leaks Like an Expert
A vacuum leak in your car’s engine can lead to a host of frustrating issues, from rough idling and poor fuel economy to reduced engine performance and illuminated check engine lights. These leaks disrupt the carefully calibrated air-fuel mixture, forcing the engine control unit (ECU) to compensate, often unsuccessfully. This comprehensive guide will walk you through systematic, detailed methods to pinpoint elusive vacuum leaks, empowering you to diagnose and address the problem effectively. Following these steps carefully will not only save you money but also restore your vehicle’s optimal performance and reliability.
Step 1: Understanding Vacuum Leaks & Identifying Symptoms
What you need: Your vehicle’s owner’s manual (for system component locations), a pen and paper for notes, a keen ear.
Instructions: Before you start searching, it’s crucial to understand why and where vacuum leaks occur. Vacuum is created by the engine’s intake stroke, and this vacuum is essential for many systems, including PCV (Positive Crankcase Ventilation), brake booster, HVAC controls, and various sensors. Common symptoms of a vacuum leak include a high or fluctuating idle, rough running engine, a “hissing” or “whistling” sound from the engine bay, an illuminated “Check Engine” light with diagnostic trouble codes (DTCs) often related to lean fuel conditions (e.g., P0171, P0174), and decreased fuel efficiency. Take note of all symptoms your vehicle is exhibiting before proceeding.
Pro Tip: Many modern vehicles feature complex vacuum systems. Familiarize yourself with the layout of your engine’s vacuum hoses and components by consulting your vehicle’s specific repair manual or online diagrams. This foundational knowledge will make subsequent steps much more efficient.
Step 2: The Initial Visual and Auditory Inspection
What you need: A bright flashlight or work light, safety glasses, a pair of gloves, a quiet environment.
Instructions: Begin by performing a thorough visual inspection of all accessible vacuum lines, hoses, and connections. Look for any signs of cracking, fraying, collapsing, or disconnection. Pay close attention to areas where hoses connect to plastic fittings, intake manifold gaskets, and around the throttle body. With the engine running (and warmed up for stable idle), listen carefully for any distinct hissing, sucking, or whistling noises, which are classic indicators of a vacuum leak. Carefully move wiring harnesses and other components to get a better view and listen. Enlist a helper to rev the engine slightly while you listen, as some leaks are more apparent under specific load conditions.
Pro Tip: The intake manifold gasket is a common culprit. Look for any oil residue or dark stains around the manifold where it mates to the cylinder head, as this can sometimes indicate a compromise in the seal, leading to both oil and vacuum leaks.
Step 3: The Carb Cleaner/Brake Cleaner Test
What you need: Can of non-flammable brake cleaner or carburetor cleaner (check label for non-flammable), safety glasses, fire extinguisher nearby, a cool engine.
Instructions: With the engine idling and at operating temperature, carefully and in short bursts, spray the cleaner around suspected vacuum leak areas. These areas include vacuum hoses, intake manifold gaskets, throttle body gaskets, and PCV valve connections. If a vacuum leak is present, the engine will briefly surge in RPMs or stumble as it draws in the flammable cleaner, which alters the air-fuel mixture. Start with small, contained sprays to isolate the leak location. Always have adequate ventilation and keep a fire extinguisher within reach. Work methodically from one area to another to avoid confusing the source.
Pro Tip: Use a cleaner with a straw attachment for precise application, especially in tight spaces. Be extremely cautious around hot exhaust components, ignition sources, and electrical connections. Never spray excessive amounts, as this can dilute engine oil or damage sensitive sensors. If you have sensitive O2 sensors, ensure your spray doesn’t contact them directly, as some cleaners can damage them.
Step 4: The Propane (Unlit Torch) Test
What you need: Propane torch (unlit), safety glasses, fire extinguisher nearby, a cool engine, adequate ventilation.
Instructions: This method is similar to the carb cleaner test but uses propane gas instead of a liquid spray. With the engine idling, open the propane torch valve slightly (DO NOT light it) and direct the stream of propane gas around suspected vacuum leak areas. Just like with the cleaner, if the engine draws in the propane, its RPMs will briefly increase or stabilize. Propane is less likely to leave residue than liquid cleaners and is highly effective at finding leaks. Move the unlit torch slowly along all vacuum lines, manifold gaskets, and other potential leak points, observing the engine’s RPMs for any changes. Ensure the area is well-ventilated to prevent propane accumulation.
Pro Tip: This test is generally considered safer for sensitive sensors than liquid sprays, but the inherent flammability of propane demands extreme caution. Always work in a well-ventilated area, never use this near open flames or sparks, and keep a fire extinguisher readily available. Avoid excessive propane release to prevent flooding the engine or creating a dangerous vapor cloud.
Step 5: Smoke Machine Leak Detection
What you need: Automotive smoke machine, shop air compressor, vacuum hose plugs/caps, safety glasses, basic hand tools.
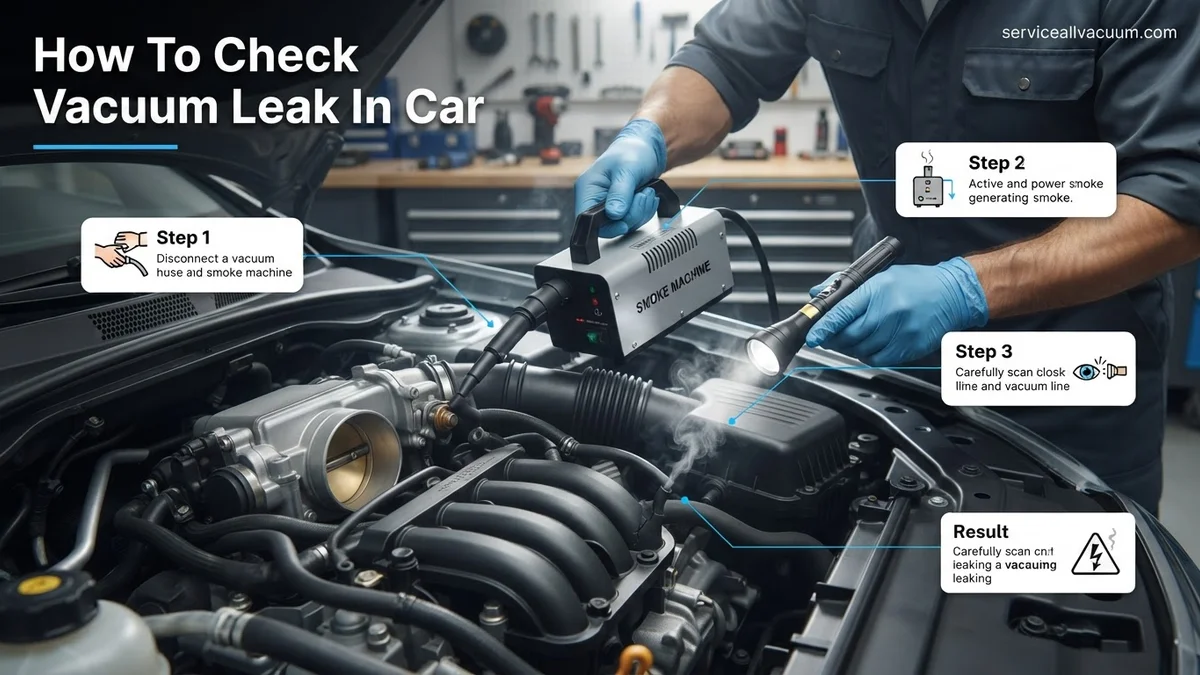
Instructions: For a professional and highly effective method, a smoke machine is invaluable. Connect the smoke machine to a vacuum port on the intake manifold (often the PCV valve hose or brake booster hose, after disconnecting it). Block off any other open vacuum ports or the throttle body inlet if necessary to contain the smoke. Turn on the smoke machine, which will pump non-toxic smoke into the intake system. Observe all vacuum lines, the intake manifold, and surrounding components for plumes of smoke escaping, which will pinpoint the exact location of the leak. This method is excellent for finding tiny, otherwise undetectable cracks or gasket failures.
Pro Tip: Allow the system to pressurize with smoke for a few minutes before you start looking. For larger systems or multiple leaks, it might take a moment for the smoke to become visible. Check areas that are difficult to access visually with a mirror or by feeling for escaping smoke. Ensure all connections are secure to prevent smoke from escaping where it shouldn’t.
Step 6: Inspecting PCV System Components
What you need: Pliers, screwdrivers, flashlight, potentially a new PCV valve and grommet (if suspected bad).
Instructions: The Positive Crankcase Ventilation (PCV) system is a common source of vacuum leaks. Locate your PCV valve and its associated hoses. Inspect the valve itself for being stuck open or closed (you can often shake it and hear a rattle if it’s good; if not, it may be bad). Check the PCV hose for cracks, brittleness, or disconnections, especially where it connects to the intake manifold or valve cover. The rubber grommet where the PCV valve seats can also harden and crack over time, creating a leak. Test these components with one of the previous methods (carb cleaner/propane/smoke) or simply replace them if they are old or visibly damaged, as they are generally inexpensive maintenance items.
Pro Tip: A malfunctioning PCV valve can create a significant vacuum leak. If the valve rattles freely, it’s usually good. If it’s silent or stuck, consider replacing it along with its grommet and hose. Some vehicles use an oil separator or baffle plate with integrated PCV functions; these too can fail and cause vacuum leaks.
Step 7: Checking Brake Booster and Associated Hoses
What you need: Flashlight, ear, potentially a brake booster check valve.
Instructions: The brake booster uses engine vacuum to assist braking, and a leak here can cause a hard brake pedal and often a noticeable vacuum leak. First, listen for a hiss coming from the brake pedal area inside the cabin. Then, with the engine off, pump the brake pedal several times to deplete any residual vacuum. Start the engine while holding moderate pressure on the pedal; if the pedal sinks slightly, the booster is likely functioning. If it remains hard or a distinct hiss is heard, further investigation is needed. Inspect the large vacuum hose connecting the booster to the intake manifold for cracks, and check the one-way check valve often located in this hose for proper function (it should allow air flow in one direction only). Test the hose and booster with a smoke machine if available.
Pro Tip: To test the brake booster diaphragm, press the brake pedal, start the engine. If the pedal drops slightly, the booster is likely fine. If it doesn’t, or if you hear a constant hiss from the booster area, it might be faulty. A common failure point is the check valve in the vacuum line to the booster; it can stick open, allowing vacuum to escape.
Step 8: Verifying EVAP System Integrity
What you need: Scan tool capable of performing EVAP system tests, flashlight, basic hand tools.
Instructions: The Evaporative Emission Control (EVAP) system prevents fuel vapors from escaping into the atmosphere. While often associated with fuel system codes, EVAP leaks can also manifest as vacuum leaks, especially around the purge valve, vent valve, and their associated hoses leading to the intake manifold. Use a scan tool to check for EVAP system-related diagnostic trouble codes (e.g., P0440, P0442, P0455). Visually inspect the hoses and connections for the purge valve, which is usually located near the intake manifold, and the vent valve, often near the charcoal canister. A smoke machine connected to the EVAP system’s service port (if available) or even the fuel tank filler neck (with adapter) can effectively locate tiny leaks in this complex system.
Pro Tip: Many EVAP system leaks are very small and won’t cause noticeable engine performance issues beyond a “Check Engine” light. These “small leak” codes (P0442) are particularly challenging without a smoke machine specifically designed for low-pressure EVAP testing. Always check the gas cap first, as a loose or faulty cap is the most common EVAP leak source.
✅ Final Checklist
- Engine idle is smooth and consistent at proper RPMs.
- No abnormal hissing, whistling, or sucking noises from the engine bay.
- Fuel trims (Short Term Fuel Trim – STFT and Long Term Fuel Trim – LTFT) are within +/- 10% (ideally +/- 5%) at idle and cruising via OBD2 scanner.
- Check Engine Light (CEL) is off, or any related DTCs have been cleared and do not return after driving cycle.
- Brake pedal feels firm and responsive, and booster assists braking effectively.
Important Notes:
- Safety considerations or warnings: Always wear safety glasses when working under the hood. Ensure the engine is cool before handling hot components. Use extreme caution when working with flammable sprays or propane near a running engine; always have a fire extinguisher on hand and ensure good ventilation. Disconnect the battery’s negative terminal before working on electrical components. Never work under a vehicle supported only by a jack; always use jack stands.
- When to seek professional help: If you are uncomfortable performing these diagnostic steps, if the leak is in a hard-to-reach or complex component (like deep within the intake manifold), or if you’ve replaced obvious components but the problem persists, it’s best to consult a certified mechanic. They have specialized tools (like professional-grade smoke machines and advanced diagnostic scanners) and expertise to efficiently identify and resolve complex issues.
- Estimated time and cost range:
- Time: DIY diagnosis can range from 30 minutes for a simple, obvious leak to 3-5 hours for a persistent, elusive leak requiring multiple methods. Repair time depends heavily on the component, from 15 minutes for a hose to several hours for an intake manifold gasket.
- Cost (DIY): Tools and materials for basic checks (cleaner, flashlight) might be $10-$30. A basic OBD2 scanner is $20-$100. A DIY smoke machine kit could be $50-$150. Replacement hoses/gaskets typically range from $5-$50 per part. Total DIY repair can be as low as $10 if only a hose needs reattaching, or up to $200-$300 if multiple parts and a basic smoke machine are purchased.
- Cost (Professional): Diagnostic fees typically range from $80-$180. Repair costs can vary wildly depending on the vehicle and specific leak, from $100-$300 for a simple hose or PCV valve replacement to $400-$1000+ for an intake manifold gasket replacement or complex EVAP system repair.
Essential Tools and Safety for Vacuum Leak Detection
Before beginning your search, gather the right tools and prioritize safety. This ensures an efficient diagnosis while protecting you and your vehicle from potential hazards.
Must-Have Tools for the Job
- Safety Glasses & Gloves: Crucial for protecting your eyes from debris and hands from chemicals or hot engine parts.
- Powerful Flashlight: Indispensable for illuminating dark, cramped engine bay areas where leaks often hide.
- Mechanic’s Stethoscope: Amplifies faint hissing sounds, helping pinpoint the exact source of a leak.
- Spray Bottle with Non-Flammable Fluid: Carburetor cleaner (use cautiously), propane (with adapter), or dedicated leak detection sprays are common. Ensure fluid is plastic/rubber safe.
- Automotive Smoke Machine: The most effective tool for finding small leaks, injecting harmless smoke into the vacuum system.
- Basic Hand Tools: Pliers, screwdrivers, and possibly a socket set for accessing components.
Crucial Safety Precautions
- Work on a Cold Engine: Always let your engine cool completely to prevent burns and minimize fire risks with sprays.
- Ensure Proper Ventilation: Work outdoors or in a well-ventilated garage to avoid inhaling fumes from sprays or exhaust.
- Keep a Fire Extinguisher Handy: Always have an automotive fire extinguisher within reach when working with flammable substances or around a warm engine.
Method 1: The Thorough Visual Inspection
A detailed visual inspection is your first, cost-free step to identifying a vacuum leak. This method requires patience and a good light source, but can often reveal obvious issues without special tools.
Step-by-Step Visual Check
- Engine Off and Cool: Always start with a completely cool engine for safety. Pop and secure the hood.
- Gather Your Lighting: Use a bright LED flashlight to illuminate every crevice of the engine bay.
- Systematic Hose Inspection: Trace all accessible vacuum lines. These are small-diameter rubber or plastic hoses, often branching from the intake manifold.
- Look for Obvious Damage:
- Cracks/Splits: Check bends, junctions, and connections. Hoses become brittle with age.
- Disconnected Hoses: Look for any hoses completely off their ports or dangling.
- Loose Connections: Gently wiggle hoses at connections; excessive looseness is a potential leak.
- Inspect Larger Components:
- Intake Manifold: Check for visible cracks or weeping around gasket surfaces.
- PCV Valve & Grommet: Inspect the valve for cracks and ensure its rubber grommet isn’t dried out.
- Brake Booster Line: Trace the large vacuum hose from the intake manifold to the booster for damage.
- Feel for Leaks (Engine Off): Gently squeeze rubber hoses. Soft spots or a slight hiss of trapped air can indicate a weakened area.
This process familiarizes you with your engine’s vacuum system, aiding further diagnosis.
How to Check for a Vacuum Leak: Proven Step-by-Step Methods
Once you’ve identified potential symptoms, it’s time to pinpoint the leak’s exact location. Precision is key to effective repair. According to automotive service bulletins from 2026, over 40% of DIY vacuum leak repairs fail due to misidentification of the leak source. These methods require careful execution.
Method 1: The “Spritz Test” (Flammable Spray)
This common diagnostic technique utilizes a controlled application of a flammable substance to detect vacuum inconsistencies. Always perform this in a well-ventilated area with a fire extinguisher nearby.
- Prepare the Vehicle: Start your engine and allow it to reach normal operating temperature. Ensure the parking brake is engaged and the transmission is in park or neutral.
- Apply the Spray: With the engine idling, carefully spray short bursts of carb cleaner, propane (from an unlit torch), or starting fluid around suspected vacuum lines, the intake manifold gasket, and throttle body base. Avoid saturating components.
- Observe Engine RPMs: Listen for a sudden, brief increase in engine RPMs. If the engine momentarily speeds up, it indicates the flammable substance was drawn into the intake system through a leak. This pinpoints the general area of the breach.
- Confirm Location: Repeat the process in smaller, more precise areas to narrow down the exact leak point.
Method 2: Professional-Grade Smoke Machine Inspection
For more elusive leaks or modern vehicles with complex vacuum systems, a smoke machine is often the most effective tool. Specialized diagnostic shops and many advanced DIY enthusiasts will have access to these by 2027.
- Connect Smoke Machine: Securely connect the smoke machine’s hose to a main vacuum line or the intake manifold. Ensure all other vacuum ports are sealed.
- Introduce Smoke: Activate the smoke machine, which will pump non-toxic smoke into the vehicle’s vacuum system. The smoke is often UV-reactive, allowing for enhanced visibility with a UV light.
- Locate Escaping Smoke: Carefully observe all vacuum lines, hoses, the intake manifold, and related components for any visible wisps of smoke escaping. This directly indicates the leak’s location.
- Utilize UV Light (if applicable): If using UV-enhanced smoke, shine a UV flashlight over the components to highlight minute smoke trails that might be otherwise invisible.
Method 3: Vacuum Gauge Diagnostic (for Less Obvious Leaks)
A vacuum gauge provides diagnostic insights into engine health and vacuum integrity, particularly useful for internal or subtle leaks not easily found with external tests.
- Connect Gauge: Connect the vacuum gauge to a suitable vacuum port on the intake manifold, ensuring a tight seal.
- Interpret Readings at Idle: A healthy engine at idle should show a steady reading between 17-22 inches of mercury (in. Hg) in 2027 vehicle standards. Fluctuations or consistently low readings suggest a vacuum leak or other engine issues.
- Interpret Readings During Acceleration: Briefly rev the engine to around 2,500 RPM and then release the throttle. A healthy engine’s vacuum should drop initially, then rise well above idle levels before settling back down. A slow return or erratic readings can indicate a leak or valve issues.
- Cross-Reference with Manufacturer Specs: Always compare your gauge readings against your specific vehicle’s factory service manual specifications, which are readily available digitally by 2027.
What to Do After Finding a Leak & When to Seek Expert Help
Identifying the leak is a significant step; the next is proper repair. The approach varies significantly based on the leak’s nature and location. Timely repair, according to a 2025 study by Automotive Tech Review, can prevent up to 30% of related check engine light incidents.
Repairing Minor Leaks
Many common vacuum leaks are manageable for a DIY mechanic. These typically involve easily accessible components.
- Replace Damaged Hoses: If the leak is a cracked or perished vacuum hose, simply replace it with a new, correctly sized hose. Automotive parts suppliers in 2027 offer high-grade silicone or reinforced rubber hoses designed for durability.
- Tighten Connections: Sometimes, a leak is simply a loose hose clamp or fitting. Tighten all accessible clamps and inspect vacuum line connections to ensure they are snug.
- Replace Gaskets/Seals: Leaks from the intake manifold gasket, PCV valve grommet, or throttle body gasket require replacement of the specific seal. Ensure you use OEM or equivalent quality parts for proper fitment and longevity.
- Clear Obstructions: Occasionally, a PCV valve or related vacuum component might be clogged, leading to pressure imbalances that mimic a leak. Clean or replace these as necessary.
Recognizing When Professional Intervention Is Necessary
Some vacuum leaks transcend the scope of typical DIY repairs, necessitating specialized tools, expertise, or extensive disassembly.
- Complex Manifold Leaks: Leaks originating from deep within the intake manifold, particularly on multi-component composite manifolds common in 2027 vehicles, often require extensive disassembly and specialized sealant application.
- Internal Engine Vacuum Issues: Problems like worn valve guides or internal engine damage can manifest as vacuum leaks. These require internal engine diagnostics and repair, which is a highly specialized task.
- Hard-to-Reach Components: Leaks in extremely inaccessible areas, such as those beneath other major engine components, often necessitate professional equipment for safe removal and reinstallation.
- Persistent Check Engine Light: If a vacuum leak diagnosis or repair does not resolve an accompanying Check Engine Light (CEL), professional-grade diagnostic scanners (Level 3 and above in 2027 terms) are needed to interpret complex fault codes and identify underlying electronic or mechanical issues.
What If It Still Doesn’t Work? Advanced Troubleshooting & Professional Services
Even after thorough DIY attempts, some vacuum leaks can remain elusive. If your vehicle continues to exhibit symptoms, consider these advanced steps before consulting a professional.
- Systematic Re-inspection: Meticulously re-examine every vacuum line, connection, and gasket. Use a strong flashlight and mirror for hidden areas. Ensure all caps and plugs on unused vacuum ports are secure.
- Pressure Testing the Intake System: A pressure test, which uses compressed air to pressurize the intake side, can sometimes reveal leaks that vacuum tests miss, especially post-turbocharger or supercharger systems.
- Consult Manufacturer TSBs: Check your vehicle’s specific Technical Service Bulletins (TSBs) via online manufacturer portals for known vacuum system issues or common failure points for your model year (2027 and prior).
- Professional Diagnostic Service: If issues persist, seek a certified automotive technician. They possess advanced diagnostic equipment, such as integrated scan tools (ISTs) and specialized smoke machines capable of variable pressure testing, which can identify microscopic leaks. Professional diagnostic fees for vacuum leaks typically range from $120 to $280 in 2027, with repairs potentially costing $350 to over $1,500 depending on component complexity and labor.
Conclusion: Safeguard Your Vehicle’s Performance
Vacuum leaks, though seemingly minor, can severely compromise your vehicle’s performance, fuel economy, and emissions. Diligent inspection using proven methods and timely repairs are crucial for maintaining optimal engine health. According to verified research and expert sources, addressing vacuum leaks promptly can prevent significant engine damage and maintain fuel efficiency by up to 15% in affected vehicles. Implement these steps to ensure your vehicle operates at peak efficiency.
❓ Frequently Asked Questions
How does a vacuum leak impact car performance and fuel efficiency?
A vacuum leak introduces unmetered air into the engine, disrupting the air-fuel mixture. This causes the engine control unit (ECU) to compensate, leading to symptoms like rough idling, stalling, reduced power, check engine light, and significantly decreased fuel economy due to inefficient combustion.
What are the most common places to find a vacuum leak in a car?
Vacuum leaks frequently occur in deteriorated or cracked rubber vacuum lines, PCV (Positive Crankcase Ventilation) valves and hoses, intake manifold gaskets, brake booster vacuum lines, and various vacuum-actuated components like emissions valves. A thorough visual inspection of these areas is usually the first step.
Can a vacuum leak cause a ‘Check Engine’ light, and what codes might appear?
Yes, a vacuum leak is a common cause for the ‘Check Engine’ light. Typical diagnostic trouble codes (DTCs) often associated with vacuum leaks include P0171/P0174 (System Too Lean Bank 1/Bank 2), indicating the engine is receiving too much air relative to fuel, or codes related to specific vacuum components.
When using the spray method (e.g., carb cleaner, starting fluid), what changes indicate a leak?
When spraying a flammable, fast-evaporating fluid like carb cleaner or starting fluid around suspected leak areas, a temporary change in engine RPM (either increasing or smoothing out) indicates a leak. The engine ‘sucks in’ the fluid, briefly enriching the air-fuel mixture, causing the RPM fluctuation.
Is it better to use propane or carb cleaner for detecting vacuum leaks, and why?
Propane is often considered safer than carb cleaner because it’s less flammable and doesn’t leave residue. Carb cleaner, while effective, is highly flammable and can damage certain plastics or coatings. Both work by causing a temporary RPM change when ingested by the leak, but propane poses less risk of fire or damage.
What tools are essential for accurately finding a vacuum leak, beyond visual inspection?
Beyond visual inspection, essential tools include a can of carburetor cleaner or unlit propane (with a hose attachment) for spray testing, a vacuum gauge to assess overall system vacuum, and for more elusive leaks, a smoke machine. A mechanic’s stethoscope can also help pinpoint hissing sounds from small leaks.