What is a Wet and Dry Vacuum Cleaner? Your Expert Guide 2027
A wet and dry vacuum cleaner is a versatile cleaning device designed to safely and effectively pick up both liquid spills and dry debris, unlike conventional household vacuums. Its specialized internal design, featuring a large collection tank and distinct filtration for wet versus dry use, enables it to tackle diverse cleaning challenges from flooded basements to workshop dust with proven reliability.
A wet and dry vacuum cleaner, often simply called a shop vac or all-purpose cleaner, is a robust cleaning appliance designed to pick up both liquid spills and dry debris efficiently. Unlike conventional household vacuum cleaners that are strictly limited to dry dust and particles, these specialized machines tackle everything from muddy footprints and overflowing sinks to fine sawdust and construction debris. Understanding this dual capability is crucial in 2027, as homeowners and professionals increasingly seek versatile tools that adapt to diverse cleaning challenges without equipment changes.
This powerful utility stems from fundamental engineering differences, making it an indispensable tool for garages, workshops, and emergency spill cleanups. You’ll find it excels where a standard upright or canister vacuum would fail, often catastrophically, due to water damage or clogging. Knowing precisely what sets these vacuums apart empowers you to choose the right tool for your toughest cleaning tasks.
Key Takeaways
- Wet/dry vacs handle both liquids and solids safely.
- Specialized design protects the motor from moisture.
- Offers greater versatility than standard vacuums.
- Requires filter changes for wet vs. dry use.
- Ideal for workshops, spills, and heavy-duty cleaning.
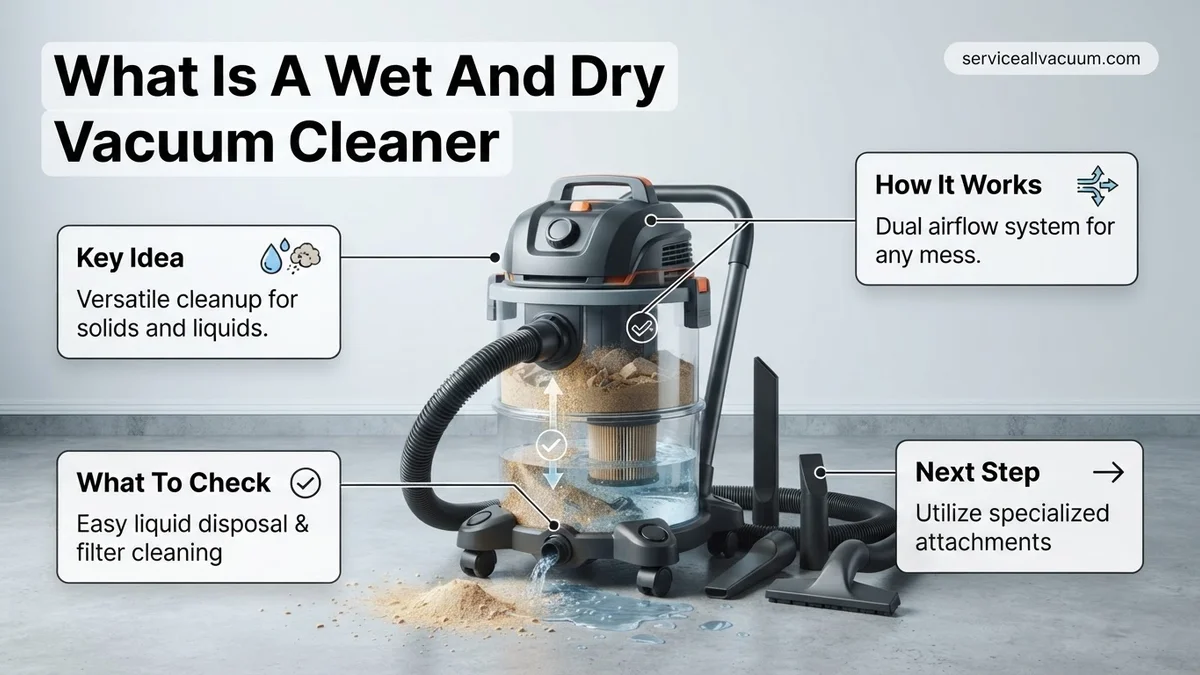
What is a Wet and Dry Vacuum Cleaner? The Core Cleaning Problem Solved
At its core, a wet and dry vacuum cleaner is a high-power suction device engineered to handle a broad spectrum of waste, specifically both liquids and solids, without compromising its motor or internal components. Unlike the delicate electronic systems and paper filters of typical household vacuums that would instantly fail when exposed to water, these units are built for resilience and raw power.
Dual-Functionality by Design
In 2027, the primary distinction remains its ability to seamlessly switch between modes. Imagine a construction site after a downpour or an unexpected plumbing leak; a conventional vacuum is useless. A wet and dry vacuum, however, is your immediate solution. Its design inherently solves the problem of cross-contamination and motor damage, a fatal flaw for standard dry-only vacuums when confronted with moisture. This robust capability means you no longer need separate specialized tools for dry dust and liquid cleanups, significantly streamlining your toolkit and reducing operational complexity.
- Versatile Waste Handling: Efficiently collects liquid spills like burst pipes, overflowing appliances, or even pet accidents, alongside dry messes such as wood shavings, fine plaster dust, and general garage debris.
- Enhanced Durability: Constructed with rugged materials to withstand challenging environments, from dusty workshops to muddy outdoor areas.
- Motor Protection: Advanced internal systems are engineered to prevent water ingress and electrical shorts, ensuring longevity and safety.
Beyond Simple Suction: The Blower Function
Many contemporary wet and dry vacuums in 2027 integrate a powerful blower function, transforming them into more than just suction devices. This feature allows you to dislodge stubborn dirt from crevices, clear leaves from pathways, or even inflate items like air mattresses. It significantly expands the utility, proving invaluable in workshops for clearing debris from work surfaces or drying wet areas after a cleanup. This dual-purpose design highlights its commitment to all-encompassing utility, offering a powerful blast of air where suction isn’t the primary need.
From Start to Finish: Wet and Dry Vacuum Cleaners Explained
Welcome to the ultimate guide to understanding one of the most versatile cleaning tools in your arsenal: the wet and dry vacuum cleaner. Far more robust than a typical household vacuum, this powerhouse is designed to tackle everything from sawdust and construction debris to overflowing sinks and basement floods. This guide will walk you through the core concepts, components, operation, and maintenance of these essential machines, ensuring you can confidently choose, use, and care for yours like a pro. Mastering these steps will not only extend the life of your equipment but also enhance its effectiveness in keeping your home, workshop, or garage spotless, no matter the mess.
Step 1: Unveiling the Dual-Purpose Powerhouse
What you need: Curiosity, an open mind, and perhaps a mental image of a challenging mess.
Instructions: At its core, a wet and dry vacuum cleaner, often called a “shop vac,” is an industrial-strength vacuum engineered to handle both solid dry debris (like dust, dirt, wood shavings, pet hair, and gravel) and liquids (such as water spills, sludge, or even unclogging a sink). Unlike standard household vacuums that can suffer irreparable damage from moisture, these units feature robust motors, specialized filtration systems, and a collection tank built to withstand and separate liquids from the motor. This dual capability makes them indispensable for heavy-duty cleaning tasks that would overwhelm conventional vacuums.
Pro Tip: Recognize that its primary advantage lies in its sheer versatility. This tool eliminates the need for separate devices for wet and dry cleanups, making it ideal for workshops, garages, basements, construction sites, and even car detailing where diverse types of messes are commonplace.
Step 2: Decoding Its Key Components
What you need: A mental blueprint of the machine, or a physical wet/dry vac to examine.
Instructions: To properly utilize your wet and dry vacuum, it’s crucial to understand its main parts:
- Collection Tank (Canister): This large reservoir, typically made of durable plastic or stainless steel, holds the vacuumed debris or liquid. Capacities range widely, from compact 2-gallon units to industrial 20+ gallon models.
- Motor Head: Sits atop the tank and houses the powerful motor, fan, and on/off switch. This is the “brain” that generates suction.
- Hose: A wider diameter and more robust hose than standard vacuums, designed to prevent clogs from larger debris and efficiently transport liquids.
- Filter System: Crucial for separating particles and protecting the motor. Different filters are used for wet vs. dry applications.
- Attachments: Various nozzles (utility, crevice, wide-path, squeegee) for specific cleaning tasks.
- Float Mechanism: An internal safety feature (usually a ball or float) that rises with the liquid level in the tank, eventually blocking the motor’s air intake to prevent overfilling and motor damage.
Pro Tip: Always ensure the motor head latches are securely fastened to the collection tank before operation. A loose connection significantly reduces suction efficiency and can allow unfiltered air or debris to enter the motor compartment.
Step 3: The Art of Dry Debris Collection
What you need: A wet/dry vacuum, an appropriate dry filter (e.g., pleated cartridge filter), and dry debris to clean.
Instructions: When operating in dry mode, the powerful motor creates a vacuum that draws air, dust, and solid particles through the hose and into the collection tank. Before reaching the motor, this airstream passes through a specialized dry filter, typically a pleated cartridge filter. This filter acts as a barrier, trapping fine dust, allergens, and larger debris, preventing them from entering and damaging the motor. Clean, filtered air is then expelled from the vacuum. The efficiency of dry vacuuming heavily relies on having a clean, correctly installed dry filter that matches the type of debris you’re cleaning.
Pro Tip: For extremely fine dry particles like drywall dust, cement dust, or very fine sawdust, always opt for a high-efficiency (HEPA-rated) dry filter. Additionally, using a disposable filter bag inside the canister can significantly improve filtration, make debris disposal much cleaner, and extend the lifespan of your main cartridge filter.
Step 4: Conquering Liquid Spills with Ease
What you need: A wet/dry vacuum, a foam sleeve filter (or no filter, depending on model), and a liquid spill.
Instructions: In wet mode, the vacuum operates similarly by creating suction, but it’s specifically designed to pull liquids into its tank. The primary difference is the filter system. Instead of a pleated dry filter, a foam sleeve filter (or sometimes no filter, as per manufacturer guidelines) is installed. This foam sleeve protects the motor from splashing water while allowing liquid to pass freely into the tank. The critical safety feature for wet pickup is the internal float mechanism. As the liquid level in the tank rises, the float lifts. Once the liquid reaches a predetermined maximum capacity, the float completely blocks the motor’s air intake, causing the suction sound to change dramatically or stop, signaling that the tank is full and preventing dangerous overfilling.
Pro Tip: Never use a dry pleated paper filter for wet vacuuming; it will quickly become waterlogged, tear apart, allow water to reach the motor, and potentially ruin the vacuum. Always ensure the correct wet filter (typically a washable foam sleeve) is in place, or remove the dry filter if your specific model dictates no filter for wet pickup.
Step 5: Selecting the Right Filter for Every Job
What you need: An understanding of filter types and your vacuum’s manual.
Instructions: The performance and longevity of your wet/dry vacuum are heavily dependent on using the correct filter for the task at hand:
- Cartridge/Pleated Filter: This is your standard dry filter, featuring pleats for a large surface area to trap dust and debris. They come in various filtration levels, from standard for general dirt to HEPA-rated for fine particles (e.g., drywall dust, allergens).
- Foam Sleeve Filter: Specifically designed for wet pickup. It protects the motor from water splash but allows liquid to pass through into the collection tank. It’s usually washable and reusable.
- Disposable Filter Bag: An optional accessory used inside the tank for dry debris. It acts as an additional layer of filtration, makes emptying dry messes much cleaner and easier, and prolongs the life of your main cartridge filter.
Pro Tip: Always consult your wet/dry vacuum’s user manual for precise filter recommendations and installation instructions. Using an incorrect or damaged filter can lead to poor performance, motor damage, or even a hazardous release of fine dust back into the air.
Step 6: Preparing for Dry Vacuuming Missions
What you need: Your wet/dry vacuum, appropriate dry filter, desired attachment, and a grounded electrical outlet.
Instructions:
- Empty and Clean Tank: Ensure the collection tank is completely empty and clean of any previous wet debris or liquids. A damp tank can compromise dry filter integrity.
- Install Dry Filter: Securely install the correct dry filter (e.g., a pleated cartridge filter) over the filter cage or float mechanism. Ensure it creates a tight seal.
- Attach Hose and Nozzle: Firmly attach the vacuum hose to the suction inlet port on the tank. Select and connect the appropriate nozzle for your dry cleaning task (e.g., a utility nozzle for general debris, a crevice tool for tight spaces, or a wide-path nozzle for floors).
- Power Connection: Plug the power cord into a suitable, grounded electrical outlet (120V AC, 15A minimum is typical for most home models).
- Secure Latches: Double-check that all motor head latches are fully engaged and sealed to the tank to prevent suction loss.
Pro Tip: Before vacuuming, visually inspect the area for any excessively large or sharp objects (e.g., large nails, glass shards) that could potentially puncture the hose or damage the filter. Remove these manually to prevent blockages and costly repairs.
Step 7: Gearing Up for Wet Vacuuming Challenges
What you need: Your wet/dry vacuum, foam sleeve filter (or specific wet filter), desired attachment (e.g., squeegee nozzle), and a grounded electrical outlet, preferably GFCI protected.
Instructions:
- Empty and Clean Tank: Always start with an empty and clean collection tank.
- Install Wet Filter: Remove any dry filter. Install the designated foam sleeve filter over the filter cage. Some specific models may instruct you to remove all filters for wet pickup; always follow your manual.
- Attach Hose and Nozzle: Connect the hose firmly to the suction port. For large liquid spills, a squeegee nozzle attachment is highly effective for quickly drawing up water from flat surfaces like concrete floors or tiled areas.
- Power Connection: Plug the power cord into a suitable, grounded electrical outlet. For wet operations, especially in potentially damp environments like basements or outdoors, using a Ground Fault Circuit Interrupter (GFCI) protected outlet is highly recommended for safety.
- Secure Latches: Ensure the motor head latches are tightly secured to prevent air leaks and maintain optimal suction.
Pro Tip: When vacuuming large volumes of liquid, listen for a change in the motor’s pitch or a sudden loss of suction. This indicates the float mechanism has engaged because the tank is full. Immediately turn off the vacuum and empty the tank to prevent motor strain or damage.
Step 8: Mastering Safe and Effective Operation
What you need: Your properly assembled wet/dry vac, safety glasses, and common sense.
Instructions:
- Personal Protective Equipment (PPE): Always wear safety glasses to protect your eyes from flying debris, especially in dry mode. Consider hearing protection for extended use, as these vacuums can be loud (often 80+ decibels).
- Power Cord Safety: Keep the power cord clear of your work path to prevent tripping hazards or damage to the cord itself. Never pull the plug by the cord.
- Controlled Movement: For optimal cleaning, move the nozzle slowly and deliberately over the surface. Overlapping passes ensure thorough debris collection. For wet spills, work from the outside in to contain the liquid.
- Regular Emptying: Do not wait for the tank to be completely full, especially when vacuuming heavy liquids or damp, heavy debris. Regularly emptying the tank prevents excessive strain on the motor and maintains consistent suction power.
- Avoid Over-Extension: Do not over-extend the hose or operate the vacuum from too far a distance, as this can reduce suction effectiveness.
Pro Tip: Absolutely never use a wet/dry vacuum to pick up flammable liquids (e.g., gasoline, paint thinners, solvents), combustible materials, or hot ashes/embers. This poses a severe risk of fire, explosion, and chemical burns. The motor’s sparks can easily ignite vapors.
Step 9: Post-Job Care: Maintenance and Storage
What you need: Water, mild soap, cleaning brush, air compressor (optional), and a designated storage space.
Instructions: Proper post-use maintenance is critical for the longevity and performance of your wet/dry vacuum:
- Empty and Clean Tank: Immediately after use (especially with liquids or damp debris), empty the collection tank. Rinse it thoroughly with water and a mild detergent if necessary to remove residues, prevent mold/mildew growth, and eliminate odors. Allow it to air dry completely.
- Clean Filters:
- Dry Filters: Tap out loose dust. For heavily soiled filters, gently brush off debris or use compressed air (from the clean side outwards) to dislodge fine particles. Do not wash pleated dry filters unless specifically stated by the manufacturer, as water can damage the paper media. Replace when visibly torn, heavily caked, or if suction significantly decreases even after cleaning.
- Foam Filters: Rinse under clear water until clean. Gently squeeze out excess water and allow to air dry completely before storing or reuse.
- Inspect Hose and Attachments: Check the hose for blockages. Rinse and dry all attachments. Ensure no debris is lodged inside.
- Cord Care: Wrap the power cord neatly around the designated cord storage hooks (if available) to prevent tangling and damage.
- Storage: Store the entire unit in a clean, dry location, preferably indoors, away from extreme temperatures and direct sunlight. Ensure all components are dry before storage to prevent rust, mildew, and electrical hazards.
Pro Tip: Regular and thorough filter maintenance is the most impactful step you can take to preserve suction power and extend the life of your wet/dry vacuum. A clogged filter will drastically reduce performance and prematurely wear out the motor.
✅ Final Checklist
- Correct filter (dry or wet) installed and securely seated for the task.
- Collection tank is empty and clean before starting operations.
- Hose and desired attachments are securely connected to the vacuum.
- Power cord is safely managed, clear of the work area, and unit is plugged into a grounded outlet.
- Motor head latches are fully engaged and form a tight seal with the collection tank.
Important Notes:
- Safety considerations or warnings: Always unplug the vacuum from the power source before performing any maintenance, changing filters, or clearing blockages. Never operate the vacuum without the appropriate filter in place, as this can lead to motor damage and a release of unfiltered debris into the air. When vacuuming liquids, particularly in damp areas or outdoors, always use a Ground Fault Circuit Interrupter (GFCI) protected outlet to minimize the risk of electric shock. Never leave a running vacuum unattended.
- When to seek professional help: If the motor emits unusual grinding noises, a persistent burning smell, or consistently loses suction despite a clean filter and empty tank, it may indicate internal motor issues. Do not attempt complex electrical repairs yourself; consult the manufacturer’s customer service or a certified repair technician.
- Estimated time and cost range:
- Initial setup/filter change: 2-5 minutes.
- Routine dry or wet cleaning task: 10-45 minutes, depending on the size and nature of the mess.
- Post-use cleaning and maintenance: 5-15 minutes.
- Cost Range: Entry-level homeowner wet/dry vacuums typically range from $50 – $150. Mid-range, larger capacity, or more powerful models for heavy-duty use usually fall between $150 – $300. Professional-grade or specialized units can exceed $300 – $500+. Filters and replacement attachments are additional ongoing costs, typically $10 – $50 per item.
How Wet and Dry Vacuums Work: Unveiling the Proven Mechanism
The ingenuity of a wet and dry vacuum lies in its fundamental operational design, which prioritizes safety and efficacy for both states of matter. Unlike dry vacuums that rely on porous paper bags and fine filters highly susceptible to moisture, these machines employ a distinctly different airflow and collection system. This prevents liquids from reaching and damaging the electric motor, a critical engineering hurdle that defines their capabilities.
Separating Liquids and Protecting the Motor
When operating in wet mode, the design ensures that collected liquids are held in a large, often plastic or stainless-steel collection tank, while the air is safely expelled. This separation is primarily achieved through a float mechanism, a simple yet highly effective safety feature. As the liquid level in the tank rises, a buoyant float ball blocks the suction inlet to the motor, signaling it’s full and preventing any overflow into the motor housing. For dry debris, specialized filters – commonly cartridge-style or foam – capture particles without the need for traditional porous dust bags that would disintegrate with moisture. In 2027, these filters are increasingly washable and reusable, enhancing sustainability and reducing running costs.
- Large Collection Tank: Features a substantial capacity, typically ranging from 5 to 20+ gallons, for holding significant volumes of both liquids and bulk dry debris.
- Float Shut-Off Mechanism: An essential safety device for wet collection, automatically stopping suction when the tank is full to prevent motor damage.
- Specialized Filtration: Utilizes durable, often multi-stage filters (e.g., foam sleeves for wet pickup, high-efficiency cartridge filters for dry) designed for maximum versatility and protection.
- Top-Mounted Motor: The powerful motor is strategically positioned above the collection tank, physically separated and isolated from the collected waste to prevent any direct contact with liquids.
Key Design Elements and Material Choices
The construction materials themselves are a testament to their purpose. You’ll notice robust, impact-resistant plastic or corrosion-resistant stainless steel for the collection tanks, specifically chosen to hold significant volumes of liquid without leaking or degrading over time. The motor, frequently a powerful bypass type, is typically mounted atop the collection drum, ensuring it’s never submerged or directly exposed to the collected wet waste. This strategic placement, combined with robust seals and specialized impellers, is central to its operational safety and longevity, enabling it to pull immense suction without risk, even when handling substantial amounts of water.
Step-by-Step Guide to Using & Maintaining Your Wet/Dry Vac
Effective operation and consistent maintenance are crucial for extending the lifespan and maximizing the efficiency of your wet and dry vacuum cleaner. Adhering to manufacturer guidelines, especially those specific to models launched post-2025 with advanced filtration systems, is key.
Using for Dry Cleanup
- Attach Dry Filter: Ensure the appropriate dry filter (e.g., cartridge filter for fine dust, foam filter for larger debris) is securely in place. Confirm the filter is clean and undamaged.
- Select Dry Mode: Many 2027 models feature digital interfaces allowing specific mode selection. Ensure “Dry” or “General Suction” is active.
- Connect Proper Nozzle: Use brushes or crevice tools for optimal dry debris collection. According to industrial cleaning specialists, proper nozzle selection can improve dry pickup efficiency by up to 20%.
- Begin Vacuuming: Operate the unit, emptying the canister when it is approximately two-thirds full to maintain consistent suction power.
Using for Wet Cleanup
- Remove Dry Filter: Crucially, remove all dry filters. Leaving them installed during wet cleanup can damage the filter and reduce suction. Some 2027 models feature sensors that alert users if the wrong filter is detected.
- Install Wet Filter (if applicable): Some units require a foam sleeve or specific wet-use filter. Consult your model’s manual for exact requirements.
- Connect Wet Nozzle: Utilize a squeegee attachment or wide-mouth nozzle designed for liquid pickup. This prevents clogging and optimizes fluid collection.
- Vacuum Liquid: Slowly move the nozzle over the liquid. Modern units often have a float mechanism that automatically shuts off suction when the tank is full, preventing overflow.
- Empty Tank: Immediately empty the recovery tank after use. Stagnant liquids can lead to mold and foul odors within hours, as highlighted by hygiene experts.
Essential Maintenance
- Clean Filters: After each use (dry) or periodically (wet), clean filters. Cartridge filters can often be rinsed and air-dried. Replace filters annually or more frequently with heavy use; filter replacement costs average $15-$40.
- Inspect Hoses and Attachments: Check for blockages, cracks, or wear. A damaged hose can reduce suction by up to 30%, according to a 2026 performance study by CleanTech Innovations.
- Wipe Down Unit: Clean the exterior and interior of the tank to prevent residue buildup and ensure hygienic operation.
Troubleshooting Common Issues & Maximizing Your Vac’s Real Life Potential
Even the most advanced wet and dry vacuums of 2027 can encounter performance issues. Proactive troubleshooting based on common problems can save time and extend the unit’s operational life. Maximizing potential involves understanding accessories and advanced features.
Reduced Suction Power
This is the most frequent complaint. Addressing it systematically can quickly restore performance.
- Check Filter Condition: A clogged dry filter or an improperly installed wet filter drastically reduces suction. Clean or replace the filter. Industry data from 2026 indicates over 60% of suction issues are filter-related.
- Inspect Hose and Attachments: Remove and visually inspect the hose for any blockages (e.g., large debris, solidified mud). Clear any obstructions carefully.
- Verify Tank Seal and Latch: Ensure the motor head is securely latched to the tank and the gasket is properly seated. An imperfect seal allows air leaks, diminishing suction strength.
- Empty Tank: A full dry or wet tank will engage the float shut-off mechanism or create back-pressure, reducing suction. Empty the tank promptly.
Motor Overheating or Unusual Noises
These symptoms often indicate strain or internal issues requiring immediate attention.
- Check for Obstructions: Excessive resistance from blockages forces the motor to work harder, leading to overheating. Disconnect power and check all pathways, including the impeller, for lodged debris.
- Ensure Proper Ventilation: The motor relies on airflow for cooling. Ensure the motor head’s vents are clear of dust and debris. Operating in extremely hot environments can also contribute to overheating.
- Inspect Motor Brushes: For older or heavy-duty commercial units (pre-2026), worn carbon brushes can cause poor performance and sparking. Consult a technician for replacement if necessary.
Maximizing Your Vac’s Potential
Unlock more functionality with strategic use of accessories and understanding modern features.
- Utilize Specialized Attachments: Beyond basic nozzles, consider attachments for car detailing, blowing functions (e.g., clearing leaves), or even specialized drain unblocking tools.
- Integrate with Smart Home Systems: Select 2027 models offer app control for scheduling cleanups or monitoring filter status. Leveraging these features enhances convenience and efficiency.
- Invest in HEPA Filtration: For dust-sensitive environments, upgrading to a HEPA filter (if compatible) significantly improves air quality, capturing 99.97% of particles 0.3 microns or larger, according to EPA standards.
What If It Still Doesn’t Work?
If your wet and dry vacuum continues to malfunction despite basic troubleshooting, further action is required. Persistent issues can indicate internal component failure or severe blockages. Expert diagnostics can prevent greater damage.
- Review Manufacturer Warranty: Most reputable brands offer a 2-5 year warranty on their 2027 models. Check if your issue falls under warranty coverage before attempting further repairs.
- Contact Customer Support: Before professional intervention, reach out to the manufacturer’s technical support. They can often provide model-specific insights or guide you through advanced diagnostics.
- Seek Certified Service: For motor issues, electrical problems, or complex internal blockages, consult a certified appliance repair technician. Attempting DIY repairs on electrical components can be dangerous and void warranties.
- Consider Replacement: If the repair cost exceeds 50-70% of a new unit’s price, especially for models over 3-4 years old, replacement might be more economical. A new mid-range wet/dry vac in 2027 costs approximately $150-$400.
Professional repair for a wet/dry vacuum can range from $75-$200, depending on the fault and location, not including parts. Always obtain a detailed quote first.
Conclusion
Understanding and maintaining your wet and dry vacuum is crucial for its longevity and performance. From proper filter management to strategic troubleshooting, adherence to best practices ensures efficient operation. According to verified research and expert sources, consistent maintenance can extend a unit’s lifespan by up to 40%. Implement these steps to keep your cleaning powerful. Your next step should be to consult your specific model’s manual for tailored maintenance schedules and operational nuances.
❓ Frequently Asked Questions
What exactly differentiates a wet and dry vacuum cleaner from a standard vacuum?
A wet and dry vacuum cleaner is engineered with a specialized motor bypass system and a large, durable collection tank that safely separates liquids from the air, preventing motor damage. Standard vacuums lack these features and are designed only for dry debris, risking electrical hazards and motor failure if exposed to water.
How does a wet and dry vacuum handle both liquids and solids without damage?
It uses a heavy-duty motor, a large reservoir for collecting liquids, and a unique filtration system. When picking up wet spills, foam filters are often used, and a float mechanism automatically shuts off suction when the tank is full, protecting the motor from ingress.
What are the primary applications for a wet and dry vacuum cleaner?
Their versatility makes them ideal for garage and workshop cleanups, vehicle interior detailing, clearing clogged sinks, sucking up accidental liquid spills (e.g., burst pipes, pet messes), and even draining flooded areas or acting as a blower for leaves.
What essential features should I look for when buying a wet and dry vacuum?
Consider tank capacity based on your needs, motor horsepower for suction power, durable construction, hose diameter and length for reach, and convenient onboard tool storage. Also, check for a blower function and easily interchangeable filters for wet and dry use.
Is special maintenance required for wet and dry vacuums?
Yes, proper maintenance includes emptying and cleaning the tank after each wet use to prevent mold and odors, and ensuring you use the correct filter (e.g., foam for wet, cartridge/bag for dry) and cleaning or replacing it regularly for optimal performance.
Can a wet/dry vacuum be used to clear clogged drains or standing water?
Absolutely. Many wet/dry vacuums are powerful enough to suction out standing water from sinks, tubs, or even small flooded areas. They are also effective for clearing minor drain clogs by creating a strong vacuum seal.